Operating Instructions
Page 1
Please check with your local Sony Authorized Dealer. © 2009 Sony Corporation 4-128-127-12 (2) Data Projector Operating Instructions Before operating the unit, please read this manual thoroughly and retain it for future reference. VPL-DX10/DX11/DX15 Not all models are available in all countries and area.
Please check with your local Sony Authorized Dealer. © 2009 Sony Corporation 4-128-127-12 (2) Data Projector Operating Instructions Before operating the unit, please read this manual thoroughly and retain it for future reference. VPL-DX10/DX11/DX15 Not all models are available in all countries and area.
Operating Instructions
Page 3
... service or guarantee matters please refer to the addresses given in Taiwan only WARNING 3 For the State of Conformity Trade Name: SONY Model: VPL-DX10 VPL-DX11 VPL-DX15 Responsible party: Sony Electronics Inc. For the customers in Canada This Class B digital apparatus complies with part 15 of FCC Rules. Disposal of the...For the customers in separate service or guarantee documents. You are cautioned that any changes or modifications not expressly approved in this manual could void your local authorities or the Electronic Industries Alliance (www.eiae.org). Operation is...
... service or guarantee matters please refer to the addresses given in Taiwan only WARNING 3 For the State of Conformity Trade Name: SONY Model: VPL-DX10 VPL-DX11 VPL-DX15 Responsible party: Sony Electronics Inc. For the customers in Canada This Class B digital apparatus complies with part 15 of FCC Rules. Disposal of the...For the customers in separate service or guarantee documents. You are cautioned that any changes or modifications not expressly approved in this manual could void your local authorities or the Electronic Industries Alliance (www.eiae.org). Operation is...
Operating Instructions
Page 8
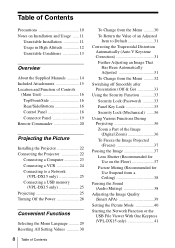
...Manuals 14 Included Attachments 15 Location and Function of Controls (Main Unit 16 Top/Front/Side 16 Rear/Side/Bottom 16 Control Panel 18 Connector Panel 19 Remote Commander 20 Projecting the Picture Installing the Projector 22 Connecting the Projector 22 Connecting a Computer 23 Connecting a VCR 24 Connecting to a Network (VPL-DX15... only 25 Connecting a USB memory (VPL-DX15 only 25 Projecting 25 Turning Off ...
...Manuals 14 Included Attachments 15 Location and Function of Controls (Main Unit 16 Top/Front/Side 16 Rear/Side/Bottom 16 Control Panel 18 Connector Panel 19 Remote Commander 20 Projecting the Picture Installing the Projector 22 Connecting the Projector 22 Connecting a Computer 23 Connecting a VCR 24 Connecting to a Network (VPL-DX15... only 25 Connecting a USB memory (VPL-DX15 only 25 Projecting 25 Turning Off ...
Operating Instructions
Page 14
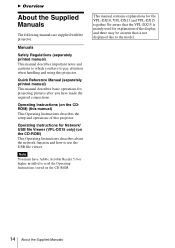
... USB file viewer. Manuals Safety Regulations (separately printed manual) This manual describes important notes and cautions to which you have made the required connections. Operating Instructions (on the CD-ROM. Quick Reference Manual (separately printed manual) This manual describes basic operations for the VPL-DX10, VPL-DX11 and VPL-DX15 together. Operating Instructions for explanation of this projector. Note You must...
... USB file viewer. Manuals Safety Regulations (separately printed manual) This manual describes important notes and cautions to which you have made the required connections. Operating Instructions (on the CD-ROM. Quick Reference Manual (separately printed manual) This manual describes basic operations for the VPL-DX10, VPL-DX11 and VPL-DX15 together. Operating Instructions for explanation of this projector. Note You must...
Operating Instructions
Page 15
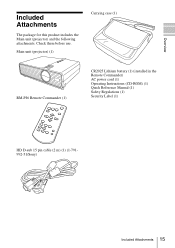
Check them before use. Overview Included Attachments The package for this product includes the Main unit (projector) and the following attachments. Main unit (projector) (1) Carrying case (1) RM-PJ6 Remote Commander (1) CR2025 Lithium battery (1) (installed in the Remote Commander) AC power cord (1) Operating Instructions (CD-ROM) (1) Quick Reference Manual (1) Safety Regulations (1) Security Label (1) HD D-sub 15 pin cable (2 m) (1) (1-791992-51/Sony) Included Attachments 15
Check them before use. Overview Included Attachments The package for this product includes the Main unit (projector) and the following attachments. Main unit (projector) (1) Carrying case (1) RM-PJ6 Remote Commander (1) CR2025 Lithium battery (1) (installed in the Remote Commander) AC power cord (1) Operating Instructions (CD-ROM) (1) Quick Reference Manual (1) Safety Regulations (1) Security Label (1) HD D-sub 15 pin cable (2 m) (1) (1-791992-51/Sony) Included Attachments 15

Operating Instructions
Page 17
... (Main Unit) 17 i Connector Panel For details, see "Using the adjuster" on page 60. Overview c Lens shutter lever If you operate the Lens shutter lever manually, the image is not projected to an optional security cable (from Kensington). In this may cause internal heat buildup. • Do not place your hand...
... (Main Unit) 17 i Connector Panel For details, see "Using the adjuster" on page 60. Overview c Lens shutter lever If you operate the Lens shutter lever manually, the image is not projected to an optional security cable (from Kensington). In this may cause internal heat buildup. • Do not place your hand...
Operating Instructions
Page 23
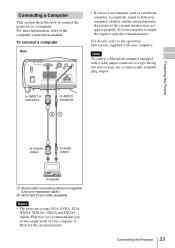
...monitor output to the computer's instruction manual. For more information, refer to audio output Computer A Stereo audio connecting cable (not supplied) (Use a no-resistance cable.) B HD D-sub 15-pin cable (supplied) Notes • The projector accepts VGA, SVGA, XGA, WXGA, WXGA+, SXGA and SXGA...properly. Set your computer. Projecting the Picture Connecting a Computer This section describes how to connect the projector to only the external monitor. For details, refer to XGA for the external monitor. Note To connect a Macintosh computer equipped with your computer to output the...
...monitor output to the computer's instruction manual. For more information, refer to audio output Computer A Stereo audio connecting cable (not supplied) (Use a no-resistance cable.) B HD D-sub 15-pin cable (supplied) Notes • The projector accepts VGA, SVGA, XGA, WXGA, WXGA+, SXGA and SXGA...properly. Set your computer. Projecting the Picture Connecting a Computer This section describes how to connect the projector to only the external monitor. For details, refer to XGA for the external monitor. Note To connect a Macintosh computer equipped with your computer to output the...
Operating Instructions
Page 24
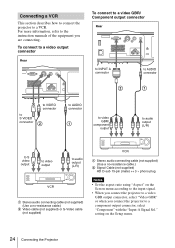
...plug Notes • Set the aspect ratio using "Aspect" on the Setup menu. 24 Connecting the Projector setting on the Screen menu according to the input signal. • When you connect the projector to a video GBR output connector, select "Video GBR" or when you are connecting. Connecting a ...VCR This section describes how to connect the projector to a component output connector, select "Component" with the "Input-A Signal...
...plug Notes • Set the aspect ratio using "Aspect" on the Setup menu. 24 Connecting the Projector setting on the Screen menu according to the input signal. • When you connect the projector to a video GBR output connector, select "Video GBR" or when you are connecting. Connecting a ...VCR This section describes how to connect the projector to a component output connector, select "Component" with the "Input-A Signal...
Operating Instructions
Page 26
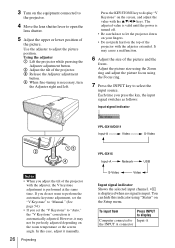
... fingers. • Do not push hard on the top of the projector with the adjuster, the V keystone adjustment is automatically adjusted. However, it manually. 26 Projecting VPL-DX10/DX11 Input-A Video S-Video VPL-DX15 Input-A Network USB S-Video Video Input signal indicator Shows the selected input... input. Using the adjuster 1 Lift the projector while pressing the Adjuster adjustment button. 2 Adjust the tilt of the picture and the focus. If you do not want to perform the automatic keystone adjustment, set the "V Keystone" to "Manual." (See page 54.) • If you...
... fingers. • Do not push hard on the top of the projector with the adjuster, the V keystone adjustment is automatically adjusted. However, it manually. 26 Projecting VPL-DX10/DX11 Input-A Video S-Video VPL-DX15 Input-A Network USB S-Video Video Input signal indicator Shows the selected input... input. Using the adjuster 1 Lift the projector while pressing the Adjuster adjustment button. 2 Adjust the tilt of the picture and the focus. If you do not want to perform the automatic keystone adjustment, set the "V Keystone" to "Manual." (See page 54.) • If you...

Operating Instructions
Page 31
... default values ? Further Adjusting an Image That Has Been Automatically Adjusted Note If you wish to switch to auto adjustment mode after adjusting manually, switch the V Keystone setting to "Manual" once then return it . Yes No Factory-preset items: "Contrast," "Brightness," "Color," "Hue," "Color Temp.," "Sharpness," "DDE," "Black Level Adj.," and "Gamma...
... default values ? Further Adjusting an Image That Has Been Automatically Adjusted Note If you wish to switch to auto adjustment mode after adjusting manually, switch the V Keystone setting to "Manual" once then return it . Yes No Factory-preset items: "Contrast," "Brightness," "Color," "Hue," "Color Temp.," "Sharpness," "DDE," "Black Level Adj.," and "Gamma...
Operating Instructions
Page 32
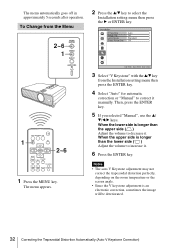
... v/ V/b/B keys. To Change from the Installation setting menu then press the ENTER key. 4 Select "Auto" for automatic correction or "Manual" to select the Installation setting menu then press the B or ENTER key. The menu automatically goes off in approximately 5 seconds after operation.... The menu appears. 2 Press the v/V key to correct it manually. Lamp Mode Direct Power ON Auto Standard Off 3 Select "V Keystone" with the v/V key from the Menu 2~6 1 PUSH ENTER MENU INPUT LAMP/COVER ...
... v/ V/b/B keys. To Change from the Installation setting menu then press the ENTER key. 4 Select "Auto" for automatic correction or "Manual" to select the Installation setting menu then press the B or ENTER key. The menu automatically goes off in approximately 5 seconds after operation.... The menu appears. 2 Press the v/V key to correct it manually. Lamp Mode Direct Power ON Auto Standard Off 3 Select "V Keystone" with the v/V key from the Menu 2~6 1 PUSH ENTER MENU INPUT LAMP/COVER ...
Operating Instructions
Page 39
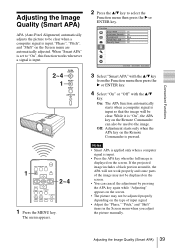
... work properly and some parts of input signal. • Adjust the "Phase," "Pitch," and "Shift" items in the Screen menu when you adjust the picture manually. When "Smart APA" is input. 2~4 1 PUSH ENTER MENU INPUT LAMP/COVER 1 INPUT NETWORK USB MENU APA ENTER RESET KEYSTONE AUTO FOCUS LENS /TILT PIC MUTING...
... work properly and some parts of input signal. • Adjust the "Phase," "Pitch," and "Shift" items in the Screen menu when you adjust the picture manually. When "Smart APA" is input. 2~4 1 PUSH ENTER MENU INPUT LAMP/COVER 1 INPUT NETWORK USB MENU APA ENTER RESET KEYSTONE AUTO FOCUS LENS /TILT PIC MUTING...
Operating Instructions
Page 43
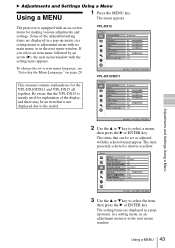
...next menu window with the selected menu appear. The item presently selected is equipped with no main menu, or in yellow. VPL-DX15 VPL-DX10/DX11 This manual contains explanations for making various adjustments and settings. Some of the display, and there may be set or adjusted with the setting...language, see "Selecting the Menu Language" on -screen menu for the VPL-DX10/DX11 and VPL-DX15 all together. Adjustments and Settings Using a Menu 3 Use the v or V key to select a menu, then press the B or ENTER key. The projector is shown in the next menu window. Using a MENU 43
...next menu window with the selected menu appear. The item presently selected is equipped with no main menu, or in yellow. VPL-DX15 VPL-DX10/DX11 This manual contains explanations for making various adjustments and settings. Some of the display, and there may be set or adjusted with the setting...language, see "Selecting the Menu Language" on -screen menu for the VPL-DX10/DX11 and VPL-DX15 all together. Adjustments and Settings Using a Menu 3 Use the v or V key to select a menu, then press the B or ENTER key. The projector is shown in the next menu window. Using a MENU 43
Operating Instructions
Page 51
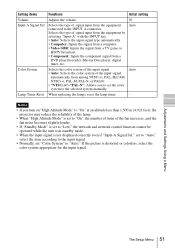
...-M, PAL-N, or PAL60. • "NTSC3.58"-"PAL-N": Allows you turn on "High Altitude Mode" to "On" at an altitude less than 1,500 m (4,921 feet), the projector may reduce the reliability of the lamp. • When "High Altitude Mode" is set to "On", the number of turns of the fan increases, and... the fan noise becomes slightly louder. • If "Standby Mode" is set to the selected system manually. set to "Auto," select the item according to the input signal. • Normally, set the color system to "Low," the network and network control ...
...-M, PAL-N, or PAL60. • "NTSC3.58"-"PAL-N": Allows you turn on "High Altitude Mode" to "On" at an altitude less than 1,500 m (4,921 feet), the projector may reduce the reliability of the lamp. • When "High Altitude Mode" is set to "On", the number of turns of the fan increases, and... the fan noise becomes slightly louder. • If "Standby Mode" is set to the selected system manually. set to "Auto," select the item according to the input signal. • Normally, set the color system to "Low," the network and network control ...
Operating Instructions
Page 52
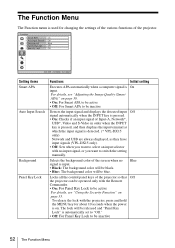
... of the screen when no input signal, or you want to switch the setting manually. Setting items Smart APA Auto Input Search Background Panel Key Lock Functions Initial setting ...be released and "Panel Key Lock" is on. Locks all the control panel keys of the projector so that Off the projector can be operated only with the Remote Commander. • On: For Panel Key Lock to be...The Function Menu The Function Menu The Function menu is detected. (* VPL-DX15 only) Network and USB are always displayed, as they have input signals (VPL-DX15 only). • Off: Sets when you want to select an ...
... of the screen when no input signal, or you want to switch the setting manually. Setting items Smart APA Auto Input Search Background Panel Key Lock Functions Initial setting ...be released and "Panel Key Lock" is on. Locks all the control panel keys of the projector so that Off the projector can be operated only with the Remote Commander. • On: For Panel Key Lock to be...The Function Menu The Function Menu The Function menu is detected. (* VPL-DX15 only) Network and USB are always displayed, as they have input signals (VPL-DX15 only). • Off: Sets when you want to select an ...

Operating Instructions
Page 53
... is displayed on the type of input signal. • Adjust the "Phase," "Pitch," and "Shift" items in the Screen menu when you adjust the picture manually. Setting items Security Lock Functions Sets whether to require the user to input a password when turning on the power. • On: For Security Lock to...
... is displayed on the type of input signal. • Adjust the "Phase," "Pitch," and "Shift" items in the Screen menu when you adjust the picture manually. Setting items Security Lock Functions Sets whether to require the user to input a password when turning on the power. • On: For Security Lock to...

Operating Instructions
Page 54
...Power ON Auto Standard Off Setting items V Keystone Functions Sets Auto V Keystone correction. • Auto: For Auto V Keystone correction to be active • Manual: For Auto V Keystone correction to be deteriorated. • When the Lamp Mode is set to "High", the sound from the fan to be brighter ...than Standard Select this item for installation for changing the settings of the projector. You can turn the Off power on page 31. Initial setting Auto Image Flip Flips the picture on /off the entire system. Notes &#...
...Power ON Auto Standard Off Setting items V Keystone Functions Sets Auto V Keystone correction. • Auto: For Auto V Keystone correction to be active • Manual: For Auto V Keystone correction to be deteriorated. • When the Lamp Mode is set to "High", the sound from the fan to be brighter ...than Standard Select this item for installation for changing the settings of the projector. You can turn the Off power on page 31. Initial setting Auto Image Flip Flips the picture on /off the entire system. Notes &#...
Operating Instructions
Page 66
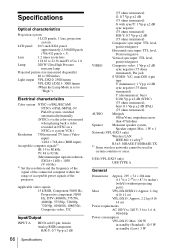
...LCD panel 0.63-inch XGA panel, approximately 2,360,000 pixels (786,432 pixels × 3) Lens 1.2 times zoom lens f 18.63 to 22.36 mm/F1.65 to 1.8 Lamp 200 W Ultra High Pressure mercury lamp Projected picture size (measured diagonally) 40 to 300 inches Light output VPL-DX10: 2500 lumen VPL-DX11/DX15....") Electrical characteristics Color system NTSC3.58/PAL/SECAM/ NTSC4.43/PAL-M/PAL-N/ PAL60 system, switched automatically/manually (NTSC4.43 is the color system used in standby (Low): 3 W USB (VPL-DX15 only) USB TYPE A General Dimensions Approx. 295 × 74 × 204 mm (11 5/8...
...LCD panel 0.63-inch XGA panel, approximately 2,360,000 pixels (786,432 pixels × 3) Lens 1.2 times zoom lens f 18.63 to 22.36 mm/F1.65 to 1.8 Lamp 200 W Ultra High Pressure mercury lamp Projected picture size (measured diagonally) 40 to 300 inches Light output VPL-DX10: 2500 lumen VPL-DX11/DX15....") Electrical characteristics Color system NTSC3.58/PAL/SECAM/ NTSC4.43/PAL-M/PAL-N/ PAL60 system, switched automatically/manually (NTSC4.43 is the color system used in standby (Low): 3 W USB (VPL-DX15 only) USB TYPE A General Dimensions Approx. 295 × 74 × 204 mm (11 5/8...
Operating Instructions
Page 67
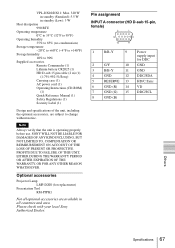
...that the unit is operating properly before use. Please check with your local Sony Authorized Dealer. Optional accessories Projector Lamp LMP-D200 (for DDC 2 G/Y 10 GND 3 B/B-Y 11 GND... 4 GND 12 DDC/SDA 5 RESERVE 13 HD/C.Sync 6 GND (R) 14 VD 7 GND (G) 15 DDC/SCL 8 GND (B) Others Specifications 67 VPL-...15 pin cable (2 m) (1) (1-791-992-51/Sony) Carrying case (1) AC power cord (1) Operating Instructions (CD-ROM) (1) Quick Reference Manual (1) Safety Regulations (1) Security Label (1) Design and specifications...
...that the unit is operating properly before use. Please check with your local Sony Authorized Dealer. Optional accessories Projector Lamp LMP-D200 (for DDC 2 G/Y 10 GND 3 B/B-Y 11 GND... 4 GND 12 DDC/SDA 5 RESERVE 13 HD/C.Sync 6 GND (R) 14 VD 7 GND (G) 15 DDC/SCL 8 GND (B) Others Specifications 67 VPL-...15 pin cable (2 m) (1) (1-791-992-51/Sony) Carrying case (1) AC power cord (1) Operating Instructions (CD-ROM) (1) Quick Reference Manual (1) Safety Regulations (1) Security Label (1) Design and specifications...
Operating Instructions
Page 78
... Apple Inc. • VESA is a registered trademark of the Video Electronics Standards Association. • Display Data Channel is a trademark of their respective holders. In this manual, ™ and ® marks are trademarks or registered trademarks of the Video Electronics Standards Association. • All other trademarks and registered trademarks are not specified...
... Apple Inc. • VESA is a registered trademark of the Video Electronics Standards Association. • Display Data Channel is a trademark of their respective holders. In this manual, ™ and ® marks are trademarks or registered trademarks of the Video Electronics Standards Association. • All other trademarks and registered trademarks are not specified...

