

Operating Instructions
Page 6
...of reflecting material, it is connected to install the projector in operation. On LCD data projector • The LCD data projector is turned off the power with a soft cloth. The powered tilt adjuster of this unit automatically extends when the power is turned on . • Do not place... look into the cabinet, unplug the unit and have your local power supply. • Should any windows that face the screen with ventilation holes (intake) and ventilation holes (exhaust). Adjust the powered tilt adjuster carefully after its automatic operation is recommended. On preventing ...
...of reflecting material, it is connected to install the projector in operation. On LCD data projector • The LCD data projector is turned off the power with a soft cloth. The powered tilt adjuster of this unit automatically extends when the power is turned on . • Do not place... look into the cabinet, unplug the unit and have your local power supply. • Should any windows that face the screen with ventilation holes (intake) and ventilation holes (exhaust). Adjust the powered tilt adjuster carefully after its automatic operation is recommended. On preventing ...

Operating Instructions
Page 8
...dots (VPL-CX6/EX1) or 800 × 600 dots (VPL-CS6) . • Compatible input signals Notes This projector accepts video signals of • The unit is not a malfunction of the projector. Features High operability • Intelligent Auto-setup function Simply press the power key, and the projector automatically ...176;, and avoid installing the unit in any way other connecting cables, and store the supplied accessories in a pocket of the composite, S video, and component as well as VGA, SVGA, XGA, SXGA1) and SXGA+1) signals, which all other than placing on a NTSC4.43 system...
...dots (VPL-CX6/EX1) or 800 × 600 dots (VPL-CS6) . • Compatible input signals Notes This projector accepts video signals of • The unit is not a malfunction of the projector. Features High operability • Intelligent Auto-setup function Simply press the power key, and the projector automatically ...176;, and avoid installing the unit in any way other connecting cables, and store the supplied accessories in a pocket of the composite, S video, and component as well as VGA, SVGA, XGA, SXGA1) and SXGA+1) signals, which all other than placing on a NTSC4.43 system...

Operating Instructions
Page 12
...TEMP/FAN PUSH ENTER LAMP/COVER 1 INPUT A connector (HD D-sub 15-pin, female) Connect to "ON," the projector goes into power saving mode if no signal is pressed. The power saving mode is canceled when a signal is set to external equipment such as a computer. For details on the LAMP/COVER... indicator, see "To connect a 15k RGB/ Component equipment" on a computer using the supplied cable. Connects to make various adjustments. 4...
...TEMP/FAN PUSH ENTER LAMP/COVER 1 INPUT A connector (HD D-sub 15-pin, female) Connect to "ON," the projector goes into power saving mode if no signal is pressed. The power saving mode is canceled when a signal is set to external equipment such as a computer. For details on the LAMP/COVER... indicator, see "To connect a 15k RGB/ Component equipment" on a computer using the supplied cable. Connects to make various adjustments. 4...

Operating Instructions
Page 13
...output of the computer. For VPL-CS6/VPL-CX6 qg qf qd FREEZE MS SLIDE I / 1 (on the control panel function identically. When you connect the projector to the computer, you can control the mouse function with the supplied Remote Commander. (When you use the VPL-EX1, an optional Remote ...IN socket Connects the supplied AC power cord. Remote Commander The keys that have the same names as a VCR. • VIDEO (phono type): Connects to the composite video output of video equipment. • S VIDEO (mini DIN 4-pin): Connects to this connector. 3 Memory Stick slot (VPL-CX6 only) The Memory...
...output of the computer. For VPL-CS6/VPL-CX6 qg qf qd FREEZE MS SLIDE I / 1 (on the control panel function identically. When you connect the projector to the computer, you can control the mouse function with the supplied Remote Commander. (When you use the VPL-EX1, an optional Remote ...IN socket Connects the supplied AC power cord. Remote Commander The keys that have the same names as a VCR. • VIDEO (phono type): Connects to the composite video output of video equipment. • S VIDEO (mini DIN 4-pin): Connects to this connector. 3 Memory Stick slot (VPL-CX6 only) The Memory...

Operating Instructions
Page 19
... INPUT A POWER SAVING MENU VIDEO S VIDEO TEMP/FAN PUSH ENTER LAMP/COVER to monitor output HD D-sub 15-pin cable (supplied) Computer Stereo audio connecting cable (not supplied)a) to audio output USB cable (supplied only VPL-CS6/CX6) (Connect the USB cable to use the projector in suspend,... standby mode, disconnect the projector from the USB port on a computer loaded ...
... INPUT A POWER SAVING MENU VIDEO S VIDEO TEMP/FAN PUSH ENTER LAMP/COVER to monitor output HD D-sub 15-pin cable (supplied) Computer Stereo audio connecting cable (not supplied)a) to audio output USB cable (supplied only VPL-CS6/CX6) (Connect the USB cable to use the projector in suspend,... standby mode, disconnect the projector from the USB port on a computer loaded ...
Operating Instructions
Page 20
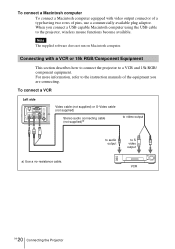
.... To connect a VCR Left side PRO AUDIO ACCESS INPUT A POWER SAVING MENU VIDEO S VIDEO TEMP/FAN PUSH ENTER LAMP/COVER Video cable (not supplied) or S-Video cable (not supplied) Stereo audio connecting cable (not supplied)a) to the projector, wireless mouse functions become available. Note The supplied software does not run on Macintosh computer. For more information...
.... To connect a VCR Left side PRO AUDIO ACCESS INPUT A POWER SAVING MENU VIDEO S VIDEO TEMP/FAN PUSH ENTER LAMP/COVER Video cable (not supplied) or S-Video cable (not supplied) Stereo audio connecting cable (not supplied)a) to the projector, wireless mouse functions become available. Note The supplied software does not run on Macintosh computer. For more information...

Operating Instructions
Page 21
... Projecting To connect a 15k RGB/Component equipment Left side PRO AUDIO ACCESS INPUT A POWER SAVING MENU VIDEO S VIDEO TEMP/FAN PUSH ENTER LAMP/COVER SMF-402 Signal Cable (not supplied) HD D-sub 15-pin (male) ↔ 3 × phono jack Stereo... audio connecting cable (not supplied)a) to audio output to RGB/ component output a) Use a no-resistance cable...input the external sync signal from 15k RGB/component equipment. 21 Connecting the Projector GB
... Projecting To connect a 15k RGB/Component equipment Left side PRO AUDIO ACCESS INPUT A POWER SAVING MENU VIDEO S VIDEO TEMP/FAN PUSH ENTER LAMP/COVER SMF-402 Signal Cable (not supplied) HD D-sub 15-pin (male) ↔ 3 × phono jack Stereo... audio connecting cable (not supplied)a) to audio output to RGB/ component output a) Use a no-resistance cable...input the external sync signal from 15k RGB/component equipment. 21 Connecting the Projector GB
Operating Instructions
Page 26
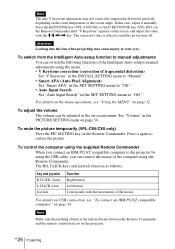
In this case, adjust it manually. Note The auto V keystone adjustment may not correct the trapezoidal distortion perfectly, depending on the screen, and adjust the value with the M/m/ Press the KEYSTONE key (VPL-CS6/CX6) or the D KEYSTONE key (VPL-EX1) on the Remote Commander until "V Keystone" appears on the room temperature or the screen angle.
In this case, adjust it manually. Note The auto V keystone adjustment may not correct the trapezoidal distortion perfectly, depending on the screen, and adjust the value with the M/m/ Press the KEYSTONE key (VPL-CS6/CX6) or the D KEYSTONE key (VPL-EX1) on the Remote Commander until "V Keystone" appears on the room temperature or the screen angle.

Operating Instructions
Page 41
...• If the lamp breaks, consult with the Projector Lamp). When you may scatter, causing injury. 1 Place a protective sheet (cloth) beneath the projector. Turn the projector over . 2 Open the lamp cover by loosening a screw with the Phillips screwdriver (supplied with qualified Sony personnel. • Pull out the lamp by the...The lamp life varies depending on the lamp (3) Handle Maintenance 41 GB When replacing the lamp after turning off the projector, then unplug the power cord. If you touch the lamp, you replace the lamp, wait for at least an hour for the lamp to cool...
...• If the lamp breaks, consult with the Projector Lamp). When you may scatter, causing injury. 1 Place a protective sheet (cloth) beneath the projector. Turn the projector over . 2 Open the lamp cover by loosening a screw with the Phillips screwdriver (supplied with qualified Sony personnel. • Pull out the lamp by the...The lamp life varies depending on the lamp (3) Handle Maintenance 41 GB When replacing the lamp after turning off the projector, then unplug the power cord. If you touch the lamp, you replace the lamp, wait for at least an hour for the lamp to cool...

Operating Instructions
Page 43
the power will not be removed from the air filter, replace the air filter with a mild detergent solution and dry it in a notch on if it is ... the air filter and replace the cover. Place the air filter so that it . Maintenance 4 Remove the air filter. 5 Wash the air filter with the supplied new one. • Be sure to clean the air filter, dust may rise inside the unit, leading to a possible malfunction or fire. • If the...
the power will not be removed from the air filter, replace the air filter with a mild detergent solution and dry it in a notch on if it is ... the air filter and replace the cover. Place the air filter so that it . Maintenance 4 Remove the air filter. 5 Wash the air filter with the supplied new one. • Be sure to clean the air filter, dust may rise inside the unit, leading to a possible malfunction or fire. • If the...

Operating Instructions
Page 50
For details, please consult your nearest Sony office. B type (1) (1-790-081-31) (VPL-CS6/ CX6 only) CD-ROM (Application software) (VPL-CX6 only) (1) Soft case (1) AC power cord (1) Air filter (for replacement) Signal Cable SMF-402 (HD D-...Projector Lamp LMP-C150 (for replacement) (1) Operating Instructions (1) Quick Reference Card (1) Security Label (1) Design and specifications are subject to change without the projection parts) Mass Approx. 2.7 kg (5 lb 15 oz) Power requirements AC 100 to 240 V, 50/60 Hz Power consumption Max. 240 W (Standby mode: VPL-CS6/EX1: 5 W VPL-CX6...
For details, please consult your nearest Sony office. B type (1) (1-790-081-31) (VPL-CS6/ CX6 only) CD-ROM (Application software) (VPL-CX6 only) (1) Soft case (1) AC power cord (1) Air filter (for replacement) Signal Cable SMF-402 (HD D-...Projector Lamp LMP-C150 (for replacement) (1) Operating Instructions (1) Quick Reference Card (1) Security Label (1) Design and specifications are subject to change without the projection parts) Mass Approx. 2.7 kg (5 lb 15 oz) Power requirements AC 100 to 240 V, 50/60 Hz Power consumption Max. 240 W (Standby mode: VPL-CS6/EX1: 5 W VPL-CX6...

Operating Instructions
Page 53
Otherwise, use the projector in your country. Warning on G H-pos, V-pos H-pos, V-pos H-pos, V-pos H-pos, V-pos SIZE 1696 1680 1696 1688 1296 1685 Notes • Whan a signal other ... SXGA VESA 85 Hz 91.146 85.024 52 1400 × 1050 SXGA+ 60 Hz 63.981 60.020 Memory No. 1 to No. 26 (VPL-CS6) Memory No. 1 to No. 38, No. 52 (VPL-CX6/EX1) Sync H-pos, V-pos S on power connection Use the supplied power cord when you use a proper power cord meeting the following specification.
Otherwise, use the projector in your country. Warning on G H-pos, V-pos H-pos, V-pos H-pos, V-pos H-pos, V-pos SIZE 1696 1680 1696 1688 1296 1685 Notes • Whan a signal other ... SXGA VESA 85 Hz 91.146 85.024 52 1400 × 1050 SXGA+ 60 Hz 63.981 60.020 Memory No. 1 to No. 26 (VPL-CS6) Memory No. 1 to No. 38, No. 52 (VPL-CX6/EX1) Sync H-pos, V-pos S on power connection Use the supplied power cord when you use a proper power cord meeting the following specification.
Operating Instructions
Page 54
...Menu Color 38 Menu Position 38 Message caution 47 warning 46 O Optional accessories ...... 50 P Picture Mode 34 Pin assignment 51 Power turn on 24 Power Saving 12, 38 Powered tilt adjuster ...... 11 Precautions 6 R Remote Commander 13, 15 location and function of controls ......... 13, 15 Remote control ... 49 Security Lock 39 SET SETTING menu ..... 37 Sharpness 35 Shift 36 Smart APA 37 Specifications 49 Startup screen 24 Status 38 Supplied accessories ...... 50 T Tilt 39 Troubleshooting 44 U USB connector 19 V V Keystone 39 Ventilation holes intake 11 Volume 34 W Wide Mode ...
...Menu Color 38 Menu Position 38 Message caution 47 warning 46 O Optional accessories ...... 50 P Picture Mode 34 Pin assignment 51 Power turn on 24 Power Saving 12, 38 Powered tilt adjuster ...... 11 Precautions 6 R Remote Commander 13, 15 location and function of controls ......... 13, 15 Remote control ... 49 Security Lock 39 SET SETTING menu ..... 37 Sharpness 35 Shift 36 Smart APA 37 Specifications 49 Startup screen 24 Status 38 Supplied accessories ...... 50 T Tilt 39 Troubleshooting 44 U USB connector 19 V V Keystone 39 Ventilation holes intake 11 Volume 34 W Wide Mode ...


