

Operating Instructions
Page 6
...wall outlet should not be changed to a dark color. To remove dust on the LCD data projector. This is completed. • Do not spread a cloth or paper under the unit. Caution The projector is equipped with a soft cloth. B Overview Precautions On safety • Check ...; To disconnect the cord, pull it out by the adjuster. Adjust the powered tilt adjuster carefully after its automatic operation is a normal result of 6 GB Precautions light-reflecting material. On LCD data projector • The LCD data projector is not disconnected to the AC power source (mains) as...
...wall outlet should not be changed to a dark color. To remove dust on the LCD data projector. This is completed. • Do not spread a cloth or paper under the unit. Caution The projector is equipped with a soft cloth. B Overview Precautions On safety • Check ...; To disconnect the cord, pull it out by the adjuster. Adjust the powered tilt adjuster carefully after its automatic operation is a normal result of 6 GB Precautions light-reflecting material. On LCD data projector • The LCD data projector is not disconnected to the AC power source (mains) as...

Operating Instructions
Page 8
... focus lens equipped (VPLCS6/CX6 only) This projector is called Intelligent Auto-setup. When storing the unit in the soft case, disconnect the AC power cord and all can be used...XGA, SXGA1) and SXGA+1) signals, which all other than placing on the floor or suspending from the ceiling. Features High operability • Intelligent Auto-setup function Simply press the power key, and the projector...the input signal within 1024 × 768 dots (VPL-CX6/EX1) or 800 × 600 dots (VPL-CS6) . • Compatible input signals Notes This projector accepts video signals of • The unit is...
... focus lens equipped (VPLCS6/CX6 only) This projector is called Intelligent Auto-setup. When storing the unit in the soft case, disconnect the AC power cord and all can be used...XGA, SXGA1) and SXGA+1) signals, which all other than placing on the floor or suspending from the ceiling. Features High operability • Intelligent Auto-setup function Simply press the power key, and the projector...the input signal within 1024 × 768 dots (VPL-CX6/EX1) or 800 × 600 dots (VPL-CS6) . • Compatible input signals Notes This projector accepts video signals of • The unit is...

Operating Instructions
Page 10
... key, the input signal switches as follows: INPUT A t MS t VIDEO t S VIDEO (VPL-CX6 only) 5 Lens protector (lens cover) The lens protector automatically opens when the power is turned on . 6 Front remote control detector 7 Ventilation holes (exhaust) 10 GB Location and...power is plugged into a wall outlet. Location and Function of Controls When turning off with the I / 1 key twice following conditions: - Once in standby mode, you cannot light up or flashes under the following the message on the projector when the projector is in red when a AC power cord is turned off the power...
... key, the input signal switches as follows: INPUT A t MS t VIDEO t S VIDEO (VPL-CX6 only) 5 Lens protector (lens cover) The lens protector automatically opens when the power is turned on . 6 Front remote control detector 7 Ventilation holes (exhaust) 10 GB Location and...power is plugged into a wall outlet. Location and Function of Controls When turning off with the I / 1 key twice following conditions: - Once in standby mode, you cannot light up or flashes under the following the message on the projector when the projector is in red when a AC power cord is turned off the power...

Operating Instructions
Page 13
...output) of video equipment. 7 AC IN socket Connects the supplied AC power cord. When you connect the projector to the computer, you can control the mouse function with the supplied Remote Commander. (When you use the VPL-EX1, an optional Remote Commander is lit. 6 Video input connector ... not function properly and the image may extend beyond the screen. 13 Location and Function of the VCR. 5 Access lamp (VPL-CX6 only) Lights during having access to this connector. 3 Memory Stick slot (VPL-CX6 only) The Memory Stick can be inserted. CLICK 7 D ZOOM 1 FUNCTION 2 1 2 3 4 5a 5b 5c 6 1...
...output) of video equipment. 7 AC IN socket Connects the supplied AC power cord. When you connect the projector to the computer, you can control the mouse function with the supplied Remote Commander. (When you use the VPL-EX1, an optional Remote Commander is lit. 6 Video input connector ... not function properly and the image may extend beyond the screen. 13 Location and Function of the VCR. 5 Access lamp (VPL-CX6 only) Lights during having access to this connector. 3 Memory Stick slot (VPL-CX6 only) The Memory Stick can be inserted. CLICK 7 D ZOOM 1 FUNCTION 2 1 2 3 4 5a 5b 5c 6 1...

Operating Instructions
Page 22
... PRO AUDIO ACCESS INPUT A POWER SAVING MENU VIDEO S VIDEO TEMP/FAN PUSH ENTER LAMP/COVER FREEZE MS SLIDE I / 1 KEYSTONE INPUT APA MENU PIC ENTER MUTING For VPL-CS6/CX6 For VPL-EX1 1 Open the connector panel, then plug the AC power cord into a wall outlet. 2 Press the I / 1 key to turn on the projector. 3 Press the MENU key...
... PRO AUDIO ACCESS INPUT A POWER SAVING MENU VIDEO S VIDEO TEMP/FAN PUSH ENTER LAMP/COVER FREEZE MS SLIDE I / 1 KEYSTONE INPUT APA MENU PIC ENTER MUTING For VPL-CS6/CX6 For VPL-EX1 1 Open the connector panel, then plug the AC power cord into a wall outlet. 2 Press the I / 1 key to turn on the projector. 3 Press the MENU key...

Operating Instructions
Page 24
... connected to the projector by pressing certain keys (e.g., / LCD VGA , / , etc.), or by changing your computer's settings. GB 24 Projecting Projecting 5 TILT 6 Rear remote control detector 7 ON/STANDBY indicators 2 4 FREEZE MS SLIDE I / 1 KEYSTONE INPUT APA MENU PIC ENTER MUTING For VPL-CS6/CX6 For VPL-EX1 1 Open the connector panel, plug the AC power cord into standby...
... connected to the projector by pressing certain keys (e.g., / LCD VGA , / , etc.), or by changing your computer's settings. GB 24 Projecting Projecting 5 TILT 6 Rear remote control detector 7 ON/STANDBY indicators 2 4 FREEZE MS SLIDE I / 1 KEYSTONE INPUT APA MENU PIC ENTER MUTING For VPL-CS6/CX6 For VPL-EX1 1 Open the connector panel, plug the AC power cord into standby...
Operating Instructions
Page 28
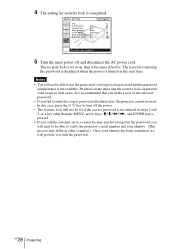
... keys (M/m/ In this case, press the I / 1 key to turn off and disconnect the AC power cord. The screen for security lock is completed. The security lock is set if the correct password is not...SETTING X Tilt... V Keystone: Auto... 4 The setting for entering the password is displayed when the power is turned on , then it becomes effective. Image Flip: Off Background: Blue Lamp Mode: Standard... Altitude Mode:Off Security Lock: On Input A Security Lock enabled! 5 Turn the main power off the power. • The security lock will not be used. Notes • You will not be...
... keys (M/m/ In this case, press the I / 1 key to turn off and disconnect the AC power cord. The screen for security lock is completed. The security lock is set if the correct password is not...SETTING X Tilt... V Keystone: Auto... 4 The setting for entering the password is displayed when the power is turned on , then it becomes effective. Image Flip: Off Background: Blue Lamp Mode: Standard... Altitude Mode:Off Security Lock: On Input A Security Lock enabled! 5 Turn the main power off the power. • The security lock will not be used. Notes • You will not be...
Operating Instructions
Page 29
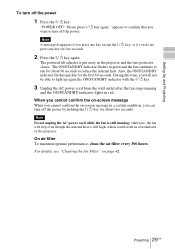
...the ON/STANDBY indicator with the I / 1 key. 3 Unplug the AC power cord from the wall outlet after the fan stops running ; For details, see "Cleaning the Air Filter" on -screen message in a breakdown of the projector. Projecting 29 GB appears to confirm that you do not press any key for... indicator flashes quickly for five seconds. 2 Press the I / 1 key again." Note Do not unplug the AC power cord while the fan is still running and the ON/STANDBY indicator lights in the projector and the lens protector closes. Note A message disappears if you press any key except the I / 1 key, ...
...the ON/STANDBY indicator with the I / 1 key. 3 Unplug the AC power cord from the wall outlet after the fan stops running ; For details, see "Cleaning the Air Filter" on -screen message in a breakdown of the projector. Projecting 29 GB appears to confirm that you do not press any key for... indicator flashes quickly for five seconds. 2 Press the I / 1 key again." Note Do not unplug the AC power cord while the fan is still running and the ON/STANDBY indicator lights in the projector and the lens protector closes. Note A message disappears if you press any key except the I / 1 key, ...

Operating Instructions
Page 41
... screwdriver (supplied with qualified Sony personnel. • Pull out the lamp by the handle. Use LMP-C150 Projector Lamp as the replacement lamp. Do not tilt the lamp. If you can see its underside. Note Be sure that the projector is stable after turning off the projector, then unplug the power cord. Note For safety sake...
... screwdriver (supplied with qualified Sony personnel. • Pull out the lamp by the handle. Use LMP-C150 Projector Lamp as the replacement lamp. Do not tilt the lamp. If you can see its underside. Note Be sure that the projector is stable after turning off the projector, then unplug the power cord. Note For safety sake...
Operating Instructions
Page 42
...filter should dispose of a used lamp contains Mercury, dispose of the used lamp As the used projector lamp in the same way as a fluorescent lamp. Remove dust from the outside of the lamp. • The power will not turn on the remote commander in the following order for less than five seconds... the new lamp all the way in until it is not secured properly. 5 Close the lamp cover and tighten the screws. 6 Turn the projector back over. 7 Connect the power cord. Tighten the screws. The ON/ STANDBY indicator around the =/1 key lights in red. 8 Press the following keys on if the lamp is ...
...filter should dispose of a used lamp contains Mercury, dispose of the used lamp As the used projector lamp in the same way as a fluorescent lamp. Remove dust from the outside of the lamp. • The power will not turn on the remote commander in the following order for less than five seconds... the new lamp all the way in until it is not secured properly. 5 Close the lamp cover and tighten the screws. 6 Turn the projector back over. 7 Connect the power cord. Tighten the screws. The ON/ STANDBY indicator around the =/1 key lights in red. 8 Press the following keys on if the lamp is ...

Operating Instructions
Page 44
...consult with the I / 1 key at all. • The electrical system breaks down . Power Symptom Cause and Remedy The power is not turned on with qualified Sony personnel. c Change the desktop pattern on the LCD panel. c Wait for about 90 seconds before turning on the combination of the numbers of .../FAN indicators c Consult with qualified Sony personnel. The powered tilt adjuster and the lens protector do not close. • The AC power cord is not set to output to an external monitor or set to output both to use it in case of the projector. If it is incorrect. c ...
...consult with the I / 1 key at all. • The electrical system breaks down . Power Symptom Cause and Remedy The power is not turned on with qualified Sony personnel. c Change the desktop pattern on the LCD panel. c Wait for about 90 seconds before turning on the combination of the numbers of .../FAN indicators c Consult with qualified Sony personnel. The powered tilt adjuster and the lens protector do not close. • The AC power cord is not set to output to an external monitor or set to output both to use it in case of the projector. If it is incorrect. c ...

Operating Instructions
Page 50
... Sony office. Optional accessories Projector Lamp LMP-C150 (for replacement) (1) Operating Instructions (1) Quick Reference Card (1) Security Label (1) Design and specifications are subject to 90% Supplied accessories Remote Commander (1) GB 50 Specifications Size AA (R6) batteries (2) (VPLCS6/CX6 ...type - For details, please consult your nearest Sony office. 1) VPS-50C may not be available in some areas. B type (1) (1-790-081-31) (VPL-CS6/ CX6 only) CD-ROM (Application software) (VPL-CX6 only) (1) Soft case (1) AC power cord (1) Air filter (for replacement) Signal Cable ...
... Sony office. Optional accessories Projector Lamp LMP-C150 (for replacement) (1) Operating Instructions (1) Quick Reference Card (1) Security Label (1) Design and specifications are subject to 90% Supplied accessories Remote Commander (1) GB 50 Specifications Size AA (R6) batteries (2) (VPLCS6/CX6 ...type - For details, please consult your nearest Sony office. 1) VPS-50C may not be available in some areas. B type (1) (1-790-081-31) (VPL-CS6/ CX6 only) CD-ROM (Application software) (VPL-CX6 only) (1) Soft case (1) AC power cord (1) Air filter (for replacement) Signal Cable ...

Operating Instructions
Page 53
... input signal by pressing INPUT key. The United States, Canada Plug type YP-11 Female end YC-13L Cord type SPT-2 Rated Voltage & Current 10A/125V Safety approval UL/CSA Cord length (max.) 4.5 m Continental UK Europe, Korrea Australia Japan YP-21 SP-61 B8 YP-13 YC... × 1050 SXGA+ 60 Hz 63.981 60.020 Memory No. 1 to No. 26 (VPL-CS6) Memory No. 1 to No. 38, No. 52 (VPL-CX6/EX1) Sync H-pos, V-pos S on power connection Use the supplied power cord when you use a proper power cord meeting the following specification. Otherwise, use the projector in your country.
... input signal by pressing INPUT key. The United States, Canada Plug type YP-11 Female end YC-13L Cord type SPT-2 Rated Voltage & Current 10A/125V Safety approval UL/CSA Cord length (max.) 4.5 m Continental UK Europe, Korrea Australia Japan YP-21 SP-61 B8 YP-13 YC... × 1050 SXGA+ 60 Hz 63.981 60.020 Memory No. 1 to No. 26 (VPL-CS6) Memory No. 1 to No. 38, No. 52 (VPL-CX6/EX1) Sync H-pos, V-pos S on power connection Use the supplied power cord when you use a proper power cord meeting the following specification. Otherwise, use the projector in your country.


