Operating Instructions
Page 6
...; Be careful not to catch your local power supply. Use a cover over fluorescent lamps to avoid lowering the contrast ratio. • Cover any liquid or solid object fall into the cabinet, unplug the unit and have it checked by qualified Sony personnel before operating it further. • Unplug the unit from the... has been turned off. • Do not look into the lens while the lamp is on the cabinet. Do not block or place anything near these chemicals. As incorrect maintenance may impair the performance of the projector, take care with a soft dry cloth. • Use of the cabinet or...
...; Be careful not to catch your local power supply. Use a cover over fluorescent lamps to avoid lowering the contrast ratio. • Cover any liquid or solid object fall into the cabinet, unplug the unit and have it checked by qualified Sony personnel before operating it further. • Unplug the unit from the... has been turned off. • Do not look into the lens while the lamp is on the cabinet. Do not block or place anything near these chemicals. As incorrect maintenance may impair the performance of the projector, take care with a soft dry cloth. • Use of the cabinet or...
Operating Instructions
Page 13
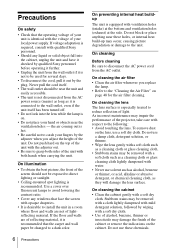
For details, see "Cleaning the Air Filter" on page 48. Location and Function of Controls (Main Unit) 13 b Front remote control detector c Air filter cover Note To maintain optimal performance, clean the air filter whenever you replace the lamp. Location and Function of Controls (Main Unit) Top/Front/Side 4 1 Overview 2 5 3 6 Rear/Side/Bottom 7 8 9 NIENTPWUTORCK RGB MONITOR INPUT A AUDIO OUTPUT AUDIO RGB S VIDEO VVIDIDEEOOIN AUDIO INPUT B RRESM-2O32TCE 0 qa qs qd qf 6 qg qh a Lens Remove the lens cap before projection.
For details, see "Cleaning the Air Filter" on page 48. Location and Function of Controls (Main Unit) 13 b Front remote control detector c Air filter cover Note To maintain optimal performance, clean the air filter whenever you replace the lamp. Location and Function of Controls (Main Unit) Top/Front/Side 4 1 Overview 2 5 3 6 Rear/Side/Bottom 7 8 9 NIENTPWUTORCK RGB MONITOR INPUT A AUDIO OUTPUT AUDIO RGB S VIDEO VVIDIDEEOOIN AUDIO INPUT B RRESM-2O32TCE 0 qa qs qd qf 6 qg qh a Lens Remove the lens cap before projection.

Operating Instructions
Page 14
g Lamp cover h Ventilation holes (intake) i Adjusters j Rear remote control detector k Connector/Connector Panel For details, see "Connector Panel" on page 15. p Speaker 14 Location and Function of ... to "Dimensions" (page 65) for the shapes. l Zoom ring Adjusts the picture size. m Focus ring Adjusts the picture focus. Refer to it. First remove the cover attached in the factory before use. n Security lock Connects to an optional security cable (from Kensington). d Control panel/Indicator For details, see "Control Panel" on...
g Lamp cover h Ventilation holes (intake) i Adjusters j Rear remote control detector k Connector/Connector Panel For details, see "Connector Panel" on page 15. p Speaker 14 Location and Function of ... to "Dimensions" (page 65) for the shapes. l Zoom ring Adjusts the picture size. m Focus ring Adjusts the picture focus. Refer to it. First remove the cover attached in the factory before use. n Security lock Connects to an optional security cable (from Kensington). d Control panel/Indicator For details, see "Control Panel" on...
Operating Instructions
Page 15
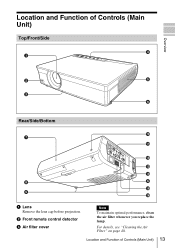
...INPUT key Select the input signal. Flashes in green from the time when the projector is turned on . Control Panel 123456 7 8 LAMP/ COVER ON/ STANDBY INPUT KEYSTONE MENU PUSH ENTER PIC MUTING Overview a LAMP/COVER indicators Flashes in orange under the following conditions: • A reception rate of ...2 flashes when the lamp cover or air filter cover is not secured firmly. • A reception rate of 3 flashes when the lamp has reached the end of models VPL-CX125/ CX155/CW125, Side Shot (Horizontal trapezoid distortion correction) can...
...INPUT key Select the input signal. Flashes in green from the time when the projector is turned on . Control Panel 123456 7 8 LAMP/ COVER ON/ STANDBY INPUT KEYSTONE MENU PUSH ENTER PIC MUTING Overview a LAMP/COVER indicators Flashes in orange under the following conditions: • A reception rate of ...2 flashes when the lamp cover or air filter cover is not secured firmly. • A reception rate of 3 flashes when the lamp has reached the end of models VPL-CX125/ CX155/CW125, Side Shot (Horizontal trapezoid distortion correction) can...

Operating Instructions
Page 26
... Commander of VPL-CX125/ CX155/CW125 You can select directly the input signal you want to project by pressing one key from among INPUT A, B, C, AIR SHOT, VIDEO or S VIDEO on the equipment connected to the projector. 4 Select the input source. Projecting 24 LAMP/ COVER ON/ STANDBY... VIDEO S VIDEO 2 4 MENU APA ENTER RESET FOCUS ZOOM SHIFT ASPECT KEY STONE VPL-CX125/CX155/CW125 APA INPUT KEY STONE /TILT LENS ENTER AUTO FOCUS RESET MENU FREEZE PIC MUTING D ZOOM AUDIO MUTING VOLUME 2 4 VPL-CX100/CX120/CX150 1 Plug the AC power cord into standby mode. 2 Press the ?/1 key...
... Commander of VPL-CX125/ CX155/CW125 You can select directly the input signal you want to project by pressing one key from among INPUT A, B, C, AIR SHOT, VIDEO or S VIDEO on the equipment connected to the projector. 4 Select the input source. Projecting 24 LAMP/ COVER ON/ STANDBY... VIDEO S VIDEO 2 4 MENU APA ENTER RESET FOCUS ZOOM SHIFT ASPECT KEY STONE VPL-CX125/CX155/CW125 APA INPUT KEY STONE /TILT LENS ENTER AUTO FOCUS RESET MENU FREEZE PIC MUTING D ZOOM AUDIO MUTING VOLUME 2 4 VPL-CX100/CX120/CX150 1 Plug the AC power cord into standby mode. 2 Press the ?/1 key...
Operating Instructions
Page 29
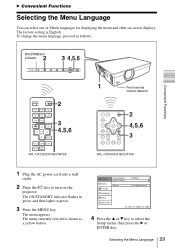
...3 4,5,6 LAMP/ COVER ON/ STANDBY INPUT KEYSTONE MENU PUSH ENTER PIC MUTING COMMAND OFF ON INPUT A INPUT D INPUT B INPUT E INPUT C AIR SHOT VIDEO S VIDEO MENU APA ENTER 2 3 4,5,6 RESET FOCUS ZOOM SHIFT ASPECT KEY STONE VPL-CX125/CX155/...INPUT KEY STONE /TILT LENS ENTER AUTO FOCUS RESET MENU FREEZE PIC MUTING D ZOOM AUDIO MUTING VOLUME 2 4,5,6 3 VPL-CX100/CX120/CX150 1 Plug the AC power cord into a wall outlet. 2 Press the ?/1 key to select the Setup ... displaying the menu and other on the projector. The menu appears. The menu currently selected is English.
...3 4,5,6 LAMP/ COVER ON/ STANDBY INPUT KEYSTONE MENU PUSH ENTER PIC MUTING COMMAND OFF ON INPUT A INPUT D INPUT B INPUT E INPUT C AIR SHOT VIDEO S VIDEO MENU APA ENTER 2 3 4,5,6 RESET FOCUS ZOOM SHIFT ASPECT KEY STONE VPL-CX125/CX155/...INPUT KEY STONE /TILT LENS ENTER AUTO FOCUS RESET MENU FREEZE PIC MUTING D ZOOM AUDIO MUTING VOLUME 2 4,5,6 3 VPL-CX100/CX120/CX150 1 Plug the AC power cord into a wall outlet. 2 Press the ?/1 key to select the Setup ... displaying the menu and other on the projector. The menu appears. The menu currently selected is English.
Operating Instructions
Page 46
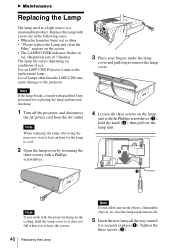
.... 2 Open the lamp cover by loosening the three screws with qualified Sony personnel for the lamp to remove the lamp cover. 4 Loosen the three screws on the ceiling, hold the knob (b), then pull out the lamp unit. appears on conditions of lamps other than the LMP-C200 may cause damage to the projector. Note If the lamp breaks, consult with...
.... 2 Open the lamp cover by loosening the three screws with qualified Sony personnel for the lamp to remove the lamp cover. 4 Loosen the three screws on the ceiling, hold the knob (b), then pull out the lamp unit. appears on conditions of lamps other than the LMP-C200 may cause damage to the projector. Note If the lamp breaks, consult with...

Operating Instructions
Page 47
... not turn the projector on if the lamp is initialized to environmental considerations. is displayed in this product contains mercury. For disposal or recycling information, please contact your local authorities or the Electronic Industries Alliance (www.eiae.org). The Lamp Timer is not secured properly. 6 Restore the lamp cover to attach the lamp cover securely as it...
... not turn the projector on if the lamp is initialized to environmental considerations. is displayed in this product contains mercury. For disposal or recycling information, please contact your local authorities or the Electronic Industries Alliance (www.eiae.org). The Lamp Timer is not secured properly. 6 Restore the lamp cover to attach the lamp cover securely as it...

Operating Instructions
Page 48
...from the each claws (7 positions) on the air filter covers. 48 Cleaning the Air Filter For details on new air filter, consult with qualified Sony personnnel. • Be sure to clean the air filter will vary depending on the environment or how the projector is used. 1 Turn the power off and unplug ...; the power can not be cleaned whenever you replace the lamp. Attach the air filter with a new one. Cleaning the Air Filter The air filter should be turned on if it fits into the each claws (7 positions) on the air filter cover. Note There is not inserted securely. (Page 51) •...
...from the each claws (7 positions) on the air filter covers. 48 Cleaning the Air Filter For details on new air filter, consult with qualified Sony personnnel. • Be sure to clean the air filter will vary depending on the environment or how the projector is used. 1 Turn the power off and unplug ...; the power can not be cleaned whenever you replace the lamp. Attach the air filter with a new one. Cleaning the Air Filter The air filter should be turned on if it fits into the each claws (7 positions) on the air filter cover. Note There is not inserted securely. (Page 51) •...

Operating Instructions
Page 49
...power. • The lamp cover is detached. c Wait for about 60 seconds before turning on the LCD panel. Picture Symptom No picture. c Select the input source correctly (see page 43). If the problem persists, consult with DDC, turn the projector on according to the ...is noisy. B Others Troubleshooting If the projector appears to be operating erratically, try to reduce video jitter. If your computer is colored strangely. The setting of dots input from the INPUT A connector is compatible with qualified Sony personnel. Others Troubleshooting 49 The picture ...
...power. • The lamp cover is detached. c Wait for about 60 seconds before turning on the LCD panel. Picture Symptom No picture. c Select the input source correctly (see page 43). If the problem persists, consult with DDC, turn the projector on according to the ...is noisy. B Others Troubleshooting If the projector appears to be operating erratically, try to reduce video jitter. If your computer is colored strangely. The setting of dots input from the INPUT A connector is compatible with qualified Sony personnel. Others Troubleshooting 49 The picture ...
Operating Instructions
Page 51
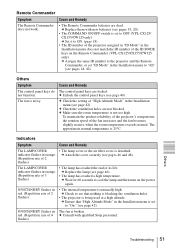
...lamp has reached a high temperature. c Check the setting of 2 flashes) The LAMP/COVER...VPL-CX125/ CX155/CW125 only) c Set it to ON. (page 18) • The ID number of the projector...LAMP/COVER • The lamp cover or the air filter cover is unusually high. ON/STANDBY flashes in the Installation menu is being used at a high altitude. c Check to cool the lamp and then turn on the Remote Commander. (VPL-CX125/CX155/CW125 only) c Assigns the same ID number to the projector...the lamp (see page 40). To maintain the product reliability of the projector's components... The projector is ...
...lamp has reached a high temperature. c Check the setting of 2 flashes) The LAMP/COVER...VPL-CX125/ CX155/CW125 only) c Set it to ON. (page 18) • The ID number of the projector...LAMP/COVER • The lamp cover or the air filter cover is unusually high. ON/STANDBY flashes in the Installation menu is being used at a high altitude. c Check to cool the lamp and then turn on the Remote Commander. (VPL-CX125/CX155/CW125 only) c Assigns the same ID number to the projector...the lamp (see page 40). To maintain the product reliability of the projector's components... The projector is ...
Operating Instructions
Page 65
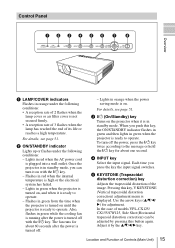
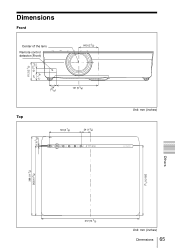
Dimensions Front Center of the lens Remote control detector (Front) 64.9 (2 5/8) 61.2 (2 1/2) 27 13 (17/32) (1 1/8) Top 24 (31/32) 141 (5 5/8) 123 (4 7/8) 34 (1 3/8) Unit: mm (inches) 5.3 (7/32) DATA PROJECTOR LAMP/ COVER ON/ STANDBY INPUT KEYSTONE MENU PUSH ENTER PIC MUTING 298 (11 3/4) 263 (10 3/8) Others 265 (10 1/2) 372 (14 3/4) Unit: mm (inches) Dimensions 65
Dimensions Front Center of the lens Remote control detector (Front) 64.9 (2 5/8) 61.2 (2 1/2) 27 13 (17/32) (1 1/8) Top 24 (31/32) 141 (5 5/8) 123 (4 7/8) 34 (1 3/8) Unit: mm (inches) 5.3 (7/32) DATA PROJECTOR LAMP/ COVER ON/ STANDBY INPUT KEYSTONE MENU PUSH ENTER PIC MUTING 298 (11 3/4) 263 (10 3/8) Others 265 (10 1/2) 372 (14 3/4) Unit: mm (inches) Dimensions 65

Operating Instructions
Page 68
... Mode 42 Image Flip 41 Input-A Signal Sel 43 Installation diagram Ceiling installation 61 Floor installation 59 Installing the projector 21 IR Receiver 41 L Lamp Mode 41 Lamp Timer 44 Lamp Timer Reset 43 LAMP/COVER indicators 15 Language 43 Location and function of controls Connector panel 16 Control panel 15 Rear/Side/Bottom 13 Top... Picture Mode 36 Pin assignment 56 Power Saving 40 Precautions 6 Preset Memory No 38, 58 Preset signals 57 Projecting 26 R Remote Commander 17 Replacing the Lamp 46 68 Index
... Mode 42 Image Flip 41 Input-A Signal Sel 43 Installation diagram Ceiling installation 61 Floor installation 59 Installing the projector 21 IR Receiver 41 L Lamp Mode 41 Lamp Timer 44 Lamp Timer Reset 43 LAMP/COVER indicators 15 Language 43 Location and function of controls Connector panel 16 Control panel 15 Rear/Side/Bottom 13 Top... Picture Mode 36 Pin assignment 56 Power Saving 40 Precautions 6 Preset Memory No 38, 58 Preset signals 57 Projecting 26 R Remote Commander 17 Replacing the Lamp 46 68 Index


