
Operating Instructions
Page 4
... 11 Location and Function of Controls (Main Unit 13 Top/Front/Side 13 Rear/Side/Bottom 13 Control Panel 15 Connector Panel 16 Remote Commander 17 VPL-CX125/CX155/CW125 ..... 17 VPL-CX100/CX120/CX150 ...... 19 Effective Tools for Your Presentation 32 Controlling the Computer Using a Presentation ... Function Menu 39 The Installation Menu 41 The Setup Menu 43 The Information Menu 44 Projecting the Picture Installing the Projector 21 Connecting the Projector 23 Connecting a Computer 23 Connecting a VCR 24 Projecting 26 Turning Off the Power 28 Convenient Functions Selecting the ...
... 11 Location and Function of Controls (Main Unit 13 Top/Front/Side 13 Rear/Side/Bottom 13 Control Panel 15 Connector Panel 16 Remote Commander 17 VPL-CX125/CX155/CW125 ..... 17 VPL-CX100/CX120/CX150 ...... 19 Effective Tools for Your Presentation 32 Controlling the Computer Using a Presentation ... Function Menu 39 The Installation Menu 41 The Setup Menu 43 The Information Menu 44 Projecting the Picture Installing the Projector 21 Connecting the Projector 23 Connecting a Computer 23 Connecting a VCR 24 Projecting 26 Turning Off the Power 28 Convenient Functions Selecting the ...
Operating Instructions
Page 11
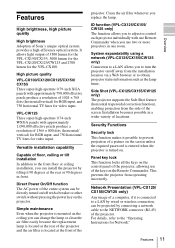
...projection of 3500 lumen for the VPL-CX150/CX155, 3000 lumen for the VPL-CX120/CX125/CW125 and 2700 lumen for video input. It allows light output of a picture on the screen unless the required password is entered when the projector is located at the rear or ...to a LAN allows you to adjust or control each projector individually with approximately 1,090,000 effective pixels produce a resolution of the projector. This prevents the projector from the installation location via a Web browser or to the NETWORK connector (RJ-45) of Sony's unique optical system provides a high-efficiency ...
...projection of 3500 lumen for the VPL-CX150/CX155, 3000 lumen for the VPL-CX120/CX125/CW125 and 2700 lumen for video input. It allows light output of a picture on the screen unless the required password is entered when the projector is located at the rear or ...to a LAN allows you to adjust or control each projector individually with approximately 1,090,000 effective pixels produce a resolution of the projector. This prevents the projector from the installation location via a Web browser or to the NETWORK connector (RJ-45) of Sony's unique optical system provides a high-efficiency ...
Operating Instructions
Page 13
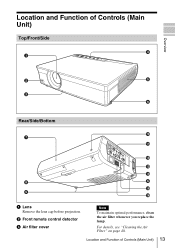
For details, see "Cleaning the Air Filter" on page 48. Location and Function of Controls (Main Unit) 13 b Front remote control detector c Air filter cover Note To maintain optimal performance, clean the air filter whenever you replace the lamp. Location and Function of Controls (Main Unit) Top/Front/Side 4 1 Overview 2 5 3 6 Rear/Side/Bottom 7 8 9 NIENTPWUTORCK RGB MONITOR INPUT A AUDIO OUTPUT AUDIO RGB S VIDEO VVIDIDEEOOIN AUDIO INPUT B RRESM-2O32TCE 0 qa qs qd qf 6 qg qh a Lens Remove the lens cap before projection.
For details, see "Cleaning the Air Filter" on page 48. Location and Function of Controls (Main Unit) 13 b Front remote control detector c Air filter cover Note To maintain optimal performance, clean the air filter whenever you replace the lamp. Location and Function of Controls (Main Unit) Top/Front/Side 4 1 Overview 2 5 3 6 Rear/Side/Bottom 7 8 9 NIENTPWUTORCK RGB MONITOR INPUT A AUDIO OUTPUT AUDIO RGB S VIDEO VVIDIDEEOOIN AUDIO INPUT B RRESM-2O32TCE 0 qa qs qd qf 6 qg qh a Lens Remove the lens cap before projection.

Operating Instructions
Page 14
m Focus ring Adjusts the picture focus. Refer to an optional security cable (from Kensington). g Lamp cover h Ventilation holes (intake) i Adjusters j Rear remote control detector k Connector/Connector Panel For details, see "Using the adjuster" on page 27. l Zoom ring Adjusts the picture size. First remove the cover attached in ...: http://www.kensington.com/ o Security bar An anti-theft chain or wire (commercially available) can be connected to it. p Speaker 14 Location and Function of Controls (Main Unit) d Control panel/Indicator For details, see "Control Panel" on page 16.
m Focus ring Adjusts the picture focus. Refer to an optional security cable (from Kensington). g Lamp cover h Ventilation holes (intake) i Adjusters j Rear remote control detector k Connector/Connector Panel For details, see "Using the adjuster" on page 27. l Zoom ring Adjusts the picture size. First remove the cover attached in ...: http://www.kensington.com/ o Security bar An anti-theft chain or wire (commercially available) can be connected to it. p Speaker 14 Location and Function of Controls (Main Unit) d Control panel/Indicator For details, see "Control Panel" on page 16.
Operating Instructions
Page 16
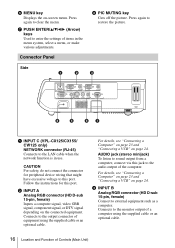
... make various adjustments. Connector Panel Side 1 2 3 NETWORK INPUT C RGB AUDIO INPUT A RGB AUDIO INPUT B MONITOR AUDIO S VIDEO VIDEO AUDIO OUTPUT VIDEO IN RS-232C REMOTE 4 5 67 a INPUT C (VPL-CX125/CX155/ CW125 only) NETWORK connector (RJ-45) Connects to restore the picture. b INPUT A Analog RGB connector (HD D-sub 15-pin, female) Inputs a computer... for this jack to enter the settings of the computer. c INPUT B Analog RGB connector (HD D-sub 15-pin, female) Connect to the monitor output of Controls (Main Unit)
... make various adjustments. Connector Panel Side 1 2 3 NETWORK INPUT C RGB AUDIO INPUT A RGB AUDIO INPUT B MONITOR AUDIO S VIDEO VIDEO AUDIO OUTPUT VIDEO IN RS-232C REMOTE 4 5 67 a INPUT C (VPL-CX125/CX155/ CW125 only) NETWORK connector (RJ-45) Connects to restore the picture. b INPUT A Analog RGB connector (HD D-sub 15-pin, female) Inputs a computer... for this jack to enter the settings of the computer. c INPUT B Analog RGB connector (HD D-sub 15-pin, female) Connect to the monitor output of Controls (Main Unit)
Operating Instructions
Page 17
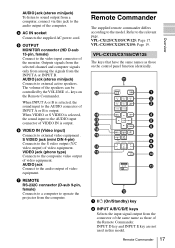
... of the speakers can be controlled by the VOLUME +/- When VIDEO or S VIDEO is output. VPL-CX125/CX155/CW125: Page 17...(Y/C video output) of INPUT A or B is selected, the sound input to the AUDIO connector of video equipment. VPL-CX100/CX120/CX150: Page 19. FREEZE ID MODE 1 2 3 1 2 3 4 5 6 7 8 9 0 qa ...Remote Commander. Remote Commander The supplied remote commander differs according to the relevant page. AUDIO jack (stereo minijack) To listen to sound output from the computer. g REMOTE RS-232C connector (D-sub 9-pin, female) Connects to a computer to operate the projector...
... of the speakers can be controlled by the VOLUME +/- When VIDEO or S VIDEO is output. VPL-CX125/CX155/CW125: Page 17...(Y/C video output) of INPUT A or B is selected, the sound input to the AUDIO connector of video equipment. VPL-CX100/CX120/CX150: Page 19. FREEZE ID MODE 1 2 3 1 2 3 4 5 6 7 8 9 0 qa ...Remote Commander. Remote Commander The supplied remote commander differs according to the relevant page. AUDIO jack (stereo minijack) To listen to sound output from the computer. g REMOTE RS-232C connector (D-sub 9-pin, female) Connects to a computer to operate the projector...
Operating Instructions
Page 18
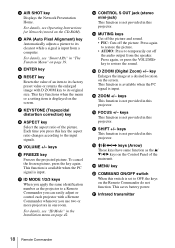
... to restore the picture. • AUDIO: Press to its clearest while a signal is not provided in this projector. d APA (Auto Pixel Alignment) key Automatically adjusts a picture to a Remote Commander you can easily adjust or control each projector with D ZOOM key to temporarily cut off the picture. This key functions when the menu or a setting...
... to restore the picture. • AUDIO: Press to its clearest while a signal is not provided in this projector. d APA (Auto Pixel Alignment) key Automatically adjusts a picture to a Remote Commander you can easily adjust or control each projector with D ZOOM key to temporarily cut off the picture. This key functions when the menu or a setting...
Operating Instructions
Page 19
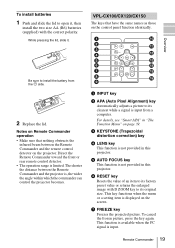
...to open it . This key functions when the menu or a setting item is displayed on the projector. Remote Commander 19 The shorter the distance between the Remote Commander and the remote control detector on the screen. e AUTO FOCUS key This function is input from the # side. ...value or returns the enlarged image with the correct polarity. VPL-CX100/CX120/CX150 The keys that nothing obstructs the infrared beam between the Remote Commander and the projector is input. For details, see "Smart APA" in "The Function Menu" on the control panel function identically. 1 2 3 4 5 6 7...
...to open it . This key functions when the menu or a setting item is displayed on the projector. Remote Commander 19 The shorter the distance between the Remote Commander and the remote control detector on the screen. e AUTO FOCUS key This function is input from the # side. ...value or returns the enlarged image with the correct polarity. VPL-CX100/CX120/CX150 The keys that nothing obstructs the infrared beam between the Remote Commander and the projector is input. For details, see "Smart APA" in "The Function Menu" on the control panel function identically. 1 2 3 4 5 6 7...
Operating Instructions
Page 20
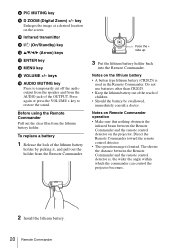
... sure that nothing obstructs the infrared beam between the Remote Commander and the remote control detector is limited. Direct the Remote Commander toward the remote control detector. • The operation range is , the wider the angle within which the commander can control the projector becomes. 2 Install the lithium battery. 20 Remote Commander j Infrared transmitter k ?/1 (On/Standby) key l v/V/b/B (Arrow) keys...
... sure that nothing obstructs the infrared beam between the Remote Commander and the remote control detector is limited. Direct the Remote Commander toward the remote control detector. • The operation range is , the wider the angle within which the commander can control the projector becomes. 2 Install the lithium battery. 20 Remote Commander j Infrared transmitter k ?/1 (On/Standby) key l v/V/b/B (Arrow) keys...

Operating Instructions
Page 26
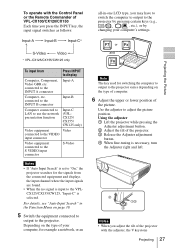
... then lights in red and the projector goes into a wall outlet, then connect all equipment. To operate with the Remote Commander of VPL-CX125/ CX155/CW125 You can select directly the input signal you want to the projector. 4 Select the input source. Projecting...remote control detector 6 COMMAND OFF ON INPUT A INPUT D INPUT B INPUT E INPUT C AIR SHOT VIDEO S VIDEO 2 4 MENU APA ENTER RESET FOCUS ZOOM SHIFT ASPECT KEY STONE VPL-CX125/CX155/CW125 APA INPUT KEY STONE /TILT LENS ENTER AUTO FOCUS RESET MENU FREEZE PIC MUTING D ZOOM AUDIO MUTING VOLUME 2 4 VPL-CX100/CX120...
... then lights in red and the projector goes into a wall outlet, then connect all equipment. To operate with the Remote Commander of VPL-CX125/ CX155/CW125 You can select directly the input signal you want to the projector. 4 Select the input source. Projecting...remote control detector 6 COMMAND OFF ON INPUT A INPUT D INPUT B INPUT E INPUT C AIR SHOT VIDEO S VIDEO 2 4 MENU APA ENTER RESET FOCUS ZOOM SHIFT ASPECT KEY STONE VPL-CX125/CX155/CW125 APA INPUT KEY STONE /TILT LENS ENTER AUTO FOCUS RESET MENU FREEZE PIC MUTING D ZOOM AUDIO MUTING VOLUME 2 4 VPL-CX100/CX120...
Operating Instructions
Page 27
...13 4 Notes • When you adjust the tilt of the projector with the Control Panel or the Remote Commander of the picture. For details, see "Auto Input Search" in -one LCD type, you may have to switch the computer to output to the projector by pressing certain keys (e.g., , etc.), or by changing your ...• If "Auto Input Search" is set to "On," the projector searches for switching the computer to output to the projector varies depending on the type of computer. 6 Adjust the upper or lower position of VPL-CX100/CX120/CX150 Each time you press the INPUT key, the input signal switches ...
...13 4 Notes • When you adjust the tilt of the projector with the Control Panel or the Remote Commander of the picture. For details, see "Auto Input Search" in -one LCD type, you may have to switch the computer to output to the projector by pressing certain keys (e.g., , etc.), or by changing your ...• If "Auto Input Search" is set to "On," the projector searches for switching the computer to output to the projector varies depending on the type of computer. 6 Adjust the upper or lower position of VPL-CX100/CX120/CX150 Each time you press the INPUT key, the input signal switches ...
Operating Instructions
Page 29
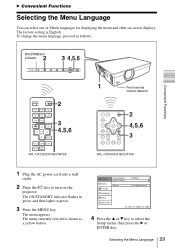
... B Convenient Functions Selecting the Menu Language You can select one of fifteen languages for displaying the menu and other on the projector. The factory setting is shown as follows: Convenient Functions ON/STANDBY 2 indicator 3 4,5,6 LAMP/ COVER ON/ STANDBY INPUT ...OUTPUT AUDIO S VIDEO RGB VVIIDDEEOOIN INPUT B AUDIO AUDIO RRSE-M23O2TCE 1 Front remote control detector APA INPUT KEY STONE /TILT LENS ENTER AUTO FOCUS RESET MENU FREEZE PIC MUTING D ZOOM AUDIO MUTING VOLUME 2 4,5,6 3 VPL-CX100/CX120/CX150 1 Plug the AC power cord into a wall outlet. 2 Press...
... B Convenient Functions Selecting the Menu Language You can select one of fifteen languages for displaying the menu and other on the projector. The factory setting is shown as follows: Convenient Functions ON/STANDBY 2 indicator 3 4,5,6 LAMP/ COVER ON/ STANDBY INPUT ...OUTPUT AUDIO S VIDEO RGB VVIIDDEEOOIN INPUT B AUDIO AUDIO RRSE-M23O2TCE 1 Front remote control detector APA INPUT KEY STONE /TILT LENS ENTER AUTO FOCUS RESET MENU FREEZE PIC MUTING D ZOOM AUDIO MUTING VOLUME 2 4,5,6 3 VPL-CX100/CX120/CX150 1 Plug the AC power cord into a wall outlet. 2 Press...

Operating Instructions
Page 33
... language of your computer. • When you use the presentation tool, set "ID Mode" in the forward/backward direction. Convenient Functions Controlling the Computer Using a Presentation Tool, RM-PJPK1 (not supplied) (When Using the Network Presentation Function) (VPLCX125/CX155/CW125 only) When ...black screen during the slide show. * Even if the network presentation function is any obstruction between the presentation tool and the remote control detector on the projector, the presentation tool may not function properly. • A black screen may not be used , the LASER key can perform...
... language of your computer. • When you use the presentation tool, set "ID Mode" in the forward/backward direction. Convenient Functions Controlling the Computer Using a Presentation Tool, RM-PJPK1 (not supplied) (When Using the Network Presentation Function) (VPLCX125/CX155/CW125 only) When ...black screen during the slide show. * Even if the network presentation function is any obstruction between the presentation tool and the remote control detector on the projector, the presentation tool may not function properly. • A black screen may not be used , the LASER key can perform...
Operating Instructions
Page 40
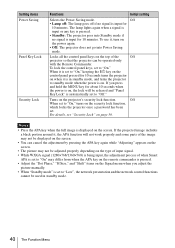
...The lamp goes off if no signal is input for 10 seconds turns the projector on when it , turn on the projector's security lock function. Locks all the control panel keys on the top of the Off projector so that the projector can cancel the adjustment by pressing the APA key again while "Adjusting" appears...is on the screen. • You can be operated only with the Remote Commander. To lock the control panel keys, set to "On" may not be displayed on , the lock will be used in standby mode, and turns the projector to standby mode when the power is in standby mode. 40 The Function...
...The lamp goes off if no signal is input for 10 seconds turns the projector on when it , turn on the projector's security lock function. Locks all the control panel keys on the top of the Off projector so that the projector can cancel the adjustment by pressing the APA key again while "Adjusting" appears...is on the screen. • You can be operated only with the Remote Commander. To lock the control panel keys, set to "On" may not be displayed on , the lock will be used in standby mode, and turns the projector to standby mode when the power is in standby mode. 40 The Function...

Operating Instructions
Page 41
...All Off Off Set: Exit: Adjustments and Settings Using a Menu Setting items V Keystone Side Shot (VPL-CX125/ CX155/CW125 only) Image Flip Background Lamp Mode IR Receiver Functions Initial setting Corrects the trapezoidal distortion... signal Blue is input to a higher value (+ direction). When the left side ( ) Set to the projector. The Installation Menu The Installation menu is used during the projection. • High: Illuminates the projected image ... ( ) Set to "Blue." Standard Selects the remote control detectors (IR Receiver) on the screen horizontally and/or vertically.
...All Off Off Set: Exit: Adjustments and Settings Using a Menu Setting items V Keystone Side Shot (VPL-CX125/ CX155/CW125 only) Image Flip Background Lamp Mode IR Receiver Functions Initial setting Corrects the trapezoidal distortion... signal Blue is input to a higher value (+ direction). When the left side ( ) Set to the projector. The Installation Menu The Installation menu is used during the projection. • High: Illuminates the projected image ... ( ) Set to "Blue." Standard Selects the remote control detectors (IR Receiver) on the screen horizontally and/or vertically.

Operating Instructions
Page 42
Setting items Functions Initial setting ID Mode (VPL-CX125/ CX155/CW125 only) Assigns an ID number (1 to 3) to the projector when you need fine adjustment when V Keystone is set to "Auto", press the KEYSTONE key on the control panel or the remote commander, and change the V Keystone setting to... then return it is set to "All," you want to "Manual" from "Auto". • If you want control two or more projectors individually with the supplied Remote Commander. The setting mode will be diminished. 42 The Installation Menu Notes • The auto V Keystone adjustment may ...
Setting items Functions Initial setting ID Mode (VPL-CX125/ CX155/CW125 only) Assigns an ID number (1 to 3) to the projector when you need fine adjustment when V Keystone is set to "Auto", press the KEYSTONE key on the control panel or the remote commander, and change the V Keystone setting to... then return it is set to "All," you want to "Manual" from "Auto". • If you want control two or more projectors individually with the supplied Remote Commander. The setting mode will be diminished. 42 The Installation Menu Notes • The auto V Keystone adjustment may ...

Operating Instructions
Page 47
... the original position and tighten the three screws with the Phillips screwdriver. 11Select "Execute" with the v key. Disposal of the projector or on the control panel of the used lamp For the customers in the USA Lamp in red. 8 Press the ?/1 key to environmental considerations. ...To erase a message, press any key on the Remote Commander. For disposal or recycling information, please contact your local authorities or the Electronic Industries Alliance (www.eiae.org). Disposal of the lamp. • The power will not turn the projector on . (Page 51) 7 Connect the power ...
... the original position and tighten the three screws with the Phillips screwdriver. 11Select "Execute" with the v key. Disposal of the projector or on the control panel of the used lamp For the customers in the USA Lamp in red. 8 Press the ?/1 key to environmental considerations. ...To erase a message, press any key on the Remote Commander. For disposal or recycling information, please contact your local authorities or the Electronic Industries Alliance (www.eiae.org). Disposal of the lamp. • The power will not turn the projector on . (Page 51) 7 Connect the power ...

Operating Instructions
Page 48
... a message, press any key on the control panel of the air filter. The time needed to clean the air filter will vary depending on the environment or how the projector is a difference between the front and rear of the projector or on the remote commander. 3 Remove the air filter from the... air filter, replace the air filter with qualified Sony personnnel. • Be sure to attach the air filter ...
... a message, press any key on the control panel of the air filter. The time needed to clean the air filter will vary depending on the environment or how the projector is a difference between the front and rear of the projector or on the remote commander. 3 Remove the air filter from the... air filter, replace the air filter with qualified Sony personnnel. • Be sure to attach the air filter ...
Operating Instructions
Page 65
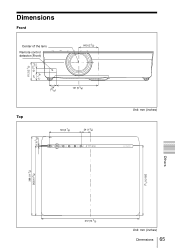
Dimensions Front Center of the lens Remote control detector (Front) 64.9 (2 5/8) 61.2 (2 1/2) 27 13 (17/32) (1 1/8) Top 24 (31/32) 141 (5 5/8) 123 (4 7/8) 34 (1 3/8) Unit: mm (inches) 5.3 (7/32) DATA PROJECTOR LAMP/ COVER ON/ STANDBY INPUT KEYSTONE MENU PUSH ENTER PIC MUTING 298 (11 3/4) 263 (10 3/8) Others 265 (10 1/2) 372 (14 3/4) Unit: mm (inches) Dimensions 65
Dimensions Front Center of the lens Remote control detector (Front) 64.9 (2 5/8) 61.2 (2 1/2) 27 13 (17/32) (1 1/8) Top 24 (31/32) 141 (5 5/8) 123 (4 7/8) 34 (1 3/8) Unit: mm (inches) 5.3 (7/32) DATA PROJECTOR LAMP/ COVER ON/ STANDBY INPUT KEYSTONE MENU PUSH ENTER PIC MUTING 298 (11 3/4) 263 (10 3/8) Others 265 (10 1/2) 372 (14 3/4) Unit: mm (inches) Dimensions 65

Operating Instructions
Page 67
Rear 154 (6 1/8) 152.5 (6 1/8) Remote control detector (Rear) 49 (1 15/16) 24 (31/32) Bottom 66 (2 5/8) 326 (12 7/8) 148 (5 7/8) 174 (6 7/8) 32 (1 5/16) 15 (19/32) Unit: mm (inches) 137.3 (5 1/2) 124 (5) 275 (10 7/8) Others 104.5 (4 1/8) Holes for mounting a projector suspension support 56.6 (2 1/4) 46.1 (1 7/8) 12.2 (1/2) Center of the projector Unit: mm (inches) Dimensions 67
Rear 154 (6 1/8) 152.5 (6 1/8) Remote control detector (Rear) 49 (1 15/16) 24 (31/32) Bottom 66 (2 5/8) 326 (12 7/8) 148 (5 7/8) 174 (6 7/8) 32 (1 5/16) 15 (19/32) Unit: mm (inches) 137.3 (5 1/2) 124 (5) 275 (10 7/8) Others 104.5 (4 1/8) Holes for mounting a projector suspension support 56.6 (2 1/4) 46.1 (1 7/8) 12.2 (1/2) Center of the projector Unit: mm (inches) Dimensions 67

