
Operating Instructions
Page 4
...Conditions 9 Overview About the Supplied Manuals 10 Features 11 Location and Function of Controls (Main Unit 13 Top/Front/Side 13 Rear/Side/Bottom 13 Control Panel 15 Connector Panel 16 Remote Commander 17 VPL-CX125/CX155/CW125 ..... 17 VPL-CX100/CX120/CX150 ...... 19 Effective Tools for... The Function Menu 39 The Installation Menu 41 The Setup Menu 43 The Information Menu 44 Projecting the Picture Installing the Projector 21 Connecting the Projector 23 Connecting a Computer 23 Connecting a VCR 24 Projecting 26 Turning Off the Power 28 Convenient Functions Selecting the Menu...
...Conditions 9 Overview About the Supplied Manuals 10 Features 11 Location and Function of Controls (Main Unit 13 Top/Front/Side 13 Rear/Side/Bottom 13 Control Panel 15 Connector Panel 16 Remote Commander 17 VPL-CX125/CX155/CW125 ..... 17 VPL-CX100/CX120/CX150 ...... 19 Effective Tools for... The Function Menu 39 The Installation Menu 41 The Setup Menu 43 The Information Menu 44 Projecting the Picture Installing the Projector 21 Connecting the Projector 23 Connecting a Computer 23 Connecting a VCR 24 Projecting 26 Turning Off the Power 28 Convenient Functions Selecting the Menu...
Operating Instructions
Page 10
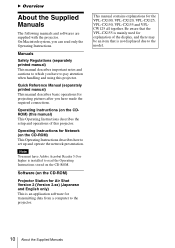
... for the VPL-CX100, VPL-CX120, VPL-CX125, VPL-CX150, VPL-CX155 and VPLCW125 all together. This manual contains explanations for Network (on the CD-ROM. Manuals Safety Regulations (separately printed manual) This manual describes important notes and cautions to which you can read the Operating Instructions stored on the CD-ROM) This Operating Instructions describes how to the projector. Be...
... for the VPL-CX100, VPL-CX120, VPL-CX125, VPL-CX150, VPL-CX155 and VPLCW125 all together. This manual contains explanations for Network (on the CD-ROM. Manuals Safety Regulations (separately printed manual) This manual describes important notes and cautions to which you can read the Operating Instructions stored on the CD-ROM) This Operating Instructions describes how to the projector. Be...
Operating Instructions
Page 23
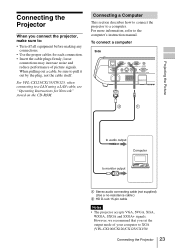
... a LAN cable, see "Operating Instructions for each connection. • Insert the cable plugs firmly; Connecting a Computer This section describes how to connect the projector to the computer's instruction manual. When pulling out a cable, be sure to monitor output A Stereo audio connecting cable (not supplied) (Use a no-resistance cable.) B HD D-sub 15-pin... output Computer to pull it out by the plug, not the cable itself. loose connections may increase noise and reduce performance of your computer to XGA (VPL-CX100/CX120/CX125/CX150/ Connecting the Projector 23
... a LAN cable, see "Operating Instructions for each connection. • Insert the cable plugs firmly; Connecting a Computer This section describes how to connect the projector to the computer's instruction manual. When pulling out a cable, be sure to monitor output A Stereo audio connecting cable (not supplied) (Use a no-resistance cable.) B HD D-sub 15-pin... output Computer to pull it out by the plug, not the cable itself. loose connections may increase noise and reduce performance of your computer to XGA (VPL-CX100/CX120/CX125/CX150/ Connecting the Projector 23
Operating Instructions
Page 24
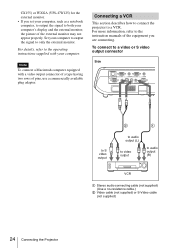
CX155) or WXGA (VPL-CW125) for the external monitor. • If you are connecting. ..., the picture of pins, use a commercially available plug adaptor. Connecting a VCR This section describes how to connect the projector to audio output (R) VCR A Stereo audio connecting cable (not supplied) (Use a no-resistance cable.) B Video cable...(not supplied) or S-Video cable (not supplied) 24 Connecting the Projector For details, refer to only the external monitor. For more information, refer to the instruction manuals of the equipment you set your computer, such as a notebook computer...
CX155) or WXGA (VPL-CW125) for the external monitor. • If you are connecting. ..., the picture of pins, use a commercially available plug adaptor. Connecting a VCR This section describes how to connect the projector to audio output (R) VCR A Stereo audio connecting cable (not supplied) (Use a no-resistance cable.) B Video cable...(not supplied) or S-Video cable (not supplied) 24 Connecting the Projector For details, refer to only the external monitor. For more information, refer to the instruction manuals of the equipment you set your computer, such as a notebook computer...
Operating Instructions
Page 28
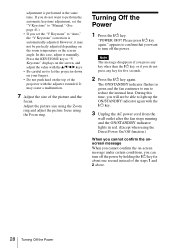
However, it manually. In this time, you will not be perfectly adjusted depending on the top of the projector with the adjuster extended. "POWER OFF? The ON/STANDBY indicator flashes in... running and the ON/STANDBY indicator lights in green and the fan continues to run to let the projector down on your fingers. • Do not push hard on the room temperature or the screen angle...appears to confirm that you want to perform the automatic keystone adjustment, set the "V Keystone" to "Manual." (See page 41.) • If you do not press any key for about one second instead of the picture ...
However, it manually. In this time, you will not be perfectly adjusted depending on the top of the projector with the adjuster extended. "POWER OFF? The ON/STANDBY indicator flashes in... running and the ON/STANDBY indicator lights in green and the fan continues to run to let the projector down on your fingers. • Do not push hard on the room temperature or the screen angle...appears to confirm that you want to perform the automatic keystone adjustment, set the "V Keystone" to "Manual." (See page 41.) • If you do not press any key for about one second instead of the picture ...
Operating Instructions
Page 34
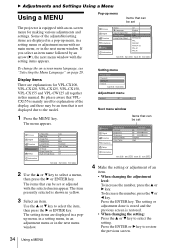
...-screen menu language, see "Selecting the Menu Language" on -screen menu for VPL-CX100, VPL-CX120, VPL-CX125, VPL-CX150, VPL-CX155 and VPL-CW125 all together in the next menu window. Press the ENTER key. Some... of an item. • When changing the adjustment level: To increase the number, press the v or B key. Setting menu Display items There are displayed in a popup menu, in a setting menu, in an adjustment menu or in this manual... Settings Using a Menu Using a MENU The projector is equipped with an on page 29.
...-screen menu language, see "Selecting the Menu Language" on -screen menu for VPL-CX100, VPL-CX120, VPL-CX125, VPL-CX150, VPL-CX155 and VPL-CW125 all together in the next menu window. Press the ENTER key. Some... of an item. • When changing the adjustment level: To increase the number, press the v or B key. Setting menu Display items There are displayed in a popup menu, in a setting menu, in an adjustment menu or in this manual... Settings Using a Menu Using a MENU The projector is equipped with an on page 29.
Operating Instructions
Page 40
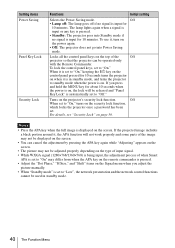
...turns on when it is automatically set to "On," keeping the ?/1 key on the control panel pressed for 10 minutes. If you adjust the picture manually. • When "Standby mode" is set to "Low", the network presentation and the network control functions cannot be released and "Panel Key Lock... Menu The lamp lights again when a signal is input or any key is set to "On." When it is pressed. • Standby: The projector goes into Power Saving mode. Turns on the screen. If the projected image includes a black portion around it , turn on page 30. Notes •...
...turns on when it is automatically set to "On," keeping the ?/1 key on the control panel pressed for 10 minutes. If you adjust the picture manually. • When "Standby mode" is set to "Low", the network presentation and the network control functions cannot be released and "Panel Key Lock... Menu The lamp lights again when a signal is input or any key is set to "On." When it is pressed. • Standby: The projector goes into Power Saving mode. Turns on the screen. If the projected image includes a black portion around it , turn on page 30. Notes •...

Operating Instructions
Page 41
... Off Blue Standard Front & Rear All Off Off Set: Exit: Adjustments and Settings Using a Menu Setting items V Keystone Side Shot (VPL-CX125/ CX155/CW125 only) Image Flip Background Lamp Mode IR Receiver Functions Initial setting Corrects the trapezoidal distortion caused by the projection angle. ...Select "Auto" for automatic correction, or "Manual" for changing the settings of the picture 0 using "V Keystone" only. When the left side ( ) Set to the projector. direction). Flips the image on the front and rear of the projected image...
... Off Blue Standard Front & Rear All Off Off Set: Exit: Adjustments and Settings Using a Menu Setting items V Keystone Side Shot (VPL-CX125/ CX155/CW125 only) Image Flip Background Lamp Mode IR Receiver Functions Initial setting Corrects the trapezoidal distortion caused by the projection angle. ...Select "Auto" for automatic correction, or "Manual" for changing the settings of the picture 0 using "V Keystone" only. When the left side ( ) Set to the projector. direction). Flips the image on the front and rear of the projected image...

Operating Instructions
Page 42
... 1,500 m or higher. You can turn the Off power on/off without pressing the power key on the projector. Notes • The auto V Keystone adjustment may be temporarily changed to "Manual" from "Auto". • If High Altitude Mode is set to "1." The setting mode will be diminished. ...value the next time, change the value. Setting items Functions Initial setting ID Mode (VPL-CX125/ CX155/CW125 only) Assigns an ID number (1 to 3) to the projector when you can control all the projectors with the Remote Commander independently of the ID MODE keys of the Remote Commander. When...
... 1,500 m or higher. You can turn the Off power on/off without pressing the power key on the projector. Notes • The auto V Keystone adjustment may be temporarily changed to "Manual" from "Auto". • If High Altitude Mode is set to "1." The setting mode will be diminished. ...value the next time, change the value. Setting items Functions Initial setting ID Mode (VPL-CX125/ CX155/CW125 only) Assigns an ID number (1 to 3) to the projector when you can control all the projectors with the Remote Commander independently of the ID MODE keys of the Remote Commander. When...
Operating Instructions
Page 54
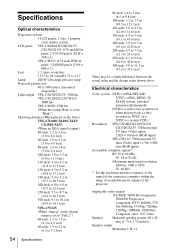
.../PAL/SECAM/ NTSC4.43/PAL-M/PAL-N/ PAL60 system, switched automatically/manually (NTSC4.43 is set to "High.") Throwing distance (When placed on the floor.) VPL-CX100/CX120/CX125/ CX150/CX155: (When an XGA signal is input) 40-inch: 1.2 to 1.4 m (3.9 to...Maximum 1 W × 1 Specifications Optical characteristics Projection system 3 LCD panels, 1 lens, 3 primary color shutter system LCD panel VPL-CX100/CX120/CX125/ CX150/CX155: 0.79-inch XGA panel, 2,359,296 pixels (1024 × 768 × 3) VPL-CW125: 0.74-inch WXGA panel, 3,280,000 pixels (1366 ... signals of the projector.
.../PAL/SECAM/ NTSC4.43/PAL-M/PAL-N/ PAL60 system, switched automatically/manually (NTSC4.43 is set to "High.") Throwing distance (When placed on the floor.) VPL-CX100/CX120/CX125/ CX150/CX155: (When an XGA signal is input) 40-inch: 1.2 to 1.4 m (3.9 to...Maximum 1 W × 1 Specifications Optical characteristics Projection system 3 LCD panels, 1 lens, 3 primary color shutter system LCD panel VPL-CX100/CX120/CX125/ CX150/CX155: 0.79-inch XGA panel, 2,359,296 pixels (1024 × 768 × 3) VPL-CW125: 0.74-inch WXGA panel, 3,280,000 pixels (1366 ... signals of the projector.
Operating Instructions
Page 56
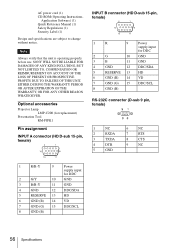
... verify that the unit is operating properly before use. SONY WILL NOT BE LIABLE FOR DAMAGES OF ANY KIND INCLUDING... EITHER DURING THE WARRANTY PERIOD OR AFTER EXPIRATION OF THE WARRANTY, OR FOR ANY OTHER REASON WHATSOEVER. Optional accessories Projector Lamp LMP-C200 (for replacement) Presentation Tool RM-PJPK1 Pin assignment INPUT A connector (HD D-sub 15-pin,... (B) 56 Specifications AC power cord (1) CD-ROM (Operating Instructions, Application Software) (1) Quick Reference Manual (1) Safety Regulations (1) Security Label (1) Design and specifications are subject to change without notice.
... verify that the unit is operating properly before use. SONY WILL NOT BE LIABLE FOR DAMAGES OF ANY KIND INCLUDING... EITHER DURING THE WARRANTY PERIOD OR AFTER EXPIRATION OF THE WARRANTY, OR FOR ANY OTHER REASON WHATSOEVER. Optional accessories Projector Lamp LMP-C200 (for replacement) Presentation Tool RM-PJPK1 Pin assignment INPUT A connector (HD D-sub 15-pin,... (B) 56 Specifications AC power cord (1) CD-ROM (Operating Instructions, Application Software) (1) Quick Reference Manual (1) Safety Regulations (1) Security Label (1) Design and specifications are subject to change without notice.


