
Operating Instructions
Page 3
...: VPL-CX100, VPL-CX120, VPL-CX125, VPL-CX150, VPL-CX155, VPL-CW125 Responsible party: Sony Electronics Inc. Telephone Number: 858-942-2230 This device complies with the limits for EMC and product safety is subject to environmental considerations. Disposal of this device must accept any interference received, including interference that may cause undesired operation. All interface cables used lamp...
...: VPL-CX100, VPL-CX120, VPL-CX125, VPL-CX150, VPL-CX155, VPL-CW125 Responsible party: Sony Electronics Inc. Telephone Number: 858-942-2230 This device complies with the limits for EMC and product safety is subject to environmental considerations. Disposal of this device must accept any interference received, including interference that may cause undesired operation. All interface cables used lamp...

Operating Instructions
Page 4
... (Main Unit 13 Top/Front/Side 13 Rear/Side/Bottom 13 Control Panel 15 Connector Panel 16 Remote Commander 17 VPL-CX125/CX155/CW125 ..... 17 VPL-CX100/CX120/CX150 ...... 19 Effective Tools for Your Presentation 32 Controlling the Computer Using a Presentation Tool, RM-PJPK1 (not supplied... the Projector 23 Connecting a Computer 23 Connecting a VCR 24 Projecting 26 Turning Off the Power 28 Convenient Functions Selecting the Menu Language .......... 29 Security Lock 30 Other Functions 32 Direct Power On/Off Function ... 32 4 Table of Contents Maintenance Replacing the Lamp 46 ...
... (Main Unit 13 Top/Front/Side 13 Rear/Side/Bottom 13 Control Panel 15 Connector Panel 16 Remote Commander 17 VPL-CX125/CX155/CW125 ..... 17 VPL-CX100/CX120/CX150 ...... 19 Effective Tools for Your Presentation 32 Controlling the Computer Using a Presentation Tool, RM-PJPK1 (not supplied... the Projector 23 Connecting a Computer 23 Connecting a VCR 24 Projecting 26 Turning Off the Power 28 Convenient Functions Selecting the Menu Language .......... 29 Security Lock 30 Other Functions 32 Direct Power On/Off Function ... 32 4 Table of Contents Maintenance Replacing the Lamp 46 ...
Operating Instructions
Page 6
... of your unit is identical with the voltage of your fingers by the adjuster when you replace the lamp. • Refer to the "Cleaning the Air Filter" on the lens, use a soft dry ... the following: • Avoid touching the lens. the air coming out is required, consult with qualified Sony personnel. • Should any windows that face the screen with respect to catch your local power supply.... On illumination • To obtain the best picture, the front of the projector, take care with opaque draperies. • It is not disconnected from the AC power source ...
... of your unit is identical with the voltage of your fingers by the adjuster when you replace the lamp. • Refer to the "Cleaning the Air Filter" on the lens, use a soft dry ... the following: • Avoid touching the lens. the air coming out is required, consult with qualified Sony personnel. • Should any windows that face the screen with respect to catch your local power supply.... On illumination • To obtain the best picture, the front of the projector, take care with opaque draperies. • It is not disconnected from the AC power source ...
Operating Instructions
Page 7
...prevent internal heat build-up , the temperature sensor will function with the message "High temp.! Notes on Installation and Usage 7 On LCD projector • The LCD projector is a normal result of the manufacturing process and does not indicate a malfunction. The power will be scratched. • If the...off. Lamp off in contact with a rubber or vinyl resin product for a long period of time, the finish of the cabinet may deteriorate or the coating may , however, see tiny black points and/or bright points (red, blue, or green) that continuously appear on the LCD projector. ...
...prevent internal heat build-up , the temperature sensor will function with the message "High temp.! Notes on Installation and Usage 7 On LCD projector • The LCD projector is a normal result of the manufacturing process and does not indicate a malfunction. The power will be scratched. • If the...off. Lamp off in contact with a rubber or vinyl resin product for a long period of time, the finish of the cabinet may deteriorate or the coating may , however, see tiny black points and/or bright points (red, blue, or green) that continuously appear on the LCD projector. ...

Operating Instructions
Page 8
... condensation or rise in temperature. Very dusty, extremely smoky Usage in a very dusty or extremely smoky environment. Clean the air filter whenever you replace the lamp. 8 Notes on the distance between the screen and the unit or the zooming magnifications.
... condensation or rise in temperature. Very dusty, extremely smoky Usage in a very dusty or extremely smoky environment. Clean the air filter whenever you replace the lamp. 8 Notes on the distance between the screen and the unit or the zooming magnifications.
Operating Instructions
Page 11
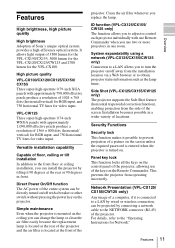
...VPL-CX100/CX120/CX125/CX150/ CX155 Three super-high-aperture 0.79-inch XGA panels with a breaker or other switch without pressing the power key on the Remote Commander. Simple maintenance Even when the projector...projector individually with approximately 1,090,000 effective pixels produce a resolution of Sony's unique optical system provides a high-efficiency optical system. This prevents the projector from the side of 3500 lumen for the VPL-CX150/CX155, 3000 lumen for the VPL-CX120... projector is located at the rear or 90 degrees in one Remote Commander when you replace the lamp....
...VPL-CX100/CX120/CX125/CX150/ CX155 Three super-high-aperture 0.79-inch XGA panels with a breaker or other switch without pressing the power key on the Remote Commander. Simple maintenance Even when the projector...projector individually with approximately 1,090,000 effective pixels produce a resolution of Sony's unique optical system provides a high-efficiency optical system. This prevents the projector from the side of 3500 lumen for the VPL-CX150/CX155, 3000 lumen for the VPL-CX120... projector is located at the rear or 90 degrees in one Remote Commander when you replace the lamp....
Operating Instructions
Page 12
...8226; Low fan noise makes your presentation comfortable • On-screen menu in 15 languages • Picture/Audio muting • Freeze • Lamp mode switching function • Low power consumption in standby • Security bar About Trademarks • Adobe Acrobat is a trademark of Adobe Systems ...Association. • Display Data Channel is a trademark of the Video Electronics Standards Association. • Air Shot is a trademark of Sony corporation. • Side Shot is a trademark of their respective holders. In this manual, ™ and ® marks are trademarks or registered...
...8226; Low fan noise makes your presentation comfortable • On-screen menu in 15 languages • Picture/Audio muting • Freeze • Lamp mode switching function • Low power consumption in standby • Security bar About Trademarks • Adobe Acrobat is a trademark of Adobe Systems ...Association. • Display Data Channel is a trademark of the Video Electronics Standards Association. • Air Shot is a trademark of Sony corporation. • Side Shot is a trademark of their respective holders. In this manual, ™ and ® marks are trademarks or registered...
Operating Instructions
Page 13
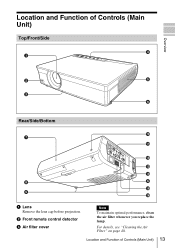
b Front remote control detector c Air filter cover Note To maintain optimal performance, clean the air filter whenever you replace the lamp. Location and Function of Controls (Main Unit) Top/Front/Side 4 1 Overview 2 5 3 6 Rear/Side/Bottom 7 8 9 NIENTPWUTORCK RGB MONITOR INPUT A AUDIO OUTPUT AUDIO RGB S VIDEO VVIDIDEEOOIN AUDIO INPUT B RRESM-2O32TCE 0 qa qs qd qf 6 qg qh a Lens Remove the lens cap before projection. For details, see "Cleaning the Air Filter" on page 48. Location and Function of Controls (Main Unit) 13
b Front remote control detector c Air filter cover Note To maintain optimal performance, clean the air filter whenever you replace the lamp. Location and Function of Controls (Main Unit) Top/Front/Side 4 1 Overview 2 5 3 6 Rear/Side/Bottom 7 8 9 NIENTPWUTORCK RGB MONITOR INPUT A AUDIO OUTPUT AUDIO RGB S VIDEO VVIDIDEEOOIN AUDIO INPUT B RRESM-2O32TCE 0 qa qs qd qf 6 qg qh a Lens Remove the lens cap before projection. For details, see "Cleaning the Air Filter" on page 48. Location and Function of Controls (Main Unit) 13

Operating Instructions
Page 14
... panel/Indicator For details, see "Control Panel" on page 16. m Focus ring Adjusts the picture focus. p Speaker 14 Location and Function of Controls (Main Unit) g Lamp cover h Ventilation holes (intake) i Adjusters j Rear remote control detector k Connector/Connector Panel For details, see "Using the adjuster" on page 27. First remove the cover...
... panel/Indicator For details, see "Control Panel" on page 16. m Focus ring Adjusts the picture focus. p Speaker 14 Location and Function of Controls (Main Unit) g Lamp cover h Ventilation holes (intake) i Adjusters j Rear remote control detector k Connector/Connector Panel For details, see "Using the adjuster" on page 27. First remove the cover...
Operating Instructions
Page 15
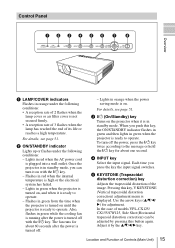
...life or reaches a high temperature. Control Panel 123456 7 8 LAMP/ COVER ON/ STANDBY INPUT KEYSTONE MENU PUSH ENTER PIC MUTING Overview a LAMP/COVER indicators Flashes in green from the time when the projector is turned on until the projector is ready to operate. Flashes in orange under the following conditions...the projector is on the projector when it by pressing this key, the ON/STANDBY indicator flashes in green and then lights in red when the AC power cord is not secured firmly. • A reception rate of 3 flashes when the lamp has reached the end of models VPL-CX125...
...life or reaches a high temperature. Control Panel 123456 7 8 LAMP/ COVER ON/ STANDBY INPUT KEYSTONE MENU PUSH ENTER PIC MUTING Overview a LAMP/COVER indicators Flashes in green from the time when the projector is turned on until the projector is ready to operate. Flashes in orange under the following conditions...the projector is on the projector when it by pressing this key, the ON/STANDBY indicator flashes in green and then lights in red when the AC power cord is not secured firmly. • A reception rate of 3 flashes when the lamp has reached the end of models VPL-CX125...

Operating Instructions
Page 26
...outlet, then connect all equipment. To operate with the Remote Commander of VPL-CX125/ CX155/CW125 You can select directly the input signal you want to the projector. 4 Select the input source. Projecting 24 LAMP/ COVER ON/ STANDBY INPUT KEYSTONE MENU PUSH ENTER PIC MUTING ON/... VIDEO S VIDEO 2 4 MENU APA ENTER RESET FOCUS ZOOM SHIFT ASPECT KEY STONE VPL-CX125/CX155/CW125 APA INPUT KEY STONE /TILT LENS ENTER AUTO FOCUS RESET MENU FREEZE PIC MUTING D ZOOM AUDIO MUTING VOLUME 2 4 VPL-CX100/CX120/CX150 1 Plug the AC power cord into standby mode. 2 Press the ?/1 key...
...outlet, then connect all equipment. To operate with the Remote Commander of VPL-CX125/ CX155/CW125 You can select directly the input signal you want to the projector. 4 Select the input source. Projecting 24 LAMP/ COVER ON/ STANDBY INPUT KEYSTONE MENU PUSH ENTER PIC MUTING ON/... VIDEO S VIDEO 2 4 MENU APA ENTER RESET FOCUS ZOOM SHIFT ASPECT KEY STONE VPL-CX125/CX155/CW125 APA INPUT KEY STONE /TILT LENS ENTER AUTO FOCUS RESET MENU FREEZE PIC MUTING D ZOOM AUDIO MUTING VOLUME 2 4 VPL-CX100/CX120/CX150 1 Plug the AC power cord into standby mode. 2 Press the ?/1 key...
Operating Instructions
Page 29
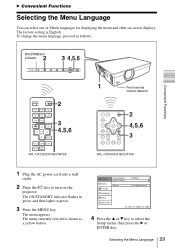
.... The factory setting is shown as follows: Convenient Functions ON/STANDBY 2 indicator 3 4,5,6 LAMP/ COVER ON/ STANDBY INPUT KEYSTONE MENU PUSH ENTER PIC MUTING COMMAND OFF ON INPUT A INPUT... VIDEO S VIDEO MENU APA ENTER 2 3 4,5,6 RESET FOCUS ZOOM SHIFT ASPECT KEY STONE VPL-CX125/CX155/CW125 MPUITICNG PEUNSTHER MENU KEYSTONE INPUT SOTNA/NDBY LACMOPV/ER NEINTPWUOTRCK RGB MONITOR INPUT... ENTER AUTO FOCUS RESET MENU FREEZE PIC MUTING D ZOOM AUDIO MUTING VOLUME 2 4,5,6 3 VPL-CX100/CX120/CX150 1 Plug the AC power cord into a wall outlet. 2 Press the ?/1 key...
.... The factory setting is shown as follows: Convenient Functions ON/STANDBY 2 indicator 3 4,5,6 LAMP/ COVER ON/ STANDBY INPUT KEYSTONE MENU PUSH ENTER PIC MUTING COMMAND OFF ON INPUT A INPUT... VIDEO S VIDEO MENU APA ENTER 2 3 4,5,6 RESET FOCUS ZOOM SHIFT ASPECT KEY STONE VPL-CX125/CX155/CW125 MPUITICNG PEUNSTHER MENU KEYSTONE INPUT SOTNA/NDBY LACMOPV/ER NEINTPWUOTRCK RGB MONITOR INPUT... ENTER AUTO FOCUS RESET MENU FREEZE PIC MUTING D ZOOM AUDIO MUTING VOLUME 2 4,5,6 3 VPL-CX100/CX120/CX150 1 Plug the AC power cord into a wall outlet. 2 Press the ?/1 key...
Operating Instructions
Page 34
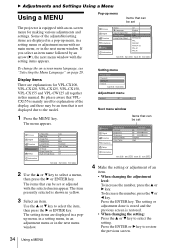
...that can be set Picture Signal Function Status: Language: Input-A Signal Sel.: Color System: Lamp Timer Reset Installation Setup Information Sel: Set: On English Auto Auto NTSC3.58 PAL SECAM...number, press the v or B key. B Adjustments and Settings Using a Menu Using a MENU The projector is equipped with an on page 29. Press the ENTER or B key to select the item, then... with the selected menu appear. The setting items are explanations for VPL-CX100, VPL-CX120, VPL-CX125, VPL-CX150, VPL-CX155 and VPL-CW125 all together in the next menu window. The menu appears....
...that can be set Picture Signal Function Status: Language: Input-A Signal Sel.: Color System: Lamp Timer Reset Installation Setup Information Sel: Set: On English Auto Auto NTSC3.58 PAL SECAM...number, press the v or B key. B Adjustments and Settings Using a Menu Using a MENU The projector is equipped with an on page 29. Press the ENTER or B key to select the item, then... with the selected menu appear. The setting items are explanations for VPL-CX100, VPL-CX120, VPL-CX125, VPL-CX150, VPL-CX155 and VPL-CW125 all together in the next menu window. The menu appears....
Operating Instructions
Page 35
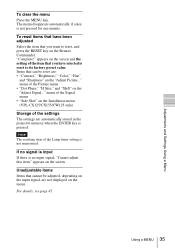
...input signal, are not displayed on the menu. appears on the Installation menu (VPL-CX125/CX155/CW125 only) Storage of the item that cannot be reset are automatically stored in the projector memory when the ENTER key is not memorized. menu of the Signal menu &#...8226; "Side Shot" on the screen and the setting of the settings The settings are : • "Contrast," "Brightness," "Color," "Hue" and "Sharpness" on the Remote Commander. appears on the "Adjust Signal..." menu of the Lamp...
...input signal, are not displayed on the menu. appears on the Installation menu (VPL-CX125/CX155/CW125 only) Storage of the item that cannot be reset are automatically stored in the projector memory when the ENTER key is not memorized. menu of the Signal menu &#...8226; "Side Shot" on the screen and the setting of the settings The settings are : • "Contrast," "Brightness," "Color," "Hue" and "Sharpness" on the Remote Commander. appears on the "Adjust Signal..." menu of the Lamp...
Operating Instructions
Page 40
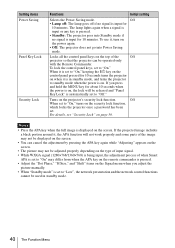
The lamp lights again when a signal is input or any key is pressed. • Standby: The projector goes into Power Saving mode. Locks all the control ... for 10 minutes. If the projected image includes a black portion around it , turn on the projector's security lock function. Setting items Power Saving Panel Key Lock Security Lock Functions Initial setting Selects the...set to "On." Off When set to "On," turns on the security lock function, which locks the projector once a password has been set to "Low", the network presentation and the network control functions cannot be ...
The lamp lights again when a signal is input or any key is pressed. • Standby: The projector goes into Power Saving mode. Locks all the control ... for 10 minutes. If the projected image includes a black portion around it , turn on the projector's security lock function. Setting items Power Saving Panel Key Lock Security Lock Functions Initial setting Selects the...set to "On." Off When set to "On," turns on the security lock function, which locks the projector once a password has been set to "Low", the network presentation and the network control functions cannot be ...

Operating Instructions
Page 41
...picture more widely using the v/V/b/B keys. Selects the background color of the projector. Front & Rear The Installation Menu 41 Picture Signal Function Installation Setup V Keystone: Side Shot: Image Flip: Background: Lamp Mode: IR Receiver: ID Mode: Direct Power On: High Altitude Mode: ...All Off Off Set: Exit: Adjustments and Settings Using a Menu Setting items V Keystone Side Shot (VPL-CX125/ CX155/CW125 only) Image Flip Background Lamp Mode IR Receiver Functions Initial setting Corrects the trapezoidal distortion caused by the projection angle. Standard Selects the...
...picture more widely using the v/V/b/B keys. Selects the background color of the projector. Front & Rear The Installation Menu 41 Picture Signal Function Installation Setup V Keystone: Side Shot: Image Flip: Background: Lamp Mode: IR Receiver: ID Mode: Direct Power On: High Altitude Mode: ...All Off Off Set: Exit: Adjustments and Settings Using a Menu Setting items V Keystone Side Shot (VPL-CX125/ CX155/CW125 only) Image Flip Background Lamp Mode IR Receiver Functions Initial setting Corrects the trapezoidal distortion caused by the projection angle. Standard Selects the...

Operating Instructions
Page 42
...a circuit breaker to turn the power on/off the entire system. High Altitude Set to "On" when the projector is used at an altitude under 1,500 m, the reliability of the lamp may not correct the trapezoidal distortion perfectly, depending on the room temperature or the screen angle. • If you... the Remote Commander with the ID MODE key set to "1." Setting items Functions Initial setting ID Mode (VPL-CX125/ CX155/CW125 only) Assigns an ID number (1 to 3) to the projector when you All want restore the "Auto" setting, first switch the V Keystone setting to "Manual", then return it is ...
...a circuit breaker to turn the power on/off the entire system. High Altitude Set to "On" when the projector is used at an altitude under 1,500 m, the reliability of the lamp may not correct the trapezoidal distortion perfectly, depending on the room temperature or the screen angle. • If you... the Remote Commander with the ID MODE key set to "1." Setting items Functions Initial setting ID Mode (VPL-CX125/ CX155/CW125 only) Assigns an ID number (1 to 3) to the projector when you All want restore the "Auto" setting, first switch the V Keystone setting to "Manual", then return it is ...
Operating Instructions
Page 43
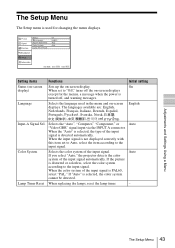
...set to Auto, select the item according to the input signal. When the "Auto" is detected automatically. If you select "Auto," the projector detects the color system of the input signal is selected, the type of the input signal automatically. The Setup Menu The Setup menu is distorted... when the power is selected, the color system cannot be detected. When the color system of the input signal. Auto Lamp Timer Reset When replacing the lamps, reset the lamp timer. - Auto Color System Selects the color system of the input signal is not displayed correctly with this item set ...
...set to Auto, select the item according to the input signal. When the "Auto" is detected automatically. If you select "Auto," the projector detects the color system of the input signal is selected, the type of the input signal automatically. The Setup Menu The Setup menu is distorted... when the power is selected, the color system cannot be detected. When the color system of the input signal. Auto Lamp Timer Reset When replacing the lamps, reset the lamp timer. - Auto Color System Selects the color system of the input signal is not displayed correctly with this item set ...

Operating Instructions
Page 44
Indicates how long the lamp has been turned on the projector. • You cannot change the displays listed above. 44 The Information Menu The displayed value is approximate. Notes • Horizontal frequency and Vertical frequency may... not be displayed depending on the input signal used on . The displayed value is approximate. Displays the vertical frequency of the lamp. The ...
Indicates how long the lamp has been turned on the projector. • You cannot change the displays listed above. 44 The Information Menu The displayed value is approximate. Notes • Horizontal frequency and Vertical frequency may... not be displayed depending on the input signal used on . The displayed value is approximate. Displays the vertical frequency of the lamp. The ...
Operating Instructions
Page 46
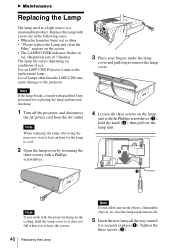
Note If the lamp breaks, consult with qualified Sony personnel for the lamp to cool. 2 Open the lamp cover by loosening the three screws with the projector hung on the ceiling, hold the knob (b), then pull out the lamp unit. Note If you release the screws. 46 Replacing the Lamp Note Do not allow any metal objects, flammable...
Note If the lamp breaks, consult with qualified Sony personnel for the lamp to cool. 2 Open the lamp cover by loosening the three screws with the projector hung on the ceiling, hold the knob (b), then pull out the lamp unit. Note If you release the screws. 46 Replacing the Lamp Note Do not allow any metal objects, flammable...


