Operating Instructions
Page 5
... Checking the model name of the projector 7 Location of Controls Front/Side 8 Rear/Bottom 9 Remote Control 10 Connections and Preparations Unpacking 11 Step 1: Installing the Projector .........12 Before Setting Up the Projector 12 Positioning the Projector and a screen 14 Step 2: Connecting the Projector .....17 Connecting to a VCR 17... Viewing Mode 31 Adjusting the Picture Quality .......... 32 Adjusting the Picture Using Real Color Processing (VPL-AW15 only 33 Using Other Functions 35 Using the Menus Operation through the Menus .......... 36 Picture Menu 40 Advanced Picture Menu...
... Checking the model name of the projector 7 Location of Controls Front/Side 8 Rear/Bottom 9 Remote Control 10 Connections and Preparations Unpacking 11 Step 1: Installing the Projector .........12 Before Setting Up the Projector 12 Positioning the Projector and a screen 14 Step 2: Connecting the Projector .....17 Connecting to a VCR 17... Viewing Mode 31 Adjusting the Picture Quality .......... 32 Adjusting the Picture Using Real Color Processing (VPL-AW15 only 33 Using Other Functions 35 Using the Menus Operation through the Menus .......... 36 Picture Menu 40 Advanced Picture Menu...
Operating Instructions
Page 8
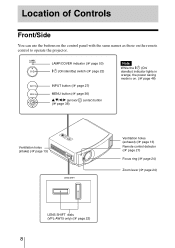
... 46) Ventilation holes (intake) (1 page 13) Ventilation holes (exhaust) (1 page 13) Remote control detector (1 page 21) Focus ring (1 page 24) Zoom lever (1 page 24) LENS SHIFT dials (VPL-AW15 only) (1 page 22) 8 LAMP/COVER indicator (1 page 53) ?/1 (On/standby) switch... (1 page 22) INPUT button (1 page 27) MENU button (1 page 36) v/V/b/B (arrow)/ (enter) button (1 page 36) Note While the ?/1 (On/ standby) indicator lights in orange, the power saving mode is on the remote control to operate the projector...
... 46) Ventilation holes (intake) (1 page 13) Ventilation holes (exhaust) (1 page 13) Remote control detector (1 page 21) Focus ring (1 page 24) Zoom lever (1 page 24) LENS SHIFT dials (VPL-AW15 only) (1 page 22) 8 LAMP/COVER indicator (1 page 53) ?/1 (On/standby) switch... (1 page 22) INPUT button (1 page 27) MENU button (1 page 36) v/V/b/B (arrow)/ (enter) button (1 page 36) Note While the ?/1 (On/ standby) indicator lights in orange, the power saving mode is on the remote control to operate the projector...
Operating Instructions
Page 9
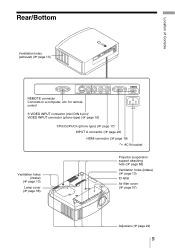
AC IN socket Ventilation holes (intake) (1 page 13) Lamp cover (1 page 56) Projector suspension support attaching hole (1 page 66) Ventilation holes (intake) (1 page 13) ID label Air filter cover (1 page 57) Adjusters (1 page 24) 9 Location of Controls Rear/Bottom Ventilation holes (exhaust) (1 page 13) REMOTE connector Connects to a computer, etc. for remote control S VIDEO INPUT connector (mini DIN 4-pin)/ VIDEO INPUT connector (phono type) (1 page 19) Y/PB/CB/PR/CR (phono type) (1 page 17) INPUT A connector (1 page 20) HDMI connector (1 page 18) -
AC IN socket Ventilation holes (intake) (1 page 13) Lamp cover (1 page 56) Projector suspension support attaching hole (1 page 66) Ventilation holes (intake) (1 page 13) ID label Air filter cover (1 page 57) Adjusters (1 page 24) 9 Location of Controls Rear/Bottom Ventilation holes (exhaust) (1 page 13) REMOTE connector Connects to a computer, etc. for remote control S VIDEO INPUT connector (mini DIN 4-pin)/ VIDEO INPUT connector (phono type) (1 page 19) Y/PB/CB/PR/CR (phono type) (1 page 17) INPUT A connector (1 page 20) HDMI connector (1 page 18) -
Operating Instructions
Page 10
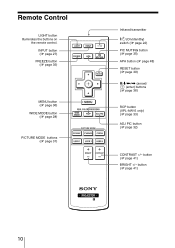
INPUT button (1 page 27) FREEZE button (1 page 35) MENU button (1 page 36) WIDE MODE button (1 page 28) PICTURE MODE buttons (1 page 31) Infrared transmitter ?/1 (On/standby) switch (1 page 22) PIC MUTING button (1 page 35) APA button (1 page 48) RESET button (1 page 39) M/m/ Remote Control LIGHT button Illuminates the buttons on the remote control.
INPUT button (1 page 27) FREEZE button (1 page 35) MENU button (1 page 36) WIDE MODE button (1 page 28) PICTURE MODE buttons (1 page 31) Infrared transmitter ?/1 (On/standby) switch (1 page 22) PIC MUTING button (1 page 35) APA button (1 page 48) RESET button (1 page 39) M/m/ Remote Control LIGHT button Illuminates the buttons on the remote control.

Operating Instructions
Page 11
...may generate heat. 11 Remove this lens cap when you use the projector. • Operating Instructions (this manual) • AC power cord (1) • Air filter (for replacement) (1) Inserting the batteries into the remote control Push and slide to make sure it contains the following items: ...• Remote control (1) and Size AA (R6) batteries (2) • Lens cap (1) When you want to project the picture, etc. Connections and Preparations Connections and Preparations This section describes how to install the projector and screen, how to connect the...
...may generate heat. 11 Remove this lens cap when you use the projector. • Operating Instructions (this manual) • AC power cord (1) • Air filter (for replacement) (1) Inserting the batteries into the remote control Push and slide to make sure it contains the following items: ...• Remote control (1) and Size AA (R6) batteries (2) • Lens cap (1) When you want to project the picture, etc. Connections and Preparations Connections and Preparations This section describes how to install the projector and screen, how to connect the...
Operating Instructions
Page 21
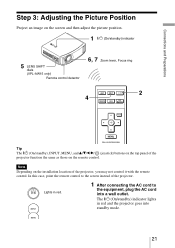
...) indicator lights in red. 1 After connecting the AC cord to the screen instead of the projector, you may not control it with the remote control. In this case, point the remote control to the equipment, plug the AC cord into standby mode. 21 Connections and Preparations Step... picture position. 1 ?/1 (On/standby) indicator 5 LENS SHIFT dials (VPL-AW15 only) Remote control detector 6, 7 Zoom lever, Focus ring 2 4 Tip The ?/1 (On/standby), INPUT, MENU, and v/V/b/B/ (joystick) buttons on the top panel of the projector function the same as those on the installation location of the...
...) indicator lights in red. 1 After connecting the AC cord to the screen instead of the projector, you may not control it with the remote control. In this case, point the remote control to the equipment, plug the AC cord into standby mode. 21 Connections and Preparations Step... picture position. 1 ?/1 (On/standby) indicator 5 LENS SHIFT dials (VPL-AW15 only) Remote control detector 6, 7 Zoom lever, Focus ring 2 4 Tip The ?/1 (On/standby), INPUT, MENU, and v/V/b/B/ (joystick) buttons on the top panel of the projector function the same as those on the installation location of the...
Operating Instructions
Page 31
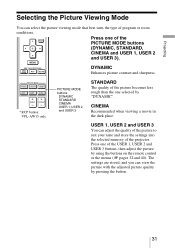
...picture becomes less rough than the one selected by using the buttons on the remote control or the menus (1 pages 32 and 40). CINEMA Recommended when viewing a movie in the dark place. Press one of the projector. The settings are stored, and you can adjust the quality of the picture... to suit your taste and store the settings into the selected memory of the PICTURE MODE buttons (DYNAMIC, STANDARD, CINEMA and USER 1, USER 2 and USER 3). * RCP button: VPL-AW15 only PICTURE MODE buttons ...
...picture becomes less rough than the one selected by using the buttons on the remote control or the menus (1 pages 32 and 40). CINEMA Recommended when viewing a movie in the dark place. Press one of the projector. The settings are stored, and you can adjust the quality of the picture... to suit your taste and store the settings into the selected memory of the PICTURE MODE buttons (DYNAMIC, STANDARD, CINEMA and USER 1, USER 2 and USER 3). * RCP button: VPL-AW15 only PICTURE MODE buttons ...

Operating Instructions
Page 32
... the button, the following adjustment windows* are displayed in each adjustment, see "Input Signals and Adjustable/Setting Items." (1 page 64) ADJ PIC button * RCP button: VPL-AW15 only Example: To adjust the contrast For details on an item. To decrease the value, press The adjusted data can adjust the picture quality that...
... the button, the following adjustment windows* are displayed in each adjustment, see "Input Signals and Adjustable/Setting Items." (1 page 64) ADJ PIC button * RCP button: VPL-AW15 only Example: To adjust the contrast For details on an item. To decrease the value, press The adjusted data can adjust the picture quality that...

Operating Instructions
Page 33
... of the video source when you are adjusting the picture using Real Color Processing. 2, 3, 4, 5 1 1 Press RCP on the remote control. 2 Press M/m to your taste. Projecting Adjusting the Picture Using Real Color Processing (VPL-AW15 only) The Real Color Processing (RCP) feature allows you to specify the target color. You can thus obtain a picture...
... of the video source when you are adjusting the picture using Real Color Processing. 2, 3, 4, 5 1 1 Press RCP on the remote control. 2 Press M/m to your taste. Projecting Adjusting the Picture Using Real Color Processing (VPL-AW15 only) The Real Color Processing (RCP) feature allows you to specify the target color. You can thus obtain a picture...

Operating Instructions
Page 39
To decrease the value, press m/ When changing the adjustment level To increase the value, press M/,. Using the Menus 4 Make the setting or adjustment of an item.
To decrease the value, press m/ When changing the adjustment level To increase the value, press M/,. Using the Menus 4 Make the setting or adjustment of an item.

Operating Instructions
Page 40
... a dark environment. Standard: Select this to reduce roughness compared to viewing the picture with the adjusted picture quality by pressing the PICTURE MODE on the remote control. To reset everything to the factory settings, select "Reset" in the menus. in "Dynamic", "Standard" or "Cinema", and store the settings. Tip You can...
... a dark environment. Standard: Select this to reduce roughness compared to viewing the picture with the adjusted picture quality by pressing the PICTURE MODE on the remote control. To reset everything to the factory settings, select "Reset" in the menus. in "Dynamic", "Standard" or "Cinema", and store the settings. Tip You can...
Operating Instructions
Page 41
...brightness of the fan increases, and the fan noise becomes slightly louder. The lower the setting, the darker the picture. on the remote control. Adjusts the intensity of the scene becomes reduced. Adjusts the color tone. Custom1, Custom2, Custom3: Enables you switch from "Low...according to a projected scene. Low: Enhances the black by pressing the BRIGHT+/- on the remote control. The lower the setting, the more greenish the picture becomes. Adjusts the color temperature. VPL-AW15 Auto 1: .Automatically switches to an optimum iris according to a projected scene. Auto 2: An...
...brightness of the fan increases, and the fan noise becomes slightly louder. The lower the setting, the darker the picture. on the remote control. Adjusts the intensity of the scene becomes reduced. Adjusts the color tone. Custom1, Custom2, Custom3: Enables you switch from "Low...according to a projected scene. Low: Enhances the black by pressing the BRIGHT+/- on the remote control. The lower the setting, the more greenish the picture becomes. Adjusts the color temperature. VPL-AW15 Auto 1: .Automatically switches to an optimum iris according to a projected scene. Auto 2: An...

Operating Instructions
Page 48
.... When set to On, the APA function works automatically for changing the settings of the various functions of the projector. Function Menu The Function menu is pressed. Detects the input signal and displays the detected input signal automatically when... the input signal from a computer so that the picture can also activate the APA function by pressing the INPUT, the projector detects the presence of an input signal in the order of Component, HDMI, Video, S-video, or Input-A signal and...Auto Input Search Background With this to "On", by pressing the APA on the remote control.
.... When set to On, the APA function works automatically for changing the settings of the various functions of the projector. Function Menu The Function menu is pressed. Detects the input signal and displays the detected input signal automatically when... the input signal from a computer so that the picture can also activate the APA function by pressing the INPUT, the projector detects the presence of an input signal in the order of Component, HDMI, Video, S-video, or Input-A signal and...Auto Input Search Background With this to "On", by pressing the APA on the remote control.
Operating Instructions
Page 52
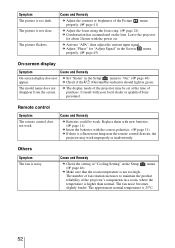
... c Check if the ?/1 (On/standby) indicator should light in a room, where the temperature is a fluorescent lamp near the remote control detector, the projector may be weak. Consult with the power on the lens. The approximate normal temperature is too dark. Cause and Remedy c Check ... Adjust "Phase" for about 2 hours with your local dealer or qualified Sony personnel. The picture is noisy. Others Symptom The fan is not clear. The fan noise becomes slightly louder. c The display mode of the projector may work . The number of fan rotation increases to "On." (1...
... c Check if the ?/1 (On/standby) indicator should light in a room, where the temperature is a fluorescent lamp near the remote control detector, the projector may be weak. Consult with the power on the lens. The approximate normal temperature is too dark. Cause and Remedy c Check ... Adjust "Phase" for about 2 hours with your local dealer or qualified Sony personnel. The picture is noisy. Others Symptom The fan is not clear. The fan noise becomes slightly louder. c The display mode of the projector may work . The number of fan rotation increases to "On." (1...
Operating Instructions
Page 54
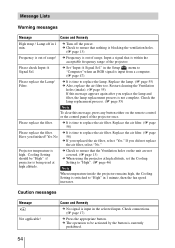
... To clear this message appears again after you replaced the air filter, select "Yes." Projector temperature is currently prohibited. 54 Check connections. (1 page 17) c Press the appropriate button. c The operation to ensure that the Ventilation holes on the remote control or the control panel of range. in 1 minute, then the fan speed...
... To clear this message appears again after you replaced the air filter, select "Yes." Projector temperature is currently prohibited. 54 Check connections. (1 page 17) c Press the appropriate button. c The operation to ensure that the Ventilation holes on the remote control or the control panel of range. in 1 minute, then the fan speed...
Operating Instructions
Page 57
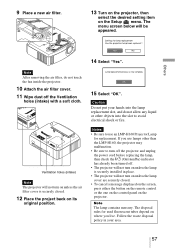
... The projector will be appeared. The menu screen below will not turn on unless the lamp is securely installed in your hands into the slot to turn on unless the air filter cover is securely closed . • To cancel a message displayed on the screen, press either the button on the remote control... or the one on the control panel on the Setup menu. 9 Place a new air filter. 13 Turn on the projector, then select the desired setting item on the...
... The projector will be appeared. The menu screen below will not turn on unless the lamp is securely installed in your hands into the slot to turn on unless the air filter cover is securely closed . • To cancel a message displayed on the screen, press either the button on the remote control... or the one on the control panel on the Setup menu. 9 Place a new air filter. 13 Turn on the projector, then select the desired setting item on the...
Operating Instructions
Page 59
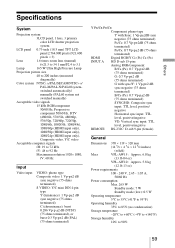
Others Specifications System Projection system 3LCD panel, 1 lens, 3 primary color LCD shutter projection system LCD panel 0.73-inch (18.5 mm) TFT LCD panel 2,764,800 pixels (921,600 pixels × 3) Lens 1.6 times zoom lens (manual) f=21.3 to 34.1 mm... SYNC/HD: Composite sync input: TTL level, positive/ negative Horizontal sync input: TTL level, positive/negative VD: Vertical sync input: TTL level, positive/negative REMOTE RS-232C: D-sub 9-pin (female) General Dimensions 370 × 119 × 320 mm (14 5/8 × 4 3/4 × 12 5/8 inches) (w/h/d) Mass VPL-AW15 : ...
Others Specifications System Projection system 3LCD panel, 1 lens, 3 primary color LCD shutter projection system LCD panel 0.73-inch (18.5 mm) TFT LCD panel 2,764,800 pixels (921,600 pixels × 3) Lens 1.6 times zoom lens (manual) f=21.3 to 34.1 mm... SYNC/HD: Composite sync input: TTL level, positive/ negative Horizontal sync input: TTL level, positive/negative VD: Vertical sync input: TTL level, positive/negative REMOTE RS-232C: D-sub 9-pin (female) General Dimensions 370 × 119 × 320 mm (14 5/8 × 4 3/4 × 12 5/8 inches) (w/h/d) Mass VPL-AW15 : ...
Operating Instructions
Page 60
Optional accessories Projector Lamp LMP-H160 (for replacement) (1) Lens Cap (1) Operating Instructions (1) Design and specifications are subject to change without notice. Supplied accessories Remote control RM-PJAW15 (1) (VPL-AW15 only) RM-PJAW10 (1) (VPL-AW10 only) Size AA (R6) batteries (2) AC power cord (1) Air filter (for replacement) Projector Suspension Support PSS-H10, PSS-610 60
Optional accessories Projector Lamp LMP-H160 (for replacement) (1) Lens Cap (1) Operating Instructions (1) Design and specifications are subject to change without notice. Supplied accessories Remote control RM-PJAW15 (1) (VPL-AW15 only) RM-PJAW10 (1) (VPL-AW10 only) Size AA (R6) batteries (2) AC power cord (1) Air filter (for replacement) Projector Suspension Support PSS-H10, PSS-610 60

Operating Instructions
Page 73
... CINEMA 31 Cinema 40 DYNAMIC 31 Dynamic 40 STANDARD 31 Standard 40 USER 31 User 40 Precautions 7 Preset Memory 50 Preset Signals 61 R RCP 43 Remote control inserting the batteries 11 location of controls 10 Reset resettable items 39 resetting the items 39 73
... CINEMA 31 Cinema 40 DYNAMIC 31 Dynamic 40 STANDARD 31 Standard 40 USER 31 User 40 Precautions 7 Preset Memory 50 Preset Signals 61 R RCP 43 Remote control inserting the batteries 11 location of controls 10 Reset resettable items 39 resetting the items 39 73


