Care and Handling of Your VAIO® Computer
Page 5
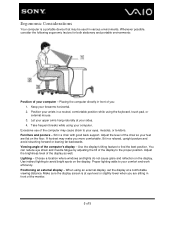
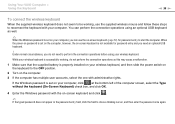
... may be used in a neutral, comfortable position while using your comfort and work efficiency. Use the display's tilting feature to your computer. Choose a location where windows and lights do not cause glare and reflection on the floor. Positioning an external display - Let your eyes, muscles, or tendons. Ergonomic Considerations Your computer...
... may be used in a neutral, comfortable position while using your comfort and work efficiency. Use the display's tilting feature to your computer. Choose a location where windows and lights do not cause glare and reflection on the floor. Positioning an external display - Let your eyes, muscles, or tendons. Ergonomic Considerations Your computer...
User Manual
Page 7
...support.microsoft.com/. Before Use > Finding More about Your VAIO Computer n7 N 3. Support Web Sites ❑ Sony online support web site The Sony online support web site provides instant access to information on commonly encountered problems. Type a description of the problem ...sony.ca/support (French) ❑ For customers in Spanish-speaking Latin American countries or areas http://esupport.sony.com/ES/VAIO/LA ❑ For customers in Brazil http://esupport.sony.com/PT/VAIO/BR/ ❑ Operating system online support web site Your computer comes preinstalled with a Microsoft Windows...
...support.microsoft.com/. Before Use > Finding More about Your VAIO Computer n7 N 3. Support Web Sites ❑ Sony online support web site The Sony online support web site provides instant access to information on commonly encountered problems. Type a description of the problem ...sony.ca/support (French) ❑ For customers in Spanish-speaking Latin American countries or areas http://esupport.sony.com/ES/VAIO/LA ❑ For customers in Brazil http://esupport.sony.com/PT/VAIO/BR/ ❑ Operating system online support web site Your computer comes preinstalled with a Microsoft Windows...
User Manual
Page 10
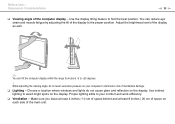
...; You can reduce eye strain and muscle fatigue by adjusting the tilt of the display to avoid bright spots on the display. Choose a location where windows and lights do not exert excessive pressure on each side of the computer display - Adjust the brightness level of mechanical damage. ❑ Lighting - You can...
...; You can reduce eye strain and muscle fatigue by adjusting the tilt of the display to avoid bright spots on the display. Choose a location where windows and lights do not exert excessive pressure on each side of the computer display - Adjust the brightness level of mechanical damage. ❑ Lighting - You can...
User Manual
Page 13
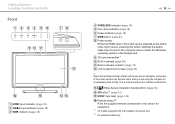
... is normal and does not indicate a malfunction. Due to this button switches the audio/ video input source to the computer input or starts the Windows operating system in camera indicator (page 18) L LCD screen/touch screen (page 46) ! I 3D sync transmitter*1 J Built-in camera (page... 55) K Built-in the background. M (Edge Access Operation Guide button) (page 50) N 3D button*1 (page 51) O SONY logo lamp (page 129) P Remote sensor*2 Point the supplied remote commander to the mechanical design of the touch screen of your computer, some areas of...
... is normal and does not indicate a malfunction. Due to this button switches the audio/ video input source to the computer input or starts the Windows operating system in camera indicator (page 18) L LCD screen/touch screen (page 46) ! I 3D sync transmitter*1 J Built-in camera (page... 55) K Built-in the background. M (Edge Access Operation Guide button) (page 50) N 3D button*1 (page 51) O SONY logo lamp (page 129) P Remote sensor*2 Point the supplied remote commander to the mechanical design of the touch screen of your computer, some areas of...
User Manual
Page 30
.... The VAIO Update automatically notifies you of new updates available on the Internet, and downloads and installs them on the computer. ❑ Windows Update Click Start, All Programs, and Windows Update and then follow the on-screen instructions. ❑ VAIO Update 5 Click Start, All Programs, and VAIO Update and then follow the...
.... The VAIO Update automatically notifies you of new updates available on the Internet, and downloads and installs them on the computer. ❑ Windows Update Click Start, All Programs, and Windows Update and then follow the on-screen instructions. ❑ VAIO Update 5 Click Start, All Programs, and VAIO Update and then follow the...
User Manual
Page 32
To launch the VAIO Care ❑ On models with the VAIO Care for example, when the Windows does not start. Getting Started > Keeping Your Computer in case of emergency, for more information. On models with the ASSIST button, pressing the ASSIST button ...
To launch the VAIO Care ❑ On models with the VAIO Care for example, when the Windows does not start. Getting Started > Keeping Your Computer in case of emergency, for more information. On models with the ASSIST button, pressing the ASSIST button ...
User Manual
Page 37
... the Keyboard n 37 N F Zoom buttons* Change the size of power. (Caps lock): Turns on some software. See the help file included with the Fn key. J Windows key* Displays the Start menu.
... the Keyboard n 37 N F Zoom buttons* Change the size of power. (Caps lock): Turns on some software. See the help file included with the Fn key. J Windows key* Displays the Start menu.
User Manual
Page 39
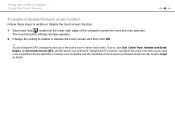
...at the bottom left of the computer screen, select the Type without the keyboard (On-Screen Keyboard) check box, and click OK. 4 Enter the Windows password with the on the computer. 3 If the computer has multiple user accounts, select the one with your wireless keyboard. Using Your VAIO Computer > ...wireless keyboard When the supplied wireless keyboard does not seem to be working , do not perform the connection operations as well. ✍ When the Windows password is set on your wireless keyboard, and then slide the power switch on the keyboard to the OFF position. 2 Turn on -screen ...
...at the bottom left of the computer screen, select the Type without the keyboard (On-Screen Keyboard) check box, and click OK. 4 Enter the Windows password with the on the computer. 3 If the computer has multiple user accounts, select the one with your wireless keyboard. Using Your VAIO Computer > ...wireless keyboard When the supplied wireless keyboard does not seem to be working , do not perform the connection operations as well. ✍ When the Windows password is set on your wireless keyboard, and then slide the power switch on the keyboard to the OFF position. 2 Turn on -screen ...
User Manual
Page 40
If the User Account Control window appears, click Yes. 7 Wait until the utility window for re-connection appears, and then slide the power switch on the wireless keyboard to the ON position. ✍ It may take a while before the utility window appears. 8 Wait until the Windows starts, and then click Start and Computer. 6 Double-click Local Disk (C:), WConnectTool, and WConnect. Using Your VAIO Computer > Using the Keyboard n 40 N 5 Wait until the utility window notifies that the wireless keyboard should now be working, and then close the utility window.
If the User Account Control window appears, click Yes. 7 Wait until the utility window for re-connection appears, and then slide the power switch on the wireless keyboard to the ON position. ✍ It may take a while before the utility window appears. 8 Wait until the Windows starts, and then click Start and Computer. 6 Double-click Local Disk (C:), WConnectTool, and WConnect. Using Your VAIO Computer > Using the Keyboard n 40 N 5 Wait until the utility window notifies that the wireless keyboard should now be working, and then close the utility window.
User Manual
Page 44
... that the supplied battery is successfully working, do not need to perform the connection operations before the utility window appears. 7 Wait until the Windows starts, and then press the Windows key on the computer. 3 If the computer has multiple user accounts, press the < or , key to select the one with your ... the Mouse n 44 N To connect the wireless mouse When the supplied wireless mouse does not seem to be working, and then close the utility window. You can perform the connection operations using an optional USB mouse as this may take a while before using your computer.
... that the supplied battery is successfully working, do not need to perform the connection operations before the utility window appears. 7 Wait until the Windows starts, and then press the Windows key on the computer. 3 If the computer has multiple user accounts, press the < or , key to select the one with your ... the Mouse n 44 N To connect the wireless mouse When the supplied wireless mouse does not seem to be working, and then close the utility window. You can perform the connection operations using an optional USB mouse as this may take a while before using your computer.

User Manual
Page 45
Using Your VAIO Computer > Using the Mouse Adjusting the Mouse Functions 1 Click Start and Control Panel. 2 Click Mouse under Hardware and Sound. n 45 N The Mouse Properties window appears. 3 Change the settings.
Using Your VAIO Computer > Using the Mouse Adjusting the Mouse Functions 1 Click Start and Control Panel. 2 Click Mouse under Hardware and Sound. n 45 N The Mouse Properties window appears. 3 Change the settings.
User Manual
Page 48
... site. Changing the DPI, however, may be set to enlarge the view size of the computer screen for easier touch works. The touch function settings window appears. 2 Change the setting to enable or disable the touch screen and then click OK. ✍ You can change the DPI to Larger by default...
... site. Changing the DPI, however, may be set to enlarge the view size of the computer screen for easier touch works. The touch function settings window appears. 2 Change the setting to enable or disable the touch screen and then click OK. ✍ You can change the DPI to Larger by default...

User Manual
Page 50
... at the time of the computer screen for example the Quick Web Access function or the HDMI/VIDEO input function. The button is running the Windows operating system, for more than two seconds. Using Your VAIO Computer > Using the Edge Access n 50 N Using the Edge Access The Edge ...disable the Edge Access and then click OK. ! The Edge Access is available only when the Windows operating system is located at the lower right edge of the computer screen. ! The touch function settings window appears. 2 Change the setting to press (Edge Access Operation Guide button) and enable the Edge...
... at the time of the computer screen for example the Quick Web Access function or the HDMI/VIDEO input function. The button is running the Windows operating system, for more than two seconds. Using Your VAIO Computer > Using the Edge Access n 50 N Using the Edge Access The Edge ...disable the Edge Access and then click OK. ! The Edge Access is available only when the Windows operating system is located at the lower right edge of the computer screen. ! The touch function settings window appears. 2 Change the setting to press (Edge Access Operation Guide button) and enable the Edge...

User Manual
Page 51
... computer. While the computer is selected as the audio/video input source. See Using the Quick Web Access Function (page 53) for example, when the Windows does not start. While the HDMI input or the video input is off . The VAIO Care Rescue can be available on your computer. To turn...
... computer. While the computer is selected as the audio/video input source. See Using the Quick Web Access Function (page 53) for example, when the Windows does not start. While the HDMI input or the video input is off . The VAIO Care Rescue can be available on your computer. To turn...

User Manual
Page 53
...the screen. Once you first need to exit the Quick Web Access function. For detailed information on how to access the Internet without launching the Windows operating system. Activating the Quick Web Access Function To activate the Quick Web Access function, your computer must be off. To launch the... Windows operating system, you have completed the initial setup, the web browser used with the Quick Web Access function launches just by pressing the WEB ...
...the screen. Once you first need to exit the Quick Web Access function. For detailed information on how to access the Internet without launching the Windows operating system. Activating the Quick Web Access Function To activate the Quick Web Access function, your computer must be off. To launch the... Windows operating system, you have completed the initial setup, the web browser used with the Quick Web Access function launches just by pressing the WEB ...

User Manual
Page 54
... USB ports, and the headphones jack. ❑ the "Memory Stick Duo" slot and the SD memory card slot. ❑ the scheduled recording function with the Windows Media Center. Exit the Quick Web Access function and launch the Windows operating system before the scheduled start time. ❑ some touch screen functions.
... USB ports, and the headphones jack. ❑ the "Memory Stick Duo" slot and the SD memory card slot. ❑ the scheduled recording function with the Windows Media Center. Exit the Quick Web Access function and launch the Windows operating system before the scheduled start time. ❑ some touch screen functions.

User Manual
Page 55
... Messenger to make a video call . With the communication software, such as Windows Live Messenger, you cannot capture images properly, for example captured images are not displayed smoothly, click the current resolution of the capturing image at the ... illuminates while the built-in camera is equipped with the software. ✍ Use the display tilting feature to adjust the viewing angle of the main window and lower the resolution. To display images from the built-in camera 1 Click Start, All Programs, ArcSoft Webcam Suite, and WebCam Companion 4. 2 Click Capture. ✍...
... Messenger to make a video call . With the communication software, such as Windows Live Messenger, you cannot capture images properly, for example captured images are not displayed smoothly, click the current resolution of the capturing image at the ... illuminates while the built-in camera is equipped with the software. ✍ Use the display tilting feature to adjust the viewing angle of the main window and lower the resolution. To display images from the built-in camera 1 Click Start, All Programs, ArcSoft Webcam Suite, and WebCam Companion 4. 2 Click Capture. ✍...
User Manual
Page 65
The hybrid TV tuner board supports both NTSC and ATSC signals but you must change your TV connection setup to find out about the configuration of your computer. ! The Windows Media Center included in this section may have a TV tuner board installed. See the specifications to switch the receiving signal type. Using Your VAIO Computer > Using the TV Function n 65 N Using the TV Function Your computer may not be available on your computer. Some features and options in your operating system enables TV program viewing, recording and playback.
The hybrid TV tuner board supports both NTSC and ATSC signals but you must change your TV connection setup to find out about the configuration of your computer. ! The Windows Media Center included in this section may have a TV tuner board installed. See the specifications to switch the receiving signal type. Using Your VAIO Computer > Using the TV Function n 65 N Using the TV Function Your computer may not be available on your computer. Some features and options in your operating system enables TV program viewing, recording and playback.
User Manual
Page 72
.... When you can receive high-definition audio and video signals from the connected device and play the audio/video content on the computer and starting Windows. ! You cannot capture audio/video signals coming through the HDMI INPUT port or the VIDEO INPUT jacks and save them into a file on your computer...
.... When you can receive high-definition audio and video signals from the connected device and play the audio/video content on the computer and starting Windows. ! You cannot capture audio/video signals coming through the HDMI INPUT port or the VIDEO INPUT jacks and save them into a file on your computer...

User Manual
Page 73
... external audio/video device to the HDMI INPUT port or the VIDEO INPUT jacks (page 14), you need to turn on your computer and start Windows to switch the audio/video input source.
... external audio/video device to the HDMI INPUT port or the VIDEO INPUT jacks (page 14), you need to turn on your computer and start Windows to switch the audio/video input source.


