
Quick Start Guide
Page 1
...your computer Keep your computer updated by downloading updates from your computer to change without notice. 4-192-023-11 (1) © 2010 Sony Corporation Printed in case of powering on . Recovery Media are subject to factory-installed settings in China Let's get started 1 Check... and maximize its lifespan, we encourage you can prevent or solve troubles on the LCD screen/ touch screen. The illustrations in hard disk drive, avoid moving your computer's efficiency, security, and functionality. For details, refer to download the updates. HDD Care If your ...
...your computer Keep your computer updated by downloading updates from your computer to change without notice. 4-192-023-11 (1) © 2010 Sony Corporation Printed in case of powering on . Recovery Media are subject to factory-installed settings in China Let's get started 1 Check... and maximize its lifespan, we encourage you can prevent or solve troubles on the LCD screen/ touch screen. The illustrations in hard disk drive, avoid moving your computer's efficiency, security, and functionality. For details, refer to download the updates. HDD Care If your ...

User Guide
Page 12
... time, do not connect any other hardware that did not originally come with your VAIO computer. ! Before starting your computer for example, a printer, an external hard disk drive, a scanner, and so on) at a time, following the manufacturer's instructions. ❑ Locating Controls and Ports (page 13) ❑ About the Indicator Lights (page 17...
... time, do not connect any other hardware that did not originally come with your VAIO computer. ! Before starting your computer for example, a printer, an external hard disk drive, a scanner, and so on) at a time, following the manufacturer's instructions. ❑ Locating Controls and Ports (page 13) ❑ About the Indicator Lights (page 17...

User Guide
Page 96
...to designate that came with your computer. compatible devices you use to connect an i.LINK device, such as a CD-RW or hard disk drive, confirm their operating system compatibility and required operating conditions. However, the actual transfer rate depends on the transfer rate of i.LINK-... i.LINK devices ❑ The i.LINK port on your system, such as a digital video camcorder. ✍ i.LINK is a trademark of Sony Corporation used only to an external device. See the manual that a product contains an IEEE 1394 connection. The procedure to establish an i.LINK connection...
...to designate that came with your computer. compatible devices you use to connect an i.LINK device, such as a CD-RW or hard disk drive, confirm their operating system compatibility and required operating conditions. However, the actual transfer rate depends on the transfer rate of i.LINK-... i.LINK devices ❑ The i.LINK port on your system, such as a digital video camcorder. ✍ i.LINK is a trademark of Sony Corporation used only to an external device. See the manual that a product contains an IEEE 1394 connection. The procedure to establish an i.LINK connection...

User Guide
Page 127
... magnets. ❑ Do not place your computer in this section may not be easily damaged if improperly used. To avoid damaging your hard disk drive ❑ Do not subject your computer to mechanical vibration or in a short time. Precautions > Handling the Built-in Storage Device n 127 N... Handling the Built-in Storage Device The built-in storage device (hard disk drive or solid state drive) has a high storage density and reads or writes data in an unstable position. ❑ Do not move your computer while the power...
... magnets. ❑ Do not place your computer in this section may not be easily damaged if improperly used. To avoid damaging your hard disk drive ❑ Do not subject your computer to mechanical vibration or in a short time. Precautions > Handling the Built-in Storage Device n 127 N... Handling the Built-in Storage Device The built-in storage device (hard disk drive or solid state drive) has a high storage density and reads or writes data in an unstable position. ❑ Do not move your computer while the power...
VPCL1 Series Hard Disk Drive Replacement Instructions
Page 1
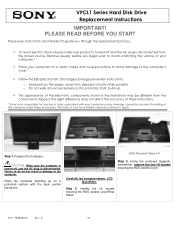
...computer's case.* Follow the ESD (Electrostatic Discharge) damage prevention instructions: o Hold parts by incorrect handling of the computer under these instructions. * Sony is not responsible for any damage caused by the edges, away from exposed circuitry when possible. Place the computer standing up . Carefully lay ...illustrations may be different from the power source. Identify the (4) screws securing the HDD access cover/Rear Stand. A 1/4 VPCL1 Series Hard Disk Drive Replacement Instructions IMPORTANT! The appearance of your computer or any loss of these procedures.
...computer's case.* Follow the ESD (Electrostatic Discharge) damage prevention instructions: o Hold parts by incorrect handling of the computer under these instructions. * Sony is not responsible for any damage caused by the edges, away from exposed circuitry when possible. Place the computer standing up . Carefully lay ...illustrations may be different from the power source. Identify the (4) screws securing the HDD access cover/Rear Stand. A 1/4 VPCL1 Series Hard Disk Drive Replacement Instructions IMPORTANT! The appearance of your computer or any loss of these procedures.
VPCL1 Series Hard Disk Drive Replacement Instructions
Page 2
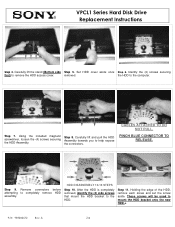
... the included magnetic screwdriver, loosen the (4) screws securing Step 8. Holding the edge of the HDD, remove each screw and set the screw aside. VPCL1 Series Hard Disk Drive Replacement Instructions Step 4. Identify the (4) screws securing first) to mount the HDD bracket onto the new HDD.e. attempting assembly. These screws will be used...
... the included magnetic screwdriver, loosen the (4) screws securing Step 8. Holding the edge of the HDD, remove each screw and set the screw aside. VPCL1 Series Hard Disk Drive Replacement Instructions Step 4. Identify the (4) screws securing first) to mount the HDD bracket onto the new HDD.e. attempting assembly. These screws will be used...
VPCL1 Series Hard Disk Drive Replacement Instructions
Page 3
... Step 15. springs previously removed. Connect the cables previously disconnected. Re-install the (2) screws with the HDD connectors appearing opposite the bracket tabs. VPCL1 Series Hard Disk Drive Replacement Instructions Step 12.
... Step 15. springs previously removed. Connect the cables previously disconnected. Re-install the (2) screws with the HDD connectors appearing opposite the bracket tabs. VPCL1 Series Hard Disk Drive Replacement Instructions Step 12.
VPCL1 Series Hard Disk Drive Replacement Instructions
Page 4
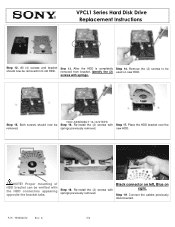
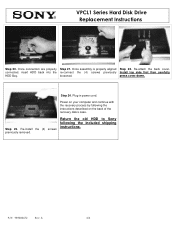
... power cord. Step 23. press cover down. P/N 989200672 Rev. Once connectors are properly Step 21. loosened. Re-install the (4) screws previously removed. VPCL1 Series Hard Disk Drive Replacement Instructions Step 20. Power on your computer and continue with the recovery process by following the included shipping instructions. Return the old HDD to...
... power cord. Step 23. press cover down. P/N 989200672 Rev. Once connectors are properly Step 21. loosened. Re-install the (4) screws previously removed. VPCL1 Series Hard Disk Drive Replacement Instructions Step 20. Power on your computer and continue with the recovery process by following the included shipping instructions. Return the old HDD to...


