User Guide
Page 34
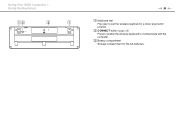
C Battery compartment Storage compartment for the AA batteries. B CONNECT button (page 35) Press to enable the wireless keyboard to put the wireless keyboard in a more 'ergonomic' position. Using Your VAIO Computer > Using the Keyboard n 34 N A Keyboard feet Flip open to communicate with the computer.
C Battery compartment Storage compartment for the AA batteries. B CONNECT button (page 35) Press to enable the wireless keyboard to put the wireless keyboard in a more 'ergonomic' position. Using Your VAIO Computer > Using the Keyboard n 34 N A Keyboard feet Flip open to communicate with the computer.

User Guide
Page 43
...to scroll down for zooming. Pinch open to zoom in quick succession with a finger. Tap on the touch screen and slide it linearly in contact with the screen. This gesture is equivalent to a right-click with a mouse. Put a finger on the touch screen and slide it while keeping the ...finger in quick motion. This gesture is equivalent to a double-click with a mouse. Using Your VAIO Computer > Using the Touch Screen n 43 N Gesture Tap Double-tap Press-and-hold on the touch screen with a finger and tap with another finger to display a context-sensitive shortcut menu (if any )....
...to scroll down for zooming. Pinch open to zoom in quick succession with a finger. Tap on the touch screen and slide it linearly in contact with the screen. This gesture is equivalent to a right-click with a mouse. Put a finger on the touch screen and slide it while keeping the ...finger in quick motion. This gesture is equivalent to a double-click with a mouse. Using Your VAIO Computer > Using the Touch Screen n 43 N Gesture Tap Double-tap Press-and-hold on the touch screen with a finger and tap with another finger to display a context-sensitive shortcut menu (if any )....

User Guide
Page 48
Be sure to hold the back of the drive tray with one hand, place a disc in the middle of the drive tray when placing/removing a disc onto/from the drive tray. 4 Close the drive tray by pushing ... sure to bring the computer back into place. ! Do not exert pressure on the computer. 2 Press the drive eject button (1) or the Fn+E keys to open the drive. Using Your VAIO Computer > Using the Optical Disc Drive n 48 N To insert a disc 1 Turn on the drive tray.
Be sure to hold the back of the drive tray with one hand, place a disc in the middle of the drive tray when placing/removing a disc onto/from the drive tray. 4 Close the drive tray by pushing ... sure to bring the computer back into place. ! Do not exert pressure on the computer. 2 Press the drive eject button (1) or the Fn+E keys to open the drive. Using Your VAIO Computer > Using the Optical Disc Drive n 48 N To insert a disc 1 Turn on the drive tray.
User Guide
Page 68
... the yellow shortcut link in teletext TV program mode. K Start button Press to move the pointer on the screen. M Directional arrow buttons Press the V, v, B, and b buttons to open the main menu on software applications, such as a DVD media. OK button Press to switch between channels.... L More button / OPTIONS button Press to the blue shortcut link in teletext TV program mode. While watching full-screen TV, press to return to the previous window. Using Your VAIO Computer > Using the Remote Commander n 68 N C Back button Press to return to the previous channel. N ...
... the yellow shortcut link in teletext TV program mode. K Start button Press to move the pointer on the screen. M Directional arrow buttons Press the V, v, B, and b buttons to open the main menu on software applications, such as a DVD media. OK button Press to switch between channels.... L More button / OPTIONS button Press to the blue shortcut link in teletext TV program mode. While watching full-screen TV, press to return to the previous window. Using Your VAIO Computer > Using the Remote Commander n 68 N C Back button Press to return to the previous channel. N ...

User Guide
Page 69
... with the HDMI/VIDEO input function (page 61) as the Alt+Tab keys. U APPLICATION CLOSE button Press to switch among open applications. This button works the same as well. Using Your VAIO Computer > Using the Remote Commander n 69 N R Teletext TV program mode selection button Press to activate/deactivate teletext TV program mode...
... with the HDMI/VIDEO input function (page 61) as the Alt+Tab keys. U APPLICATION CLOSE button Press to switch among open applications. This button works the same as well. Using Your VAIO Computer > Using the Remote Commander n 69 N R Teletext TV program mode selection button Press to activate/deactivate teletext TV program mode...

User Guide
Page 73
... select Quick Format in Format options. Do not remove "Memory Stick" from the File system drop-down list as it may change. Using Your VAIO Computer > Using "Memory Stick" n 73 N Formatting "Memory Stick" To format "Memory Stick" "Memory Stick" has been formatted by default and ... format the media and supports "Memory Stick" when formatting the media. Formatting "Memory Stick" erases the entire data stored on the media. Be sure to open the Computer window. 4 Right-click the "Memory Stick" icon and select Format. 5 Click Restore device defaults. ! This could cause a malfunction. 1 ...
... select Quick Format in Format options. Do not remove "Memory Stick" from the File system drop-down list as it may change. Using Your VAIO Computer > Using "Memory Stick" n 73 N Formatting "Memory Stick" To format "Memory Stick" "Memory Stick" has been formatted by default and ... format the media and supports "Memory Stick" when formatting the media. Formatting "Memory Stick" erases the entire data stored on the media. Be sure to open the Computer window. 4 Right-click the "Memory Stick" icon and select Format. 5 Click Restore device defaults. ! This could cause a malfunction. 1 ...

User Guide
Page 85
To access this on-screen guide: 1 Click Start, All Programs, and SmartWi Connection Utility. 2 Click SmartWi Connection Utility Help. Using Your VAIO Computer > Using the Bluetooth Function n 85 N Using the Bluetooth Function You can transfer data between your computer and other Bluetooth devices such as another computer ... set up the Bluetooth function. To use the Bluetooth function To use the Bluetooth function, you first need to 33 feet (10 meters) in an open area. See the SmartWi Connection Utility Help for more information.
To access this on-screen guide: 1 Click Start, All Programs, and SmartWi Connection Utility. 2 Click SmartWi Connection Utility Help. Using Your VAIO Computer > Using the Bluetooth Function n 85 N Using the Bluetooth Function You can transfer data between your computer and other Bluetooth devices such as another computer ... set up the Bluetooth function. To use the Bluetooth function To use the Bluetooth function, you first need to 33 feet (10 meters) in an open area. See the SmartWi Connection Utility Help for more information.

User Guide
Page 103
Customizing Your VAIO Computer > Using the VAIO Control Center n 103 N Using the VAIO Control Center The VAIO Control Center utility allows you open the VAIO Control Center as a standard user. The setting of the control items will not be visible if you to access system information and to specify preferences for system behavior. To use the VAIO Control...
Customizing Your VAIO Computer > Using the VAIO Control Center n 103 N Using the VAIO Control Center The VAIO Control Center utility allows you open the VAIO Control Center as a standard user. The setting of the control items will not be visible if you to access system information and to specify preferences for system behavior. To use the VAIO Control...

User Guide
Page 104
... high precision components and electronic connectors technology. To find out about Your VAIO Computer (page 5). See the specifications to install a new memory module. ❑ You should not touch the connectors or open the memory module compartment cover. To avoid invalidation of memory installed on ...a computer. ❑ You should not install it yourself, if you purchased. For assistance, contact an authorized Sony Service Center. The type of...
... high precision components and electronic connectors technology. To find out about Your VAIO Computer (page 5). See the specifications to install a new memory module. ❑ You should not touch the connectors or open the memory module compartment cover. To avoid invalidation of memory installed on ...a computer. ❑ You should not install it yourself, if you purchased. For assistance, contact an authorized Sony Service Center. The type of...

User Guide
Page 105
Before touching a memory module, ensure the following pages. Notes on a flat surface before adding or removing ...Turn off your computer and disconnect it from the power cord and from any cover or panel from ESD. Upgrading Your VAIO Computer > Adding and Removing Memory n 105 N Adding and Removing Memory If you want to expand the functionality of... your computer, you can increase the amount of the chassis while performing the procedure. ❑ Do not open the memory module package before you remove any telecommunication links, networks, or modems before you are ready to do...
Before touching a memory module, ensure the following pages. Notes on a flat surface before adding or removing ...Turn off your computer and disconnect it from the power cord and from any cover or panel from ESD. Upgrading Your VAIO Computer > Adding and Removing Memory n 105 N Adding and Removing Memory If you want to expand the functionality of... your computer, you can increase the amount of the chassis while performing the procedure. ❑ Do not open the memory module package before you remove any telecommunication links, networks, or modems before you are ready to do...

User Guide
Page 109
If you want to install only one memory module, be sure to the power source. 10 Turn on all peripheral devices and then the computer. n 109 N ! Do not force the memory module into the slot in the open slot. Upgrading Your VAIO Computer > Adding and Removing Memory 7 Slide the memory module into the memory... computer, and then plug them to use the lower slot. Be sure to insert the connector edge of the memory module into place. Do not touch any other components on the motherboard.
If you want to install only one memory module, be sure to the power source. 10 Turn on all peripheral devices and then the computer. n 109 N ! Do not force the memory module into the slot in the open slot. Upgrading Your VAIO Computer > Adding and Removing Memory 7 Slide the memory module into the memory... computer, and then plug them to use the lower slot. Be sure to insert the connector edge of the memory module into place. Do not touch any other components on the motherboard.

User Guide
Page 128
... the computer turns off. ! Troubleshooting > Computer n 128 N Why doesn't my computer enter Sleep mode? Turning off . To restore your computer to normal mode 1 Close all open programs. 2 Click Start, the arrow next to the Shut down button and Restart. 4 If this procedure does not work, press and hold the power button...
... the computer turns off. ! Troubleshooting > Computer n 128 N Why doesn't my computer enter Sleep mode? Turning off . To restore your computer to normal mode 1 Close all open programs. 2 Click Start, the arrow next to the Shut down button and Restart. 4 If this procedure does not work, press and hold the power button...

User Guide
Page 140
... drive. ❑ Try restarting your computer. Troubleshooting > Optical Discs n 140 N Optical Discs Why does my computer freeze when I do if the drive tray does not open? ❑ Make sure your computer is trying to read a disc? If you need to clean the disc, see Discs (page 114) for dirt or damage...
... drive. ❑ Try restarting your computer. Troubleshooting > Optical Discs n 140 N Optical Discs Why does my computer freeze when I do if the drive tray does not open? ❑ Make sure your computer is trying to read a disc? If you need to clean the disc, see Discs (page 114) for dirt or damage...

User Guide
Page 141
... the optical disc drive. 3 Check the disc for instructions. ❑ If you are using external speakers, check the volume settings on the taskbar and click Open Volume Mixer to check the settings. ❑ Check the volume setting in the audio mixer. ❑ If you . ❑ Make sure the necessary program(s) is...
... the optical disc drive. 3 Check the disc for instructions. ❑ If you are using external speakers, check the volume settings on the taskbar and click Open Volume Mixer to check the settings. ❑ Check the volume setting in the audio mixer. ❑ If you . ❑ Make sure the necessary program(s) is...

User Guide
Page 142
..."X" or an exclamation point appears on the listed device, you notice condensation on your computer, do not use the computer for at least one hour. The Device Manager window appears with the optical disc drive. ❑ If you may be incompatible with the optical disc drive. ...Adhesive labels can cause the computer to open a list of the optical disc drives of your desired drive. Follow these steps: 1 Click Start and Control Panel. 2 Click System and Security. ...
..."X" or an exclamation point appears on the listed device, you notice condensation on your computer, do not use the computer for at least one hour. The Device Manager window appears with the optical disc drive. ❑ If you may be incompatible with the optical disc drive. ...Adhesive labels can cause the computer to open a list of the optical disc drives of your desired drive. Follow these steps: 1 Click Start and Control Panel. 2 Click System and Security. ...

User Guide
Page 147
... this problem: ❑ Keep the microphone away from a sound output device, such as a speaker. To configure the sound input device, follow these steps: 1 Close all open programs. 2 Click Start and Control Panel. 3 Click Hardware and Sound. 4 Click Manage audio devices under Sound. 5 On the Recording tab, select your computer. ❑ Your...
... this problem: ❑ Keep the microphone away from a sound output device, such as a speaker. To configure the sound input device, follow these steps: 1 Close all open programs. 2 Click Start and Control Panel. 3 Click Hardware and Sound. 4 Click Manage audio devices under Sound. 5 On the Recording tab, select your computer. ❑ Your...

User Guide
Page 154
... audio devices under Sound. 5 On the Playback tab, select your computer or camcorder. See Connecting an i.LINK Device (page 95) for sound output. 1 Close all open programs. 2 Click Start and Control Panel. 3 Click Hardware and Sound. 4 Click Manage audio devices under Sound. 4 On the Sounds tab, click to change the sound...
... audio devices under Sound. 5 On the Playback tab, select your computer or camcorder. See Connecting an i.LINK Device (page 95) for sound output. 1 Close all open programs. 2 Click Start and Control Panel. 3 Click Hardware and Sound. 4 Click Manage audio devices under Sound. 4 On the Sounds tab, click to change the sound...
Care and Handling of Your VAIO® Computer
Page 3
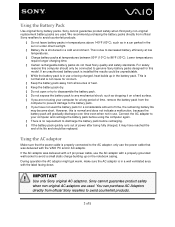
...temperatures above 140°F (60°C), such as dropping it may become short. only use the AC adaptor with the VAIO PC and/or AC adaptor. IMPORTANT Use only Sony original AC adaptors. For safety reasons this computer should be replaced. This is normal and is in use or being fully... for a considerable amount of heat. § Keep the battery pack dry. § Do not open or try to disassemble the battery pack. § Do not expose the battery pack to the AC adapter; Sony cannot guarantee product safety when third party non-original replacement battery packs are not using the...
...temperatures above 140°F (60°C), such as dropping it may become short. only use the AC adaptor with the VAIO PC and/or AC adaptor. IMPORTANT Use only Sony original AC adaptors. For safety reasons this computer should be replaced. This is normal and is in use or being fully... for a considerable amount of heat. § Keep the battery pack dry. § Do not open or try to disassemble the battery pack. § Do not expose the battery pack to the AC adapter; Sony cannot guarantee product safety when third party non-original replacement battery packs are not using the...
Safety Information
Page 4
...sure it is not responsible for customers in USA or at least 8 inches / 20 cm away from the pacemaker. ❑ Sony is at http://sony.ca/support/ for any interference that you may apply, See www.dtsc.ca.gov/hazardouswaste/perchlorate Perchlorate Material: Lithium battery contains perchlorate...To prevent fire or shock hazard, do not open the cabinet. Safety Information and Caution For questions regarding your product or for the Sony Service Center nearest you, visit the Sony online support Web site at http://esupport.sony.com/EN/VAIO/ for customers in Canada. moisture or rain;...
...sure it is not responsible for customers in USA or at least 8 inches / 20 cm away from the pacemaker. ❑ Sony is at http://sony.ca/support/ for any interference that you may apply, See www.dtsc.ca.gov/hazardouswaste/perchlorate Perchlorate Material: Lithium battery contains perchlorate...To prevent fire or shock hazard, do not open the cabinet. Safety Information and Caution For questions regarding your product or for the Sony Service Center nearest you, visit the Sony online support Web site at http://esupport.sony.com/EN/VAIO/ for customers in Canada. moisture or rain;...

Safety Information
Page 5
For incorporated optical disc drive: Caution - Class 3B visible and invisible laser radiation when open. Use of controls or adjustments or performance of your nearest Sony Service Center. To change the backup battery, please contact your computer is extremely important. Avoid direct exposure to ...disc drive of procedures other than those specified herein may arise from the use and repairs can create a safety hazard. Caution - Sony assumes no responsibility for the Wireless LAN is classified as a CLASS 1 LASER PRODUCT and complies with the Laser Products Safety Standard...
For incorporated optical disc drive: Caution - Class 3B visible and invisible laser radiation when open. Use of controls or adjustments or performance of your nearest Sony Service Center. To change the backup battery, please contact your computer is extremely important. Avoid direct exposure to ...disc drive of procedures other than those specified herein may arise from the use and repairs can create a safety hazard. Caution - Sony assumes no responsibility for the Wireless LAN is classified as a CLASS 1 LASER PRODUCT and complies with the Laser Products Safety Standard...


