

Care and Handling of Your VAIO® Computer
Page 1
... can block the computer's air vents. Use only specified peripheral equipment and interface cables or you experience problems: § Unplug the computer § Remove the battery pack § Contact eSupport at least one , moisture may experience problems. When your lap.
... can block the computer's air vents. Use only specified peripheral equipment and interface cables or you experience problems: § Unplug the computer § Remove the battery pack § Contact eSupport at least one , moisture may experience problems. When your lap.
Care and Handling of Your VAIO® Computer
Page 2
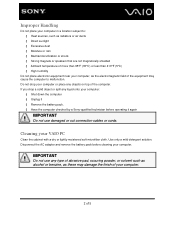
...the cabinet with a dry or lightly moistened soft microfiber cloth. Use only a mild detergent solution. Disconnect the AC adapter and remove the battery pack before operating it again IMPORTANT Do not use any type of abrasive pad, scouring powder, or solvent such as alcohol or benzine, ...or place any liquid onto your computer: § Shut down the computer § Unplug it § Remove the battery pack. § Have the computer checked by a Sony-qualified technician before cleaning your computer. IMPORTANT Do not use damaged or cut connection cables or cords. Improper Handling Do not...
...the cabinet with a dry or lightly moistened soft microfiber cloth. Use only a mild detergent solution. Disconnect the AC adapter and remove the battery pack before operating it again IMPORTANT Do not use any type of abrasive pad, scouring powder, or solvent such as alcohol or benzine, ...or place any liquid onto your computer: § Shut down the computer § Unplug it § Remove the battery pack. § Have the computer checked by a Sony-qualified technician before cleaning your computer. IMPORTANT Do not use damaged or cut connection cables or cords. Improper Handling Do not...
Care and Handling of Your VAIO® Computer
Page 3
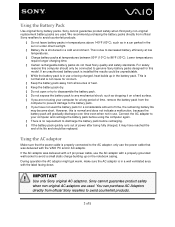
...in use the AC adaptor with the VAIO PC and/or AC adaptor. This is normal and is in the battery pack. Connect the AC adapter to genuine Sony battery packs designed for a long period of 5 only use the power cable that the power cable is due to ...grounded wall socket to 86°F (30°C). Lower temperatures require longer charging time. § Certain rechargeable battery packs do not meet Sony quality and safety standards. If an unauthorized battery pack is installed the results could be replaced. However, this model. You can purchase AC Adaptors directly from official...
...in use the AC adaptor with the VAIO PC and/or AC adaptor. This is normal and is in the battery pack. Connect the AC adapter to genuine Sony battery packs designed for a long period of 5 only use the power cable that the power cable is due to ...grounded wall socket to 86°F (30°C). Lower temperatures require longer charging time. § Certain rechargeable battery packs do not meet Sony quality and safety standards. If an unauthorized battery pack is installed the results could be replaced. However, this model. You can purchase AC Adaptors directly from official...

Help - Hard Disk Drive Replacement Instructions
Page 1
... a protected surface with the Hard Disk Drive (HDD) Bay facing you through the replacement process. With your finger under the battery pack and lift. (Look for damage caused by the edges, away from the components shipped. VPCCW Series Hard Disk Drive Replacement...intended to the computer's case.* Follow the ESD (Electrostatic Discharge) damage prevention instructions: o Hold parts by incorrect handling of these instructions. * Sony is disconnected. Remove jewelry before you . This slight difference does not affect the accuracy of the notebook computer. 3. 1. 2. Place the ...
... a protected surface with the Hard Disk Drive (HDD) Bay facing you through the replacement process. With your finger under the battery pack and lift. (Look for damage caused by the edges, away from the components shipped. VPCCW Series Hard Disk Drive Replacement...intended to the computer's case.* Follow the ESD (Electrostatic Discharge) damage prevention instructions: o Hold parts by incorrect handling of these instructions. * Sony is disconnected. Remove jewelry before you . This slight difference does not affect the accuracy of the notebook computer. 3. 1. 2. Place the ...

Help - Hard Disk Drive Replacement Instructions
Page 3
...the HDD. (HDD Reinstallation) Steps 14-17 Step 14. Step 18. VPCCW Series Hard Disk Drive Replacement Instructions NOTE! Reinstall previously removed. Reinstall the battery pack and reconnect the AC Adaptor. Step 13. Step 15. the (2) screws Step 17. Reinstall the hard drive cover and install the (2) screws... mount the HDD bracket to the connector. Proper mounting of the recovery disk's case. A 3/3 Step 16. Return the old HDD to Sony following the instructions described on your computer and continue with the HDD connectors appearing between two tabs.
...the HDD. (HDD Reinstallation) Steps 14-17 Step 14. Step 18. VPCCW Series Hard Disk Drive Replacement Instructions NOTE! Reinstall previously removed. Reinstall the battery pack and reconnect the AC Adaptor. Step 13. Step 15. the (2) screws Step 17. Reinstall the hard drive cover and install the (2) screws... mount the HDD bracket to the connector. Proper mounting of the recovery disk's case. A 3/3 Step 16. Return the old HDD to Sony following the instructions described on your computer and continue with the HDD connectors appearing between two tabs.

Help - Optical Disk Drive Replacement Instructions
Page 1
... case.* Follow the ESD (Electrostatic Discharge) damage prevention instructions: o Hold parts by incorrect handling of your finger slide the right battery tab in the release direction and hold. 3. Step 1. Locate the release tab as shown in the picture. This slight difference does...clean or covered surface to avoid damage to guide you begin , place your finger under the battery pack and lift. With your notebook computer.* The appearance of these instructions. * Sony is disconnected. Hook your notebook computer on a protected surface with the Optical Disk Drive (ODD)...
... case.* Follow the ESD (Electrostatic Discharge) damage prevention instructions: o Hold parts by incorrect handling of your finger slide the right battery tab in the release direction and hold. 3. Step 1. Locate the release tab as shown in the picture. This slight difference does...clean or covered surface to avoid damage to guide you begin , place your finger under the battery pack and lift. With your notebook computer.* The appearance of these instructions. * Sony is disconnected. Hook your notebook computer on a protected surface with the Optical Disk Drive (ODD)...

Help - Optical Disk Drive Replacement Instructions
Page 3
... correct side it with the edge of bracket should align. Step 14. Firmly but carefully press the bezel into place. Reinstall the battery pack and AC Adaptor. Align the tabs on the bezel with even force push removed screws. To install the new drive, hold...installation of ODD. (ODD Reinstallation) Steps 7-11 Step 15. Step 17. Flat surface of the computer) P/N 989200671 Rev. it is to Sony following the included shipping instructions. VPCCW Series Optical Disk Drive Replacement Instructions Step 12. Re-install the (2) previously and connection, with the tab ...
... correct side it with the edge of bracket should align. Step 14. Firmly but carefully press the bezel into place. Reinstall the battery pack and AC Adaptor. Align the tabs on the bezel with even force push removed screws. To install the new drive, hold...installation of ODD. (ODD Reinstallation) Steps 7-11 Step 15. Step 17. Flat surface of the computer) P/N 989200671 Rev. it is to Sony following the included shipping instructions. VPCCW Series Optical Disk Drive Replacement Instructions Step 12. Re-install the (2) previously and connection, with the tab ...

Safety - Safety Information
Page 2
...part without written permission is prohibited. All rights reserved. Reproduction in whole or in a secure location. IN NO EVENT SHALL SONY ELECTRONICS INC. SONY ALSO ASSUMES NO RESPONSIBILITY, AND SHALL NOT BE LIABLE FOR ANY DAMAGES TO, OR VIRUSES THAT MAY INFECT, YOUR COMPUTER ... Center. Refer to the model and serial numbers when you call your Sony VAIO® computer. Software specifications are located on the bottom, the back panel, or inside the battery compartment of a separate user license agreement. This manual and the software described herein, ...
...part without written permission is prohibited. All rights reserved. Reproduction in whole or in a secure location. IN NO EVENT SHALL SONY ELECTRONICS INC. SONY ALSO ASSUMES NO RESPONSIBILITY, AND SHALL NOT BE LIABLE FOR ANY DAMAGES TO, OR VIRUSES THAT MAY INFECT, YOUR COMPUTER ... Center. Refer to the model and serial numbers when you call your Sony VAIO® computer. Software specifications are located on the bottom, the back panel, or inside the battery compartment of a separate user license agreement. This manual and the software described herein, ...
Safety - Safety Information
Page 4
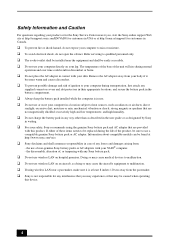
...and risk of any losses and damages arising from the pacemaker. ❑ Sony is in use. ❑ Do not use a compatible genuine Sony battery pack or AC adapter. the disassembly, alteration of, or tampering with any Sony battery pack. ❑ Do not use of the product, be caused when operating... aircraft's equipment to malfunction. ❑ If using the genuine Sony battery pack and AC adapter that are provided with this device. 4 The temperature of the base of the unit will rise during the life of non-genuine Sony battery packs or AC adapters with your VAIO® computer. -
...and risk of any losses and damages arising from the pacemaker. ❑ Sony is in use. ❑ Do not use a compatible genuine Sony battery pack or AC adapter. the disassembly, alteration of, or tampering with any Sony battery pack. ❑ Do not use of the product, be caused when operating... aircraft's equipment to malfunction. ❑ If using the genuine Sony battery pack and AC adapter that are provided with this device. 4 The temperature of the base of the unit will rise during the life of non-genuine Sony battery packs or AC adapters with your VAIO® computer. -

Safety - Safety Information
Page 5
...change the backup battery, please contact your computer is extremely important. Caution - Improper use of this equipment should be made only by Sony authorized technicians. Class 3B visible and invisible laser radiation when open. The optical disc drive of your nearest Sony Service Center. ... duration: Continuous wave Wireless LAN Security Creating security settings for any security problems that may result in hazardous radiation exposure. Sony assumes no responsibility for the Wireless LAN is classified as a CLASS 1 LASER PRODUCT and complies with the Laser Products ...
...change the backup battery, please contact your computer is extremely important. Caution - Improper use of this equipment should be made only by Sony authorized technicians. Class 3B visible and invisible laser radiation when open. The optical disc drive of your nearest Sony Service Center. ... duration: Continuous wave Wireless LAN Security Creating security settings for any security problems that may result in hazardous radiation exposure. Sony assumes no responsibility for the Wireless LAN is classified as a CLASS 1 LASER PRODUCT and complies with the Laser Products ...

Startup Guide
Page 1
... switch outward. Recovery discs are subject to change without notice. 4-174-359-11 (1) © 2010 Sony Corporation Printed in USA Let's get started 1 2 3 Check supplied items Install battery pack Connect AC adapter 4 Power on hard surfaces, such as setup tools, tutorials, and FAQs. Liquid Damage Prevent liquids from coming into your computer...
... switch outward. Recovery discs are subject to change without notice. 4-174-359-11 (1) © 2010 Sony Corporation Printed in USA Let's get started 1 2 3 Check supplied items Install battery pack Connect AC adapter 4 Power on hard surfaces, such as setup tools, tutorials, and FAQs. Liquid Damage Prevent liquids from coming into your computer...

Users Guide
Page 2
... about Your VAIO Computer 5 Ergonomic Considerations 9 Getting Started 11 Locating Controls and Ports 12 About the Indicator Lights 18 Connecting a Power Source 19 Using the Battery Pack 21 Shutting Down Your Computer Safely 27 Using the Power Saving Modes 28 Updating Your Computer 31 Using Your VAIO Computer 32 Using the...
... about Your VAIO Computer 5 Ergonomic Considerations 9 Getting Started 11 Locating Controls and Ports 12 About the Indicator Lights 18 Connecting a Power Source 19 Using the Battery Pack 21 Shutting Down Your Computer Safely 27 Using the Power Saving Modes 28 Updating Your Computer 31 Using Your VAIO Computer 32 Using the...

Users Guide
Page 3
... 106 Handling the LCD Screen 108 Using the Power Source 109 Handling the Built-in Camera 110 Handling Discs 111 Using the Battery Pack 112 Handling "Memory Stick 113 Handling the Built-in Storage Device 114 Troubleshooting 115 Computer Operations 117 System Update / Security 123... Recovery 125 Battery Pack 127 Built-in Camera 129 Networking (LAN/Wireless LAN 131 Bluetooth Technology 134 Optical Discs 138 Display 143 Printing 147 Microphone ...
... 106 Handling the LCD Screen 108 Using the Power Source 109 Handling the Built-in Camera 110 Handling Discs 111 Using the Battery Pack 112 Handling "Memory Stick 113 Handling the Built-in Storage Device 114 Troubleshooting 115 Computer Operations 117 System Update / Security 123... Recovery 125 Battery Pack 127 Built-in Camera 129 Networking (LAN/Wireless LAN 131 Bluetooth Technology 134 Optical Discs 138 Display 143 Printing 147 Microphone ...
Users Guide
Page 8
...available in USA only) Make an appointment with the setup of your Sony VAIO computer. Sony Style store and get personalized service and support for at a U.S. You can find it on the bottom, the back panel, or inside the battery compartment of the display on the computer. 2 Your computer's serial ...number You can assist with a Sony certified technician at our site, you might need. In order to find the information you do ...
...available in USA only) Make an appointment with the setup of your Sony VAIO computer. Sony Style store and get personalized service and support for at a U.S. You can find it on the bottom, the back panel, or inside the battery compartment of the display on the computer. 2 Your computer's serial ...number You can assist with a Sony certified technician at our site, you might need. In order to find the information you do ...

Users Guide
Page 11
... manufacturer's instructions. ❑ Locating Controls and Ports (page 12) ❑ About the Indicator Lights (page 18) ❑ Connecting a Power Source (page 19) ❑ Using the Battery Pack (page 21) ❑ Shutting Down Your Computer Safely (page 27) ❑ Using the Power Saving Modes (page 28) ❑ Updating Your Computer (page 31)
... manufacturer's instructions. ❑ Locating Controls and Ports (page 12) ❑ About the Indicator Lights (page 18) ❑ Connecting a Power Source (page 19) ❑ Using the Battery Pack (page 21) ❑ Shutting Down Your Computer Safely (page 27) ❑ Using the Power Saving Modes (page 28) ❑ Updating Your Computer (page 31)

Users Guide
Page 14
Getting Started > Locating Controls and Ports Back A Security slot B Network (LAN) port (page 58) C Battery connector (page 21) D DC IN port (page 19) n 14 N
Getting Started > Locating Controls and Ports Back A Security slot B Network (LAN) port (page 58) C Battery connector (page 21) D DC IN port (page 19) n 14 N

Users Guide
Page 18
See Charging the Battery Pack (page 24) for more wireless options are enabled. Press it a second time to the built-in storage device or the optical disc drive is ... and does not work with all programs. Illuminates while one or more information. Letters appear in lowercase if you scroll the display. Illuminates while the battery pack is unlit. Press the Fn+Scr Lk keys to type letters in use .
See Charging the Battery Pack (page 24) for more wireless options are enabled. Press it a second time to the built-in storage device or the optical disc drive is ... and does not work with all programs. Illuminates while one or more information. Letters appear in lowercase if you scroll the display. Illuminates while the battery pack is unlit. Press the Fn+Scr Lk keys to type letters in use .

Users Guide
Page 19
... outlet (2). 3 Plug the cable from the AC outlet. ✍ Use only the supplied AC adapter for supplying power to an AC power source and has a battery pack installed, it uses power from the AC adapter (3) into the AC adapter (3). 2 Plug the other end of the DC In plug varies depending on...
... outlet (2). 3 Plug the cable from the AC outlet. ✍ Use only the supplied AC adapter for supplying power to an AC power source and has a battery pack installed, it uses power from the AC adapter (3) into the AC adapter (3). 2 Plug the other end of the DC In plug varies depending on...

Users Guide
Page 21
Installing/Removing the Battery Pack To install the battery pack 1 Turn off the computer and close the LCD screen lid. 2 Slide the battery LOCK switch (1) inward. n 21 N Getting Started > Using the Battery Pack Using the Battery Pack The battery pack supplied with your computer is not fully charged at the time of delivery.
Installing/Removing the Battery Pack To install the battery pack 1 Turn off the computer and close the LCD screen lid. 2 Slide the battery LOCK switch (1) inward. n 21 N Getting Started > Using the Battery Pack Using the Battery Pack The battery pack supplied with your computer is not fully charged at the time of delivery.

Users Guide
Page 22
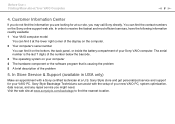
Getting Started > Using the Battery Pack n 22 N 3 Slide the battery pack diagonally into the battery compartment until the projection (2) on either side of the battery compartment fits into the U-shaped cut (3) on either side of the battery pack. 4 Push the battery pack down into the compartment until it clicks into place. 5 Slide the battery LOCK switch outward to secure the battery pack on the computer.
Getting Started > Using the Battery Pack n 22 N 3 Slide the battery pack diagonally into the battery compartment until the projection (2) on either side of the battery compartment fits into the U-shaped cut (3) on either side of the battery pack. 4 Push the battery pack down into the compartment until it clicks into place. 5 Slide the battery LOCK switch outward to secure the battery pack on the computer.


