User Guide
Page 2
... 12 About the Indicator Lights 18 Connecting a Power Source 19 Using the Battery Pack 21 Shutting Down Your Computer Safely 27 Using the Power Saving Modes 28 Updating Your Computer 30 Using Your VAIO Computer 31 Using the Keyboard 32 Using the Touch Pad 34 Using Special-...Connecting a USB Device 105 Connecting an i.LINK Device 107 Customizing Your VAIO Computer 109 Selecting Performance Modes 110 Setting the Password 112 Using Intel® VT 124 Using the VAIO Control Center 125 Using the VAIO Power Management 127 Configuring Your Modem 128 Protecting the Hard Disk 129 ...
... 12 About the Indicator Lights 18 Connecting a Power Source 19 Using the Battery Pack 21 Shutting Down Your Computer Safely 27 Using the Power Saving Modes 28 Updating Your Computer 30 Using Your VAIO Computer 31 Using the Keyboard 32 Using the Touch Pad 34 Using Special-...Connecting a USB Device 105 Connecting an i.LINK Device 107 Customizing Your VAIO Computer 109 Selecting Performance Modes 110 Setting the Password 112 Using Intel® VT 124 Using the VAIO Control Center 125 Using the VAIO Power Management 127 Configuring Your Modem 128 Protecting the Hard Disk 129 ...
User Guide
Page 3
...143 Handling the LCD Screen 145 Using the Power Source 146 Handling the Built-in Camera 147 Handling Discs 148 Using the Battery Pack 149 Handling "Memory Stick 150 Handling the Built-in Storage Device 151 Using Fingerprint Authentication 152 Using the TPM 153 ...Troubleshooting 154 Computer 156 System Security 165 Battery 166 Built-in Camera 168 Internet 170 Networking 172 Bluetooth Technology 175 Optical Discs 179 Display 183 Printing 187 Microphone 188 Speakers ...
...143 Handling the LCD Screen 145 Using the Power Source 146 Handling the Built-in Camera 147 Handling Discs 148 Using the Battery Pack 149 Handling "Memory Stick 150 Handling the Built-in Storage Device 151 Using Fingerprint Authentication 152 Using the TPM 153 ...Troubleshooting 154 Computer 156 System Security 165 Battery 166 Built-in Camera 168 Internet 170 Networking 172 Bluetooth Technology 175 Optical Discs 179 Display 183 Printing 187 Microphone 188 Speakers ...

User Guide
Page 8
In Store Service & Support (available in USA only) Make an appointment with the setup of your VAIO PC. Sony Style Backstage Technicians can assist with a Sony certified technician at a U.S. Sony Style store and get personalized service and support for at the lower right corner of the display on the computer...bottom, the back panel, or inside the battery compartment of your computer 4 The hardware component or the software program that is causing the problem 5 A brief description of the number below the barcode. 3 The operating system on the Sony online support web site. In order to ...
In Store Service & Support (available in USA only) Make an appointment with the setup of your VAIO PC. Sony Style Backstage Technicians can assist with a Sony certified technician at a U.S. Sony Style store and get personalized service and support for at the lower right corner of the display on the computer...bottom, the back panel, or inside the battery compartment of your computer 4 The hardware component or the software program that is causing the problem 5 A brief description of the number below the barcode. 3 The operating system on the Sony online support web site. In order to ...
User Guide
Page 11
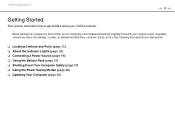
.... ❑ Locating Controls and Ports (page 12) ❑ About the Indicator Lights (page 18) ❑ Connecting a Power Source (page 19) ❑ Using the Battery Pack (page 21) ❑ Shutting Down Your Computer Safely (page 27) ❑ Using the Power Saving Modes (page 28) ❑ Updating Your Computer (page 30...) Upon completion, connect one device (for the first time, do not connect any other hardware that did not originally come with your VAIO computer. ! Getting Started > n 11 N Getting Started This section describes how to get started using your computer.
.... ❑ Locating Controls and Ports (page 12) ❑ About the Indicator Lights (page 18) ❑ Connecting a Power Source (page 19) ❑ Using the Battery Pack (page 21) ❑ Shutting Down Your Computer Safely (page 27) ❑ Using the Power Saving Modes (page 28) ❑ Updating Your Computer (page 30...) Upon completion, connect one device (for the first time, do not connect any other hardware that did not originally come with your VAIO computer. ! Getting Started > n 11 N Getting Started This section describes how to get started using your computer.

User Guide
Page 14
n 14 N Getting Started > Locating Controls and Ports Back A SIM card slot* B Battery connector (page 21) * On selected models only.
n 14 N Getting Started > Locating Controls and Ports Back A SIM card slot* B Battery connector (page 21) * On selected models only.
User Guide
Page 18
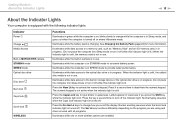
... not place the computer into Sleep mode or turn off . Press the Caps Lock key to type letters in use. See Charging the Battery Pack (page 24) for more wireless options are using and does not work with the following indicator lights: Indicator Power 1 Charge Media Access...Indicator Lights n 18 N About the Indicator Lights Your computer is equipped with all programs. Illuminates while one or more information. Illuminates while the battery pack is lit. Letters appear in camera is unlit. Press the Fn+Scr Lk keys to activate the numeric keypad. When the indicator light is...
... not place the computer into Sleep mode or turn off . Press the Caps Lock key to type letters in use. See Charging the Battery Pack (page 24) for more wireless options are using and does not work with the following indicator lights: Indicator Power 1 Charge Media Access...Indicator Lights n 18 N About the Indicator Lights Your computer is equipped with all programs. Illuminates while one or more information. Illuminates while the battery pack is lit. Letters appear in camera is unlit. Press the Fn+Scr Lk keys to activate the numeric keypad. When the indicator light is...
User Guide
Page 19
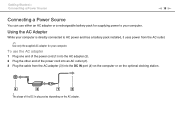
... the optional docking station. ! Using the AC Adapter While your computer is directly connected to your computer. To use either an AC adapter or a rechargeable battery pack for your computer. The shape of the power cord into an AC outlet (2). 3 Plug the cable from the AC outlet. ✍ Use only the... supplied AC adapter for supplying power to AC power and has a battery pack installed, it uses power from the AC adapter (3) into the DC IN port (4) on the computer or on the AC adapter.
... the optional docking station. ! Using the AC Adapter While your computer is directly connected to your computer. To use either an AC adapter or a rechargeable battery pack for your computer. The shape of the power cord into an AC outlet (2). 3 Plug the cable from the AC outlet. ✍ Use only the... supplied AC adapter for supplying power to AC power and has a battery pack installed, it uses power from the AC adapter (3) into the DC IN port (4) on the computer or on the AC adapter.
User Guide
Page 21
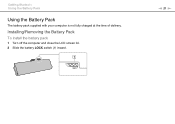
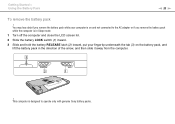
n 21 N Getting Started > Using the Battery Pack Using the Battery Pack The battery pack supplied with your computer is not fully charged at the time of delivery. Installing/Removing the Battery Pack To install the battery pack 1 Turn off the computer and close the LCD screen lid. 2 Slide the battery LOCK switch (1) inward.
n 21 N Getting Started > Using the Battery Pack Using the Battery Pack The battery pack supplied with your computer is not fully charged at the time of delivery. Installing/Removing the Battery Pack To install the battery pack 1 Turn off the computer and close the LCD screen lid. 2 Slide the battery LOCK switch (1) inward.
User Guide
Page 22
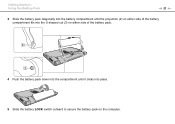
Getting Started > Using the Battery Pack n 22 N 3 Slide the battery pack diagonally into the battery compartment until the projection (2) on either side of the battery compartment fits into the U-shaped cut (3) on either side of the battery pack. 4 Push the battery pack down into the compartment until it clicks into place. 5 Slide the battery LOCK switch outward to secure the battery pack on the computer.
Getting Started > Using the Battery Pack n 22 N 3 Slide the battery pack diagonally into the battery compartment until the projection (2) on either side of the battery compartment fits into the U-shaped cut (3) on either side of the battery pack. 4 Push the battery pack down into the compartment until it clicks into place. 5 Slide the battery LOCK switch outward to secure the battery pack on the computer.
User Guide
Page 23
...LCD screen lid. 2 Slide the battery LOCK switch (1) inward. 3 Slide and hold the battery RELEASE latch (2) inward, put your fingertip underneath the tab (3) on and not connected to operate only with genuine Sony battery packs. You may lose data if you remove the battery pack while the computer is on... the battery pack, and lift the battery pack in the direction of the arrow, and then slide it away from the...
...LCD screen lid. 2 Slide the battery LOCK switch (1) inward. 3 Slide and hold the battery RELEASE latch (2) inward, put your fingertip underneath the tab (3) on and not connected to operate only with genuine Sony battery packs. You may lose data if you remove the battery pack while the computer is on... the battery pack, and lift the battery pack in the direction of the arrow, and then slide it away from the...
User Guide
Page 24
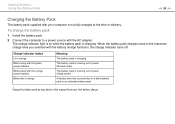
... functions, the charge indicator turns off. Charge the battery pack as described in orange Meaning The battery pack is charging. Getting Started > Using the Battery Pack n 24 N Charging the Battery Pack The battery pack supplied with your first battery charge. To charge the battery pack 1 Install the battery pack. 2 Connect the computer to a power source with the AC...
... functions, the charge indicator turns off. Charge the battery pack as described in orange Meaning The battery pack is charging. Getting Started > Using the Battery Pack n 24 N Charging the Battery Pack The battery pack supplied with your first battery charge. To charge the battery pack 1 Install the battery pack. 2 Connect the computer to a power source with the AC...
User Guide
Page 25
... should save your data frequently. Going back to charge while you are in Sleep mode, you enable the battery care function of the Battery Charge Functions with a lithium ion battery pack and can extend the life of data, you should either connect the AC adapter to AC power. Your computer... is supplied with the VAIO Control Center. The battery pack continues to the previous work state is impossible. If the battery pack runs out of power and both the charge and power indicator lights blink, you should save...
... should save your data frequently. Going back to charge while you are in Sleep mode, you enable the battery care function of the Battery Charge Functions with a lithium ion battery pack and can extend the life of data, you should either connect the AC adapter to AC power. Your computer... is supplied with the VAIO Control Center. The battery pack continues to the previous work state is impossible. If the battery pack runs out of power and both the charge and power indicator lights blink, you should save...
User Guide
Page 26
... (page 28) for more information. ❑ Change the power saving settings on battery power, you can extend your battery life using the following methods. ❑ Decrease the LCD brightness of your desktop background with the VAIO Control Center. See Using the VAIO Power Management (page 127) for more information. ❑ Set the wallpaper in...
... (page 28) for more information. ❑ Change the power saving settings on battery power, you can extend your battery life using the following methods. ❑ Decrease the LCD brightness of your desktop background with the VAIO Control Center. See Using the VAIO Power Management (page 127) for more information. ❑ Set the wallpaper in...
User Guide
Page 28
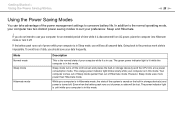
.... Mode Normal mode Sleep mode Hibernate mode Description This is the normal state of Hibernate mode. Even when the battery pack runs out of the system is saved on the built-in storage device(s) and the CPU into a low power consumption mode. To avoid loss ... state of power, no data will lose all unsaved data. The orange power indicator light blinks slowly while your preference: Sleep and Hibernate. ! If the battery pack runs out of time while it is disconnected from AC power, place the computer into Hibernate mode or turn it is in this mode...
.... Mode Normal mode Sleep mode Hibernate mode Description This is the normal state of Hibernate mode. Even when the battery pack runs out of the system is saved on the built-in storage device(s) and the CPU into a low power consumption mode. To avoid loss ... state of power, no data will lose all unsaved data. The orange power indicator light blinks slowly while your preference: Sleep and Hibernate. ! If the battery pack runs out of time while it is disconnected from AC power, place the computer into Hibernate mode or turn it is in this mode...
User Guide
Page 87
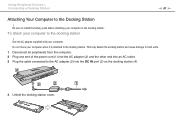
Use the AC adapter supplied with your computer to install the battery pack before attaching your computer. This may detach the docking station and cause damage to both units. 1 Disconnect all peripherals from the computer. 2 Plug one ...
Use the AC adapter supplied with your computer to install the battery pack before attaching your computer. This may detach the docking station and cause damage to both units. 1 Disconnect all peripherals from the computer. 2 Plug one ...
User Guide
Page 90
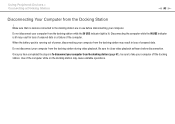
... computer from the docking station may result in To disconnect your computer from the docking station during video playback. Use of the computer. When the battery pack is running out of unsaved data. Once you have completed the steps in loss of power, disconnecting your computer from the docking station (page...
... computer from the docking station may result in To disconnect your computer from the docking station during video playback. Use of the computer. When the battery pack is running out of unsaved data. Once you have completed the steps in loss of power, disconnecting your computer from the docking station (page...
User Guide
Page 110
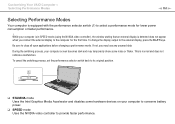
During the switching process, your computer to conserve battery power. ❑ SPEED mode Uses the NVIDIA video controller to its original position. ❑ STAMINA mode Uses the Intel Graphics Media Accelerator and disables ... select a performance mode for the first time. If not, you connect the external display to close all open applications before changing a performance mode. Customizing Your VAIO Computer > Selecting Performance Modes n 110 N Selecting Performance Modes Your computer is equipped with the performance selector switch (1) to the external display, press the Fn+...
During the switching process, your computer to conserve battery power. ❑ SPEED mode Uses the NVIDIA video controller to its original position. ❑ STAMINA mode Uses the Intel Graphics Media Accelerator and disables ... select a performance mode for the first time. If not, you connect the external display to close all open applications before changing a performance mode. Customizing Your VAIO Computer > Selecting Performance Modes n 110 N Selecting Performance Modes Your computer is equipped with the performance selector switch (1) to the external display, press the Fn+...
User Guide
Page 127
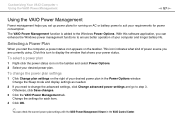
...the Windows power management functions to the Windows Power Options. Customizing Your VAIO Computer > Using the VAIO Power Management n 127 N Using the VAIO Power Management Power management helps you set up power plans for running on AC or battery power to suit your desired power plan. Selecting a Power Plan ...When you can check the current power plan settings with the VAIO Power Management Viewer in the Power Options window. This icon indicates what...
...the Windows power management functions to the Windows Power Options. Customizing Your VAIO Computer > Using the VAIO Power Management n 127 N Using the VAIO Power Management Power management helps you set up power plans for running on AC or battery power to suit your desired power plan. Selecting a Power Plan ...When you can check the current power plan settings with the VAIO Power Management Viewer in the Power Options window. This icon indicates what...

User Guide
Page 131
... static electricity (cellophane wrappers, for using and modifying electronic equipment. ❑ Turn off your computer and disconnect it from its power sources (battery pack and AC adapter) and from any telecommunication links, networks, or modems before adding or removing memory modules. ❑ Be careful when ...This damage may cause damage to place your computer on adding/removing memory modules ❑ Be sure to your system. Upgrading Your VAIO Computer > Adding and Removing Memory n 131 N Adding and Removing Memory If you want to do not handle materials that are compatible ...
... static electricity (cellophane wrappers, for using and modifying electronic equipment. ❑ Turn off your computer and disconnect it from its power sources (battery pack and AC adapter) and from any telecommunication links, networks, or modems before adding or removing memory modules. ❑ Be careful when ...This damage may cause damage to place your computer on adding/removing memory modules ❑ Be sure to your system. Upgrading Your VAIO Computer > Adding and Removing Memory n 131 N Adding and Removing Memory If you want to do not handle materials that are compatible ...
User Guide
Page 133
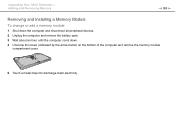
Upgrading Your VAIO Computer > Adding and Removing Memory n 133 N Removing and Installing a Memory Module To change or add a memory module 1 Shut down the computer and disconnect all peripheral devices. 2 Unplug the computer and remove the battery pack. 3 Wait about an hour until the computer cools down. 4 Unscrew the screw (indicated by the arrow below) on the bottom of the computer and remove the memory module compartment cover. 5 Touch a metal object to discharge static electricity.
Upgrading Your VAIO Computer > Adding and Removing Memory n 133 N Removing and Installing a Memory Module To change or add a memory module 1 Shut down the computer and disconnect all peripheral devices. 2 Unplug the computer and remove the battery pack. 3 Wait about an hour until the computer cools down. 4 Unscrew the screw (indicated by the arrow below) on the bottom of the computer and remove the memory module compartment cover. 5 Touch a metal object to discharge static electricity.


