
User Guide
Page 4
n4 N Precautions ...104 Handling the LCD Screen ...105 Using the Power Source ...106 Handling Your Computer ...107 Handling the Built-in MOTION EYE Camera...109 Handling Floppy Disks ...110 Handling Discs ...111 Using the Battery Pack ...112 Using Headphones ...114 Handling the Memory Stick ...115 Handling the Hard Disk ...116 Updating Your Computer ...117 Troubleshooting ...118 Computer ...120 System Security ...126 Battery...127 Built-in MOTION EYE Camera...129 Internet ...132 Networking ...134 Optical Discs ...137 Display ...141 Printing ...146 Microphone ...147 Mouse ...148
n4 N Precautions ...104 Handling the LCD Screen ...105 Using the Power Source ...106 Handling Your Computer ...107 Handling the Built-in MOTION EYE Camera...109 Handling Floppy Disks ...110 Handling Discs ...111 Using the Battery Pack ...112 Using Headphones ...114 Handling the Memory Stick ...115 Handling the Hard Disk ...116 Updating Your Computer ...117 Troubleshooting ...118 Computer ...120 System Security ...126 Battery...127 Built-in MOTION EYE Camera...129 Internet ...132 Networking ...134 Optical Discs ...137 Display ...141 Printing ...146 Microphone ...147 Mouse ...148

User Guide
Page 6
External views illustrated in this Sony VAIO® computer, and welcome to provide state-of-the-art personal computing experience. ! You may look slightly different from those of your computer comes preinstalled ... on your purchase of this manual may find differences in the information when your computer. Information in audio, video, computing, and communications to the on-screen User Guide. Sony has combined leading-edge technology in the supplied manuals including this User Guide is intended for users of the...
External views illustrated in this Sony VAIO® computer, and welcome to provide state-of-the-art personal computing experience. ! You may look slightly different from those of your computer comes preinstalled ... on your purchase of this manual may find differences in the information when your computer. Information in audio, video, computing, and communications to the on-screen User Guide. Sony has combined leading-edge technology in the supplied manuals including this User Guide is intended for users of the...
User Guide
Page 8
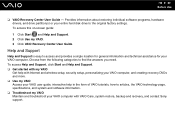
...screen guide: 1 Click Start and Help and Support. 2 Click Use my VAIO. 3 Click VAIO Recovery Center User Guide. Provides information about restoring individual software programs, hardware drivers, and drive partition(s) or your VAIO computer. Choose from the following categories to articles, the VAIO... technology page, specifications, and system and software information. ❑ Troubleshoot my VAIO Maintain and troubleshoot your VAIO computer with VAIO Care, system restore, backup and recovery, and contact Sony ...
...screen guide: 1 Click Start and Help and Support. 2 Click Use my VAIO. 3 Click VAIO Recovery Center User Guide. Provides information about restoring individual software programs, hardware drivers, and drive partition(s) or your VAIO computer. Choose from the following categories to articles, the VAIO... technology page, specifications, and system and software information. ❑ Troubleshoot my VAIO Maintain and troubleshoot your VAIO computer with VAIO Care, system restore, backup and recovery, and contact Sony ...

User Guide
Page 10
... the display as well. ❑ Lighting - You can reduce eye strain and muscle fatigue by adjusting the tilt of the monitor. Make sure the display screen is at a comfortable viewing distance.
... the display as well. ❑ Lighting - You can reduce eye strain and muscle fatigue by adjusting the tilt of the monitor. Make sure the display screen is at a comfortable viewing distance.

User Guide
Page 12
Locating Controls and Ports Take a moment to identify the controls and ports shown on the following pages. Front A Muting (S1) button (page 34) B AV MODE button (page 34) C Num lock indicator (page 18) D Caps lock indicator (page 18) E Scroll lock indicator (page 18) F Power button G LCD screen (page 105) H Built-in speakers (stereo) I Keyboard (page 31) J Touch pad (page 33) n 12 N Getting Started
Locating Controls and Ports Take a moment to identify the controls and ports shown on the following pages. Front A Muting (S1) button (page 34) B AV MODE button (page 34) C Num lock indicator (page 18) D Caps lock indicator (page 18) E Scroll lock indicator (page 18) F Power button G LCD screen (page 105) H Built-in speakers (stereo) I Keyboard (page 31) J Touch pad (page 33) n 12 N Getting Started

User Guide
Page 21
Using the Battery Pack The battery pack supplied with your computer is not fully charged at the time of delivery. Installing the Battery Pack To install the battery pack 1 Turn off the computer and close the LCD screen lid. 2 Slide the battery LOCK switch (1) inward. n 21 N Getting Started
Using the Battery Pack The battery pack supplied with your computer is not fully charged at the time of delivery. Installing the Battery Pack To install the battery pack 1 Turn off the computer and close the LCD screen lid. 2 Slide the battery LOCK switch (1) inward. n 21 N Getting Started

User Guide
Page 28
n 28 N Getting Started Removing the Battery Pack ! You may lose data if you remove the battery pack while your fingertip underneath the tab (3) on and not connected to the AC adapter or if you remove the battery pack while the computer is on the battery pack, and lift the battery pack in Sleep mode. To remove the battery pack 1 Turn off the computer and close the LCD screen lid. 2 Slide the battery LOCK switch (1) inward. 3 Slide and hold the battery RELEASE latch (2) inward, put your computer is in the direction of the arrow, and then slide it away from the computer.
n 28 N Getting Started Removing the Battery Pack ! You may lose data if you remove the battery pack while your fingertip underneath the tab (3) on and not connected to the AC adapter or if you remove the battery pack while the computer is on the battery pack, and lift the battery pack in Sleep mode. To remove the battery pack 1 Turn off the computer and close the LCD screen lid. 2 Slide the battery LOCK switch (1) inward. 3 Slide and hold the battery RELEASE latch (2) inward, put your computer is in the direction of the arrow, and then slide it away from the computer.
User Guide
Page 31
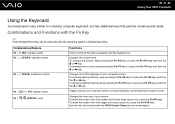
...keys and then the m or < key. To make the screen view look smaller and further away (zoom out), press the Fn+F9 keys. Combinations and Functions with the VAIO Control Center for more information. n 31 N Using Your VAIO Computer Using the Keyboard Your keyboard is finished launching. To ...decrease the volume, keep pressing the Fn+F4 keys or press the Fn+F4 keys and then the M or , key. Toggles among your computer screen. Changes the view size of your computer screen, an external display,...
...keys and then the m or < key. To make the screen view look smaller and further away (zoom out), press the Fn+F9 keys. Combinations and Functions with the VAIO Control Center for more information. n 31 N Using Your VAIO Computer Using the Keyboard Your keyboard is finished launching. To ...decrease the volume, keep pressing the Fn+F4 keys or press the Fn+F4 keys and then the M or , key. Toggles among your computer screen. Changes the view size of your computer screen, an external display,...
User Guide
Page 33
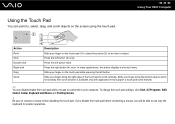
n 33 N Using Your VAIO Computer Action Point Click Double-click Right-click Drag Scroll Description Slide your finger on the touch pad (1) ...mouse, you will be able to use only the keyboard for pointer operations. To change the touch pad settings, click Start, All Programs, VAIO Control Center, Keyboard and Mouse and Pointing Device. ! Slide your finger on an item or object. Press the right button (4) once.... that support a touch pad scroll feature). ✍ You can point to, select, drag, and scroll objects on the screen using the touch pad. Press the left button (3) once.
n 33 N Using Your VAIO Computer Action Point Click Double-click Right-click Drag Scroll Description Slide your finger on the touch pad (1) ...mouse, you will be able to use only the keyboard for pointer operations. To change the touch pad settings, click Start, All Programs, VAIO Control Center, Keyboard and Mouse and Pointing Device. ! Slide your finger on an item or object. Press the right button (4) once.... that support a touch pad scroll feature). ✍ You can point to, select, drag, and scroll objects on the screen using the touch pad. Press the left button (3) once.

User Guide
Page 45
n 45 N Using Your VAIO Computer Playing CDs To play the CD. If the AutoPlay window appears, click Burn files to disc and follow the on the desktop, click Start, ... to select an option. If the Audio CD window appears, click to a disc 1 Insert a recordable disc into the optical disc drive. 2 If nothing appears on -screen instructions until the empty disc folder appears. 2 Open the folder that contains the file(s) you want to copy and drag them to play an audio...
n 45 N Using Your VAIO Computer Playing CDs To play the CD. If the AutoPlay window appears, click Burn files to disc and follow the on the desktop, click Start, ... to select an option. If the Audio CD window appears, click to a disc 1 Insert a recordable disc into the optical disc drive. 2 If nothing appears on -screen instructions until the empty disc folder appears. 2 Open the folder that contains the file(s) you want to copy and drag them to play an audio...

User Guide
Page 50
To remove an ExpressCard module ✍ To remove an ExpressCard module when your computer is not removed properly, your computer is on -screen instructions to remove the ExpressCard module. 5 Push in the ExpressCard module toward the computer so that the module pops out. 6 Gently take hold of ...1 Double-click the Safely Remove Hardware icon on the taskbar. 2 Select the hardware you want to unplug. 3 Click Stop. 4 Follow the on . n 50 N Using Your VAIO Computer Removing an ExpressCard Module Follow the steps below to remove the ExpressCard module while your system may not work properly.
To remove an ExpressCard module ✍ To remove an ExpressCard module when your computer is not removed properly, your computer is on -screen instructions to remove the ExpressCard module. 5 Push in the ExpressCard module toward the computer so that the module pops out. 6 Gently take hold of ...1 Double-click the Safely Remove Hardware icon on the taskbar. 2 Select the hardware you want to unplug. 3 Click Stop. 4 Follow the on . n 50 N Using Your VAIO Computer Removing an ExpressCard Module Follow the steps below to remove the ExpressCard module while your system may not work properly.

User Guide
Page 55
It may take time to format the Memory Stick depending on -screen instructions. ! n 55 N Using Your VAIO Computer 5 Click Start. 6 Follow the on the media type.
It may take time to format the Memory Stick depending on -screen instructions. ! n 55 N Using Your VAIO Computer 5 Click Start. 6 Follow the on the media type.
User Guide
Page 61
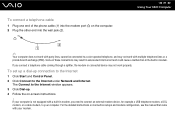
... (2). If you need to connect an external modem device, for example a USB telephone modem, a DSL modem, or a cable modem, to your modem. n 61 N Using Your VAIO Computer ✍ Your computer does not work with party lines, cannot be connected to the Internet under Network and Internet. To set up a dial-up... could cause a malfunction in the built-in modem, you connect a telephone cable coming through a splitter, the modem or connected device may not work properly. on -screen instructions. !
... (2). If you need to connect an external modem device, for example a USB telephone modem, a DSL modem, or a cable modem, to your modem. n 61 N Using Your VAIO Computer ✍ Your computer does not work with party lines, cannot be connected to the Internet under Network and Internet. To set up a dial-up... could cause a malfunction in the built-in modem, you connect a telephone cable coming through a splitter, the modem or connected device may not work properly. on -screen instructions. !

User Guide
Page 71
n 71 N Using Peripheral Devices Selecting Display Modes You can select which display to use as the primary monitor when an external display (desktop monitor, etc.) is connected to work on the video controller used in the computer. The procedure for detailed information on the video controller. If you want to your computer screen and the external display at the same time, see Using the Multiple Monitors Function (page 73) for more information. See the online specifications for selecting a display depends on your computer.
n 71 N Using Peripheral Devices Selecting Display Modes You can select which display to use as the primary monitor when an external display (desktop monitor, etc.) is connected to work on the video controller used in the computer. The procedure for detailed information on the video controller. If you want to your computer screen and the external display at the same time, see Using the Multiple Monitors Function (page 73) for more information. See the online specifications for selecting a display depends on your computer.

User Guide
Page 72
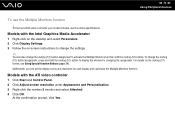
See the help file for more information. ✍ You may not be able to display the same contents on your computer screen and the external display or projector at the same time, depending on the type of your external display or projector. Before turning on ... external display. Models with the Intel Graphics Media Accelerator 1 Right-click on the desktop and select Personalize. 2 Click Display Settings. 3 Follow the on-screen instructions to change the settings. n 72 N Using Peripheral Devices To select a display Models with the ATI video controller When the computer has an external ...
See the help file for more information. ✍ You may not be able to display the same contents on your computer screen and the external display or projector at the same time, depending on the type of your external display or projector. Before turning on ... external display. Models with the Intel Graphics Media Accelerator 1 Right-click on the desktop and select Personalize. 2 Click Display Settings. 3 Follow the on-screen instructions to change the settings. n 72 N Using Peripheral Devices To select a display Models with the ATI video controller When the computer has an external ...

User Guide
Page 73
This allows you to drag objects, such as a single desktop. If you set different colors on each display. Otherwise, your computer screen and the external display can move the cursor from one display to the monitor port, your software may not support the Multiple Monitors function. You ...
This allows you to drag objects, such as a single desktop. If you set different colors on each display. Otherwise, your computer screen and the external display can move the cursor from one display to the monitor port, your software may not support the Multiple Monitors function. You ...
User Guide
Page 74
...muting (S1) button assignment to activate the Multiple Monitors function with the ATI video controller 1 Click Start and Control Panel. 2 Click Adjust screen resolution under Appearance and Personalization. 3 Right-click the number 2 monitor and select Attached. 4 Click OK. Additionally, you can also change ... click Yes. To find out which video controller your model includes, see Using Special-function Buttons (page 34). For details on -screen instructions to display the window for each display and customize the Multiple Monitors function. n 74 N Using Peripheral Devices To use the ...
...muting (S1) button assignment to activate the Multiple Monitors function with the ATI video controller 1 Click Start and Control Panel. 2 Click Adjust screen resolution under Appearance and Personalization. 3 Right-click the number 2 monitor and select Attached. 4 Click OK. Additionally, you can also change ... click Yes. To find out which video controller your model includes, see Using Special-function Buttons (page 34). For details on -screen instructions to display the window for each display and customize the Multiple Monitors function. n 74 N Using Peripheral Devices To use the ...

User Guide
Page 79
To disconnect a USB floppy disk drive ✍ To disconnect a USB floppy disk drive when your computer is on -screen instructions to malfunction. Disconnecting the drive when the computer is in a power saving mode (Sleep or Hibernate) may cause the computer to remove the floppy ...
To disconnect a USB floppy disk drive ✍ To disconnect a USB floppy disk drive when your computer is on -screen instructions to malfunction. Disconnecting the drive when the computer is in a power saving mode (Sleep or Hibernate) may cause the computer to remove the floppy ...

User Guide
Page 84
n 84 N Customizing Your VAIO Computer Setting the Password Use one of the BIOS setup options, as well as to start your computer. Once you have set the power-on password and need to be sent in the BIOS setup screen, as well as starting the computer. The user password is provided for the... two types of the power-on password is provided for service to set the password, you will be prompted to enter the password after the VAIO logo appears to reset it safe and private from unauthorized access. To set the machine password. ! If you must first set the user password, you...
n 84 N Customizing Your VAIO Computer Setting the Password Use one of the BIOS setup options, as well as to start your computer. Once you have set the power-on password and need to be sent in the BIOS setup screen, as well as starting the computer. The user password is provided for the... two types of the power-on password is provided for service to set the password, you will be prompted to enter the password after the VAIO logo appears to reset it safe and private from unauthorized access. To set the machine password. ! If you must first set the user password, you...

User Guide
Page 85
At the confirmation prompt, press the Enter key. The BIOS setup screen appears. If not, restart the computer and press the F2 key several times when the VAIO logo appears. 3 Press the < or , key to select Security to select Exit, select Exit Setup, and then press the Enter key. The password...to display the Security tab, select Set Machine Password, and then press the Enter key. 4 On the password entry screen, enter the password twice and press the Enter key. n 85 N Customizing Your VAIO Computer To add the power-on password (machine password) 1 Turn on the computer. 2 Press the F2 key ...
At the confirmation prompt, press the Enter key. The BIOS setup screen appears. If not, restart the computer and press the F2 key several times when the VAIO logo appears. 3 Press the < or , key to select Security to select Exit, select Exit Setup, and then press the Enter key. The password...to display the Security tab, select Set Machine Password, and then press the Enter key. 4 On the password entry screen, enter the password twice and press the Enter key. n 85 N Customizing Your VAIO Computer To add the power-on password (machine password) 1 Turn on the computer. 2 Press the F2 key ...

