User Guide
Page 4
n4 N Precautions ...108 Handling the LCD Screen ...109 Using the Power Source ...110 Handling Your Computer ...111 Handling the Built-in MOTION EYE Camera...113 Handling Floppy Disks ...114 Handling Discs ...115 Using the Battery Pack ...116 Using Headphones ...118 Handling the Memory Stick ...119 Handling the Hard Disk ...120 Updating Your Computer ...121 Troubleshooting ...122 Computer ...124 System Security ...131 Battery...132 Built-in MOTION EYE Camera...134 Internet ...137 Networking ...139 Bluetooth Technology ...142 Optical Discs ...147 Display ...152 Printing ...157 Microphone ...158
n4 N Precautions ...108 Handling the LCD Screen ...109 Using the Power Source ...110 Handling Your Computer ...111 Handling the Built-in MOTION EYE Camera...113 Handling Floppy Disks ...114 Handling Discs ...115 Using the Battery Pack ...116 Using Headphones ...118 Handling the Memory Stick ...119 Handling the Hard Disk ...120 Updating Your Computer ...121 Troubleshooting ...122 Computer ...124 System Security ...131 Battery...132 Built-in MOTION EYE Camera...134 Internet ...137 Networking ...139 Bluetooth Technology ...142 Optical Discs ...147 Display ...152 Printing ...157 Microphone ...158
User Guide
Page 13
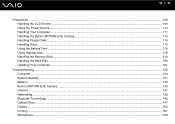
... shown on the following pages. Front A Built-in MOTION EYE camera (page 33) B Built-in MOTION EYE camera indicator (page 19) C Built-in microphone (monaural) D LCD screen (page 109) E Built-in speakers (stereo) F Keyboard (page 30) G Touch pad (page 31) H Charge indicator (page 19) I Hard disk drive/Optical disc drive indicator (page...
... shown on the following pages. Front A Built-in MOTION EYE camera (page 33) B Built-in MOTION EYE camera indicator (page 19) C Built-in microphone (monaural) D LCD screen (page 109) E Built-in speakers (stereo) F Keyboard (page 30) G Touch pad (page 31) H Charge indicator (page 19) I Hard disk drive/Optical disc drive indicator (page...

User Guide
Page 21
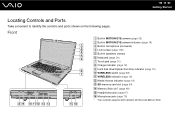
Installing the Battery Pack To install the battery pack 1 Turn off the computer and close the LCD screen lid. 2 Slide the battery LOCK switch (1) inward. n 21 N Getting Started Using the Battery Pack The battery pack supplied with your computer is not fully charged at the time of delivery.
Installing the Battery Pack To install the battery pack 1 Turn off the computer and close the LCD screen lid. 2 Slide the battery LOCK switch (1) inward. n 21 N Getting Started Using the Battery Pack The battery pack supplied with your computer is not fully charged at the time of delivery.
User Guide
Page 27
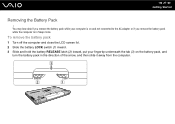
n 27 N Getting Started Removing the Battery Pack ! To remove the battery pack 1 Turn off the computer and close the LCD screen lid. 2 Slide the battery LOCK switch (1) inward. 3 Slide and hold the battery RELEASE latch (2) inward, put your computer is in the direction of the arrow, and then slide it away from the computer. You may lose data if you remove the battery pack while your fingertip underneath the tab (3) on and not connected to the AC adapter or if you remove the battery pack while the computer is on the battery pack, and turn the battery pack in Sleep mode.
n 27 N Getting Started Removing the Battery Pack ! To remove the battery pack 1 Turn off the computer and close the LCD screen lid. 2 Slide the battery LOCK switch (1) inward. 3 Slide and hold the battery RELEASE latch (2) inward, put your computer is in the direction of the arrow, and then slide it away from the computer. You may lose data if you remove the battery pack while your fingertip underneath the tab (3) on and not connected to the AC adapter or if you remove the battery pack while the computer is on the battery pack, and turn the battery pack in Sleep mode.
User Guide
Page 30
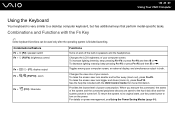
To decrease lighting intensity, keep pressing Fn+F6 or press Fn+F6 and then M or ,. n 30 N Using Your VAIO Computer Using the Keyboard Your keyboard is finished launching. Combinations and Functions with the Fn Key ✍ Some keyboard functions can be used only... keys that perform model-specific tasks. To increase lighting intensity, keep pressing Fn+F5 or press Fn+F5 and then m or Changes the LCD brightness of your computer screen. Combinations/Feature Fn + % (F2): speaker switch Fn + 8 (F5/F6): brightness control Fn + /T (F7): display output Fn + / (F9/F10): zoom Fn + (F12): ...
To decrease lighting intensity, keep pressing Fn+F6 or press Fn+F6 and then M or ,. n 30 N Using Your VAIO Computer Using the Keyboard Your keyboard is finished launching. Combinations and Functions with the Fn Key ✍ Some keyboard functions can be used only... keys that perform model-specific tasks. To increase lighting intensity, keep pressing Fn+F5 or press Fn+F5 and then m or Changes the LCD brightness of your computer screen. Combinations/Feature Fn + % (F2): speaker switch Fn + 8 (F5/F6): brightness control Fn + /T (F7): display output Fn + / (F9/F10): zoom Fn + (F12): ...
User Guide
Page 95
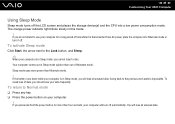
... loss of Sleep mode quicker than Hibernate mode. ! n 95 N Customizing Your VAIO Computer Using Sleep Mode Sleep mode turns off . Sleep mode uses more than four seconds, your computer for more power than out of time while it off the LCD screen and places the storage device(s) and the CPU into Hibernate mode...
... loss of Sleep mode quicker than Hibernate mode. ! n 95 N Customizing Your VAIO Computer Using Sleep Mode Sleep mode turns off . Sleep mode uses more than four seconds, your computer for more power than out of time while it off the LCD screen and places the storage device(s) and the CPU into Hibernate mode...
User Guide
Page 108
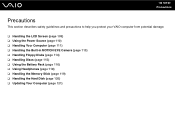
n 108 N Precautions Precautions This section describes safety guidelines and precautions to help you protect your VAIO computer from potential damage. ❑ Handling the LCD Screen (page 109) ❑ Using the Power Source (page 110) ❑ Handling Your Computer (page 111) ❑ Handling the Built-in MOTION EYE Camera (page 113) &#...
n 108 N Precautions Precautions This section describes safety guidelines and precautions to help you protect your VAIO computer from potential damage. ❑ Handling the LCD Screen (page 109) ❑ Using the Power Source (page 110) ❑ Handling Your Computer (page 111) ❑ Handling the Built-in MOTION EYE Camera (page 113) &#...
User Guide
Page 109
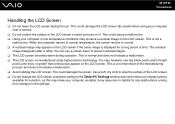
... green) that continuously appear on the LCD screen. The residual image disappears after a while. You can use a screen saver to the settings. Sony assumes no liability for a long period of time. n 109 N Precautions Handling the LCD Screen ❑ Do not leave the LCD screen facing the sun. This could damage the LCD screen. This is manufactured using your computer in...
... green) that continuously appear on the LCD screen. The residual image disappears after a while. You can use a screen saver to the settings. Sony assumes no liability for a long period of time. n 109 N Precautions Handling the LCD Screen ❑ Do not leave the LCD screen facing the sun. This could damage the LCD screen. This is manufactured using your computer in...
User Guide
Page 112
To find the nearest center or agent, see Sony Support Information (page 170). ❑ Make sure you disconnect the AC adapter and remove the battery pack before turning on the LCD screen or its edges when opening the LCD screen lid or lifting your data regularly. ❑ Do not exert pressure on the... inside the computer. If any problems occur, unplug the computer and contact an authorized Sony Service Center. To carry the computer with the lid open the computer, hold the computer with the other. The LCD screen may be sure to hold the base with one hand and gently lift the...
To find the nearest center or agent, see Sony Support Information (page 170). ❑ Make sure you disconnect the AC adapter and remove the battery pack before turning on the LCD screen or its edges when opening the LCD screen lid or lifting your data regularly. ❑ Do not exert pressure on the... inside the computer. If any problems occur, unplug the computer and contact an authorized Sony Service Center. To carry the computer with the lid open the computer, hold the computer with the other. The LCD screen may be sure to hold the base with one hand and gently lift the...

User Guide
Page 134
... not indicate a malfunction. ❑ If the problem persists, restart your computer. See Handling the Built-in MOTION EYE camera. ❑ The video memory of the LCD screen might help file included with your software application for example horizontal streaks, if you view a rapid-moving object.
... not indicate a malfunction. ❑ If the problem persists, restart your computer. See Handling the Built-in MOTION EYE camera. ❑ The video memory of the LCD screen might help file included with your software application for example horizontal streaks, if you view a rapid-moving object.
User Guide
Page 152
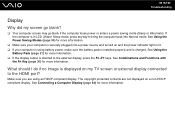
... Battery Pack (page 21) for more information. ❑ If the display output is charged. n 152 N Troubleshooting Display Why did my screen go blank? ❑ Your computer screen may go blank if the computer loses power or enters a power saving mode (Sleep or Hibernate). See Using the Power Saving Modes (page...the power indicator light is lit. ❑ If your computer is using an HDCP-compliant display. What should I do if no image is in LCD (Video) Sleep mode, press any key to the external display, press the Fn+F7 keys. See Combinations and Functions with the Fn Key (page...
... Battery Pack (page 21) for more information. ❑ If the display output is charged. n 152 N Troubleshooting Display Why did my screen go blank? ❑ Your computer screen may go blank if the computer loses power or enters a power saving mode (Sleep or Hibernate). See Using the Power Saving Modes (page...the power indicator light is lit. ❑ If your computer is using an HDCP-compliant display. What should I do if no image is in LCD (Video) Sleep mode, press any key to the external display, press the Fn+F7 keys. See Combinations and Functions with the Fn Key (page...
User Guide
Page 153
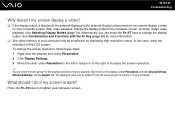
...can press the Fn+F7 keys to brighten your computer may be insufficient for more information. ❑ The video memory of your computer screen. Stop video playback, change the display output. Alternatively, you cannot display a video on your computer. See Combinations and Functions with the... Fn Key (page 30) for displaying high resolution videos. What should I do if my screen is disconnected, you can check the total amount of the LCD screen. Right-click on the desktop, select Personalize, and click Display Settings, Advanced Settings, and the Adaptor tab...
...can press the Fn+F7 keys to brighten your computer may be insufficient for more information. ❑ The video memory of your computer screen. Stop video playback, change the display output. Alternatively, you cannot display a video on your computer. See Combinations and Functions with the... Fn Key (page 30) for displaying high resolution videos. What should I do if my screen is disconnected, you can check the total amount of the LCD screen. Right-click on the desktop, select Personalize, and click Display Settings, Advanced Settings, and the Adaptor tab...

User Guide
Page 154
... Change advanced power settings. 4 Select the Advanced settings tab. 5 Double-click Display. 6 Adjust the LCD brightness setting in the item for brightness adjustment. n 154 N Troubleshooting What should I do if the LCD brightness of my screen changes? ❑ The LCD brightness setting, adjusted with the Fn+F5/F6 keys, is temporary and may be restored...
... Change advanced power settings. 4 Select the Advanced settings tab. 5 Double-click Display. 6 Adjust the LCD brightness setting in the item for brightness adjustment. n 154 N Troubleshooting What should I do if the LCD brightness of my screen changes? ❑ The LCD brightness setting, adjusted with the Fn+F5/F6 keys, is temporary and may be restored...

