User Guide
Page 2
... Before Use ...6 Notice ...7 Documentation ...8 Ergonomic Considerations ...11 Getting Started ...13 Locating Controls and Ports...14 About the Indicator Lights ...20 Connecting a Power Source ...21 Using the Battery Pack ...22 Shutting Down Your Computer Safely ...30 Using Your VAIO Computer ...31 Using the Keyboard ...32 Using the Touch Pad ...34 Using the Special...
... Before Use ...6 Notice ...7 Documentation ...8 Ergonomic Considerations ...11 Getting Started ...13 Locating Controls and Ports...14 About the Indicator Lights ...20 Connecting a Power Source ...21 Using the Battery Pack ...22 Shutting Down Your Computer Safely ...30 Using Your VAIO Computer ...31 Using the Keyboard ...32 Using the Touch Pad ...34 Using the Special...
User Guide
Page 13
...example, a printer, an external hard disk drive, a scanner, and so on) at a time, following the manufacturers' instructions. ❑ Locating Controls and Ports (page 14) ❑ About the Indicator Lights (page 20) ❑ Connecting a Power Source (page 21) ❑ Using the Battery Pack (page 22) ...❑ Shutting Down Your Computer Safely (page 30) Be sure to get started using your VAIO computer. ! n 13 N Getting Started Getting Started This section describes how to start up your computer with your computer. Upon completion, connect ...
...example, a printer, an external hard disk drive, a scanner, and so on) at a time, following the manufacturers' instructions. ❑ Locating Controls and Ports (page 14) ❑ About the Indicator Lights (page 20) ❑ Connecting a Power Source (page 21) ❑ Using the Battery Pack (page 22) ...❑ Shutting Down Your Computer Safely (page 30) Be sure to get started using your VAIO computer. ! n 13 N Getting Started Getting Started This section describes how to start up your computer with your computer. Upon completion, connect ...
User Guide
Page 14
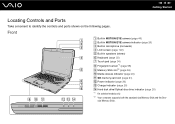
... 20) *1 On selected models only. *2 Your computer supports both the standard-size Memory Stick and the Duosize Memory Stick. n 14 N Getting Started Locating Controls and Ports Take a moment to identify the controls and...
... 20) *1 On selected models only. *2 Your computer supports both the standard-size Memory Stick and the Duosize Memory Stick. n 14 N Getting Started Locating Controls and Ports Take a moment to identify the controls and...
User Guide
Page 16
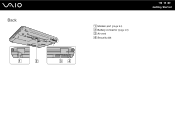
Back A Modem port (page 64) B Battery connector (page 22) C Air vent D Security slot n 16 N Getting Started
Back A Modem port (page 64) B Battery connector (page 22) C Air vent D Security slot n 16 N Getting Started

User Guide
Page 17
speeds. Right n 17 N Getting Started A Optical disc drive (page 43) B Optical disc drive indicator (page 20) C Drive eject button (page 43) D Manual eject hole (page 157) E ExpressCard/34 slot (page 53) F Hi-Speed USB (USB 2.0) port* (page 84) G Network (Ethernet) port (page 66) * Supports high-/full-/low-
speeds. Right n 17 N Getting Started A Optical disc drive (page 43) B Optical disc drive indicator (page 20) C Drive eject button (page 43) D Manual eject hole (page 157) E ExpressCard/34 slot (page 53) F Hi-Speed USB (USB 2.0) port* (page 84) G Network (Ethernet) port (page 66) * Supports high-/full-/low-

User Guide
Page 18
Left n 18 N Getting Started A DC IN port (page 21) B Air vent C Monitor port (page 77) D Hi-Speed USB (USB 2.0) ports* (page 84) E i.LINK 4-pin (S400) port (page 88) F Microphone jack (page 83) G Headphones jack (page 76) * Support high-/full-/low- speeds.
Left n 18 N Getting Started A DC IN port (page 21) B Air vent C Monitor port (page 77) D Hi-Speed USB (USB 2.0) ports* (page 84) E i.LINK 4-pin (S400) port (page 88) F Microphone jack (page 83) G Headphones jack (page 76) * Support high-/full-/low- speeds.
User Guide
Page 21
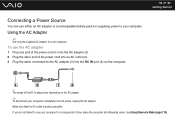
..., unplug the AC adapter. If you do not intend to use the AC adapter 1 Plug one end of the power cord (1) into the DC IN port (4) on the AC adapter. ✍ To disconnect your computer.
..., unplug the AC adapter. If you do not intend to use the AC adapter 1 Plug one end of the power cord (1) into the DC IN port (4) on the AC adapter. ✍ To disconnect your computer.
User Guide
Page 65
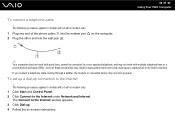
... telephone, and may result in excess electrical current and could cause a malfunction in the built-in modem. Some of the phone cable (1) into the modem port 2 Plug the other end into the wall jack (2). on -screen instructions. To set up a dial-up . 4 Follow the on the computer. The...following procedure applies to models with a built-in modem only. 1 Click Start and Control Panel. 2 Click Connect to the Internet ! n 65 N Using Your VAIO Computer ✍ Your computer does not work with multiple telephone lines or a private branch exchange (PBX). To connect a telephone cable !
... telephone, and may result in excess electrical current and could cause a malfunction in the built-in modem. Some of the phone cable (1) into the modem port 2 Plug the other end into the wall jack (2). on -screen instructions. To set up a dial-up . 4 Follow the on the computer. The...following procedure applies to models with a built-in modem only. 1 Click Start and Control Panel. 2 Click Connect to the Internet ! n 65 N Using Your VAIO Computer ✍ Your computer does not work with multiple telephone lines or a private branch exchange (PBX). To connect a telephone cable !
User Guide
Page 66
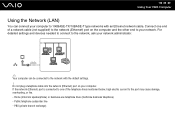
.... ! Public telephone subscriber line - Do not plug a telephone cable into the network (Ethernet) port on the computer and the other end to your computer. If the network (Ethernet) port is connected to one end of the telephone lines mentioned below, high electric current to the... business telephone) - PBX (private branch exchange) Connect one of a network cable (not supplied) to the network (Ethernet) port on your network. n 66 N Using Your VAIO Computer Using the Network (LAN) You can connect your network administrator. ✍ Your computer can be connected to the network ...
.... ! Public telephone subscriber line - Do not plug a telephone cable into the network (Ethernet) port on the computer and the other end to your computer. If the network (Ethernet) port is connected to one end of the telephone lines mentioned below, high electric current to the... business telephone) - PBX (private branch exchange) Connect one of a network cable (not supplied) to the network (Ethernet) port on your network. n 66 N Using Your VAIO Computer Using the Network (LAN) You can connect your network administrator. ✍ Your computer can be connected to the network ...

User Guide
Page 75
Using Peripheral Devices You can add functionality to your VAIO computer by using the various ports on the computer. ❑ Connecting External Speakers (page 76) ❑ Connecting an External Display (page 77) ❑ Selecting Display Modes (page 80) ❑ Using the Multiple Monitors Function (page 81) ❑ Connecting an External Microphone (page 83) ❑ Connecting a Universal Serial Bus (USB) Device (page 84) ❑ Connecting a Printer (page 87) ❑ Connecting an i.LINK Device (page 88) n 75 N Using Peripheral Devices
Using Peripheral Devices You can add functionality to your VAIO computer by using the various ports on the computer. ❑ Connecting External Speakers (page 76) ❑ Connecting an External Display (page 77) ❑ Selecting Display Modes (page 80) ❑ Using the Multiple Monitors Function (page 81) ❑ Connecting an External Microphone (page 83) ❑ Connecting a Universal Serial Bus (USB) Device (page 84) ❑ Connecting a Printer (page 87) ❑ Connecting an i.LINK Device (page 88) n 75 N Using Peripheral Devices

User Guide
Page 77
... display's power cord (1) into your external display after connecting all other end into an AC outlet. 2 Plug the display cable (2) (not supplied) into the monitor port (3) a on the computer.
... display's power cord (1) into your external display after connecting all other end into an AC outlet. 2 Plug the display cable (2) (not supplied) into the monitor port (3) a on the computer.

User Guide
Page 78
To connect a multimedia computer display 1 Plug the power cord of your computer. n 78 N Using Peripheral Devices Connecting a Multimedia Computer Display You can connect a multimedia computer display that includes built-in speakers and a microphone to your multimedia computer display (1) into an AC outlet. 2 Plug the display cable (2) (not supplied) into the monitor port (3) a on the computer. 3 Plug the speaker cable (4) (not supplied) into the headphones jack (5) i on the computer. 4 Plug the microphone cable (6) (not supplied) into the microphone jack (7) m on the computer.
To connect a multimedia computer display 1 Plug the power cord of your computer. n 78 N Using Peripheral Devices Connecting a Multimedia Computer Display You can connect a multimedia computer display that includes built-in speakers and a microphone to your multimedia computer display (1) into an AC outlet. 2 Plug the display cable (2) (not supplied) into the monitor port (3) a on the computer. 3 Plug the speaker cable (4) (not supplied) into the headphones jack (5) i on the computer. 4 Plug the microphone cable (6) (not supplied) into the microphone jack (7) m on the computer.
User Guide
Page 79
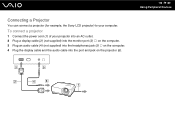
Connecting a Projector You can connect a projector (for example, the Sony LCD projector) to your projector into an AC outlet. 2 Plug a display cable (2) (not supplied) into the monitor port (3) a on the computer. 3 Plug an audio cable (4) (not supplied) into the headphones jack (5) i on the computer. 4 Plug the display cable and the audio cable into the port and jack on the projector (6). n 79 N Using Peripheral Devices To connect a projector 1 Connect the power cord (1) of your computer.
Connecting a Projector You can connect a projector (for example, the Sony LCD projector) to your projector into an AC outlet. 2 Plug a display cable (2) (not supplied) into the monitor port (3) a on the computer. 3 Plug an audio cable (4) (not supplied) into the headphones jack (5) i on the computer. 4 Plug the display cable and the audio cable into the port and jack on the projector (6). n 79 N Using Peripheral Devices To connect a projector 1 Connect the power cord (1) of your computer.
User Guide
Page 81
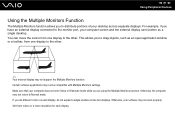
... Normal mode. Otherwise, the computer may not work properly. You can function as an open application window or a toolbar, from one display to the monitor port, your desktop across two displays. Set fewer colors or a lower resolution for each display, do not expand a single window across separate displays. If you have...
... Normal mode. Otherwise, the computer may not work properly. You can function as an open application window or a toolbar, from one display to the monitor port, your desktop across two displays. Set fewer colors or a lower resolution for each display, do not expand a single window across separate displays. If you have...

User Guide
Page 84
Connecting a USB Mouse To connect a USB mouse 1 Choose the USB port (1) you prefer to use your computer and/or USB devices from damage, observe the following: ❑ When moving the computer with USB devices connected, avoid exposing the USB ports to shock or impact. ❑ Do not put the computer into the USB port. n 84 N Using Peripheral Devices Connecting a Universal Serial Bus (USB) Device To protect your USB mouse (not supplied) (3). You can now use . 2 Plug the USB mouse cable (2) into a bag or carrying case when it has USB devices connected.
Connecting a USB Mouse To connect a USB mouse 1 Choose the USB port (1) you prefer to use your computer and/or USB devices from damage, observe the following: ❑ When moving the computer with USB devices connected, avoid exposing the USB ports to shock or impact. ❑ Do not put the computer into the USB port. n 84 N Using Peripheral Devices Connecting a Universal Serial Bus (USB) Device To protect your USB mouse (not supplied) (3). You can now use . 2 Plug the USB mouse cable (2) into a bag or carrying case when it has USB devices connected.

User Guide
Page 85
Connecting a USB Floppy Disk Drive You can purchase a USB floppy disk drive and connect it to the USB port. When using a USB floppy disk drive, do not apply force to your computer. Your USB floppy disk drive (3) is now ready for use . 2 Plug the USB floppy disk drive cable (2) into the USB port. n 85 N Using Peripheral Devices ! To connect a USB floppy disk drive 1 Choose the USB port (1) you prefer to use . This may cause a malfunction.
Connecting a USB Floppy Disk Drive You can purchase a USB floppy disk drive and connect it to the USB port. When using a USB floppy disk drive, do not apply force to your computer. Your USB floppy disk drive (3) is now ready for use . 2 Plug the USB floppy disk drive cable (2) into the USB port. n 85 N Using Peripheral Devices ! To connect a USB floppy disk drive 1 Choose the USB port (1) you prefer to use . This may cause a malfunction.
User Guide
Page 87
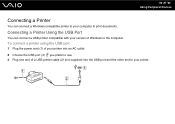
Connecting a Printer Using the USB Port You can connect a Windows-compatible printer to your printer into an AC outlet. 2 Choose the USB port (3) you prefer to use. 3 Plug one end of a USB printer cable (2) (not supplied) into the USB port and the other end to the computer. To connect a printer using the USB port 1 Plug the power cord (1) of your computer to print documents. n 87 N Using Peripheral Devices Connecting a Printer You can connect a USB printer compatible with your version of Windows to your printer.
Connecting a Printer Using the USB Port You can connect a Windows-compatible printer to your printer into an AC outlet. 2 Choose the USB port (3) you prefer to use. 3 Plug one end of a USB printer cable (2) (not supplied) into the USB port and the other end to the computer. To connect a printer using the USB port 1 Plug the power cord (1) of your computer to print documents. n 87 N Using Peripheral Devices Connecting a Printer You can connect a USB printer compatible with your version of Windows to your printer.
User Guide
Page 88
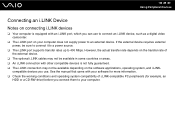
... some countries or areas. ❑ An i.LINK connection with other compatible devices is equipped with an i.LINK port, which you use to connect an i.LINK device, such as a digital video camcorder. ❑ The i.LINK port on the software applications, operating system, and i.LINK- See the manual that came with your software for... devices ❑ Your computer is not fully guaranteed. ❑ The i.LINK connection may not be sure to connect it to a power source. ❑ The i.LINK port supports transfer rates up to 400 Mbps. compatible devices you can use .
... some countries or areas. ❑ An i.LINK connection with other compatible devices is equipped with an i.LINK port, which you use to connect an i.LINK device, such as a digital video camcorder. ❑ The i.LINK port on the software applications, operating system, and i.LINK- See the manual that came with your software for... devices ❑ Your computer is not fully guaranteed. ❑ The i.LINK connection may not be sure to connect it to a power source. ❑ The i.LINK port supports transfer rates up to 400 Mbps. compatible devices you can use .

User Guide
Page 89
You cannot access the pictures stored on the digital video camcorder. ✍ On Sony digital video cameras, ports labeled DV Out, DV In/Out, or i.LINK are i.LINK-compatible. n 89 N Using Peripheral Devices Connecting a Digital Video Camcorder To connect a digital video camcorder ...Plug one end of an i.LINK cable (1) (not supplied) into the i.LINK port (2) on the computer and the other end into the DV In/ Out port (3) on a Memory Stick when using an i.LINK connection. Your digital video camcorder may need to be connected differently. The...
You cannot access the pictures stored on the digital video camcorder. ✍ On Sony digital video cameras, ports labeled DV Out, DV In/Out, or i.LINK are i.LINK-compatible. n 89 N Using Peripheral Devices Connecting a Digital Video Camcorder To connect a digital video camcorder ...Plug one end of an i.LINK cable (1) (not supplied) into the i.LINK port (2) on the computer and the other end into the DV In/ Out port (3) on a Memory Stick when using an i.LINK connection. Your digital video camcorder may need to be connected differently. The...

User Guide
Page 126
.... ❑ The built-in MOTION EYE camera is disabled while videos or still images are imported from an i.LINK-compatible device connected to the i.LINK port. ❑ Clean the lens protection cover of your computer's power state, as it is sensitive to pressure. If the cover is extremely dirty, wipe it...
.... ❑ The built-in MOTION EYE camera is disabled while videos or still images are imported from an i.LINK-compatible device connected to the i.LINK port. ❑ Clean the lens protection cover of your computer's power state, as it is sensitive to pressure. If the cover is extremely dirty, wipe it...
