
User Guide
Page 2
... and Ports...14 About the Indicator Lights ...20 Connecting a Power Source ...21 Using the Battery Pack ...22 Shutting Down Your Computer Safely ...29 Using Your VAIO Computer ...30 Using the Keyboard ...31 Using the Touch Pad ...32 Using the Special-function Button ...33 Using the Touch Sensor Buttons ...34 Using the...
... and Ports...14 About the Indicator Lights ...20 Connecting a Power Source ...21 Using the Battery Pack ...22 Shutting Down Your Computer Safely ...29 Using Your VAIO Computer ...30 Using the Keyboard ...31 Using the Touch Pad ...32 Using the Special-function Button ...33 Using the Touch Sensor Buttons ...34 Using the...

User Guide
Page 3
... External Microphone ...80 Connecting a Universal Serial Bus (USB) Device...81 Connecting a Printer ...84 Connecting an i.LINK Device ...85 Connecting to a Network (LAN) ...87 Customizing Your VAIO Computer ...88 Setting the Password ...89 Using Fingerprint Authentication ...96 Setting Up Your Computer with...
... External Microphone ...80 Connecting a Universal Serial Bus (USB) Device...81 Connecting a Printer ...84 Connecting an i.LINK Device ...85 Connecting to a Network (LAN) ...87 Customizing Your VAIO Computer ...88 Setting the Password ...89 Using Fingerprint Authentication ...96 Setting Up Your Computer with...
User Guide
Page 4
n4 N Precautions ...119 Handling the LCD Screen ...120 Using the Power Source ...121 Handling Your Computer ...122 Handling the Built-in MOTION EYE Camera...124 Handling Floppy Disks ...125 Handling Discs ...126 Using the Battery Pack ...127 Using Headphones ...129 Handling the Memory Stick ...130 Handling the Hard Disk ...131 Updating Your Computer ...132 Troubleshooting ...133 Computer ...135 System Security ...141 Battery...142 Built-in MOTION EYE Camera...144 Internet ...147 Networking ...149 Bluetooth Technology ...152 Optical Discs ...157 Display ...161 Printing ...165 Microphone ...166
n4 N Precautions ...119 Handling the LCD Screen ...120 Using the Power Source ...121 Handling Your Computer ...122 Handling the Built-in MOTION EYE Camera...124 Handling Floppy Disks ...125 Handling Discs ...126 Using the Battery Pack ...127 Using Headphones ...129 Handling the Memory Stick ...130 Handling the Hard Disk ...131 Updating Your Computer ...132 Troubleshooting ...133 Computer ...135 System Security ...141 Battery...142 Built-in MOTION EYE Camera...144 Internet ...147 Networking ...149 Bluetooth Technology ...152 Optical Discs ...157 Display ...161 Printing ...165 Microphone ...166
User Guide
Page 5
n5 N Mouse ...167 Speakers ...168 Touch Pad...170 Keyboard...171 Floppy Disks ...172 Audio/Video...173 Memory Stick ...175 Peripherals ...176 Support Options ...177 Sony Support Information ...178 Program Support Information...181 Trademarks ...191
n5 N Mouse ...167 Speakers ...168 Touch Pad...170 Keyboard...171 Floppy Disks ...172 Audio/Video...173 Memory Stick ...175 Peripherals ...176 Support Options ...177 Sony Support Information ...178 Program Support Information...181 Trademarks ...191
User Guide
Page 6
External views illustrated in audio, video, computing, and communications to the on-screen User Guide. n6 N Before Use Before Use Congratulations on your purchase of this manual may look slightly different from those of -the-art personal computing experience. ! Sony has combined leading-edge technology in this Sony VAIO® computer, and welcome to provide state-of your computer.
External views illustrated in audio, video, computing, and communications to the on-screen User Guide. n6 N Before Use Before Use Congratulations on your purchase of this manual may look slightly different from those of -the-art personal computing experience. ! Sony has combined leading-edge technology in this Sony VAIO® computer, and welcome to provide state-of your computer.
User Guide
Page 7
... LCD backlight is an international program that promotes energy saving through the use of inactivity. ENERGY STAR n7 N Before Use As an ENERGY STAR Partner, Sony has determined that effectively reduce energy consumption.
... LCD backlight is an international program that promotes energy saving through the use of inactivity. ENERGY STAR n7 N Before Use As an ENERGY STAR Partner, Sony has determined that effectively reduce energy consumption.

User Guide
Page 8
...of your computer must be connected to the Sony online support web site at the following URLs: http://esupport.sony.com/EN/VAIO/ for customers in USA http://www.sony.ca/support/ for customers in Canada http://esupport.sony.com/ES/VAIO/ for customers in Spanish-speaking Latin American ...countries or areas http://esupport.sony.com/ES/VAIO/BR/ for customers in this manual)...
...of your computer must be connected to the Sony online support web site at the following URLs: http://esupport.sony.com/EN/VAIO/ for customers in USA http://www.sony.ca/support/ for customers in Canada http://esupport.sony.com/ES/VAIO/ for customers in Spanish-speaking Latin American ...countries or areas http://esupport.sony.com/ES/VAIO/BR/ for customers in this manual)...
User Guide
Page 9
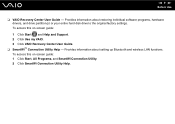
... original factory settings. To access this on -screen guide: 1 Click Start and Help and Support. 2 Click Use my VAIO. 3 Click VAIO Recovery Center User Guide. ❑ SmartWi™ Connection Utility Help - n9 N Before Use ❑ VAIO Recovery Center User Guide - To access this on -screen guide: 1 Click Start, All Programs, and SmartWi Connection...
... original factory settings. To access this on -screen guide: 1 Click Start and Help and Support. 2 Click Use my VAIO. 3 Click VAIO Recovery Center User Guide. ❑ SmartWi™ Connection Utility Help - n9 N Before Use ❑ VAIO Recovery Center User Guide - To access this on -screen guide: 1 Click Start, All Programs, and SmartWi Connection...
User Guide
Page 10
... Use Help and Support Help and Support is easy to access and provides a single location for general information and technical assistance for your VAIO computer with VAIO Care, system restore, backup and recovery, and contact Sony support. To access Help and Support, click Start and Help and Support. ❑ Get started with my...
... Use Help and Support Help and Support is easy to access and provides a single location for general information and technical assistance for your VAIO computer with VAIO Care, system restore, backup and recovery, and contact Sony support. To access Help and Support, click Start and Help and Support. ❑ Get started with my...
User Guide
Page 11
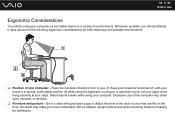
Sit in a chair with your forearms horizontal (2), with good back support. Excessive use of environments. Whenever possible, you (1). Place the computer directly in front of you should attempt to take account of the following ergonomic considerations for both stationary and portable environments: ❑ Position of your computer - Adjust the level of the chair so your computer as a portable device in a neutral, comfortable position (3) while using your sides. A footrest may strain eyes, muscles, or tendons. ❑ Furniture and posture - n 11 N Before Use ...
Sit in a chair with your forearms horizontal (2), with good back support. Excessive use of environments. Whenever possible, you (1). Place the computer directly in front of you should attempt to take account of the following ergonomic considerations for both stationary and portable environments: ❑ Position of your computer - Adjust the level of the chair so your computer as a portable device in a neutral, comfortable position (3) while using your sides. A footrest may strain eyes, muscles, or tendons. ❑ Furniture and posture - n 11 N Before Use ...
User Guide
Page 12
When using an external display, set the display at eye level or slightly lower when you are sitting in front of the display as well. ❑ Lighting - Use the display's tilting feature to your comfort and work efficiency. ❑ Positioning an external display - n 12 N Before Use ❑ Viewing angle of the display to the proper position. Proper lighting adds to find the best position. You can reduce eye strain and muscle fatigue by adjusting the tilt of the computer's display - Make sure the display screen is at a comfortable viewing distance. Choose a location ...
When using an external display, set the display at eye level or slightly lower when you are sitting in front of the display as well. ❑ Lighting - Use the display's tilting feature to your comfort and work efficiency. ❑ Positioning an external display - n 12 N Before Use ❑ Viewing angle of the display to the proper position. Proper lighting adds to find the best position. You can reduce eye strain and muscle fatigue by adjusting the tilt of the computer's display - Make sure the display screen is at a comfortable viewing distance. Choose a location ...
User Guide
Page 13
n 13 N Getting Started Getting Started This section describes how to start up your computer with your computer. Be sure to get started using your VAIO computer. ! Upon completion, connect one device (for the first time, do not connect any other hardware that did not originally come with only the supplied ...
n 13 N Getting Started Getting Started This section describes how to start up your computer with your computer. Be sure to get started using your VAIO computer. ! Upon completion, connect one device (for the first time, do not connect any other hardware that did not originally come with only the supplied ...
User Guide
Page 14
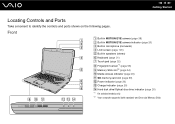
Front A Built-in MOTION EYE camera (page 38) B Built-in MOTION EYE camera indicator (page 20) C Built-in microphone (monaural) D LCD screen (page 120) E Built-in speakers (stereo) F Keyboard (page 31) G Touch pad (page 32) H Fingerprint sensor*1 (page 96) I Memory Stick slot*2 (page 54) J Media Access indicator (page 20) K SD memory card slot (page 59) L Power indicator (page 20) M Charge indicator (page 20) N Hard disk drive/Optical disc drive indicator (page 20) *1 On selected models only. *2 Your computer supports both standard- n 14 N Getting Started Locating Controls and Ports Take a ...
Front A Built-in MOTION EYE camera (page 38) B Built-in MOTION EYE camera indicator (page 20) C Built-in microphone (monaural) D LCD screen (page 120) E Built-in speakers (stereo) F Keyboard (page 31) G Touch pad (page 32) H Fingerprint sensor*1 (page 96) I Memory Stick slot*2 (page 54) J Media Access indicator (page 20) K SD memory card slot (page 59) L Power indicator (page 20) M Charge indicator (page 20) N Hard disk drive/Optical disc drive indicator (page 20) *1 On selected models only. *2 Your computer supports both standard- n 14 N Getting Started Locating Controls and Ports Take a ...
User Guide
Page 15
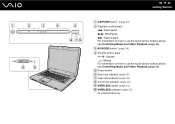
n 15 N Getting Started A CAPTURE button* (page 33) B Playback control area* : Fast-rewind : Play/Pause : Fast-forward For information on how to use the touch sensor buttons above , see Controlling Music and Video Playback (page 35). C AV MODE button* (page 34) D Volume control area* / : Volume : Muting For information on how to use the touch sensor buttons above , see Controlling Music and Video Playback (page 35). E Power button F Num lock indicator (page 20) G Caps lock indicator (page 20) H Scroll lock indicator (page 20) I WIRELESS switch (page 63) J WIRELESS indicator (page 20...
n 15 N Getting Started A CAPTURE button* (page 33) B Playback control area* : Fast-rewind : Play/Pause : Fast-forward For information on how to use the touch sensor buttons above , see Controlling Music and Video Playback (page 35). C AV MODE button* (page 34) D Volume control area* / : Volume : Muting For information on how to use the touch sensor buttons above , see Controlling Music and Video Playback (page 35). E Power button F Num lock indicator (page 20) G Caps lock indicator (page 20) H Scroll lock indicator (page 20) I WIRELESS switch (page 63) J WIRELESS indicator (page 20...
User Guide
Page 16
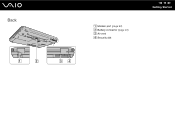
Back A Modem port (page 62) B Battery connector (page 22) C Air vent D Security slot n 16 N Getting Started
Back A Modem port (page 62) B Battery connector (page 22) C Air vent D Security slot n 16 N Getting Started
User Guide
Page 17
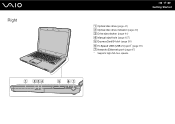
speeds. Right n 17 N Getting Started A Optical disc drive (page 41) B Optical disc drive indicator (page 20) C Drive eject button (page 41) D Manual eject hole (page 157) E ExpressCard/34 slot (page 50) F Hi-Speed USB (USB 2.0) port* (page 81) G Network (Ethernet) port (page 87) * Supports high-/full-/low-
speeds. Right n 17 N Getting Started A Optical disc drive (page 41) B Optical disc drive indicator (page 20) C Drive eject button (page 41) D Manual eject hole (page 157) E ExpressCard/34 slot (page 50) F Hi-Speed USB (USB 2.0) port* (page 81) G Network (Ethernet) port (page 87) * Supports high-/full-/low-
User Guide
Page 18
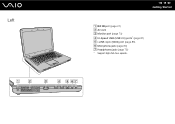
Left n 18 N Getting Started A DC IN port (page 21) B Air vent C Monitor port (page 73) D Hi-Speed USB (USB 2.0) ports* (page 81) E i.LINK 4-pin (S400) port (page 85) F Microphone jack (page 80) G Headphones jack (page 72) * Support high-/full-/low- speeds.
Left n 18 N Getting Started A DC IN port (page 21) B Air vent C Monitor port (page 73) D Hi-Speed USB (USB 2.0) ports* (page 81) E i.LINK 4-pin (S400) port (page 85) F Microphone jack (page 80) G Headphones jack (page 72) * Support high-/full-/low- speeds.
User Guide
Page 19
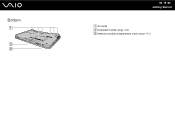
Bottom n 19 N Getting Started A Air vents B Illumination lamp (page 104) C Memory module compartment cover (page 113)
Bottom n 19 N Getting Started A Air vents B Illumination lamp (page 104) C Memory module compartment cover (page 113)
User Guide
Page 20
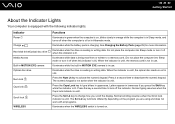
Do not place the computer into Sleep mode or turn off the indicator. Press it off when this indicator is lit.) When the indicator is unlit, the memory card is not in use. Press the key a second time to deactivate the numeric keypad. Press the Scr Lk key to a memory card. (Do not place the computer into Sleep mode or turn it a second time to turn it off when this indicator is charging. Illuminates while the drive is lit. Letters appear in lowercase if you press the Shift key while the indicator is reading or writing data. Normal typing resumes when the Caps lock ...
Do not place the computer into Sleep mode or turn off the indicator. Press it off when this indicator is lit.) When the indicator is unlit, the memory card is not in use. Press the key a second time to deactivate the numeric keypad. Press the Scr Lk key to a memory card. (Do not place the computer into Sleep mode or turn it a second time to turn it off when this indicator is charging. Illuminates while the drive is lit. Letters appear in lowercase if you press the Shift key while the indicator is reading or writing data. Normal typing resumes when the Caps lock ...

User Guide
Page 21
This power saving mode saves the time of the power cord into an AC outlet (2). 3 Plug the cable connected to the AC adapter (3) into Hibernate mode. See Using Hibernate Mode (page 108). n 21 N Getting Started Connecting a Power Source You can use either an AC adapter or a rechargeable battery pack for a long period of time, place the computer into the DC IN port (4) on the AC adapter. ✍ To disconnect your computer. The shape of the DC In plug varies depending on the computer. ! Make sure that the AC outlet is easily accessible. If you do not intend to your computer ...
This power saving mode saves the time of the power cord into an AC outlet (2). 3 Plug the cable connected to the AC adapter (3) into Hibernate mode. See Using Hibernate Mode (page 108). n 21 N Getting Started Connecting a Power Source You can use either an AC adapter or a rechargeable battery pack for a long period of time, place the computer into the DC IN port (4) on the AC adapter. ✍ To disconnect your computer. The shape of the DC In plug varies depending on the computer. ! Make sure that the AC outlet is easily accessible. If you do not intend to your computer ...
