
User Guide
Page 3
...i.LINK Device ...103 Connecting to a Network (LAN) ...105 Customizing Your VAIO Computer ...107 Setting the Password ...108 Setting Up Your Computer with VAIO Control Center 111 Using the Power Saving Mode...112 Upgrading Your VAIO Computer...114 Adding and Removing Memory...115 Adding the Hard Disk Drive...121 ...Precautions ...127 On Handling the LCD Screen ...128 On Using the Power Source ...129 On Handling...
...i.LINK Device ...103 Connecting to a Network (LAN) ...105 Customizing Your VAIO Computer ...107 Setting the Password ...108 Setting Up Your Computer with VAIO Control Center 111 Using the Power Saving Mode...112 Upgrading Your VAIO Computer...114 Adding and Removing Memory...115 Adding the Hard Disk Drive...121 ...Precautions ...127 On Handling the LCD Screen ...128 On Using the Power Source ...129 On Handling...

User Guide
Page 6
....gov (USA) ❑ http://www.eu-energystar.org (Europe) This computer is designed based on power saving modes, see Using the Power Saving Mode (page 112). For detailed information on the ENERGY STAR Program, visit the following power saving settings: ❑ The LCD backlight is an international Program that effectively reduce energy consumption... of about 25 minutes. Press any key to bring the computer back into Normal mode. ENERGY STAR n6 N Before Use As an ENERGY STAR Partner, Sony has determined that this product meets the ENERGY STAR guidelines for energy efficiency.
....gov (USA) ❑ http://www.eu-energystar.org (Europe) This computer is designed based on power saving modes, see Using the Power Saving Mode (page 112). For detailed information on the ENERGY STAR Program, visit the following power saving settings: ❑ The LCD backlight is an international Program that effectively reduce energy consumption... of about 25 minutes. Press any key to bring the computer back into Normal mode. ENERGY STAR n6 N Before Use As an ENERGY STAR Partner, Sony has determined that this product meets the ENERGY STAR guidelines for energy efficiency.
User Guide
Page 14
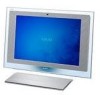
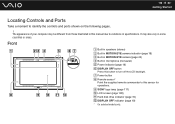
... 19) F DISPLAY OFF button Press this button to this manual due to identify the controls and ports shown on the following pages. ! G Power button H Remote sensor* Point the supplied remote commander to turn off the LCD backlight. n 14 N Getting Started Locating Controls and Ports Take... a moment to variations in specifications. The appearance of your computer may also vary in this sensor for operations. I SONY logo lamp (page 111) J LCD screen (page 128) K Hard disk drive indicator (page 19) L DISPLAY OFF indicator (page 19) * On selected...
... 19) F DISPLAY OFF button Press this button to this manual due to identify the controls and ports shown on the following pages. ! G Power button H Remote sensor* Point the supplied remote commander to turn off the LCD backlight. n 14 N Getting Started Locating Controls and Ports Take... a moment to variations in specifications. The appearance of your computer may also vary in this sensor for operations. I SONY logo lamp (page 111) J LCD screen (page 128) K Hard disk drive indicator (page 19) L DISPLAY OFF indicator (page 19) * On selected...
User Guide
Page 19
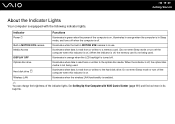
... this indicator is on . Hard disk drive Illuminates when data is read from or written to the optical disc media. Indicator Functions Power 1 Illuminates in green when the power of the indicator lights. When the indicator is off , the memory card is not being used . n 19 N Getting Started ...About the Indicator Lights Your computer is equipped with VAIO Control Center (page 111) and find out more in its help file. Media Access ...
... this indicator is on . Hard disk drive Illuminates when data is read from or written to the optical disc media. Indicator Functions Power 1 Illuminates in green when the power of the indicator lights. When the indicator is off , the memory card is not being used . n 19 N Getting Started ...About the Indicator Lights Your computer is equipped with VAIO Control Center (page 111) and find out more in its help file. Media Access ...
User Guide
Page 22
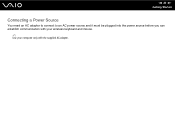
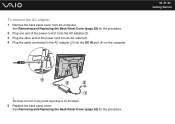
n 22 N Getting Started Connecting a Power Source You need an AC adapter to connect to an AC power source and it must be plugged into the power source before you can establish communication with your wireless keyboard and mouse. ✍ Use your computer only with the supplied AC adapter.
n 22 N Getting Started Connecting a Power Source You need an AC adapter to connect to an AC power source and it must be plugged into the power source before you can establish communication with your wireless keyboard and mouse. ✍ Use your computer only with the supplied AC adapter.
User Guide
Page 23
The shape of the power cord into an AC outlet (2). 4 Plug the cable connected to the AC adapter (3) into the DC IN port (4) on the AC adapter. 5 Replace the back panel cover. n 23 N Getting Started ! See Removing and Replacing the Back Panel Cover (page 20) for the procedure. 2 Plug one end of the power cord (1) into the AC adapter (3). 3 Plug the other end of the DC In plug varies depending on the computer. See Removing and Replacing the Back Panel Cover (page 20) for the procedure. To connect the AC adapter 1 Remove the back panel cover from the computer.
The shape of the power cord into an AC outlet (2). 4 Plug the cable connected to the AC adapter (3) into the DC IN port (4) on the AC adapter. 5 Replace the back panel cover. n 23 N Getting Started ! See Removing and Replacing the Back Panel Cover (page 20) for the procedure. 2 Plug one end of the power cord (1) into the AC adapter (3). 3 Plug the other end of the DC In plug varies depending on the computer. See Removing and Replacing the Back Panel Cover (page 20) for the procedure. To connect the AC adapter 1 Remove the back panel cover from the computer.

User Guide
Page 24
Snap open the cable clamp, route the cables through it, and then snap the cable clamp back shut as shown below: To disconnect your computer while the computer is on or in Sleep mode, you unplug the AC adapter from your computer completely from AC power, unplug the AC adapter. Make sure that the AC outlets are easily accessible. ! If you may lose all unsaved data. n 24 N Getting Started ✍ You can bundle the AC adapter cable along with other cables to keep them tidy.
Snap open the cable clamp, route the cables through it, and then snap the cable clamp back shut as shown below: To disconnect your computer while the computer is on or in Sleep mode, you unplug the AC adapter from your computer completely from AC power, unplug the AC adapter. Make sure that the AC outlets are easily accessible. ! If you may lose all unsaved data. n 24 N Getting Started ✍ You can bundle the AC adapter cable along with other cables to keep them tidy.
User Guide
Page 25
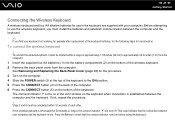
... batteries (1) into the battery compartment (2) on the bottom of the keyboard batteries, try the following steps for the procedure. 3 Turn on the computer. 4 Slide the POWER switch (3) at the top of the keyboard to use in the LCD window on the keyboard when connection is left unused for 20 minutes or...
... batteries (1) into the battery compartment (2) on the bottom of the keyboard batteries, try the following steps for the procedure. 3 Turn on the computer. 4 Slide the POWER switch (3) at the top of the keyboard to use in the LCD window on the keyboard when connection is left unused for 20 minutes or...

User Guide
Page 27
If you want to be replaced. If the wireless keyboard does not operate properly, the batteries may need to put the wireless keyboard in the LCD window on the wireless keyboard for an extended period of time, remove the batteries to avoid possible damage from battery leakage. If the wireless keyboard is not being used for its battery power level. n 27 N Getting Started ✍ You can check the battery indicator ( or ) in a more 'ergonomic' position, flip open the keyboard feet.
If you want to be replaced. If the wireless keyboard does not operate properly, the batteries may need to put the wireless keyboard in the LCD window on the wireless keyboard for an extended period of time, remove the batteries to avoid possible damage from battery leakage. If the wireless keyboard is not being used for its battery power level. n 27 N Getting Started ✍ You can check the battery indicator ( or ) in a more 'ergonomic' position, flip open the keyboard feet.

User Guide
Page 29
Communication between the mouse and the computer should now be established. n 29 N Getting Started 6 Press the CONNECT button on the back of the mouse within 10 seconds from step 5. 4 Slide the power switch on the bottom of the mouse to the ON position. 5 Press the CONNECT button (1) on the bottom of the computer.
Communication between the mouse and the computer should now be established. n 29 N Getting Started 6 Press the CONNECT button on the back of the mouse within 10 seconds from step 5. 4 Slide the power switch on the bottom of the mouse to the ON position. 5 Press the CONNECT button (1) on the bottom of the computer.
User Guide
Page 33
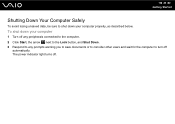
To shut down your computer 1 Turn off any peripherals connected to the computer. 2 Click Start, the arrow next to the Lock button, and Shut Down. 3 Respond to any prompts warning you to save documents or to consider other users and wait for the computer to shut down your computer properly, as described below. n 33 N Getting Started Shutting Down Your Computer Safely To avoid losing unsaved data, be sure to turn off . The power indicator light turns off automatically.
To shut down your computer 1 Turn off any peripherals connected to the computer. 2 Click Start, the arrow next to the Lock button, and Shut Down. 3 Respond to any prompts warning you to save documents or to consider other users and wait for the computer to shut down your computer properly, as described below. n 33 N Getting Started Shutting Down Your Computer Safely To avoid losing unsaved data, be sure to turn off . The power indicator light turns off automatically.
User Guide
Page 37
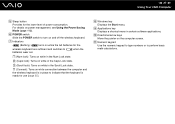
G Indicators (Battery): turns on while the AA batteries for use (page 25). J Directional arrow keys Move the pointer on power management, see Using the Power Saving Mode (page 112). when the (Num lock): Turns on while in the Num Lock state. (Caps lock): Turns on ... keyboard is ready for the wireless keyboard are sufficient and switches to batteries wear out. H Windows key Displays the Start menu. F POWER switch Slide the POWER switch to perform basic math calculations. I Applications key Displays a shortcut menu in place to indicate that the keyboard is in certain software...
G Indicators (Battery): turns on while the AA batteries for use (page 25). J Directional arrow keys Move the pointer on power management, see Using the Power Saving Mode (page 112). when the (Num lock): Turns on while in the Num Lock state. (Caps lock): Turns on ... keyboard is ready for the wireless keyboard are sufficient and switches to batteries wear out. H Windows key Displays the Start menu. F POWER switch Slide the POWER switch to perform basic math calculations. I Applications key Displays a shortcut menu in place to indicate that the keyboard is in certain software...

User Guide
Page 40
... Slide the switch to display a context-sensitive shortcut menu (not always an active function). This will help you save battery power. n 40 N Using Your VAIO Computer A Left button Click or double-click the left button to select items. To drag and drop items, hold the left button down a page. Press ...
... Slide the switch to display a context-sensitive shortcut menu (not always an active function). This will help you save battery power. n 40 N Using Your VAIO Computer A Left button Click or double-click the left button to select items. To drag and drop items, hold the left button down a page. Press ...

User Guide
Page 50
n 50 N Using Your VAIO Computer Notes on writing data to a disc ❑ Use only Sony recommended software, which is preinstalled on the optical disc drive, you need to the same disc. Do not use circular discs. This may cause your ... to add more data to close all other shape (star, heart, card, etc.), as this process, follow the instructions included with your computer into the power saving mode while using your software application to a used disc. Use of different disc burning software for additional data burning may damage the optical disc...
n 50 N Using Your VAIO Computer Notes on writing data to a disc ❑ Use only Sony recommended software, which is preinstalled on the optical disc drive, you need to the same disc. Do not use circular discs. This may cause your ... to add more data to close all other shape (star, heart, card, etc.), as this process, follow the instructions included with your computer into the power saving mode while using your software application to a used disc. Use of different disc burning software for additional data burning may damage the optical disc...
User Guide
Page 51
.... ❑ Some DVD players and computers' optical disc drives may cause your computer to malfunction. ❑ Do not place your computer into the power saving mode while your computer is playing a disc. ❑ Region code indicators are labeled on the DVDs to play DVDs created with the DVD+R... DL, DVD- If the DVD is labeled "all," this means that you cannot play the disc on your computer. n 51 N Using Your VAIO Computer Notes on playing discs To achieve optimum performance when playing discs, you should follow these recommendations. ❑ Some CD players and computers' optical disc...
.... ❑ Some DVD players and computers' optical disc drives may cause your computer to malfunction. ❑ Do not place your computer into the power saving mode while your computer is playing a disc. ❑ Region code indicators are labeled on the DVDs to play DVDs created with the DVD+R... DL, DVD- If the DVD is labeled "all," this means that you cannot play the disc on your computer. n 51 N Using Your VAIO Computer Notes on playing discs To achieve optimum performance when playing discs, you should follow these recommendations. ❑ Some CD players and computers' optical disc...

User Guide
Page 59
...the type of antenna system in your home, your computer to an indoor/outdoor antenna system, using Option 1 or Option 2 from other power sources or connectors to reduce signal interference. Move the antenna cable away from the previous section, Connecting to standard cable access (CATV) (page... 57). n 59 N Using Your VAIO Computer Connecting to a standard antenna You can connect your connection may require a VHF/UHF RF combiner/transformer (not supplied) to connect the ...
...the type of antenna system in your home, your computer to an indoor/outdoor antenna system, using Option 1 or Option 2 from other power sources or connectors to reduce signal interference. Move the antenna cable away from the previous section, Connecting to standard cable access (CATV) (page... 57). n 59 N Using Your VAIO Computer Connecting to a standard antenna You can connect your connection may require a VHF/UHF RF combiner/transformer (not supplied) to connect the ...
User Guide
Page 69
... Press to open applications. M Directional arrow buttons Press the M, m, L More button Press to view the TV program guide for Media Center features. This button works the same as the Alt+Tab keys. n 69 N Using Your VAIO Computer E Guide button Press to view additional options that are available for your area. J Sleep button...
... Press to open applications. M Directional arrow buttons Press the M, m, L More button Press to view the TV program guide for Media Center features. This button works the same as the Alt+Tab keys. n 69 N Using Your VAIO Computer E Guide button Press to view additional options that are available for your area. J Sleep button...
User Guide
Page 102
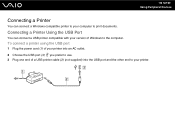
n 102 N Using Peripheral Devices Connecting a Printer You can connect a USB printer compatible with your version of a USB printer cable (2) (not supplied) into the USB port and the other end to your printer. To connect a printer using the USB port 1 Plug the power cord (1) of your computer to the computer. Connecting a Printer Using the USB Port You can connect a Windows-compatible printer to your printer into an AC outlet. 2 Choose the USB port (3) you prefer to use. 3 Plug one end of Windows to print documents.
n 102 N Using Peripheral Devices Connecting a Printer You can connect a USB printer compatible with your version of a USB printer cable (2) (not supplied) into the USB port and the other end to your printer. To connect a printer using the USB port 1 Plug the power cord (1) of your computer to the computer. Connecting a Printer Using the USB Port You can connect a Windows-compatible printer to your printer into an AC outlet. 2 Choose the USB port (3) you prefer to use. 3 Plug one end of Windows to print documents.

User Guide
Page 103
... i.LINK port on the software applications, operating system, and i.LINK-compatible devices you connect them to your computer does not supply power to external devices generally powered by i.LINK ports. ❑ The i.LINK port supports transfer rates up to 400 Mbps; however, the actual transfer rate depends... on the transfer rate of i.LINK-compatible PC peripherals (for example, an HDD or a CD-RW drive) before you use. n 103 N Using ...
... i.LINK port on the software applications, operating system, and i.LINK-compatible devices you connect them to your computer does not supply power to external devices generally powered by i.LINK ports. ❑ The i.LINK port supports transfer rates up to 400 Mbps; however, the actual transfer rate depends... on the transfer rate of i.LINK-compatible PC peripherals (for example, an HDD or a CD-RW drive) before you use. n 103 N Using ...
User Guide
Page 107
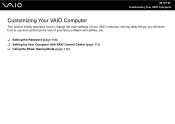
Among other things, you will learn how to change the main settings of your VAIO computer. n 107 N Customizing Your VAIO Computer Customizing Your VAIO Computer This section briefly describes how to use and customize the look of your Sony software and utilities, etc. ❑ Setting the Password (page 108) ❑ Setting Up Your Computer with VAIO Control Center (page 111) ❑ Using the Power Saving Mode (page 112)
Among other things, you will learn how to change the main settings of your VAIO computer. n 107 N Customizing Your VAIO Computer Customizing Your VAIO Computer This section briefly describes how to use and customize the look of your Sony software and utilities, etc. ❑ Setting the Password (page 108) ❑ Setting Up Your Computer with VAIO Control Center (page 111) ❑ Using the Power Saving Mode (page 112)

