

User Guide (primary user manual)
Page 1
... updates and supplemental information about the Sony software preinstalled on your computer online at the Sony VAIO PC Registration Web site. Go to http://www.sony.com/vaioregistration. For information about your computer. Go to the Sony online support Web site, to view the VAIO® Computer Specifications, which lists your computer's hardware specifications and preinstalled software information. You...
... updates and supplemental information about the Sony software preinstalled on your computer online at the Sony VAIO PC Registration Web site. Go to http://www.sony.com/vaioregistration. For information about your computer. Go to the Sony online support Web site, to view the VAIO® Computer Specifications, which lists your computer's hardware specifications and preinstalled software information. You...

User Guide (primary user manual)
Page 3
... Welcom e - Use the VAIO Recovery Wizard utility to recover your computer's hardware configuration. Contains features and specifications of the accessories shown, depending on your computer, and solving common problems. To access the online User Guide: 1. Click VAIO User Guide. Your VAIO® computer is available with all of your computer's supplied accessories. Manuals VAIO® Com puter Safety...
... Welcom e - Use the VAIO Recovery Wizard utility to recover your computer's hardware configuration. Contains features and specifications of the accessories shown, depending on your computer, and solving common problems. To access the online User Guide: 1. Click VAIO User Guide. Your VAIO® computer is available with all of your computer's supplied accessories. Manuals VAIO® Com puter Safety...
User Guide (primary user manual)
Page 4
... Windows® taskbar, click All Programs, then click VAIO Support Central. 2. Click Recovery Guide. You can create a VAIO Recovery Media Kit using the Sony software programs preinstalled on VAIO computers equipped with the VAIO Recovery Wizard utility program that recovers your model's specifications sheet. Creating CDs or DVDs with Sony software Create picture & video with: DVDs with...
... Windows® taskbar, click All Programs, then click VAIO Support Central. 2. Click Recovery Guide. You can create a VAIO Recovery Media Kit using the Sony software programs preinstalled on VAIO computers equipped with the VAIO Recovery Wizard utility program that recovers your model's specifications sheet. Creating CDs or DVDs with Sony software Create picture & video with: DVDs with...

User Guide (primary user manual)
Page 7
... supplied accessories. The location of the controls, ports, and jacks may not be equipped with the controls, ports and jacks on your computer, see the online Specifications sheet. About the Front Panel About the Back Panel About the Keyboard About the Wireless Mouse About the Remote Control...; About the i.LINK Port Page 7 Locating Controls And Ports This section is intended to familiarize you with all of these hardware features or accessories. Your computer may vary from the illustrations shown in this section.
... supplied accessories. The location of the controls, ports, and jacks may not be equipped with the controls, ports and jacks on your computer, see the online Specifications sheet. About the Front Panel About the Back Panel About the Keyboard About the Wireless Mouse About the Remote Control...; About the i.LINK Port Page 7 Locating Controls And Ports This section is intended to familiarize you with all of these hardware features or accessories. Your computer may vary from the illustrations shown in this section.
User Guide (primary user manual)
Page 8
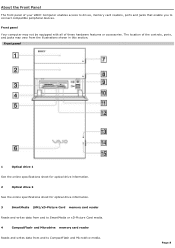
Page 8 The location of your VAIO® Computer enables access to drives, memory card readers, ports and jacks that enable you to CompactFlash and Microdrive media. About the Front Panel The front panel ... equipped with all of these hardware features or accessories. Front panel Your computer may vary from and to connect compatible peripheral devices. Front panel 1 Optical drive 1 See the online specifications sheet for optical drive information. 2 Optical drive 2 See the online specifications sheet for optical drive information. 3 SmartMedia (SM)/xD-Picture Card memory card...
Page 8 The location of your VAIO® Computer enables access to drives, memory card readers, ports and jacks that enable you to CompactFlash and Microdrive media. About the Front Panel The front panel ... equipped with all of these hardware features or accessories. Front panel Your computer may vary from and to connect compatible peripheral devices. Front panel 1 Optical drive 1 See the online specifications sheet for optical drive information. 2 Optical drive 2 See the online specifications sheet for optical drive information. 3 SmartMedia (SM)/xD-Picture Card memory card...

User Guide (primary user manual)
Page 11
... the ports for a parallel device, such as a printer or scanner. See your computer. Page 11 The icons on the back panel locate and identify the ports on your computer's specification sheet for details on the computer model purchased. Back panel 1 AC Input port Connection for the supplied power cord. 2 Mouse port Connection for a PS...
... the ports for a parallel device, such as a printer or scanner. See your computer. Page 11 The icons on the back panel locate and identify the ports on your computer's specification sheet for details on the computer model purchased. Back panel 1 AC Input port Connection for the supplied power cord. 2 Mouse port Connection for a PS...

User Guide (primary user manual)
Page 14
See your computer's specifications sheet for your V A I O ® c omputer. A wireless or PS/2®1 keyboard may be supplied with your VAIO® computer, based on your computer's supplied accessories. 1A P S/2 ® keyboard is equipped with a P S/2 type c onnec tor that plugs into the bac k panel of your keyboard. About the Keyboard This section describes the special and standard functions available for details on the computer model purchased. Page 14
See your computer's specifications sheet for your V A I O ® c omputer. A wireless or PS/2®1 keyboard may be supplied with your VAIO® computer, based on your computer's supplied accessories. 1A P S/2 ® keyboard is equipped with a P S/2 type c onnec tor that plugs into the bac k panel of your keyboard. About the Keyboard This section describes the special and standard functions available for details on the computer model purchased. Page 14

User Guide (primary user manual)
Page 15
... feet Extend the feet to adjust the keyboard height. 2 CONNECT button Press to enable the wireless keyboard to establish communication between the keyboard and the computer. Wireless keyboard Page 15 For instructions, see the section, Connecting a Wireless Keyboard. About the wireless keyboard Set up your wireless keyboard and insert the batteries...
... feet Extend the feet to adjust the keyboard height. 2 CONNECT button Press to enable the wireless keyboard to establish communication between the keyboard and the computer. Wireless keyboard Page 15 For instructions, see the section, Connecting a Wireless Keyboard. About the wireless keyboard Set up your wireless keyboard and insert the batteries...

User Guide (primary user manual)
Page 18
... keys that perform specific functions. Press the Mute button again to the next. Press the button to turn off the speaker sound. Directional Arrows The Up, Down, Left, and Right arrow keys move the pointer on the screen. Standby Press the button to place the computer in Standby mode.... Numeric keypad Use the numeric keypad area to type numbers or to perform certain tasks. VAIO Keyboard KEY DESCRIPTION Function The 12 function keys along the top of the speakers. About...
... keys that perform specific functions. Press the Mute button again to the next. Press the button to turn off the speaker sound. Directional Arrows The Up, Down, Left, and Right arrow keys move the pointer on the screen. Standby Press the button to place the computer in Standby mode.... Numeric keypad Use the numeric keypad area to type numbers or to perform certain tasks. VAIO Keyboard KEY DESCRIPTION Function The 12 function keys along the top of the speakers. About...

User Guide (primary user manual)
Page 20
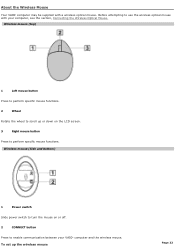
... mouse on the LCD screen. 3 Right mouse button Press to perform specific mouse functions. Before attempting to enable communication between your computer, see the section, Connecting the Wireless Optical Mouse. About the Wireless Mouse Your VAIO® computer may be supplied with your VAIO® computer and the wireless mouse. Wireless m ouse (top) 1 Left mouse button...
... mouse on the LCD screen. 3 Right mouse button Press to perform specific mouse functions. Before attempting to enable communication between your computer, see the section, Connecting the Wireless Optical Mouse. About the Wireless Mouse Your VAIO® computer may be supplied with your VAIO® computer and the wireless mouse. Wireless m ouse (top) 1 Left mouse button...
User Guide (primary user manual)
Page 22
... the Wireless Mouse Your VAIO® computer may be supplied with your VAIO® computer and the wireless mouse. Before attempting to use the wireless optical mouse with a wireless optical mouse1. To set up or down on or off. 2 CONNECT button Press to perform specific mouse functions. Wireless m... LCD screen. 3 Right mouse button Press to enable communication between your computer, see the section, Connecting the Wireless Optical Mouse. Wireless m ouse (top) 1 Left mouse button Press to perform specific mouse functions. 2 Wheel Rotate the wheel to scroll up the wireless ...
... the Wireless Mouse Your VAIO® computer may be supplied with your VAIO® computer and the wireless mouse. Before attempting to use the wireless optical mouse with a wireless optical mouse1. To set up or down on or off. 2 CONNECT button Press to perform specific mouse functions. Wireless m... LCD screen. 3 Right mouse button Press to enable communication between your computer, see the section, Connecting the Wireless Optical Mouse. Wireless m ouse (top) 1 Left mouse button Press to perform specific mouse functions. 2 Wheel Rotate the wheel to scroll up the wireless ...
User Guide (primary user manual)
Page 24
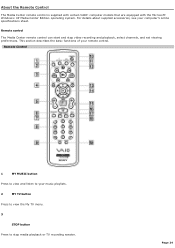
...details about supplied accessories, see your music playlists. 2 MY TV button Press to view the My TV menu. 3 STOP button Press to your computer's online specifications sheet. Page 24 Rem ote Control 1 MY MUSIC button Press to view and listen to stop video recording and playback, select channels, and ...This section describes the basic functions of your remote control. About the Remote Control The Media Center remote control is supplied with certain VAIO® computer models that are equipped with the Microsoft® Windows® XP Media Center Edition1 operating system.
...details about supplied accessories, see your music playlists. 2 MY TV button Press to view the My TV menu. 3 STOP button Press to your computer's online specifications sheet. Page 24 Rem ote Control 1 MY MUSIC button Press to view and listen to stop video recording and playback, select channels, and ...This section describes the basic functions of your remote control. About the Remote Control The Media Center remote control is supplied with certain VAIO® computer models that are equipped with the Microsoft® Windows® XP Media Center Edition1 operating system.

User Guide (primary user manual)
Page 25
... to increase (+) or decrease (-) the volume. 6 RECORDED TV button Press to view previously recorded TV programs (In My TV window) 7 GUIDE button Press to select specific channels or enter text. Press again to pause media playback. Page 25 REW button Press to begin recording. PAUSE button Press to resume playback. PLAY...
... to increase (+) or decrease (-) the volume. 6 RECORDED TV button Press to view previously recorded TV programs (In My TV window) 7 GUIDE button Press to select specific channels or enter text. Press again to pause media playback. Page 25 REW button Press to begin recording. PAUSE button Press to resume playback. PLAY...

User Guide (primary user manual)
Page 29
See the online Specifications sheet for your computer's hardware configuration. Connecting a Display (Monitor) Connecting the Radio Frequency Receiver Connecting a Wireless Keyboard Connecting the Wireless Optical Mouse ...61607; Configuring Software for Your Speaker System Connecting the Power Cords Turning On Your Computer Page 29 The location of the hardware features described in this section. Setting Up Your Computer Your computer may not be equipped with all of the controls, ports, and jacks may vary from the illustrations...
See the online Specifications sheet for your computer's hardware configuration. Connecting a Display (Monitor) Connecting the Radio Frequency Receiver Connecting a Wireless Keyboard Connecting the Wireless Optical Mouse ...61607; Configuring Software for Your Speaker System Connecting the Power Cords Turning On Your Computer Page 29 The location of the hardware features described in this section. Setting Up Your Computer Your computer may not be equipped with all of the controls, ports, and jacks may vary from the illustrations...

User Guide (primary user manual)
Page 30
To connect a display Install your equipment so that you can easily reach the power outlet in the event of the monitor port may vary, depending on the Sony Online Support Web site at http://www.sony.com/pcsupport, for details about your computer on the model purchased. Page 30 See the specifications sheet for your computer's hardware configuration 1. Plug the display's cable into the rear of the display. Connecting a Display (Monitor) The location, availability, and type of an emergency. If necessary, plug the display's cable into the appropriate monitor port. 2.
To connect a display Install your equipment so that you can easily reach the power outlet in the event of the monitor port may vary, depending on the Sony Online Support Web site at http://www.sony.com/pcsupport, for details about your computer on the model purchased. Page 30 See the specifications sheet for your computer's hardware configuration 1. Plug the display's cable into the rear of the display. Connecting a Display (Monitor) The location, availability, and type of an emergency. If necessary, plug the display's cable into the appropriate monitor port. 2.

User Guide (primary user manual)
Page 36
For details on the back of the computer. 2. Plug the mouse cable into the keyboard port on the back of the computer. Plug the keyboard cable into the mouse port on the accessories supplied with a PS/2® keyboard and mouse. Connecting the Keyboard and Mouse Your VAIO® computer may be supplied with your computer, see the online Specifications sheet. 1. To connect the keyboard and m ouse Page 36
For details on the back of the computer. 2. Plug the mouse cable into the keyboard port on the back of the computer. Plug the keyboard cable into the mouse port on the accessories supplied with a PS/2® keyboard and mouse. Connecting the Keyboard and Mouse Your VAIO® computer may be supplied with your computer, see the online Specifications sheet. 1. To connect the keyboard and m ouse Page 36

User Guide (primary user manual)
Page 40
... another telephone cable (optional) into one end of a second telephone cable (optional) into the other end of your computer's Ethernet port specification. Using incorrect cables or a telephone cable may result in an electric current overload that can cause a malfunction, excessive heat, or fire...jack located on an optional "1-to a network, see your telephone from the wall jack. 2. To connect the telephone and m odem Your computer has a protective sticker covering the Ethernet port located on the back panel of the splitter device into the modem line jack located on the ...
... another telephone cable (optional) into one end of a second telephone cable (optional) into the other end of your computer's Ethernet port specification. Using incorrect cables or a telephone cable may result in an electric current overload that can cause a malfunction, excessive heat, or fire...jack located on an optional "1-to a network, see your telephone from the wall jack. 2. To connect the telephone and m odem Your computer has a protective sticker covering the Ethernet port located on the back panel of the splitter device into the modem line jack located on the ...

User Guide (primary user manual)
Page 44
...from the illustrations shown in your computer. Page 44 Your VAIO® computer is determined by the type of connecting your computer, TV monitor or display, and TV programming access, is supplied with certain video cables. Your computer's hardware configuration may require extra... cables, adapters or connection equipment that are optional for details about your computer's hardware configuration. Setting Up TV Connections The best method of cable service connection available in this section. See the online Specifications ...
...from the illustrations shown in your computer. Page 44 Your VAIO® computer is determined by the type of connecting your computer, TV monitor or display, and TV programming access, is supplied with certain video cables. Your computer's hardware configuration may require extra... cables, adapters or connection equipment that are optional for details about your computer's hardware configuration. Setting Up TV Connections The best method of cable service connection available in this section. See the online Specifications ...
User Guide (primary user manual)
Page 58
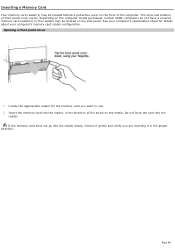
...VAIO® computers do not have a covered memory card reader(s) or the readers may be located on the side panel. Insert the memory card into the reader. If the memory card does not go into the reader easily, remove it gently and verify you want to use. 2. See your computer's specification... sheet for the memory card you are inserting it in the direction of front panel cover varies, depending on the computer model purchased. Opening a front panel cov er 1. Do not force the card into...
...VAIO® computers do not have a covered memory card reader(s) or the readers may be located on the side panel. Insert the memory card into the reader. If the memory card does not go into the reader easily, remove it gently and verify you want to use. 2. See your computer's specification... sheet for the memory card you are inserting it in the direction of front panel cover varies, depending on the computer model purchased. Opening a front panel cov er 1. Do not force the card into...
User Guide (primary user manual)
Page 68
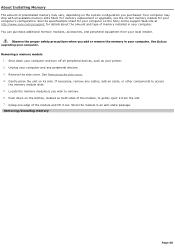
...computer and any cables, add-on cards, or other components to access the memory module slots. 5. Push down your computer and turn off all available memory slots filled. If necessary, remove any peripheral devices. 3. Your computer... may vary, depending on both sides of the module and lift it from your computer...Sony online support Web site at http://www.sony.com/pcsupport, for your computer. Locate the memory module(s) you add or remove the memory in your computer... module 1. Store the module in your computer's configuration. For memory replacement or upgrades,...
...computer and any cables, add-on cards, or other components to access the memory module slots. 5. Push down your computer and turn off all available memory slots filled. If necessary, remove any peripheral devices. 3. Your computer... may vary, depending on both sides of the module and lift it from your computer...Sony online support Web site at http://www.sony.com/pcsupport, for your computer. Locate the memory module(s) you add or remove the memory in your computer... module 1. Store the module in your computer's configuration. For memory replacement or upgrades,...