
Quick Start Guide
Page 3
... products are located on the back panel of your Sony VAIO® computer. Owner's Record The model number and serial number are office equipment such as computers, displays, printers, facsimiles and copiers. For customers in which is not supplied with all VAIO® computer models) Carrier frequency Output power 27.095 - 27.145MHz Less than 100 nW 3 For...
... products are located on the back panel of your Sony VAIO® computer. Owner's Record The model number and serial number are office equipment such as computers, displays, printers, facsimiles and copiers. For customers in which is not supplied with all VAIO® computer models) Carrier frequency Output power 27.095 - 27.145MHz Less than 100 nW 3 For...
Quick Start Guide
Page 14
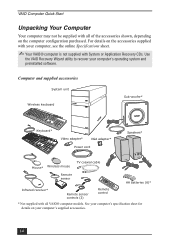
...* VGA adapter* Power cord Speakers* Mouse* Wireless mouse TV coaxial cable Remote sensor AA batteries (6)* Infrared receiver* Remote sensor controls (2) Remote control * Not supplied with your computer's operating system and preinstalled software. Use the VAIO Recovery Wizard utility to recover your computer, see the online Specifications sheet. ✍ Your VAIO® computer is not supplied with System or...
...* VGA adapter* Power cord Speakers* Mouse* Wireless mouse TV coaxial cable Remote sensor AA batteries (6)* Infrared receiver* Remote sensor controls (2) Remote control * Not supplied with your computer's operating system and preinstalled software. Use the VAIO Recovery Wizard utility to recover your computer, see the online Specifications sheet. ✍ Your VAIO® computer is not supplied with System or...
Quick Start Guide
Page 25
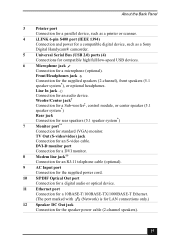
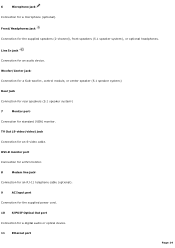
...DVI monitor. 8 Modem line jack†† Connection for an RJ-11 telephone cable (optional). 9 AC Input port Connection for the supplied power cord. 10 S/PDIF Optical Out port Connection for a digital audio or optical device. 11 Ethernet port Connection for a 10BASE-T/100BASE-TX/... Connection for a parallel device, such as a printer or scanner. 4 i.LINK 6-pin S400 port (IEEE 1394) Connection and power for a compatible digital device, such as a Sony Digital Handycam® camcorder. 5 Universal Serial Bus (USB 2.0) ports (4) Connections for compatible high/full/low-speed USB devices....
...DVI monitor. 8 Modem line jack†† Connection for an RJ-11 telephone cable (optional). 9 AC Input port Connection for the supplied power cord. 10 S/PDIF Optical Out port Connection for a digital audio or optical device. 11 Ethernet port Connection for a 10BASE-T/100BASE-TX/... Connection for a parallel device, such as a printer or scanner. 4 i.LINK 6-pin S400 port (IEEE 1394) Connection and power for a compatible digital device, such as a Sony Digital Handycam® camcorder. 5 Universal Serial Bus (USB 2.0) ports (4) Connections for compatible high/full/low-speed USB devices....
Quick Start Guide
Page 27
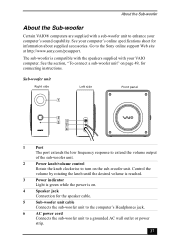
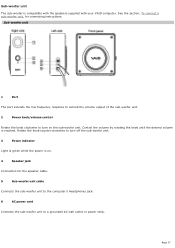
... desired volume is reached. 3 Power indicator Light is green while the power is compatible with the speakers supplied with a sub-woofer unit to a grounded AC wall outlet or power strip. 27 About the Sub-woofer About the Sub-woofer Certain VAIO® computers are supplied with your computer's online specifications sheet for information about supplied accessories. The sub-woofer...
... desired volume is reached. 3 Power indicator Light is green while the power is compatible with the speakers supplied with a sub-woofer unit to a grounded AC wall outlet or power strip. 27 About the Sub-woofer About the Sub-woofer Certain VAIO® computers are supplied with your computer's online specifications sheet for information about supplied accessories. The sub-woofer...

Quick Start Guide
Page 30
... of time, remove the batteries to clicking Start on the screen when the keyboard's battery power becomes low. To set up a wireless keyboard Insert two AA batteries (supplied) into the wireless keyboard ✍ If your wireless keyboard does not operate properly, the ... 30 Inserting batteries into the wireless keyboard as shown. When your keyboard's battery power level by clicking (wireless keyboard icon), located in Stand by mode to resume normal operation. VAIO Computer Quick Start KEY Windows DESCRIPTION The key with the Microsoft® Windows® logo...
... of time, remove the batteries to clicking Start on the screen when the keyboard's battery power becomes low. To set up a wireless keyboard Insert two AA batteries (supplied) into the wireless keyboard ✍ If your wireless keyboard does not operate properly, the ... 30 Inserting batteries into the wireless keyboard as shown. When your keyboard's battery power level by clicking (wireless keyboard icon), located in Stand by mode to resume normal operation. VAIO Computer Quick Start KEY Windows DESCRIPTION The key with the Microsoft® Windows® logo...
Quick Start Guide
Page 33
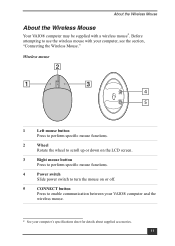
... screen. 3 Right mouse button Press to perform specific mouse functions. 4 Power switch Slide power switch to turn the mouse on or off. 5 CONNECT button Press to use the wireless mouse with a wireless mouse*. About the Wireless Mouse About the Wireless Mouse Your VAIO® computer may be supplied with your computer's specifications sheet for details about...
... screen. 3 Right mouse button Press to perform specific mouse functions. 4 Power switch Slide power switch to turn the mouse on or off. 5 CONNECT button Press to use the wireless mouse with a wireless mouse*. About the Wireless Mouse About the Wireless Mouse Your VAIO® computer may be supplied with your computer's specifications sheet for details about...

Quick Start Guide
Page 34
... to be replaced. You can damage the mouse. Using incompatible batteries or mixing used for extended periods of battery. VAIO Computer Quick Start To set up the wireless mouse Insert two AA batteries (supplied) into the wireless mouse ✍ If your wireless mouse is not being used /new batteries can check your mouse...
... to be replaced. You can damage the mouse. Using incompatible batteries or mixing used for extended periods of battery. VAIO Computer Quick Start To set up the wireless mouse Insert two AA batteries (supplied) into the wireless mouse ✍ If your wireless mouse is not being used /new batteries can check your mouse...
Quick Start Guide
Page 39
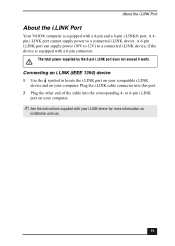
... cannot supply power to locate the i.LINK port on your compatible i.LINK device and on your i.LINK device for more information on your computer. ✍ See the instructions supplied with your computer. Connecting an i.LINK (IEEE 1394) device 1 Use the symbol to a connected i.LINK device. About the i.LINK Port About the i.LINK Port Your VAIO® computer...
... cannot supply power to locate the i.LINK port on your compatible i.LINK device and on your i.LINK device for more information on your computer. ✍ See the instructions supplied with your computer. Connecting an i.LINK (IEEE 1394) device 1 Use the symbol to a connected i.LINK device. About the i.LINK Port About the i.LINK Port Your VAIO® computer...
Quick Start Guide
Page 45
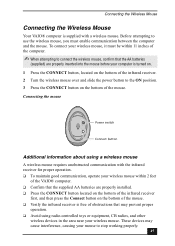
To connect your wireless mouse, it must enable communication between the computer and the mouse. Connecting the mouse Power switch Connect button Additional information about using radio-controlled toys or equipment, CB radios, and other wireless devices in the area... communication, operate your wireless mouse within 2 feet of the mouse. Connecting the Wireless Mouse Connecting the Wireless Mouse Your VAIO® computer is free of obstructions that the supplied AA batteries are properly installed. ❑ Press the CONNECT button located on the bottom of the infrared receiver first,...
To connect your wireless mouse, it must enable communication between the computer and the mouse. Connecting the mouse Power switch Connect button Additional information about using radio-controlled toys or equipment, CB radios, and other wireless devices in the area... communication, operate your wireless mouse within 2 feet of the mouse. Connecting the Wireless Mouse Connecting the Wireless Mouse Your VAIO® computer is free of obstructions that the supplied AA batteries are properly installed. ❑ Press the CONNECT button located on the bottom of the infrared receiver first,...
Quick Start Guide
Page 48
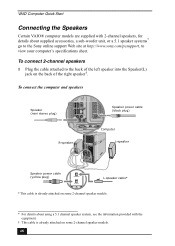
VAIO Computer Quick Start Connecting the Speakers Certain VAIO® computer models are supplied with 2-channel speakers, for details about using a 5.1 channel speaker system, see the information provided with the equipment. † This cable is already attached on some 2-channel speaker models. * For details about supplied accessories, a sub-woofer unit, or a 5.1 speaker systems* go to the Sony online...
VAIO Computer Quick Start Connecting the Speakers Certain VAIO® computer models are supplied with 2-channel speakers, for details about using a 5.1 channel speaker system, see the information provided with the equipment. † This cable is already attached on some 2-channel speaker models. * For details about supplied accessories, a sub-woofer unit, or a 5.1 speaker systems* go to the Sony online...
Quick Start Guide
Page 49
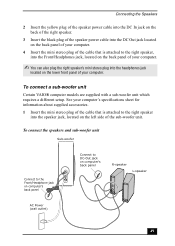
...-woofer unit Certain VAIO® computer models are supplied with a sub-woofer unit which requires a different setup. Connecting the Speakers 2 Insert the yellow plug of the speaker power cable into the DC In jack on the back of the right speaker. 3 Insert the black plug of the speaker power cable into the...You can also plug the right speaker's mini stereo plug into the speaker jack, located on the left side of your computer's specifications sheet for information about supplied accessories. 1 Insert the mini stereo plug of the cable that is attached to DC-Out jack on the lower front panel...
...-woofer unit Certain VAIO® computer models are supplied with a sub-woofer unit which requires a different setup. Connecting the Speakers 2 Insert the yellow plug of the speaker power cable into the DC In jack on the back of the right speaker. 3 Insert the black plug of the speaker power cable into the...You can also plug the right speaker's mini stereo plug into the speaker jack, located on the left side of your computer's specifications sheet for information about supplied accessories. 1 Insert the mini stereo plug of the cable that is attached to DC-Out jack on the lower front panel...
Quick Start Guide
Page 77
... an optical drive (unless you are using bootable media). ❑ Confirm that the power cord and all cables are adjusted correctly. (See the manual supplied with a floppy disk drive. Windows attempts to locate and close the program. * Certain VAIO computers are not equipped with your display for details.) ❑ Confirm that has stopped responding...
... an optical drive (unless you are using bootable media). ❑ Confirm that the power cord and all cables are adjusted correctly. (See the manual supplied with a floppy disk drive. Windows attempts to locate and close the program. * Certain VAIO computers are not equipped with your display for details.) ❑ Confirm that has stopped responding...
Quick Start Guide
Page 79
...computer with these support options: ❑ VAIO® Computer Quick Start* - Contains an overview of RAID-0 and RAID-1 levels, along with certain VAIO® computers that have RAID capability or are supplied with the VAIO® Computer Quick Start. ‡ This booklet is supplied with Sony®. Support Options Sony...connect power cords, cables, peripheral devices, and register your computer. * Certain VAIO® computers are not supplied with the Quick Start guide, they are supplied with the VAIO® Computer Welcome. † Certain VAIO® computers are not supplied with...
...computer with these support options: ❑ VAIO® Computer Quick Start* - Contains an overview of RAID-0 and RAID-1 levels, along with certain VAIO® computers that have RAID capability or are supplied with the VAIO® Computer Quick Start. ‡ This booklet is supplied with Sony®. Support Options Sony...connect power cords, cables, peripheral devices, and register your computer. * Certain VAIO® computers are not supplied with the Quick Start guide, they are supplied with the VAIO® Computer Welcome. † Certain VAIO® computers are not supplied with...
VAIO User Guide
Page 14
... cable. DVI-D monitor port Connection for a DVI monitor. 8 Modem line jack5 Connection for an RJ-11 telephone cable (optional). 9 AC Input port Connection for the supplied power cord. 10 S/PDIF Optical Out port Connection for a microphone (optional). 6 Microphone jack Connection for a digital audio or optical device. 11 Ethernet port Page 14 Woofer...
... cable. DVI-D monitor port Connection for a DVI monitor. 8 Modem line jack5 Connection for an RJ-11 telephone cable (optional). 9 AC Input port Connection for the supplied power cord. 10 S/PDIF Optical Out port Connection for a microphone (optional). 6 Microphone jack Connection for a digital audio or optical device. 11 Ethernet port Page 14 Woofer...

VAIO User Guide
Page 15
...s heet for a video cable (optional). Page 15 S-video In jack Connection for an S-video cable (optional) 14 VHF/UHF port Connection for a TV coaxial cable (supplied). 1 C ertain V A I O c omputer models . See your c omputer's s pec ific ation s heet for details about s upplied ac c es s ories..."1 -to-2 " jac k adapter devic e (s plitter) is for LAN connections only.) 12 Speaker DC Out jack Connection for the speaker power cable (2-channel speakers). 13 Composite audio R In jack Connection for an audio cable (optional). Connection for a 10BASE-T/100BASE-TX/1000BASE-T Ethernet....
...s heet for a video cable (optional). Page 15 S-video In jack Connection for an S-video cable (optional) 14 VHF/UHF port Connection for a TV coaxial cable (supplied). 1 C ertain V A I O c omputer models . See your c omputer's s pec ific ation s heet for details about s upplied ac c es s ories..."1 -to-2 " jac k adapter devic e (s plitter) is for LAN connections only.) 12 Speaker DC Out jack Connection for the speaker power cable (2-channel speakers). 13 Composite audio R In jack Connection for an audio cable (optional). Connection for a 10BASE-T/100BASE-TX/1000BASE-T Ethernet....
VAIO User Guide
Page 17
... until the desired volume is compatible with the speakers supplied with your VAIO computer. Page 17 Sub-woofer unit The sub-woofer is reached. Sub- woofer unit 1 Port The port extends the low frequency response to extend the volume output of the sub-woofer unit. 2 Power knob/volume control Rotate the knob clockwise to...
... until the desired volume is compatible with the speakers supplied with your VAIO computer. Page 17 Sub-woofer unit The sub-woofer is reached. Sub- woofer unit 1 Port The port extends the low frequency response to extend the volume output of the sub-woofer unit. 2 Power knob/volume control Rotate the knob clockwise to...

VAIO User Guide
Page 33
A 6-pin i.LINK port can supply power (10V to 12V) to a connected i.LINK device. A 4-pin i.LINK port cannot supply power to a connected i.LINK device, if the device is equipped with a 6-pin connector. The total power supplied by the 6-pin i.LINK port does not exceed 6 watts. Page 33 About the i.LINK Port Your VAIO® computer is equipped with a 4-pin and a 6-pin i.LINK® port.
A 6-pin i.LINK port can supply power (10V to 12V) to a connected i.LINK device. A 4-pin i.LINK port cannot supply power to a connected i.LINK device, if the device is equipped with a 6-pin connector. The total power supplied by the 6-pin i.LINK port does not exceed 6 watts. Page 33 About the i.LINK Port Your VAIO® computer is equipped with a 4-pin and a 6-pin i.LINK® port.

VAIO User Guide
Page 108
...VAIO Computer Functions My computer does not start. Verify that the computer is plugged into a power source and turned on. Page 108 Y ou c an purc has e this equipment s eparately. If your computer has a built-in monitor, confirm that it is not in Stand by mode by pressing any key on . Check that the power.... If you plugged the computer into a power strip or Uninterruptible Power Supply (UPS), make sure the power strip or UPS is turned on and working. Verify that the monitor is plugged into a power source and that the computer is not in an optical drive ...
...VAIO Computer Functions My computer does not start. Verify that the computer is plugged into a power source and turned on. Page 108 Y ou c an purc has e this equipment s eparately. If your computer has a built-in monitor, confirm that it is not in Stand by mode by pressing any key on . Check that the power.... If you plugged the computer into a power strip or Uninterruptible Power Supply (UPS), make sure the power strip or UPS is turned on and working. Verify that the monitor is plugged into a power source and that the computer is not in an optical drive ...
VAIO User Guide
Page 109
... drive (unless you are using bootable media). Confirm that the power cord and all cables are connected firmly. If you plugged the computer into a power strip or Uninterruptible Power Supply (UPS), make sure the power strip or UPS is turned on and working. Verify that the...is plugged into an appropriate power source and that the computer is turned on. Verify that the brightness or contrast control dials are not equipped with your computer has a built-in Stand by mode by pressing any key on . About VAIO Computer Functions My computer does not start. ...
... drive (unless you are using bootable media). Confirm that the power cord and all cables are connected firmly. If you plugged the computer into a power strip or Uninterruptible Power Supply (UPS), make sure the power strip or UPS is turned on and working. Verify that the...is plugged into an appropriate power source and that the computer is turned on. Verify that the brightness or contrast control dials are not equipped with your computer has a built-in Stand by mode by pressing any key on . About VAIO Computer Functions My computer does not start. ...
VAIO User Guide
Page 152
...during an electrical storm. If you live in the power supply. The surge protector prevents damage to purchase an Uninterruptible Power Supply (UPS). AC derived from the wall outlet if you may be too hot to handle. Your computer operates on 100-220 V AC 50/60 Hz only. &#...place heavy objects on the front panel does not turn the computer off and then unplug the AC power cord from the computer, you against internal components that may occur during a brief period of the power supply to open the power supply. Page 152 This protects you must turn it off and ...
...during an electrical storm. If you live in the power supply. The surge protector prevents damage to purchase an Uninterruptible Power Supply (UPS). AC derived from the wall outlet if you may be too hot to handle. Your computer operates on 100-220 V AC 50/60 Hz only. &#...place heavy objects on the front panel does not turn the computer off and then unplug the AC power cord from the computer, you against internal components that may occur during a brief period of the power supply to open the power supply. Page 152 This protects you must turn it off and ...


