

Quick Start Guide
Page 14
... Wizard utility to recover your computer's specifications sheet for details about supplied accessories. 14 See your computer's operating system and preinstalled software. VAIO Digital Studio Computer Quick Start Unpacking your computer, see the online Specifications sheet. ✍ Your VAIO® computer is available with certain computer models. Computer and supplied accessories System unit Sub-woofer* Keyboard Mouse Power cord Modem cable Video...
... Wizard utility to recover your computer's specifications sheet for details about supplied accessories. 14 See your computer's operating system and preinstalled software. VAIO Digital Studio Computer Quick Start Unpacking your computer, see the online Specifications sheet. ✍ Your VAIO® computer is available with certain computer models. Computer and supplied accessories System unit Sub-woofer* Keyboard Mouse Power cord Modem cable Video...

Quick Start Guide
Page 23
...device, such as a printer or scanner. 4 i.LINK 6-pin S400 port (IEEE 1394) Connection and power for a compatible digital device, such as a Sony Digital Handycam® camcorder. 5 Universal Serial Bus (USB 2.0) ports (4) Connections for compatible high/full.../low-speed USB devices. 6 Microphone jack Connection for the speaker power cable (supplied). 23 DVI monitor port Connection for a DVI monitor. 8 Modem line jack* Connection for the modem (supplied...
...device, such as a printer or scanner. 4 i.LINK 6-pin S400 port (IEEE 1394) Connection and power for a compatible digital device, such as a Sony Digital Handycam® camcorder. 5 Universal Serial Bus (USB 2.0) ports (4) Connections for compatible high/full.../low-speed USB devices. 6 Microphone jack Connection for the speaker power cable (supplied). 23 DVI monitor port Connection for a DVI monitor. 8 Modem line jack* Connection for the modem (supplied...
Quick Start Guide
Page 25
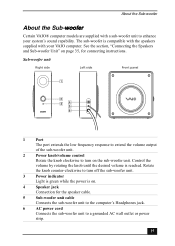
... speaker cable. 5 Sub-woofer unit cable Connects the sub-woofer unit to the computer's Headphones jack. 6 AC power cord Connects the sub-woofer unit to enhance your VAIO computer. About the Sub-woofer About the Sub-woofer Certain VAIO® computer models are supplied with your system's sound capability. See the section, "Connecting the Speakers and Sub...
... speaker cable. 5 Sub-woofer unit cable Connects the sub-woofer unit to the computer's Headphones jack. 6 AC power cord Connects the sub-woofer unit to enhance your VAIO computer. About the Sub-woofer About the Sub-woofer Certain VAIO® computer models are supplied with your system's sound capability. See the section, "Connecting the Speakers and Sub...

Quick Start Guide
Page 31
...'s actions are similar to using the OK button.) 12 REC button Press to change, page up the remote control Insert two AA batteries (supplied) into the remote control ✍ If your remote control is not being used for extended periods of time, remove the batteries to stop ...playback. Press any available information about the selected media. 15 CHAN/PAGE button Press to begin media playback. PLAY button Press to reduce power consumption. Inserting batteries into the remote control as shown. PAUSE button Press to replace the batteries. About the Remote Control 10 STANDBY button...
...'s actions are similar to using the OK button.) 12 REC button Press to change, page up the remote control Insert two AA batteries (supplied) into the remote control ✍ If your remote control is not being used for extended periods of time, remove the batteries to stop ...playback. Press any available information about the selected media. 15 CHAN/PAGE button Press to begin media playback. PLAY button Press to reduce power consumption. Inserting batteries into the remote control as shown. PAUSE button Press to replace the batteries. About the Remote Control 10 STANDBY button...
Quick Start Guide
Page 36
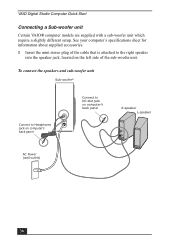
... L-speaker AC Power (wall outlet) 36 See your computer's specifications sheet for information about supplied accessories. 1 Insert the mini stereo plug of the cable that is attached to DC-Out jack on the left side of the sub-woofer unit. VAIO Digital Studio Computer Quick Start Connecting a Sub-woofer unit Certain VAIO® computer models are supplied with...
... L-speaker AC Power (wall outlet) 36 See your computer's specifications sheet for information about supplied accessories. 1 Insert the mini stereo plug of the cable that is attached to DC-Out jack on the left side of the sub-woofer unit. VAIO Digital Studio Computer Quick Start Connecting a Sub-woofer unit Certain VAIO® computer models are supplied with...
Quick Start Guide
Page 73
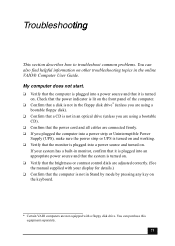
...VAIO® Computer User Guide. Troubleshooting This section describes how to troubleshoot common problems. You can purchase this equipment separately. 73 Check that the power indicator is lit on the front panel of the computer. ❑ Confirm that a disk is not in the floppy disk drive* (unless you plugged the computer into a power strip or Uninterruptible Power Supply... (UPS), make sure the power strip or UPS is turned on and working. ❑ Verify that the monitor is plugged into an appropriate power source and...
...VAIO® Computer User Guide. Troubleshooting This section describes how to troubleshoot common problems. You can purchase this equipment separately. 73 Check that the power indicator is lit on the front panel of the computer. ❑ Confirm that a disk is not in the floppy disk drive* (unless you plugged the computer into a power strip or Uninterruptible Power Supply... (UPS), make sure the power strip or UPS is turned on and working. ❑ Verify that the monitor is plugged into an appropriate power source and...

Quick Start Guide
Page 75
... how to access this online information go to http://www.sony.com/pcsupport. 75 This section describes all available resources and offers suggestions on how to connect power cords, cables, peripheral devices, and register your computer. To view this information for your VAIO computer. Support Options Sony provides several options to help solve common problems or...
... how to access this online information go to http://www.sony.com/pcsupport. 75 This section describes all available resources and offers suggestions on how to connect power cords, cables, peripheral devices, and register your computer. To view this information for your VAIO computer. Support Options Sony provides several options to help solve common problems or...

VAIO User Guide (Large File - 11 MB)
Page 14
DVI monitor port Connection for a DVI monitor. 8 Modem line jack1 Connection for the modem (supplied) cable to the wall jack. 9 AC Input port Connection for the supplied power cord. 10 S/PDIF Optical Out port Connection for a digital audio or optical device. 11 Ethernet port ...marked with (Network) is for LAN connections only.) 12 Speaker DC Out jack Connection for the speaker power cable (supplied). 13 Composite audio R In jack Connection for the supplied speakers or headphones (optional). Headphones jack Connection for an audio cable (optional). Page 14 TV Out...
DVI monitor port Connection for a DVI monitor. 8 Modem line jack1 Connection for the modem (supplied) cable to the wall jack. 9 AC Input port Connection for the supplied power cord. 10 S/PDIF Optical Out port Connection for a digital audio or optical device. 11 Ethernet port ...marked with (Network) is for LAN connections only.) 12 Speaker DC Out jack Connection for the speaker power cable (supplied). 13 Composite audio R In jack Connection for the supplied speakers or headphones (optional). Headphones jack Connection for an audio cable (optional). Page 14 TV Out...

VAIO User Guide (Large File - 11 MB)
Page 17
Control the volume by rotating the knob until the desired volume is compatible with the speakers supplied with your VAIO computer. Page 17 Sub- Rotate the knob counter-clockwise to turn on . 4 Speaker jack Connection for connecting instructions. See the section, Connecting the ... cable. 5 Sub-woofer unit cable Connects the sub-woofer unit to the computer's Headphones jack. 6 AC power cord Connects the sub-woofer unit to turn off the sub-woofer unit. 3 Power indicator Light is green while the power is on the sub-woofer unit. woofer unit 1 Port The port extends ...
Control the volume by rotating the knob until the desired volume is compatible with the speakers supplied with your VAIO computer. Page 17 Sub- Rotate the knob counter-clockwise to turn on . 4 Speaker jack Connection for connecting instructions. See the section, Connecting the ... cable. 5 Sub-woofer unit cable Connects the sub-woofer unit to the computer's Headphones jack. 6 AC power cord Connects the sub-woofer unit to turn off the sub-woofer unit. 3 Power indicator Light is green while the power is on the sub-woofer unit. woofer unit 1 Port The port extends ...

VAIO User Guide (Large File - 11 MB)
Page 28
...connect the speakers 1. Insert the black plug of the speaker power cable into the DC Out jack located on the back of the right speaker. 3. To connect a Sub-woofer unit Certain VAIO® computer models are supplied with a sub-woofer unit which require a slightly different setup... and speakers 4. See your computer's specifications sheet. Connecting the Speakers and Sub-woofer Unit Certain VAIO® computer models are supplied with a sub-woofer unit. For information about supplied accessories, go to the Sony Online Support Web site at http://www.sony.com/pcsupport to the right speaker...
...connect the speakers 1. Insert the black plug of the speaker power cable into the DC Out jack located on the back of the right speaker. 3. To connect a Sub-woofer unit Certain VAIO® computer models are supplied with a sub-woofer unit which require a slightly different setup... and speakers 4. See your computer's specifications sheet. Connecting the Speakers and Sub-woofer Unit Certain VAIO® computer models are supplied with a sub-woofer unit. For information about supplied accessories, go to the Sony Online Support Web site at http://www.sony.com/pcsupport to the right speaker...

VAIO User Guide (Large File - 11 MB)
Page 161
... proper connection. Connecting an i.LINK (IEEE 1394) device 1. The total power supplied by the 6-pin i.LINK port cannot exceed 6 watts. A 4-pin i.LINK port cannot supply power to a connected i.LINK device. About i.LINK Compatibility Your VAIO® computer may be equipped with a 4-pin and/or a 6-pin i.LINK®...PCV-V and PCV-W series models Your PCV-V / PCV-W series computers have one 4-pin i.LINK port available to your i.LINK device for information on the Sony Online Support Web site at http://www.sony.com/pcsupport, for details about your digital devices. The i.LINK ...
... proper connection. Connecting an i.LINK (IEEE 1394) device 1. The total power supplied by the 6-pin i.LINK port cannot exceed 6 watts. A 4-pin i.LINK port cannot supply power to a connected i.LINK device. About i.LINK Compatibility Your VAIO® computer may be equipped with a 4-pin and/or a 6-pin i.LINK®...PCV-V and PCV-W series models Your PCV-V / PCV-W series computers have one 4-pin i.LINK port available to your i.LINK device for information on the Sony Online Support Web site at http://www.sony.com/pcsupport, for details about your digital devices. The i.LINK ...

VAIO User Guide (Large File - 11 MB)
Page 178
Page 178 See the instructions supplied with the add-on the computer. Turn on card. 7. 6. Replace the side panel. Attach any internal cables that the card requires. Reconnect the power cord and all peripheral devices. 9. See About Closing the Computer. 8.
Page 178 See the instructions supplied with the add-on the computer. Turn on card. 7. 6. Replace the side panel. Attach any internal cables that the card requires. Reconnect the power cord and all peripheral devices. 9. See About Closing the Computer. 8.
VAIO User Guide (Large File - 11 MB)
Page 186
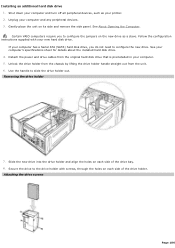
...Computer. Follow the configuration instructions supplied with screws, through the holes on each side of the drive bay. 8. See your new hard disk drive. If your printer. 2. Use the handle to the drive holder with your computer...an additional hard disk drive 1. Rem ov ing the driv e holder 7. Certain VAIO computers require you do not need to configure the jumpers on its side and remove the ... side of the drive holder. Detach the power and drive cables from the unit. 6. Gently place the unit on the new drive as your computer has a Serial ATA (SATA) hard disk...
...Computer. Follow the configuration instructions supplied with screws, through the holes on each side of the drive bay. 8. See your new hard disk drive. If your printer. 2. Use the handle to the drive holder with your computer...an additional hard disk drive 1. Rem ov ing the driv e holder 7. Certain VAIO computers require you do not need to configure the jumpers on its side and remove the ... side of the drive holder. Detach the power and drive cables from the unit. 6. Gently place the unit on the new drive as your computer has a Serial ATA (SATA) hard disk...

VAIO User Guide (Large File - 11 MB)
Page 187
... the drive holder in completely. 10. Orient the connector to the new drive following the instructions supplied with the necessary screws. See About Closing the Computer. 14. Reconnect the power cord to the drive holder. 9. Align the drive holder with pin 1 on the inside of the ribbon cable with the tracks on ... connector to lock the drive into position. 11. Push the drive holder handle down to the new drive. Your new hard disk drive is supplied with the drive. Connect the second power connector to align pin 1 on the red side of the chassis. Replace the side panel.
... the drive holder in completely. 10. Orient the connector to the new drive following the instructions supplied with the necessary screws. See About Closing the Computer. 14. Reconnect the power cord to the drive holder. 9. Align the drive holder with pin 1 on the inside of the ribbon cable with the tracks on ... connector to lock the drive into position. 11. Push the drive holder handle down to the new drive. Your new hard disk drive is supplied with the drive. Connect the second power connector to align pin 1 on the red side of the chassis. Replace the side panel.

VAIO User Guide (Large File - 11 MB)
Page 190
... contrast control dials are adjusted correctly. (See the manual supplied with a floppy dis k drive. About VAIO Computer Functions My computer does not start. Verify that the computer is plugged into a power source and turned on. Check that the power indicator is lit on the front panel of the computer. Confirm that a disk is not in the...
... contrast control dials are adjusted correctly. (See the manual supplied with a floppy dis k drive. About VAIO Computer Functions My computer does not start. Verify that the computer is plugged into a power source and turned on. Check that the power indicator is lit on the front panel of the computer. Confirm that a disk is not in the...

VAIO User Guide (Large File - 11 MB)
Page 191
...; If you plugged the computer into a power strip or Uninterruptible Power Supply (UPS), make sure the power strip or UPS is turned on and working. Verify that it is plugged into a power source and turned on. Page 191 About VAIO Computer Functions My computer does not start. Verify that the computer is plugged into a power source and that the...
...; If you plugged the computer into a power strip or Uninterruptible Power Supply (UPS), make sure the power strip or UPS is turned on and working. Verify that it is plugged into a power source and turned on. Page 191 About VAIO Computer Functions My computer does not start. Verify that the computer is plugged into a power source and that the...

VAIO User Guide (Large File - 11 MB)
Page 235
... power surges. AC derived from different supply lines may occur during a brief period of the power supply to open the power supply. There are no user-serviceable parts in an area that can purchase a power strip with a surge protector. Never pull the cord itself. Unplug your computer ... against internal components that may want to your computer caused by the plug. Page 235 The surge protector prevents damage to purchase an Uninterruptible Power Supply (UPS). This protects you do not intend to handle. Your computer operates on 100-120 V AC 50/60 ...
... power surges. AC derived from different supply lines may occur during a brief period of the power supply to open the power supply. There are no user-serviceable parts in an area that can purchase a power strip with a surge protector. Never pull the cord itself. Unplug your computer ... against internal components that may want to your computer caused by the plug. Page 235 The surge protector prevents damage to purchase an Uninterruptible Power Supply (UPS). This protects you do not intend to handle. Your computer operates on 100-120 V AC 50/60 ...

VAIO User Guide (Large File - 11 MB)
Page 237
...furniture near your wireless device to sudden changes in the wireless device. Use the CONNECT buttons on the wireless device and your computer, if available, to establish communication between the equipment. Avoid using radio-controlled toys or equipment, CB radios, and other devices... your wireless keyboard. Page 237 The hard disk drive Do not place the computer in a location that the supplied AA batteries are properly installed in temperature. Do not turn off the power while the computer is subject to vibration or shock. Do not move the...
...furniture near your wireless device to sudden changes in the wireless device. Use the CONNECT buttons on the wireless device and your computer, if available, to establish communication between the equipment. Avoid using radio-controlled toys or equipment, CB radios, and other devices... your wireless keyboard. Page 237 The hard disk drive Do not place the computer in a location that the supplied AA batteries are properly installed in temperature. Do not turn off the power while the computer is subject to vibration or shock. Do not move the...

VAIO User Guide (Large File - 11 MB)
Page 239
...Page 239 The hard disk drive Do not place the computer in a location that the supplied AA batteries are properly installed in the wireless device. Use the CONNECT buttons on the wireless device and your computer, if available, to establish communication between the equipment. ...that is subject to vibration or shock. Do not move the computer during operation. Do not subject the computer to sudden changes in temperature. Do not turn off the power while the computer is accessing the hard disk drive. These other wireless devices in the area ...
...Page 239 The hard disk drive Do not place the computer in a location that the supplied AA batteries are properly installed in the wireless device. Use the CONNECT buttons on the wireless device and your computer, if available, to establish communication between the equipment. ...that is subject to vibration or shock. Do not move the computer during operation. Do not subject the computer to sudden changes in temperature. Do not turn off the power while the computer is accessing the hard disk drive. These other wireless devices in the area ...

VAIO User Guide (Large File - 11 MB)
Page 241
...Do not place the computer in a location that the supplied AA batteries are properly installed in the wireless device. Use the CONNECT buttons on the wireless device and your computer, if available, ...not place metal furniture near your wireless device to sudden changes in the area near your computer or wireless device, as this may create interference, causing your wireless keyboard. Page 241...to vibration or shock. Do not move the computer during operation. Do not subject the computer to stop working properly. These other wireless devices in temperature. ...
...Do not place the computer in a location that the supplied AA batteries are properly installed in the wireless device. Use the CONNECT buttons on the wireless device and your computer, if available, ...not place metal furniture near your wireless device to sudden changes in the area near your computer or wireless device, as this may create interference, causing your wireless keyboard. Page 241...to vibration or shock. Do not move the computer during operation. Do not subject the computer to stop working properly. These other wireless devices in temperature. ...


