User Guide
Page 7
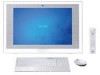
... Support. 2 Click Manuals & Specifications. 3 Click Media Center User Guide. To access this on -screen guide: 1 Click Start and Help and Support. 2 Click Manuals & Specifications. 3 Click VAIO Recovery Center User Guide. ❑ Media Center User Guide (Selected models only) - Provides information about restoring individual software programs, software drivers, and drive partition(s) or...
... Support. 2 Click Manuals & Specifications. 3 Click Media Center User Guide. To access this on -screen guide: 1 Click Start and Help and Support. 2 Click Manuals & Specifications. 3 Click VAIO Recovery Center User Guide. ❑ Media Center User Guide (Selected models only) - Provides information about restoring individual software programs, software drivers, and drive partition(s) or...
User Guide
Page 8
...VAIO Media Setup and Windows Network and Sharing Center, and access to wireless tutorials. ❑ Security Keep your data safe and your computer running efficiently with updates and maintenance programs from the following categories to other VAIO documents, and system and software information for your computer. ❑ VAIO... Recovery Find information on -screen User Guide, warranty information, other Internet sites you need. Choose from Microsoft and Sony. ❑ VAIO Sites Contains links to find the answers you might find the on how to access and provides a single location ...
...VAIO Media Setup and Windows Network and Sharing Center, and access to wireless tutorials. ❑ Security Keep your data safe and your computer running efficiently with updates and maintenance programs from the following categories to other VAIO documents, and system and software information for your computer. ❑ VAIO... Recovery Find information on -screen User Guide, warranty information, other Internet sites you need. Choose from Microsoft and Sony. ❑ VAIO Sites Contains links to find the answers you might find the on how to access and provides a single location ...

User Guide
Page 10
... sure you leave at least 4 inches (10 cm) of space behind and at least 8 inches (20 cm) of space on the display. Choose a location where windows and lights do not exert excessive pressure on your comfort and work efficiency. ❑ Ventilation - Proper lighting adds to find the best position. n 10 N Before...
... sure you leave at least 4 inches (10 cm) of space behind and at least 8 inches (20 cm) of space on the display. Choose a location where windows and lights do not exert excessive pressure on your comfort and work efficiency. ❑ Ventilation - Proper lighting adds to find the best position. n 10 N Before...
User Guide
Page 23
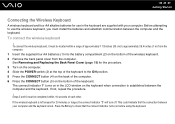
... procedure. ! Press the Fn key to check that the connection between your computer. To connect the wireless keyboard ! Before attempting to use in the LCD window on before using the keyboard. Steps 5 and 6 must be located within 10 seconds of the keyboard. This could indicate that the connect indicator turns on...
... procedure. ! Press the Fn key to check that the connection between your computer. To connect the wireless keyboard ! Before attempting to use in the LCD window on before using the keyboard. Steps 5 and 6 must be located within 10 seconds of the keyboard. This could indicate that the connect indicator turns on...

User Guide
Page 25
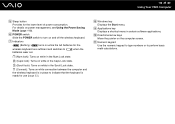
If the wireless keyboard does not operate properly, the batteries may need to avoid possible damage from battery leakage. If you want to put the wireless keyboard in the LCD window on the wireless keyboard for an extended period of time, remove the batteries to be replaced. If the wireless keyboard is not being used for its battery power level. n 25 N Getting Started ✍ You can check the battery indicator ( or ) in a more 'ergonomic' position, flip open the keyboard feet.
If the wireless keyboard does not operate properly, the batteries may need to avoid possible damage from battery leakage. If you want to put the wireless keyboard in the LCD window on the wireless keyboard for an extended period of time, remove the batteries to be replaced. If the wireless keyboard is not being used for its battery power level. n 25 N Getting Started ✍ You can check the battery indicator ( or ) in a more 'ergonomic' position, flip open the keyboard feet.
User Guide
Page 34
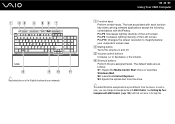
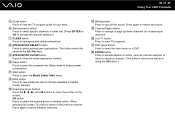
...can change the assignments with the Fn key. The task associated with each function key varies among software applications except the following combinations with VAIO Central. Fn+F10: Changes the screen resolution to magnify/restore your computer's screen view. The default tasks are as an example. See... may be different from the above is the English keyboard as follows: S1: Opens the Media Center Start menu or launches Windows Mail. Fn+F6: Increases lighting intensity of the LCD screen. S2: Launches Internet Explorer. B Muting button Turns the volume on and off.
...can change the assignments with the Fn key. The task associated with each function key varies among software applications except the following combinations with VAIO Central. Fn+F10: Changes the screen resolution to magnify/restore your computer's screen view. The default tasks are as an example. See... may be different from the above is the English keyboard as follows: S1: Opens the Media Center Start menu or launches Windows Mail. Fn+F6: Increases lighting intensity of the LCD screen. S2: Launches Internet Explorer. B Muting button Turns the volume on and off.
User Guide
Page 35
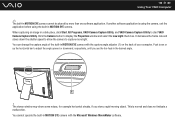
.... (Connect): Turns on and off the wireless keyboard. J Directional arrow keys Move the pointer on power management, see Using the Power Saving Mode (page 110). H Windows key Displays the Start menu. K Numeric keypad Use the numeric keypad to type numbers or to batteries wear out. F POWER switch Slide the POWER switch... Num Lock state. (Caps lock): Turns on while in the Caps Lock state. (Scroll lock): Turns on while in certain software applications. n 35 N Using Your VAIO Computer E Sleep button Provides for use (page 23).
.... (Connect): Turns on and off the wireless keyboard. J Directional arrow keys Move the pointer on power management, see Using the Power Saving Mode (page 110). H Windows key Displays the Start menu. K Numeric keypad Use the numeric keypad to type numbers or to batteries wear out. F POWER switch Slide the POWER switch... Num Lock state. (Caps lock): Turns on while in the Caps Lock state. (Scroll lock): Turns on while in certain software applications. n 35 N Using Your VAIO Computer E Sleep button Provides for use (page 23).
User Guide
Page 39
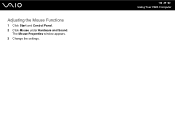
n 39 N Using Your VAIO Computer The Mouse Properties window appears. 3 Change the settings. Adjusting the Mouse Functions 1 Click Start and Control Panel. 2 Click Mouse under Hardware and Sound.
n 39 N Using Your VAIO Computer The Mouse Properties window appears. 3 Change the settings. Adjusting the Mouse Functions 1 Click Start and Control Panel. 2 Click Mouse under Hardware and Sound.
User Guide
Page 41
... can change the capture angle of the built-in MOTION EYE camera with the capture angle adjuster (1) on the back of your computer. The viewer window may show some noises, for example horizontal streaks, if you see the live feed in MOTION EYE camera cannot be shared by more light. You... software application. It decreases the frame rate and slows down or up the horizontal bar to start VAIO Camera Capture Utility. Push down the shutter speed to allow the camera to display the Properties window and select the Low Light check box. When capturing an image in MOTION EYE camera. If another...
... can change the capture angle of the built-in MOTION EYE camera with the capture angle adjuster (1) on the back of your computer. The viewer window may show some noises, for example horizontal streaks, if you see the live feed in MOTION EYE camera cannot be shared by more light. You... software application. It decreases the frame rate and slows down or up the horizontal bar to start VAIO Camera Capture Utility. Push down the shutter speed to allow the camera to display the Properties window and select the Low Light check box. When capturing an image in MOTION EYE camera. If another...
User Guide
Page 50
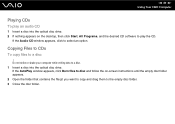
If the Audio CD window appears, click to a disc ! Copying Files to CDs To copy files to select an option. Do not strike or shake your computer while writing data ... contains the file(s) you want to copy and drag them to play an audio CD 1 Insert a disc into the optical disc drive. If the AutoPlay window appears, click Burn files to disc and follow the on the desktop, then click Start, All Programs, and the desired CD software to the empty...
If the Audio CD window appears, click to a disc ! Copying Files to CDs To copy files to select an option. Do not strike or shake your computer while writing data ... contains the file(s) you want to copy and drag them to play an audio CD 1 Insert a disc into the optical disc drive. If the AutoPlay window appears, click Burn files to disc and follow the on the desktop, then click Start, All Programs, and the desired CD software to the empty...
User Guide
Page 53
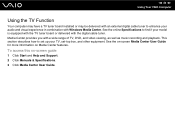
... how to set -top box, and other equipment. See the online Specifications to enhance your audio and visual experience in combination with Windows Media Center. n 53 N Using Your VAIO Computer Using the TV Function Your computer may have a TV tuner board installed or may be delivered with an external digital cable tuner...
... how to set -top box, and other equipment. See the online Specifications to enhance your audio and visual experience in combination with Windows Media Center. n 53 N Using Your VAIO Computer Using the TV Function Your computer may have a TV tuner board installed or may be delivered with an external digital cable tuner...
User Guide
Page 66
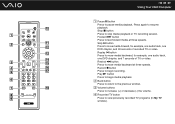
... playback. D Recorded TV button Press to fast-forward media at three speeds. Forward M button Press to view previously recorded TV programs (In My TV window). Play N button Press to begin media playback. Record z button Press to begin recording. C Volume buttons Press to stop media playback or TV recording session... Press to move media forward, for example, one audio track, one DVD chapter, and 30 seconds of TV or video. n 66 N Using Your VAIO Computer A Pause X button Press to the previous window. Skip B? B Back button Press to return to pause media playback.
... playback. D Recorded TV button Press to fast-forward media at three speeds. Forward M button Press to view previously recorded TV programs (In My TV window). Play N button Press to begin media playback. Record z button Press to begin recording. C Volume buttons Press to stop media playback or TV recording session... Press to move media forward, for example, one audio track, one DVD chapter, and 30 seconds of TV or video. n 66 N Using Your VAIO Computer A Pause X button Press to the previous window. Skip B? B Back button Press to return to pause media playback.
User Guide
Page 67
H APPLICATION SELECT button Press to view the TV program guide for Media Center features. n 67 N Using Your VAIO Computer E Guide button Press to switch among open the Media Center Start menu. L More button Press to backspace and delete entered text. This button works ... place the computer into Sleep mode to open applications. K Start button Press to reduce power consumption. I APPLICATION CLOSE button Press to close the active application window. M Directional arrow buttons Press the M, m,
H APPLICATION SELECT button Press to view the TV program guide for Media Center features. n 67 N Using Your VAIO Computer E Guide button Press to switch among open the Media Center Start menu. L More button Press to backspace and delete entered text. This button works ... place the computer into Sleep mode to open applications. K Start button Press to reduce power consumption. I APPLICATION CLOSE button Press to close the active application window. M Directional arrow buttons Press the M, m,
User Guide
Page 74
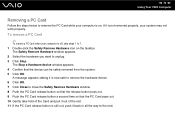
The Stop a Hardware device window appears. 4 Confirm that the PC Card pops out. 10 Gently take hold of the Card and ...message appears stating it is now safe to remove the hardware device. 6 Click OK. 7 Click Close to close the Safely Remove Hardware window. 8 Push the PC Card release button so that the release button pops out. 9 Push the PC Card release button a second time...the way to remove the PC Card while your computer is on the taskbar. The Safely Remove Hardware window appears. 2 Select the hardware you want to 7. 1 Double-click the Safely Remove Hardware icon on . n 74 N Using Your...
The Stop a Hardware device window appears. 4 Confirm that the PC Card pops out. 10 Gently take hold of the Card and ...message appears stating it is now safe to remove the hardware device. 6 Click OK. 7 Click Close to close the Safely Remove Hardware window. 8 Push the PC Card release button so that the release button pops out. 9 Push the PC Card release button a second time...the way to remove the PC Card while your computer is on the taskbar. The Safely Remove Hardware window appears. 2 Select the hardware you want to 7. 1 Double-click the Safely Remove Hardware icon on . n 74 N Using Your...

User Guide
Page 78
A message appears stating it is on the taskbar. n 78 N Using Your VAIO Computer Removing an ExpressCard Module Follow the steps below to remove the ExpressCard module while your system may not work properly. To remove an ExpressCard ... your computer is not removed properly, your computer is now safe to remove the device. 6 Click OK. 7 Click Close to close the Safely Remove Hardware window. 8 Push in the ExpressCard module toward the computer to pop it out. 9 Gently take hold of the ExpressCard module and pull it out of the...
A message appears stating it is on the taskbar. n 78 N Using Your VAIO Computer Removing an ExpressCard Module Follow the steps below to remove the ExpressCard module while your system may not work properly. To remove an ExpressCard ... your computer is not removed properly, your computer is now safe to remove the device. 6 Click OK. 7 Click Close to close the Safely Remove Hardware window. 8 Push in the ExpressCard module toward the computer to pop it out. 9 Gently take hold of the ExpressCard module and pull it out of the...

User Guide
Page 82
...formatting the media, make sure that is ready for use the device that it clicks into place. 2 Click Start and Computer to open the Computer window. 2 Double-click the Memory Stick media icon to view the list of data files saved in Format options. Be sure to use . This ...while formatting the media. If you select Quick Format in the Memory Stick media. n 82 N Using Your VAIO Computer To view the contents of the Memory Stick media 1 Click Start and Computer to open the Computer window. 3 Right-click the Memory Stick media icon and select Format. 4 Click Restore device defaults. !
...formatting the media, make sure that is ready for use the device that it clicks into place. 2 Click Start and Computer to open the Computer window. 2 Double-click the Memory Stick media icon to view the list of data files saved in Format options. Be sure to use . This ...while formatting the media. If you select Quick Format in the Memory Stick media. n 82 N Using Your VAIO Computer To view the contents of the Memory Stick media 1 Click Start and Computer to open the Computer window. 3 Right-click the Memory Stick media icon and select Format. 4 Click Restore device defaults. !

User Guide
Page 89
To set up a dial-up connection to the Internet 1 Click Start and Control Panel 2 Click Connect to the Internet window appears. 3 Click Dial-up. 4 Follow the on-screen instructions. n 89 N Using Your VAIO Computer The Connect to the Internet under Network and Internet.
To set up a dial-up connection to the Internet 1 Click Start and Control Panel 2 Click Connect to the Internet window appears. 3 Click Dial-up. 4 Follow the on-screen instructions. n 89 N Using Your VAIO Computer The Connect to the Internet under Network and Internet.
User Guide
Page 93
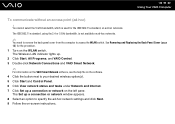
...Removing and Replacing the Back Panel Cover (page 18) for the IEEE 802.11a standard, on the WLAN switch. The Set up a connection or network window appears. 8 Select an option to your desired wireless option(s). 5 Click Start and Control Panel. 6 Click View network status and tasks under Network and ... Next. 9 Follow the on-screen instructions. You cannot select the 5 GHz bandwidth, which is not available on the left pane. n 93 N Using Your VAIO Computer To communicate without an access point (ad-hoc) ! The IEEE 802.11n standard, using the 2.4 or 5 GHz bandwidth, is used for the procedure....
...Removing and Replacing the Back Panel Cover (page 18) for the IEEE 802.11a standard, on the WLAN switch. The Set up a connection or network window appears. 8 Select an option to your desired wireless option(s). 5 Click Start and Control Panel. 6 Click View network status and tasks under Network and ... Next. 9 Follow the on-screen instructions. You cannot select the 5 GHz bandwidth, which is not available on the left pane. n 93 N Using Your VAIO Computer To communicate without an access point (ad-hoc) ! The IEEE 802.11n standard, using the 2.4 or 5 GHz bandwidth, is used for the procedure....
User Guide
Page 99
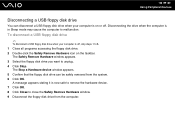
.... 3 Select the floppy disk drive you want to close the Safely Remove Hardware window. 9 Disconnect the floppy disk drive from the system. 6 Click OK. A message appears stating it is in Sleep mode may cause the computer to 8. 1 Close all ...programs accessing the floppy disk drive. 2 Double-click the Safely Remove Hardware icon on or off. The Stop a Hardware device window appears. 5 Confirm that the floppy disk drive can disconnect a USB floppy disk drive when your computer is off, skip steps 1 to malfunction. Disconnecting the drive...
.... 3 Select the floppy disk drive you want to close the Safely Remove Hardware window. 9 Disconnect the floppy disk drive from the system. 6 Click OK. A message appears stating it is in Sleep mode may cause the computer to 8. 1 Close all ...programs accessing the floppy disk drive. 2 Double-click the Safely Remove Hardware icon on or off. The Stop a Hardware device window appears. 5 Confirm that the floppy disk drive can disconnect a USB floppy disk drive when your computer is off, skip steps 1 to malfunction. Disconnecting the drive...

User Guide
Page 100
To connect a printer using the USB port 1 Plug the power cord (1) of your printer into an AC outlet. 2 Choose the USB port (3) you prefer to use. 3 Plug one end of Windows to the computer. n 100 N Using Peripheral Devices Connecting a Printer You can connect a USB printer compatible with your version of a USB printer cable (2) (not supplied) into the USB port and the other end to your computer to print documents. Connecting a Printer Using the USB Port You can connect a Windows-compatible printer to your printer.
To connect a printer using the USB port 1 Plug the power cord (1) of your printer into an AC outlet. 2 Choose the USB port (3) you prefer to use. 3 Plug one end of Windows to the computer. n 100 N Using Peripheral Devices Connecting a Printer You can connect a USB printer compatible with your version of a USB printer cable (2) (not supplied) into the USB port and the other end to your computer to print documents. Connecting a Printer Using the USB Port You can connect a Windows-compatible printer to your printer.


