User Guide
Page 2
n2 N Contents Before Use ...5 Documentation ...6 Ergonomic Considerations ...9 Getting Started ...11 Locating Controls and Ports...12 About the Indicator Lights ...17 Setting Up Your Computer ...18 Shutting Down Your Computer Safely ...31 Using Your VAIO Computer ...32 Using the Keyboard ...33 Using the Mouse ...37 Using the Built-in MOTION EYE Camera...40 Using the Optical Disc Drive ...42 Using the TV Function ...53 Using PC Cards ...72 Using the ExpressCard Module ...75 Using the Memory Stick Media ...79 Using Other Memory Cards ...85 Using the Internet...88 Using Wireless LAN (WLAN) ...90
n2 N Contents Before Use ...5 Documentation ...6 Ergonomic Considerations ...9 Getting Started ...11 Locating Controls and Ports...12 About the Indicator Lights ...17 Setting Up Your Computer ...18 Shutting Down Your Computer Safely ...31 Using Your VAIO Computer ...32 Using the Keyboard ...33 Using the Mouse ...37 Using the Built-in MOTION EYE Camera...40 Using the Optical Disc Drive ...42 Using the TV Function ...53 Using PC Cards ...72 Using the ExpressCard Module ...75 Using the Memory Stick Media ...79 Using Other Memory Cards ...85 Using the Internet...88 Using Wireless LAN (WLAN) ...90
User Guide
Page 3
... Connecting a Printer ...100 Connecting an i.LINK Device ...101 Connecting to a Network (LAN) ...103 Customizing Your VAIO Computer ...105 Setting the Password ...106 Setting Up Your Computer with VAIO Central ...109 Using the Power Saving Mode...110 Upgrading Your VAIO Computer...112 Adding and Removing Memory...113 Adding the Hard Disk Drive...119 Precautions ...125 On Handling...
... Connecting a Printer ...100 Connecting an i.LINK Device ...101 Connecting to a Network (LAN) ...103 Customizing Your VAIO Computer ...105 Setting the Password ...106 Setting Up Your Computer with VAIO Central ...109 Using the Power Saving Mode...110 Upgrading Your VAIO Computer...112 Adding and Removing Memory...113 Adding the Hard Disk Drive...119 Precautions ...125 On Handling...
User Guide
Page 5
n5 N Before Use Before Use Congratulations on -screen User Guide. Sony has combined leading-edge technology in this Sony VAIO® computer, and welcome to provide state-of this manual may look slightly different from those of your purchase of -the-art personal computing. ! External views illustrated in audio, video, computing, and communications to the on your computer.
n5 N Before Use Before Use Congratulations on -screen User Guide. Sony has combined leading-edge technology in this Sony VAIO® computer, and welcome to provide state-of this manual may look slightly different from those of your purchase of -the-art personal computing. ! External views illustrated in audio, video, computing, and communications to the on your computer.
User Guide
Page 6
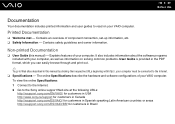
... (this manual by clicking their respective URLs beginning with your VAIO computer. Explains features of your VAIO computer. Contains safety guidelines and owner information. It also includes information about the software programs included with http://, your computer must be connected to Web sites described in this manual) ...information and user guides to the Sony online support Web site at the following URLs: http://esupport.sony.com/EN/VAIO/ for customers in USA http://www.sony.ca/support for customers in Canada http://esupport.sony.com/ES/VAIO/ for customers in Spanish speaking ...
... (this manual by clicking their respective URLs beginning with your VAIO computer. Explains features of your VAIO computer. Contains safety guidelines and owner information. It also includes information about the software programs included with http://, your computer must be connected to Web sites described in this manual) ...information and user guides to the Sony online support Web site at the following URLs: http://esupport.sony.com/EN/VAIO/ for customers in USA http://www.sony.ca/support for customers in Canada http://esupport.sony.com/ES/VAIO/ for customers in Spanish speaking ...
User Guide
Page 7
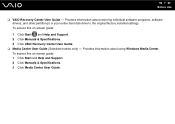
... hard disk drive to the original factory installed settings. To access this on -screen guide: 1 Click Start and Help and Support. 2 Click Manuals & Specifications. 3 Click VAIO Recovery Center User Guide. ❑ Media Center User Guide (Selected models only) - To access this on -screen guide: 1 Click Start and Help and Support. 2 Click...
... hard disk drive to the original factory installed settings. To access this on -screen guide: 1 Click Start and Help and Support. 2 Click Manuals & Specifications. 3 Click VAIO Recovery Center User Guide. ❑ Media Center User Guide (Selected models only) - To access this on -screen guide: 1 Click Start and Help and Support. 2 Click...
User Guide
Page 8
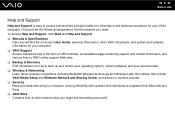
... and useful. Choose from Microsoft and Sony. ❑ VAIO Sites Contains links to access and provides a single location for information and technical assistance for your computer. ❑ VAIO Support Access interactive help in the form of VAIO tutorials, an escalation page containing support ...and contact information, and various links to VAIO online support Web sites. ❑ Backup & Recovery ...
... and useful. Choose from Microsoft and Sony. ❑ VAIO Sites Contains links to access and provides a single location for information and technical assistance for your computer. ❑ VAIO Support Access interactive help in the form of VAIO tutorials, an escalation page containing support ...and contact information, and various links to VAIO online support Web sites. ❑ Backup & Recovery ...
User Guide
Page 11
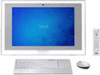
Upon completion, connect one device (for the first time, do not connect any other hardware that did not originally come with only the supplied accessories connected and set up your computer. Be sure to get started using your computer for example, a printer, an external hard disk ...; Locating Controls and Ports (page 12) ❑ About the Indicator Lights (page 17) ❑ Setting Up Your Computer (page 18) ❑ Shutting Down Your Computer Safely (page 31) Before starting your VAIO computer. ! n 11 N Getting Started Getting Started This section describes how to start up your...
Upon completion, connect one device (for the first time, do not connect any other hardware that did not originally come with only the supplied accessories connected and set up your computer. Be sure to get started using your computer for example, a printer, an external hard disk ...; Locating Controls and Ports (page 12) ❑ About the Indicator Lights (page 17) ❑ Setting Up Your Computer (page 18) ❑ Shutting Down Your Computer Safely (page 31) Before starting your VAIO computer. ! n 11 N Getting Started Getting Started This section describes how to start up your...

User Guide
Page 17
... Power 1 Illuminates in green when the power of the computer is on, illuminates in orange when the computer is off. Remote sensor* Illuminates in Sleep mode, and turns off . Do not enter Sleep mode or turn off , the optical disc media is equipped with VAIO Central (page 109) and find out more in... hard disk drive. Media Access Illuminates when data is read from or written to a memory card. (Do not enter Sleep mode or turn off the computer when this indicator is on . Optical disc drive Illuminates when data is read from the remote commander. See Setting Up Your...
... Power 1 Illuminates in green when the power of the computer is on, illuminates in orange when the computer is off. Remote sensor* Illuminates in Sleep mode, and turns off . Do not enter Sleep mode or turn off , the optical disc media is equipped with VAIO Central (page 109) and find out more in... hard disk drive. Media Access Illuminates when data is read from or written to a memory card. (Do not enter Sleep mode or turn off the computer when this indicator is on . Optical disc drive Illuminates when data is read from the remote commander. See Setting Up Your...
User Guide
Page 32
... section describes how to get the most out of using your VAIO computer. ❑ Using the Keyboard (page 33) ❑ Using the Mouse (page 37) ❑ Using the Built-in MOTION EYE Camera (page 40) ❑ Using the ... (page 79) ❑ Using Other Memory Cards (page 85) ❑ Using the Internet (page 88) ❑ Using Wireless LAN (WLAN) (page 90) n 32 N Using Your VAIO Computer
... section describes how to get the most out of using your VAIO computer. ❑ Using the Keyboard (page 33) ❑ Using the Mouse (page 37) ❑ Using the Built-in MOTION EYE Camera (page 40) ❑ Using the ... (page 79) ❑ Using Other Memory Cards (page 85) ❑ Using the Internet (page 88) ❑ Using Wireless LAN (WLAN) (page 90) n 32 N Using Your VAIO Computer
User Guide
Page 33
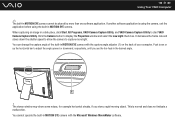
... the 2.4 GHz frequency band near your computer. The wireless keyboard uses a standard key arrangement with manganese batteries. Do not mix alkaline with additional keys that the supplied AA batteries are properly installed. n 33 N Using Your VAIO Computer Using the Keyboard A wireless keyboard is ...supplied with your computer first, and then press the CONNECT button on the bottom of the wireless keyboard. Do not place...
... the 2.4 GHz frequency band near your computer. The wireless keyboard uses a standard key arrangement with manganese batteries. Do not mix alkaline with additional keys that the supplied AA batteries are properly installed. n 33 N Using Your VAIO Computer Using the Keyboard A wireless keyboard is ...supplied with your computer first, and then press the CONNECT button on the bottom of the wireless keyboard. Do not place...
User Guide
Page 34
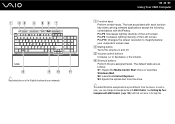
...C Volume control buttons Increase (+) or decrease (-) the volume. See Setting Up Your Computer with VAIO Central. B Muting button Turns the volume on and off. In such a case, you can change the assignments with VAIO Central (page 109) and find out more in its help file. Fn+F5: ... as follows: S1: Opens the Media Center Start menu or launches Windows Mail. ✍ Illustrated above . n 34 N Using Your VAIO Computer A Function keys Perform certain tasks. The task associated with each function key varies among software applications except the following combinations with the Fn key....
...C Volume control buttons Increase (+) or decrease (-) the volume. See Setting Up Your Computer with VAIO Central. B Muting button Turns the volume on and off. In such a case, you can change the assignments with VAIO Central (page 109) and find out more in its help file. Fn+F5: ... as follows: S1: Opens the Media Center Start menu or launches Windows Mail. ✍ Illustrated above . n 34 N Using Your VAIO Computer A Function keys Perform certain tasks. The task associated with each function key varies among software applications except the following combinations with the Fn key....
User Guide
Page 35
... keypad Use the numeric keypad to type numbers or to turn on while connection between the computer and the wireless keyboard is in certain software applications. H Windows key Displays the Start menu. n 35 N Using Your VAIO Computer E Sleep button Provides for the lower level of power consumption. F POWER switch Slide the POWER switch...
... keypad Use the numeric keypad to type numbers or to turn on while connection between the computer and the wireless keyboard is in certain software applications. H Windows key Displays the Start menu. n 35 N Using Your VAIO Computer E Sleep button Provides for the lower level of power consumption. F POWER switch Slide the POWER switch...

User Guide
Page 36
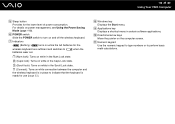
B CONNECT button (page 23) Press to enable the wireless keyboard to adjust the keyboard angle. n 36 N Using Your VAIO Computer A Keyboard feet Flip open to communicate with the computer. C Battery compartment Storage compartment for the AA batteries.
B CONNECT button (page 23) Press to enable the wireless keyboard to adjust the keyboard angle. n 36 N Using Your VAIO Computer A Keyboard feet Flip open to communicate with the computer. C Battery compartment Storage compartment for the AA batteries.
User Guide
Page 37
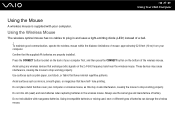
n 37 N Using Your VAIO Computer Using the Mouse A wireless mouse is supplied with manganese batteries. ... AA batteries are properly installed. Press the CONNECT button located on the 2.4 GHz frequency band near your computer. Do not place metal furniture near the wireless mouse. To maintain good communication, operate the wireless mouse ...working properly. Always use the same type and manufacture of mouse: approximately 32.8 feet (10 m) from your computer or wireless mouse, as mirrors, smooth glass, or magazines that have half- Using incompatible batteries or mixing used...
n 37 N Using Your VAIO Computer Using the Mouse A wireless mouse is supplied with manganese batteries. ... AA batteries are properly installed. Press the CONNECT button located on the 2.4 GHz frequency band near your computer. Do not place metal furniture near the wireless mouse. To maintain good communication, operate the wireless mouse ...working properly. Always use the same type and manufacture of mouse: approximately 32.8 feet (10 m) from your computer or wireless mouse, as mirrors, smooth glass, or magazines that have half- Using incompatible batteries or mixing used...
User Guide
Page 38
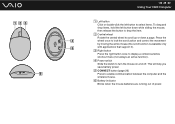
... the wireless mouse. F Battery indicator Blinks when the mouse batteries are running out of power. n 38 N Using Your VAIO Computer A Left button Click or double-click the left button to select items. To drag and drop items, hold the left button down a page. C Right button ...
... the wireless mouse. F Battery indicator Blinks when the mouse batteries are running out of power. n 38 N Using Your VAIO Computer A Left button Click or double-click the left button to select items. To drag and drop items, hold the left button down a page. C Right button ...
User Guide
Page 39
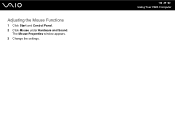
n 39 N Using Your VAIO Computer The Mouse Properties window appears. 3 Change the settings. Adjusting the Mouse Functions 1 Click Start and Control Panel. 2 Click Mouse under Hardware and Sound.
n 39 N Using Your VAIO Computer The Mouse Properties window appears. 3 Change the settings. Adjusting the Mouse Functions 1 Click Start and Control Panel. 2 Click Mouse under Hardware and Sound.

User Guide
Page 40
...messaging or video editing software does not activate or deactivate the built-in MOTION EYE camera. n 40 N Using Your VAIO Computer Using the Built-in MOTION EYE Camera Your computer is equipped with a built-in MOTION EYE camera, respectively. Note that the camera is ready for a video conference... using the software. Turning on the computer activates the built-in MOTION EYE camera adds video functionality to instant messaging ...
...messaging or video editing software does not activate or deactivate the built-in MOTION EYE camera. n 40 N Using Your VAIO Computer Using the Built-in MOTION EYE Camera Your computer is equipped with a built-in MOTION EYE camera, respectively. Note that the camera is ready for a video conference... using the software. Turning on the computer activates the built-in MOTION EYE camera adds video functionality to instant messaging ...
User Guide
Page 41
You can change the capture angle of your computer. The viewer window may show some noises, for example horizontal streaks,...allow the camera to display the Properties window and select the Low Light check box. n 41 N Using Your VAIO Computer ✍ The built-in MOTION EYE camera cannot be shared by more light. When capturing an image in a dark ...place, click Start, All Programs, VAIO Camera Capture Utility, and VAIO Camera Capture Utility to adjust the angle upward or downward, respectively, until you view a rapid-moving ...
You can change the capture angle of your computer. The viewer window may show some noises, for example horizontal streaks,...allow the camera to display the Properties window and select the Low Light check box. n 41 N Using Your VAIO Computer ✍ The built-in MOTION EYE camera cannot be shared by more light. When capturing an image in a dark ...place, click Start, All Programs, VAIO Camera Capture Utility, and VAIO Camera Capture Utility to adjust the angle upward or downward, respectively, until you view a rapid-moving ...

User Guide
Page 42
To insert a disc ! n 42 N Using Your VAIO Computer ✍ If you plan to the disc or slot. 1 Turn on the computer. 2 With the label side facing toward you launch any preinstalled disc operation program. Using the Optical Disc Drive Your computer is equipped with an optical disc drive. Slide the disc straight into the slot...
To insert a disc ! n 42 N Using Your VAIO Computer ✍ If you plan to the disc or slot. 1 Turn on the computer. 2 With the label side facing toward you launch any preinstalled disc operation program. Using the Optical Disc Drive Your computer is equipped with an optical disc drive. Slide the disc straight into the slot...
User Guide
Page 43
... forcefully before it completely slides out. 1 Check that the optical disc drive indicator (1) is in Sleep mode. Do not remove the optical disc when your computer is turned off . 2 Press the drive eject button (2) or the S3 button on the wireless keyboard. The optical disc slides out. ✍ Alternatively, ...you can remove a disc with some mouse operations. The drive eject button is disabled when your computer is off . Be sure not to malfunction. If pressing either button does not slide the disc out of the drive, restart your...
... forcefully before it completely slides out. 1 Check that the optical disc drive indicator (1) is in Sleep mode. Do not remove the optical disc when your computer is turned off . 2 Press the drive eject button (2) or the S3 button on the wireless keyboard. The optical disc slides out. ✍ Alternatively, ...you can remove a disc with some mouse operations. The drive eject button is disabled when your computer is off . Be sure not to malfunction. If pressing either button does not slide the disc out of the drive, restart your...


