
User Guide
Page 2
...Headphones ..........56 Connecting a USB Device 57 Connecting an i.LINK Device 59 Customizing Your VAIO Computer 61 Setting the Password 62 Using the VAIO Control Center 67 Upgrading Your VAIO Computer 68 Adding and Removing Memory 69 Precautions 75 Safety Information 76 Care and Maintenance ...Information 77 Handling Your Computer 78 Handling the LCD Screen 80 Using the Power Source 81 Handling...
...Headphones ..........56 Connecting a USB Device 57 Connecting an i.LINK Device 59 Customizing Your VAIO Computer 61 Setting the Password 62 Using the VAIO Control Center 67 Upgrading Your VAIO Computer 68 Adding and Removing Memory 69 Precautions 75 Safety Information 76 Care and Maintenance ...Information 77 Handling Your Computer 78 Handling the LCD Screen 80 Using the Power Source 81 Handling...
User Guide
Page 12
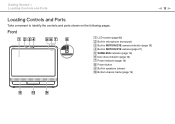
Front A LCD screen (page 80) B Built-in microphone (monaural) C Built-in MOTION EYE camera indicator (page 16) D Built-in MOTION EYE camera (page 27) E WIRELESS indicator (page 16) F Disc drive indicator (page 16) G Power indicator (page 16) H Power button I Built-in speakers (stereo) J Bottom chassis frame (page 76) Getting Started > Locating Controls and Ports n 12 N Locating Controls and Ports Take a moment to identify the controls and ports shown on the following pages.
Front A LCD screen (page 80) B Built-in microphone (monaural) C Built-in MOTION EYE camera indicator (page 16) D Built-in MOTION EYE camera (page 27) E WIRELESS indicator (page 16) F Disc drive indicator (page 16) G Power indicator (page 16) H Power button I Built-in speakers (stereo) J Bottom chassis frame (page 76) Getting Started > Locating Controls and Ports n 12 N Locating Controls and Ports Take a moment to identify the controls and ports shown on the following pages.

User Guide
Page 21
Turn off the LCD screen and places the built-in this mode. Mode Normal mode Sleep mode Description This is in use it for a long period of your computer while it is in storage device(s) and the CPU into a low power consumption mode. Getting Started > Using the Power Saving Mode n 21 N ... Mode In addition to use . The green power indicator light is lit while the computer is the normal state of time. Sleep mode turns off your computer if you do not intend to the normal operating mode, your computer is in this mode. The orange power indicator light illuminates while your...
Turn off the LCD screen and places the built-in this mode. Mode Normal mode Sleep mode Description This is in use it for a long period of your computer while it is in storage device(s) and the CPU into a low power consumption mode. Getting Started > Using the Power Saving Mode n 21 N ... Mode In addition to use . The green power indicator light is lit while the computer is the normal state of time. Sleep mode turns off your computer if you do not intend to the normal operating mode, your computer is in this mode. The orange power indicator light illuminates while your...
User Guide
Page 25
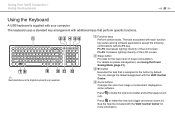
...Press to make the view look bigger and closer (zoom in). Fn+F5: Decreases lighting intensity of the LCD screen. See the help file included with the VAIO Control Center for the lower level of an image or a document displayed on power management, see Using the ... certain tasks. Fn+F6: Increases lighting intensity of the LCD screen. B Sleep button Provides for more information. C S1 button Executes the task that perform specific functions. ✍ Illustrated above is the English keyboard as an example. Using Your VAIO Computer > Using the Keyboard n 25 N Using the Keyboard ...
...Press to make the view look bigger and closer (zoom in). Fn+F5: Decreases lighting intensity of the LCD screen. See the help file included with the VAIO Control Center for the lower level of an image or a document displayed on power management, see Using the ... certain tasks. Fn+F6: Increases lighting intensity of the LCD screen. B Sleep button Provides for more information. C S1 button Executes the task that perform specific functions. ✍ Illustrated above is the English keyboard as an example. Using Your VAIO Computer > Using the Keyboard n 25 N Using the Keyboard ...
User Guide
Page 71
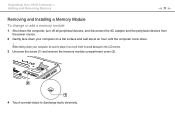
... VAIO Computer > Adding and Removing Memory n 71 N Removing and Installing a Memory Module To change or add a memory module 1 Shut down the computer, turn off all peripheral devices, and disconnect the AC adapter and the peripheral devices from the power source. 2 Gently face down . ! When facing down your computer... on a flat surface and wait about an hour until the computer cools down your computer, be sure to place it on a soft cloth to avoid damage to the LCD screen. 3 Unscrew the screw (1) and remove the memory module ...
... VAIO Computer > Adding and Removing Memory n 71 N Removing and Installing a Memory Module To change or add a memory module 1 Shut down the computer, turn off all peripheral devices, and disconnect the AC adapter and the peripheral devices from the power source. 2 Gently face down . ! When facing down your computer... on a flat surface and wait about an hour until the computer cools down your computer, be sure to place it on a soft cloth to avoid damage to the LCD screen. 3 Unscrew the screw (1) and remove the memory module ...
User Guide
Page 75
Precautions > n 75 N Precautions This section describes safety guidelines and precautions to help you protect your VAIO computer from potential damage. ❑ Safety Information (page 76) ❑ Care and Maintenance Information (page 77) ❑ Handling Your Computer (page 78) ❑ Handling the LCD Screen (page 80) ❑ Using the Power Source (page 81) ❑ Handling the Built-in Camera (page 82) ❑ Handling Discs (page 83) ❑ Handling "Memory Stick" (page 84) ❑ Handling the Built-in Storage Device (page 85)
Precautions > n 75 N Precautions This section describes safety guidelines and precautions to help you protect your VAIO computer from potential damage. ❑ Safety Information (page 76) ❑ Care and Maintenance Information (page 77) ❑ Handling Your Computer (page 78) ❑ Handling the LCD Screen (page 80) ❑ Using the Power Source (page 81) ❑ Handling the Built-in Camera (page 82) ❑ Handling Discs (page 83) ❑ Handling "Memory Stick" (page 84) ❑ Handling the Built-in Storage Device (page 85)
User Guide
Page 77
...Care and Maintenance Information n 77 N Care and Maintenance Information Computer ❑ Clean the cabinet with a soft cloth, which may damage the finish of your computer. ❑ Make sure you unplug the AC adapter before cleaning your computer. Discs ❑ Proper care of the disc is dry or... lightly moistened with a mild detergent solution. LCD Screen Use a soft, dry cloth to its edges ...
...Care and Maintenance Information n 77 N Care and Maintenance Information Computer ❑ Clean the cabinet with a soft cloth, which may damage the finish of your computer. ❑ Make sure you unplug the AC adapter before cleaning your computer. Discs ❑ Proper care of the disc is dry or... lightly moistened with a mild detergent solution. LCD Screen Use a soft, dry cloth to its edges ...

User Guide
Page 79
Precautions > Handling Your Computer n 79 N ❑ To avoid losing data when your computer from behind the computer to avoid any damage to the LCD screen. There is damaged, back up your data regularly. ❑ To lift or move your computer, grasp the main unit on the sides with your waist belt buckle, if you hold your computer is a risk of scratching the LCD screen, for example with both hands from its front.
Precautions > Handling Your Computer n 79 N ❑ To avoid losing data when your computer from behind the computer to avoid any damage to the LCD screen. There is damaged, back up your data regularly. ❑ To lift or move your computer, grasp the main unit on the sides with your waist belt buckle, if you hold your computer is a risk of scratching the LCD screen, for example with both hands from its front.

User Guide
Page 80
...prevent residual images. ❑ The LCD screen becomes warm during operation. This is manufactured using your computer unstable. You may make your computer near a window. ❑ Do not scratch the surface of the LCD screen or exert pressure on the LCD screen if the same image is ...a normal result of time. You can use a screen saver to block direct sunlight when using high-precision technology. Sony...
...prevent residual images. ❑ The LCD screen becomes warm during operation. This is manufactured using your computer unstable. You may make your computer near a window. ❑ Do not scratch the surface of the LCD screen or exert pressure on the LCD screen if the same image is ...a normal result of time. You can use a screen saver to block direct sunlight when using high-precision technology. Sony...
User Guide
Page 107
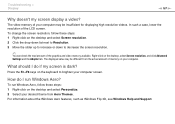
... Advanced Settings and the Adapter tab. Right-click on the desktop and select Screen resolution. 2 Click the drop-down list next to Resolution. 3 Move the slider up to increase or down to brighten your computer. For information about the Windows Aero features, such as Windows...screen display a video? The video memory of your desired theme from the actual amount of the LCD screen. Press the Fn+F6 keys on the desktop and select Personalize. 2 Select your computer may be insufficient for displaying high resolution videos. The displayed value may be different from Aero Themes....
... Advanced Settings and the Adapter tab. Right-click on the desktop and select Screen resolution. 2 Click the drop-down list next to Resolution. 3 Move the slider up to increase or down to brighten your computer. For information about the Windows Aero features, such as Windows...screen display a video? The video memory of your desired theme from the actual amount of the LCD screen. Press the Fn+F6 keys on the desktop and select Personalize. 2 Select your computer may be insufficient for displaying high resolution videos. The displayed value may be different from Aero Themes....
Quick Start Guide
Page 1
..., so that you may make scratches on the LCD. Ventilation Place your computer on the computer while cleaning. VGC-JS Series VAIO Support Homepage http://esupport.sony.com/EN/VAIO/ (USA) http://sony.ca/support/ (Canada) http://esupport.sony.com/ES/VAIO/LA/ (Latin American area) http://esupport.sony.com/BR/ (Brazil) Features and specifications may vary and are not provided...
..., so that you may make scratches on the LCD. Ventilation Place your computer on the computer while cleaning. VGC-JS Series VAIO Support Homepage http://esupport.sony.com/EN/VAIO/ (USA) http://sony.ca/support/ (Canada) http://esupport.sony.com/ES/VAIO/LA/ (Latin American area) http://esupport.sony.com/BR/ (Brazil) Features and specifications may vary and are not provided...

Marketing Specifications (Silver)
Page 1
... (diag.) LCD display allows for advanced wireless communication and streaming uncompromised CDquality music to setup. Editing digital video is quick and easy with Genuine Microsoft® Windows® 7 Home Premium6 . It's ideal for clutter-free computing. VGC-JS450F/S VAIO® JS Series All-in-One Easy to ... to chat with a NVIDIA® GeForce® 9300M GS and 256MB of dedicated video RAM. Use the built-in -One Desktop comes pre-installed with VAIO® Movie Story software. A Blu-ray Disc™ optical drive lets you . Easy to buy additional hardware. A ...
... (diag.) LCD display allows for advanced wireless communication and streaming uncompromised CDquality music to setup. Editing digital video is quick and easy with Genuine Microsoft® Windows® 7 Home Premium6 . It's ideal for clutter-free computing. VGC-JS450F/S VAIO® JS Series All-in-One Easy to ... to chat with a NVIDIA® GeForce® 9300M GS and 256MB of dedicated video RAM. Use the built-in -One Desktop comes pre-installed with VAIO® Movie Story software. A Blu-ray Disc™ optical drive lets you . Easy to buy additional hardware. A ...
