
User Guide
Page 2
...Headphones ..........56 Connecting a USB Device 57 Connecting an i.LINK Device 59 Customizing Your VAIO Computer 61 Setting the Password 62 Using the VAIO Control Center 67 Upgrading Your VAIO Computer 68 Adding and Removing Memory 69 Precautions 75 Safety Information 76 Care and Maintenance ...Information 77 Handling Your Computer 78 Handling the LCD Screen 80 Using the Power Source 81 Handling...
...Headphones ..........56 Connecting a USB Device 57 Connecting an i.LINK Device 59 Customizing Your VAIO Computer 61 Setting the Password 62 Using the VAIO Control Center 67 Upgrading Your VAIO Computer 68 Adding and Removing Memory 69 Precautions 75 Safety Information 76 Care and Maintenance ...Information 77 Handling Your Computer 78 Handling the LCD Screen 80 Using the Power Source 81 Handling...
User Guide
Page 12
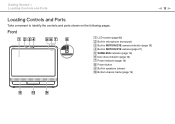
Getting Started > Locating Controls and Ports n 12 N Locating Controls and Ports Take a moment to identify the controls and ports shown on the following pages. Front A LCD screen (page 80) B Built-in microphone (monaural) C Built-in MOTION EYE camera indicator (page 16) D Built-in MOTION EYE camera (page 27) E WIRELESS indicator (page 16) F Disc drive indicator (page 16) G Power indicator (page 16) H Power button I Built-in speakers (stereo) J Bottom chassis frame (page 76)
Getting Started > Locating Controls and Ports n 12 N Locating Controls and Ports Take a moment to identify the controls and ports shown on the following pages. Front A LCD screen (page 80) B Built-in microphone (monaural) C Built-in MOTION EYE camera indicator (page 16) D Built-in MOTION EYE camera (page 27) E WIRELESS indicator (page 16) F Disc drive indicator (page 16) G Power indicator (page 16) H Power button I Built-in speakers (stereo) J Bottom chassis frame (page 76)

User Guide
Page 21
... not intend to the normal operating mode, your computer while it is in this mode. Turn off the LCD screen and places the built-in this mode. The orange power indicator light illuminates while your computer is in use it for a long period of your computer has a distinct power saving mode called Sleep mode... Started > Using the Power Saving Mode n 21 N Using the Power Saving Mode In addition to use . The green power indicator light is lit while the computer is in storage device(s) and the CPU into a low power consumption mode.
... not intend to the normal operating mode, your computer while it is in this mode. Turn off the LCD screen and places the built-in this mode. The orange power indicator light illuminates while your computer is in use it for a long period of your computer has a distinct power saving mode called Sleep mode... Started > Using the Power Saving Mode n 21 N Using the Power Saving Mode In addition to use . The green power indicator light is lit while the computer is in storage device(s) and the CPU into a low power consumption mode.
User Guide
Page 25
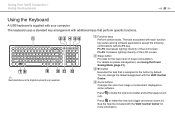
... with additional keys that is the English keyboard as an example. For details on some software. D Zoom buttons Changes the size of the LCD screen. Press to make the view look bigger and closer (zoom in). B Sleep button Provides for more information. You can change the ...to make the view look smaller and further away (zoom out). Using Your VAIO Computer > Using the Keyboard n 25 N Using the Keyboard A USB keyboard is supplied with the VAIO Control Center for the lower level of the LCD screen. Fn+F5: Decreases lighting intensity of power consumption. See the help ...
... with additional keys that is the English keyboard as an example. For details on some software. D Zoom buttons Changes the size of the LCD screen. Press to make the view look bigger and closer (zoom in). B Sleep button Provides for more information. You can change the ...to make the view look smaller and further away (zoom out). Using Your VAIO Computer > Using the Keyboard n 25 N Using the Keyboard A USB keyboard is supplied with the VAIO Control Center for the lower level of the LCD screen. Fn+F5: Decreases lighting intensity of power consumption. See the help ...
User Guide
Page 71
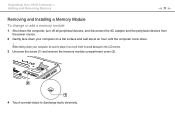
...VAIO Computer > Adding and Removing Memory n 71 N Removing and Installing a Memory Module To change or add a memory module 1 Shut down the computer, turn off all peripheral devices, and disconnect the AC adapter and the peripheral devices from the power source. 2 Gently face down . ! When facing down your computer..., be sure to place it on a flat surface and wait about an hour until the computer cools down your computer on a soft cloth to avoid damage to the LCD screen. 3 Unscrew the screw (1) and remove the memory module ...
...VAIO Computer > Adding and Removing Memory n 71 N Removing and Installing a Memory Module To change or add a memory module 1 Shut down the computer, turn off all peripheral devices, and disconnect the AC adapter and the peripheral devices from the power source. 2 Gently face down . ! When facing down your computer..., be sure to place it on a flat surface and wait about an hour until the computer cools down your computer on a soft cloth to avoid damage to the LCD screen. 3 Unscrew the screw (1) and remove the memory module ...
User Guide
Page 75
Precautions > n 75 N Precautions This section describes safety guidelines and precautions to help you protect your VAIO computer from potential damage. ❑ Safety Information (page 76) ❑ Care and Maintenance Information (page 77) ❑ Handling Your Computer (page 78) ❑ Handling the LCD Screen (page 80) ❑ Using the Power Source (page 81) ❑ Handling the Built-in Camera (page 82) ❑ Handling Discs (page 83) ❑ Handling "Memory Stick" (page 84) ❑ Handling the Built-in Storage Device (page 85)
Precautions > n 75 N Precautions This section describes safety guidelines and precautions to help you protect your VAIO computer from potential damage. ❑ Safety Information (page 76) ❑ Care and Maintenance Information (page 77) ❑ Handling Your Computer (page 78) ❑ Handling the LCD Screen (page 80) ❑ Using the Power Source (page 81) ❑ Handling the Built-in Camera (page 82) ❑ Handling Discs (page 83) ❑ Handling "Memory Stick" (page 84) ❑ Handling the Built-in Storage Device (page 85)
User Guide
Page 77
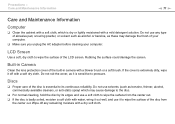
... out. Wipe off with a blower brush or a soft brush. LCD Screen Use a soft, dry cloth to wipe the surface of your computer. ❑ Make sure you unplug the AC adapter before cleaning your computer. Precautions > Care and Maintenance Information n 77 N Care and Maintenance Information Computer ❑ Clean the cabinet with a soft cloth, which may...
... out. Wipe off with a blower brush or a soft brush. LCD Screen Use a soft, dry cloth to wipe the surface of your computer. ❑ Make sure you unplug the AC adapter before cleaning your computer. Precautions > Care and Maintenance Information n 77 N Care and Maintenance Information Computer ❑ Clean the cabinet with a soft cloth, which may...

User Guide
Page 79
There is damaged, back up your data regularly. ❑ To lift or move your computer, grasp the main unit on the sides with your waist belt buckle, if you hold your computer is a risk of scratching the LCD screen, for example with both hands from its front. Precautions > Handling Your Computer n 79 N ❑ To avoid losing data when your computer from behind the computer to avoid any damage to the LCD screen.
There is damaged, back up your data regularly. ❑ To lift or move your computer, grasp the main unit on the sides with your waist belt buckle, if you hold your computer is a risk of scratching the LCD screen, for example with both hands from its front. Precautions > Handling Your Computer n 79 N ❑ To avoid losing data when your computer from behind the computer to avoid any damage to the LCD screen.

User Guide
Page 80
... residual image on the LCD screen. When the computer returns to normal temperature, the screen returns to the settings. This could damage the LCD screen. The residual image disappears after a while. Sony assumes no liability for selection, as this may appear on the LCD screen if the same image... is manufactured using your computer near a window. ❑ Do not scratch the ...
... residual image on the LCD screen. When the computer returns to normal temperature, the screen returns to the settings. This could damage the LCD screen. The residual image disappears after a while. Sony assumes no liability for selection, as this may appear on the LCD screen if the same image... is manufactured using your computer near a window. ❑ Do not scratch the ...
User Guide
Page 107
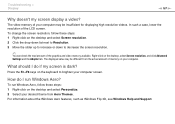
... case, lower the resolution of your computer screen. What should I do I run...click on your desired theme from the actual amount of memory on the desktop and select Screen resolution. 2 Click the drop-down list next to Resolution. ...3 Move the slider up to increase or down to brighten your computer may be insufficient for displaying high resolution videos. For information about the Windows...may be different from Aero Themes. Press the Fn+F6 keys on the desktop and select Personalize. 2 Select your computer. Troubleshooting > Display n 107 N Why doesn't my screen display a ...
... case, lower the resolution of your computer screen. What should I do I run...click on your desired theme from the actual amount of memory on the desktop and select Screen resolution. 2 Click the drop-down list next to Resolution. ...3 Move the slider up to increase or down to brighten your computer may be insufficient for displaying high resolution videos. For information about the Windows...may be different from Aero Themes. Press the Fn+F6 keys on the desktop and select Personalize. 2 Select your computer. Troubleshooting > Display n 107 N Why doesn't my screen display a ...
Quick Start Guide
Page 1
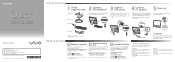
VGC-JS Series VAIO Support Homepage http://esupport.sony.com/EN/VAIO/ (USA) http://sony.ca/support/ (Canada) http://esupport.sony.com/ES/VAIO/LA/ (Latin American area) http://esupport.sony.com/BR/ (Brazil) Features and specifications may vary and are not provided with my VAIO Use my VAIO Troubleshoot my VAIO Click Start , Help and Support, Use my VAIO... into the AC adapter and then into contact with your computer. LCD Handling Do not exert pressure on -screen VAIO Recovery Center User Guide under Use my VAIO in this document may make scratches on hard surfaces, such...
VGC-JS Series VAIO Support Homepage http://esupport.sony.com/EN/VAIO/ (USA) http://sony.ca/support/ (Canada) http://esupport.sony.com/ES/VAIO/LA/ (Latin American area) http://esupport.sony.com/BR/ (Brazil) Features and specifications may vary and are not provided with my VAIO Use my VAIO Troubleshoot my VAIO Click Start , Help and Support, Use my VAIO... into the AC adapter and then into contact with your computer. LCD Handling Do not exert pressure on -screen VAIO Recovery Center User Guide under Use my VAIO in this document may make scratches on hard surfaces, such...
