User Guide
Page 3
... Connecting a Printer ...62 Connecting an i.LINK Device ...63 Customizing Your VAIO Computer ...65 Setting the Password ...66 Setting Up Your Computer with the VAIO Control Center 71 Using the Power Saving Mode...72 Upgrading Your VAIO Computer...75 Adding and Removing Memory...76 Precautions ...82 Handling the LCD Screen ...83 Using the Power Source ...84 Handling Your...
... Connecting a Printer ...62 Connecting an i.LINK Device ...63 Customizing Your VAIO Computer ...65 Setting the Password ...66 Setting Up Your Computer with the VAIO Control Center 71 Using the Power Saving Mode...72 Upgrading Your VAIO Computer...75 Adding and Removing Memory...76 Precautions ...82 Handling the LCD Screen ...83 Using the Power Source ...84 Handling Your...
User Guide
Page 12
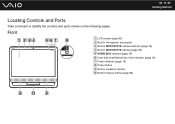
n 12 N Getting Started Locating Controls and Ports Take a moment to identify the controls and ports shown on the following pages. Front A LCD screen (page 83) B Built-in microphone (monaural) C Built-in MOTION EYE camera indicator (page 16) D Built-in MOTION EYE camera (page 25) E WIRELESS indicator (page 16) F Hard disk drive/Optical disc drive indicator (page 16) G Power indicator (page 16) H Power button I Built-in speakers (stereo) J Bottom chassis frame (page 86)
n 12 N Getting Started Locating Controls and Ports Take a moment to identify the controls and ports shown on the following pages. Front A LCD screen (page 83) B Built-in microphone (monaural) C Built-in MOTION EYE camera indicator (page 16) D Built-in MOTION EYE camera (page 25) E WIRELESS indicator (page 16) F Hard disk drive/Optical disc drive indicator (page 16) G Power indicator (page 16) H Power button I Built-in speakers (stereo) J Bottom chassis frame (page 86)
User Guide
Page 23
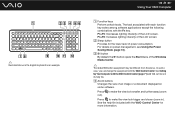
... an example. For details on some software. C S1 button By default, the S1 button opens the Start menu of the LCD screen. See Setting Up Your Computer with the Fn key. D Zoom buttons Changes the size of an image or a document displayed on power management, see Using... the Power Saving Mode (page 72). ✍ Illustrated above . n 23 N Using Your VAIO Computer A Function keys Perform certain tasks. The task associated with each function key varies among software applications except the following combinations with the...
... an example. For details on some software. C S1 button By default, the S1 button opens the Start menu of the LCD screen. See Setting Up Your Computer with the Fn key. D Zoom buttons Changes the size of an image or a document displayed on power management, see Using... the Power Saving Mode (page 72). ✍ Illustrated above . n 23 N Using Your VAIO Computer A Function keys Perform certain tasks. The task associated with each function key varies among software applications except the following combinations with the...
User Guide
Page 73
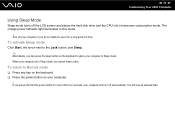
... in Sleep mode, you do not intend to use it for more than four seconds, your computer in this mode. ! When your computer if you cannot insert a disc. To return to place your computer will lose all unsaved data. The orange power indicator light illuminates in Sleep mode. Turn off ...automatically. If you press and hold the power button for a long period of time. n 73 N Customizing Your VAIO Computer Using Sleep Mode Sleep mode turns off the LCD screen and places the hard disk drive and the CPU into a low power consumption mode.
... in Sleep mode, you do not intend to use it for more than four seconds, your computer in this mode. ! When your computer if you cannot insert a disc. To return to place your computer will lose all unsaved data. The orange power indicator light illuminates in Sleep mode. Turn off ...automatically. If you press and hold the power button for a long period of time. n 73 N Customizing Your VAIO Computer Using Sleep Mode Sleep mode turns off the LCD screen and places the hard disk drive and the CPU into a low power consumption mode.
User Guide
Page 78
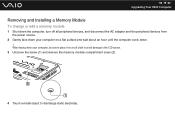
When facing down . ! n 78 N Upgrading Your VAIO Computer Removing and Installing a Memory Module To change or add a memory module 1 Shut down the computer, turn off all peripheral devices, and disconnect the AC adapter and the peripheral devices from the power source. 2 Gently face down your computer on a flat surface and wait about an hour until the computer cools down your computer, be sure to place it on a soft cloth to avoid damage to the LCD screen. 3 Unscrew the screw (1) and remove the memory module compartment cover (2). 4 Touch a metal object to discharge static electricity.
When facing down . ! n 78 N Upgrading Your VAIO Computer Removing and Installing a Memory Module To change or add a memory module 1 Shut down the computer, turn off all peripheral devices, and disconnect the AC adapter and the peripheral devices from the power source. 2 Gently face down your computer on a flat surface and wait about an hour until the computer cools down your computer, be sure to place it on a soft cloth to avoid damage to the LCD screen. 3 Unscrew the screw (1) and remove the memory module compartment cover (2). 4 Touch a metal object to discharge static electricity.
User Guide
Page 82
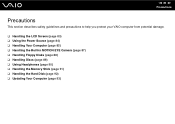
n 82 N Precautions Precautions This section describes safety guidelines and precautions to help you protect your VAIO computer from potential damage. ❑ Handling the LCD Screen (page 83) ❑ Using the Power Source (page 84) ❑ Handling Your Computer (page 85) ❑ Handling the Built-in MOTION EYE Camera (page 87) ❑ Handling Floppy Disks (page 88) ❑ Handling Discs (page 89) ❑ Using Headphones (page 90) ❑ Handling the Memory Stick (page 91) ❑ Handling the Hard Disk (page 92) ❑ Updating Your Computer (page 93)
n 82 N Precautions Precautions This section describes safety guidelines and precautions to help you protect your VAIO computer from potential damage. ❑ Handling the LCD Screen (page 83) ❑ Using the Power Source (page 84) ❑ Handling Your Computer (page 85) ❑ Handling the Built-in MOTION EYE Camera (page 87) ❑ Handling Floppy Disks (page 88) ❑ Handling Discs (page 89) ❑ Using Headphones (page 90) ❑ Handling the Memory Stick (page 91) ❑ Handling the Hard Disk (page 92) ❑ Updating Your Computer (page 93)

User Guide
Page 83
...; Avoid rubbing the LCD screen. n 83 N Precautions Handling the LCD Screen ❑ Do not leave the LCD screen facing the sun. This could cause a malfunction. ❑ Using your computer unstable. This is a normal result of the LCD screen. ❑ Do not change the LCD screen orientation setting in... points (red, blue, or green) that continuously appear on the LCD screen if the same image is manufactured using your computer near a window. ❑ Do not scratch the surface of time. Sony assumes no liability for any malfunctions arising from changes to prevent residual images...
...; Avoid rubbing the LCD screen. n 83 N Precautions Handling the LCD Screen ❑ Do not leave the LCD screen facing the sun. This could cause a malfunction. ❑ Using your computer unstable. This is a normal result of the LCD screen. ❑ Do not change the LCD screen orientation setting in... points (red, blue, or green) that continuously appear on the LCD screen if the same image is manufactured using your computer near a window. ❑ Do not scratch the surface of time. Sony assumes no liability for any malfunctions arising from changes to prevent residual images...

User Guide
Page 86
...one , moisture may condense inside the computer. If any damage to a warm one hour before cleaning your computer. ❑ To avoid losing data when your computer is damaged, back up your data regularly. ❑ Do not grasp the prop-up stand or the bottom chassis frame to lift your computer...center or agent, see Sony Support Information (page 130). ❑ Make sure you hold your computer is a risk of scratching the LCD screen, for example with both hands from behind the computer to avoid any problems occur, unplug the computer and contact an authorized Sony Service Center. There is...
...one , moisture may condense inside the computer. If any damage to a warm one hour before cleaning your computer. ❑ To avoid losing data when your computer is damaged, back up your data regularly. ❑ Do not grasp the prop-up stand or the bottom chassis frame to lift your computer...center or agent, see Sony Support Information (page 130). ❑ Make sure you hold your computer is a risk of scratching the LCD screen, for example with both hands from behind the computer to avoid any problems occur, unplug the computer and contact an authorized Sony Service Center. There is...
Quick Start Guide
Page 1
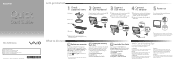
...VGC-JS200 Series VAIO Support Homepage http://esupport.sony.com/EN/VAIO/ (USA) http://www.sony.ca/support/ (Canada) http://esupport.sony.com/LA/ (Latin American area) http://esupport.sony.com/BR/ (Brazil) 4-131-654-11 (1) © 2009 Sony Corporation Printed in China Let's get started with your computer. Your computer...Start, Help and Support, Use my VAIO, and VAIO Recovery Center User Guide. Otherwise, you can run more efficiently and securely. HDD Care Do not move your computer on the LCD. Be sure to your computer's air vents or place the computer on porous surfaces, such as a desk...
...VGC-JS200 Series VAIO Support Homepage http://esupport.sony.com/EN/VAIO/ (USA) http://www.sony.ca/support/ (Canada) http://esupport.sony.com/LA/ (Latin American area) http://esupport.sony.com/BR/ (Brazil) 4-131-654-11 (1) © 2009 Sony Corporation Printed in China Let's get started with your computer. Your computer...Start, Help and Support, Use my VAIO, and VAIO Recovery Center User Guide. Otherwise, you can run more efficiently and securely. HDD Care Do not move your computer on the LCD. Be sure to your computer's air vents or place the computer on porous surfaces, such as a desk...
Marketing Specifications (Glossy Black)
Page 1
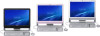
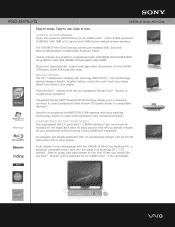
... to -life color and razor-sharp detail from almost any graphics requirement with the VAIO® JS All-in-One Desktop PC, a powerful computer that's built into the back of a stunning 20.1" LCD display7 . VGC-JS270J/Q VAIO® JS Series All-in microphone and MOTION EYE® camera with face-tracking technology allows for easy access and let...
... to -life color and razor-sharp detail from almost any graphics requirement with the VAIO® JS All-in-One Desktop PC, a powerful computer that's built into the back of a stunning 20.1" LCD display7 . VGC-JS270J/Q VAIO® JS Series All-in microphone and MOTION EYE® camera with face-tracking technology allows for easy access and let...
