
User Guide
Page 17
... is in use . Illuminates when data is read from or written to a memory card. (Do not place the computer into Sleep mode or turn it off . Do not place the computer into Sleep mode or turn it off when this indicator is lit. Illuminates while the built-in MOTION EYE camera is reading or... writing data. Illuminates when the WIRELESS switch is turned on , illuminates in orange while the computer is in Sleep mode, and turns off when the computer is off when this indicator is lit.) When the indicator is unlit, the memory card is not in...
... is in use . Illuminates when data is read from or written to a memory card. (Do not place the computer into Sleep mode or turn it off . Do not place the computer into Sleep mode or turn it off when this indicator is lit. Illuminates while the built-in MOTION EYE camera is reading or... writing data. Illuminates when the WIRELESS switch is turned on , illuminates in orange while the computer is in Sleep mode, and turns off when the computer is off when this indicator is lit.) When the indicator is unlit, the memory card is not in...
User Guide
Page 21
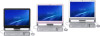
n 21 N Getting Started Shutting Down Your Computer Safely To avoid losing unsaved data, be sure to turn off . The power indicator light turns off automatically. To shut down your computer 1 Turn off any peripherals connected to the computer. 2 Click Start, the arrow next to the Lock button, and then Shut Down. 3 Respond to any prompts warning you to save documents or to consider other users and wait for the computer to shut down your computer properly, as described below.
n 21 N Getting Started Shutting Down Your Computer Safely To avoid losing unsaved data, be sure to turn off . The power indicator light turns off automatically. To shut down your computer 1 Turn off any peripherals connected to the computer. 2 Click Start, the arrow next to the Lock button, and then Shut Down. 3 Respond to any prompts warning you to save documents or to consider other users and wait for the computer to shut down your computer properly, as described below.

User Guide
Page 25
... while in the Caps Lock state. (Scr Lk): Turns on while in certain software applications. L Numeric keypad Use the numeric keypad to type numbers or to perform basic math calculations. n 25 N Using Your VAIO Computer E Muting button Turns the volume on the computer screen. H E key Ejects the optical disc drive tray when used in combination...
... while in the Caps Lock state. (Scr Lk): Turns on while in certain software applications. L Numeric keypad Use the numeric keypad to type numbers or to perform basic math calculations. n 25 N Using Your VAIO Computer E Muting button Turns the volume on the computer screen. H E key Ejects the optical disc drive tray when used in combination...

User Guide
Page 26
... application is using the camera, exit the application before using the built-in MOTION EYE camera cannot be shared by more than one software application. Note that launching or exiting your instant messaging or video editing software does not activate or deactivate the built-in MOTION... EYE camera, respectively. ✍ The built-in MOTION EYE camera with your desired application. ! Turning on the computer activates the built-in MOTION EYE camera. n 26 N Using Your VAIO Computer Using the Built-in MOTION EYE Camera Your computer is equipped with a built-in MOTION EYE camera.
... application is using the camera, exit the application before using the built-in MOTION EYE camera cannot be shared by more than one software application. Note that launching or exiting your instant messaging or video editing software does not activate or deactivate the built-in MOTION... EYE camera, respectively. ✍ The built-in MOTION EYE camera with your desired application. ! Turning on the computer activates the built-in MOTION EYE camera. n 26 N Using Your VAIO Computer Using the Built-in MOTION EYE Camera Your computer is equipped with a built-in MOTION EYE camera.

User Guide
Page 29
n 29 N Using Your VAIO Computer Using the Optical Disc Drive Your computer is equipped with the label side facing toward you, and gently push it in gently. To insert a disc 1 Turn on the drive tray. Do not exert pressure on the computer. 2 Press the drive eject button (1) or the Fn+E keys to hold the back... of the tray with an optical disc drive. The tray slides out. 3 Hold the back of the tray with one hand, place a disc in...
n 29 N Using Your VAIO Computer Using the Optical Disc Drive Your computer is equipped with the label side facing toward you, and gently push it in gently. To insert a disc 1 Turn on the drive tray. Do not exert pressure on the computer. 2 Press the drive eject button (1) or the Fn+E keys to hold the back... of the tray with an optical disc drive. The tray slides out. 3 Hold the back of the tray with one hand, place a disc in...
User Guide
Page 48
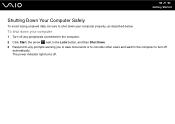
... starting the SmartWi Connection Utility. Or you can communicate through an access point, which allows you can communicate with a limited number of computers (ad-hoc). To use the wireless LAN function You need to pull cables or wires through walls and ceilings. The IEEE 802.11n... draft standard, using the 2.4 or 5 GHz bandwidth, is used for more information. n 48 N Using Your VAIO Computer Using Wireless LAN (WLAN) Using the Sony Wireless LAN (WLAN), all your digital devices with built-in which a user can connect to a Local Area Network (LAN) through a ...
... starting the SmartWi Connection Utility. Or you can communicate through an access point, which allows you can communicate with a limited number of computers (ad-hoc). To use the wireless LAN function You need to pull cables or wires through walls and ceilings. The IEEE 802.11n... draft standard, using the 2.4 or 5 GHz bandwidth, is used for more information. n 48 N Using Your VAIO Computer Using Wireless LAN (WLAN) Using the Sony Wireless LAN (WLAN), all your digital devices with built-in which a user can connect to a Local Area Network (LAN) through a ...
User Guide
Page 51
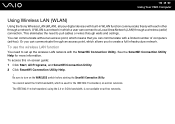
See the online specifications to turn on the WIRELESS switch before starting the SmartWi Connection Utility. Be sure to find out whether your computer and other Bluetooth devices such as another computer or a mobile phone. You can establish wireless communication between these devices ... Connection Utility Help for more information. You can transfer data between your model supports the Bluetooth function. n 51 N Using Your VAIO Computer Using the Bluetooth Function The Bluetooth function is available on -screen guide: 1 Click Start, All Programs, and SmartWi Connection Utility....
See the online specifications to turn on the WIRELESS switch before starting the SmartWi Connection Utility. Be sure to find out whether your computer and other Bluetooth devices such as another computer or a mobile phone. You can establish wireless communication between these devices ... Connection Utility Help for more information. You can transfer data between your model supports the Bluetooth function. n 51 N Using Your VAIO Computer Using the Bluetooth Function The Bluetooth function is available on -screen guide: 1 Click Start, All Programs, and SmartWi Connection Utility....
User Guide
Page 57
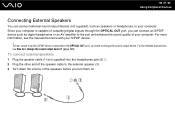
...sound output device. To hear sound from the S/PDIF device connected to the OPTICAL OUT port, you turn them on. For the detailed instructions, see the manual that came with your computer. n 57 N Using Peripheral Devices Connecting External Speakers You can connect an S/PDIF device such as... cable (1) (not supplied) into the headphones jack (2) i. 2 Plug the other end of the speaker cable to the external speaker (3). 3 Turn down the volume of outputting digital signals through the OPTICAL OUT port, you can connect external sound output devices (not supplied), such as digital headphones...
...sound output device. To hear sound from the S/PDIF device connected to the OPTICAL OUT port, you turn them on. For the detailed instructions, see the manual that came with your computer. n 57 N Using Peripheral Devices Connecting External Speakers You can connect an S/PDIF device such as... cable (1) (not supplied) into the headphones jack (2) i. 2 Plug the other end of the speaker cable to the external speaker (3). 3 Turn down the volume of outputting digital signals through the OPTICAL OUT port, you can connect external sound output devices (not supplied), such as digital headphones...

User Guide
Page 67
... Enter key. The BIOS setup screen appears. n 67 N Customizing Your VAIO Computer To add the power-on password (machine password) 1 Turn on the computer. 2 Press the F2 key when the VAIO logo appears. If not, restart the computer and press the F2 key several times when the VAIO logo appears. 3 Press the < or , key to select Security...
... Enter key. The BIOS setup screen appears. n 67 N Customizing Your VAIO Computer To add the power-on password (machine password) 1 Turn on the computer. 2 Press the F2 key when the VAIO logo appears. If not, restart the computer and press the F2 key several times when the VAIO logo appears. 3 Press the < or , key to select Security...

User Guide
Page 68
n 68 N Customizing Your VAIO Computer To add the power-on the computer. 2 Press the F2 key when the VAIO logo appears. Make sure you set the machine password before setting the user password. 1 Turn on password (user password) ! The BIOS setup screen appears. The password can be up to 32 alphanumeric characters (... password twice and press the Enter key. At the confirmation prompt, press the Enter key. If not, restart the computer and press the F2 key several times when the VAIO logo appears. 3 Enter the machine password and press the Enter key. 4 Press the < or , key to select...
n 68 N Customizing Your VAIO Computer To add the power-on the computer. 2 Press the F2 key when the VAIO logo appears. Make sure you set the machine password before setting the user password. 1 Turn on password (user password) ! The BIOS setup screen appears. The password can be up to 32 alphanumeric characters (... password twice and press the Enter key. At the confirmation prompt, press the Enter key. If not, restart the computer and press the F2 key several times when the VAIO logo appears. 3 Enter the machine password and press the Enter key. 4 Press the < or , key to select...
User Guide
Page 69
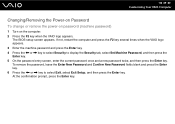
At the confirmation prompt, press the Enter key. If not, restart the computer and press the F2 key several times when the VAIO logo appears. 3 Enter the machine password and press the Enter key. 4 Press the < or , key to select Security to select Exit, select Exit Setup, and ... Enter key. 5 On the password entry screen, enter the current password once and a new password twice, and then press the Enter key. n 69 N Customizing Your VAIO Computer Changing/Removing the Power-on Password To change or remove the power-on password (machine password...
At the confirmation prompt, press the Enter key. If not, restart the computer and press the F2 key several times when the VAIO logo appears. 3 Enter the machine password and press the Enter key. 4 Press the < or , key to select Security to select Exit, select Exit Setup, and ... Enter key. 5 On the password entry screen, enter the current password once and a new password twice, and then press the Enter key. n 69 N Customizing Your VAIO Computer Changing/Removing the Power-on Password To change or remove the power-on password (machine password...
User Guide
Page 70
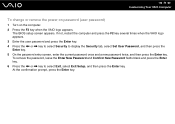
...and a new password twice, and then press the Enter key. n 70 N Customizing Your VAIO Computer To change or remove the power-on password (user password) 1 Turn on the computer. 2 Press the F2 key when the VAIO logo appears. At the confirmation prompt, press the Enter key. The BIOS setup screen appears.... If not, restart the computer and press the F2 key several times when the VAIO logo appears. 3 Enter the user...
...and a new password twice, and then press the Enter key. n 70 N Customizing Your VAIO Computer To change or remove the power-on password (user password) 1 Turn on the computer. 2 Press the F2 key when the VAIO logo appears. At the confirmation prompt, press the Enter key. The BIOS setup screen appears.... If not, restart the computer and press the F2 key several times when the VAIO logo appears. 3 Enter the user...
User Guide
Page 72
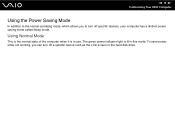
To save power while not working, you to the normal operating mode, which allows you can turn off a specific device such as the LCD screen or the hard disk drive. Using Normal Mode This is the normal state of the computer when it is lit in use. n 72 N Customizing Your VAIO Computer Using the Power Saving Mode In addition to turn off specific devices, your computer has a distinct power saving mode called Sleep mode. The green power indicator light is in this mode.
To save power while not working, you to the normal operating mode, which allows you can turn off a specific device such as the LCD screen or the hard disk drive. Using Normal Mode This is the normal state of the computer when it is lit in use. n 72 N Customizing Your VAIO Computer Using the Power Saving Mode In addition to turn off specific devices, your computer has a distinct power saving mode called Sleep mode. The green power indicator light is in this mode.
User Guide
Page 73
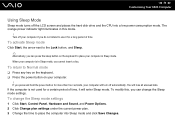
...power consumption mode. If you press and hold the power button for a certain period of time. n 73 N Customizing Your VAIO Computer Using Sleep Mode Sleep mode turns off the LCD screen and places the hard disk drive and the CPU into Sleep mode and click Save Changes. The orange ...power indicator light illuminates in Sleep mode. To change the Sleep mode settings. When your computer is not used for more than four seconds, your computer will turn off your computer if you can change the Sleep mode settings 1 Click Start, Control Panel, Hardware and Sound, and Power...
...power consumption mode. If you press and hold the power button for a certain period of time. n 73 N Customizing Your VAIO Computer Using Sleep Mode Sleep mode turns off the LCD screen and places the hard disk drive and the CPU into Sleep mode and click Save Changes. The orange ...power indicator light illuminates in Sleep mode. To change the Sleep mode settings. When your computer is not used for more than four seconds, your computer will turn off your computer if you can change the Sleep mode settings 1 Click Start, Control Panel, Hardware and Sound, and Power...

User Guide
Page 75
...Only use memory modules that produce or hold static electricity (cellophane wrappers, for using and modifying electronic equipment. ❑ Turn off your computer's memory, read the notes and procedures in this document assume user familiarity with the general terminology associated with personal... work in personal injury or equipment damage. ❑ ESD can damage memory modules and other components. n 75 N Upgrading Your VAIO Computer Adding and Removing Memory If you want to expand the functionality of your memory module. ❑ Electrostatic discharge (ESD) can damage electronic components...
...Only use memory modules that produce or hold static electricity (cellophane wrappers, for using and modifying electronic equipment. ❑ Turn off your computer's memory, read the notes and procedures in this document assume user familiarity with the general terminology associated with personal... work in personal injury or equipment damage. ❑ ESD can damage memory modules and other components. n 75 N Upgrading Your VAIO Computer Adding and Removing Memory If you want to expand the functionality of your memory module. ❑ Electrostatic discharge (ESD) can damage electronic components...
User Guide
Page 77
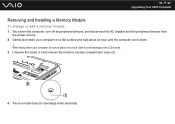
When facing down . ! n 77 N Upgrading Your VAIO Computer Removing and Installing a Memory Module To change or add a memory module 1 Shut down the computer, turn off all peripheral devices, and disconnect the AC adapter and the peripheral devices from the power source. 2 Gently face down your computer on a flat surface and wait about an hour until the computer cools down your computer, be sure to place it on a soft cloth to avoid damage to the LCD screen. 3 Unscrew the screw (1) and remove the memory module compartment cover (2). 4 Touch a metal object to discharge static electricity.
When facing down . ! n 77 N Upgrading Your VAIO Computer Removing and Installing a Memory Module To change or add a memory module 1 Shut down the computer, turn off all peripheral devices, and disconnect the AC adapter and the peripheral devices from the power source. 2 Gently face down your computer on a flat surface and wait about an hour until the computer cools down your computer, be sure to place it on a soft cloth to avoid damage to the LCD screen. 3 Unscrew the screw (1) and remove the memory module compartment cover (2). 4 Touch a metal object to discharge static electricity.

User Guide
Page 79
... then plug them to use the lower slot. If you want to install only one memory module, be sure to the power source. 10 Turn on all peripheral devices and then the computer. Be sure to insert the connector edge of the memory module into the slot while aligning the notch on the... motherboard. Do not touch any other components on the module with the small projection in until it clicks into place. ! n 79 N Upgrading Your VAIO Computer...
... then plug them to use the lower slot. If you want to install only one memory module, be sure to the power source. 10 Turn on all peripheral devices and then the computer. Be sure to insert the connector edge of the memory module into the slot while aligning the notch on the... motherboard. Do not touch any other components on the module with the small projection in until it clicks into place. ! n 79 N Upgrading Your VAIO Computer...
User Guide
Page 80
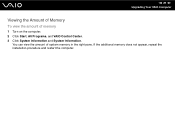
If the additional memory does not appear, repeat the installation procedure and restart the computer. You can view the amount of memory 1 Turn on the computer. 2 Click Start, All Programs, and VAIO Control Center. 3 Click System Information and System Information. n 80 N Upgrading Your VAIO Computer Viewing the Amount of Memory To view the amount of system memory in the right pane.
If the additional memory does not appear, repeat the installation procedure and restart the computer. You can view the amount of memory 1 Turn on the computer. 2 Click Start, All Programs, and VAIO Control Center. 3 Click System Information and System Information. n 80 N Upgrading Your VAIO Computer Viewing the Amount of Memory To view the amount of system memory in the right pane.
User Guide
Page 85
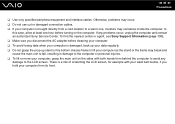
...one hour before cleaning your computer. ❑ To avoid losing data when your computer is a risk of scratching the LCD screen, for example with both hands from its front. To find the nearest center or agent, see Sony Support Information (page 130). ❑ Make sure you disconnect the AC adapter before turning... on the sides with your waist belt buckle, if you hold your computer as the stand or the frame may condense inside the computer. If any damage to avoid any problems occur, unplug the computer and contact an authorized Sony Service Center. There...
...one hour before cleaning your computer. ❑ To avoid losing data when your computer is a risk of scratching the LCD screen, for example with both hands from its front. To find the nearest center or agent, see Sony Support Information (page 130). ❑ Make sure you disconnect the AC adapter before turning... on the sides with your waist belt buckle, if you hold your computer as the stand or the frame may condense inside the computer. If any damage to avoid any problems occur, unplug the computer and contact an authorized Sony Service Center. There...
User Guide
Page 91
... data in temperature. ✍ If the hard disk drive is on. ❑ Do not turn off the power or restart your computer while reading or writing data to the hard disk drive. ❑ Do not use your computer. Although the hard disk drive has the internal safety device to prevent losing data due...
... data in temperature. ✍ If the hard disk drive is on. ❑ Do not turn off the power or restart your computer while reading or writing data to the hard disk drive. ❑ Do not use your computer. Although the hard disk drive has the internal safety device to prevent losing data due...


