User Guide
Page 3
n3 N Using Peripheral Devices...56 Connecting External Speakers ...57 Connecting a Universal Serial Bus (USB) Device...59 Connecting a Printer ...61 Connecting an i.LINK Device ...62 Connecting to a Network (LAN) ...64 Customizing Your VAIO Computer ...65 Setting the Password ...66 Setting Up Your Computer with VAIO Control Center 71 Using the Power Saving Mode...72 Upgrading Your VAIO Computer...74 Adding and Removing Memory...75 Precautions ...81 Handling the LCD Screen ...82 Using the Power Source ...83 Handling Your Computer ...84 Handling the Built-in MOTION...
n3 N Using Peripheral Devices...56 Connecting External Speakers ...57 Connecting a Universal Serial Bus (USB) Device...59 Connecting a Printer ...61 Connecting an i.LINK Device ...62 Connecting to a Network (LAN) ...64 Customizing Your VAIO Computer ...65 Setting the Password ...66 Setting Up Your Computer with VAIO Control Center 71 Using the Power Saving Mode...72 Upgrading Your VAIO Computer...74 Adding and Removing Memory...75 Precautions ...81 Handling the LCD Screen ...82 Using the Power Source ...83 Handling Your Computer ...84 Handling the Built-in MOTION...
User Guide
Page 7
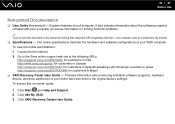
To view the online specifications: 1 Connect to the Internet. 2 Go to the Internet. ❑ Specifications - The online specifications describe the hardware and software configurations of your VAIO computer. To access this manual) - n7 N Before Use Non-printed Documentation ❑ User Guide (this on solving common problems. ✍ To go to web sites described in Brazil ❑ VAIO Recovery Center User Guide - It also includes information about restoring individual software programs, hardware drivers, and drive partition(s) or your computer...
To view the online specifications: 1 Connect to the Internet. 2 Go to the Internet. ❑ Specifications - The online specifications describe the hardware and software configurations of your VAIO computer. To access this manual) - n7 N Before Use Non-printed Documentation ❑ User Guide (this on solving common problems. ✍ To go to web sites described in Brazil ❑ VAIO Recovery Center User Guide - It also includes information about restoring individual software programs, hardware drivers, and drive partition(s) or your computer...
User Guide
Page 8
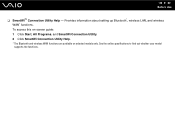
n8 N Before Use ❑ SmartWi™ Connection Utility Help - To access this on-screen guide: 1 Click Start, All Programs, and SmartWi Connection Utility. 2 Click SmartWi Connection Utility Help. * The Bluetooth and wireless WAN functions are available on selected models only. See the online specifications to find out whether your model supports the functions. Provides information about setting up Bluetooth*, wireless LAN, and wireless WAN* functions.
n8 N Before Use ❑ SmartWi™ Connection Utility Help - To access this on-screen guide: 1 Click Start, All Programs, and SmartWi Connection Utility. 2 Click SmartWi Connection Utility Help. * The Bluetooth and wireless WAN functions are available on selected models only. See the online specifications to find out whether your model supports the functions. Provides information about setting up Bluetooth*, wireless LAN, and wireless WAN* functions.
User Guide
Page 16
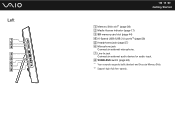
H WIRELESS switch (page 48) *1 Your computer supports both standard- and Duo-size Memory Stick. *2 Support high-/full-/low- speeds. Left n 16 N Getting Started A Memory Stick slot*1 (page 38) B Media Access indicator (page 17) C SD memory card slot (page 44) D Hi-Speed USB (USB 2.0) ports*2 (page 59) E Headphones jack (page 57) F Microphone jack Connect an external microphone. G Line In jack Connect an external audio device for audio input.
H WIRELESS switch (page 48) *1 Your computer supports both standard- and Duo-size Memory Stick. *2 Support high-/full-/low- speeds. Left n 16 N Getting Started A Memory Stick slot*1 (page 38) B Media Access indicator (page 17) C SD memory card slot (page 44) D Hi-Speed USB (USB 2.0) ports*2 (page 59) E Headphones jack (page 57) F Microphone jack Connect an external microphone. G Line In jack Connect an external audio device for audio input.

User Guide
Page 31
n 31 N Using Your VAIO Computer Reading and Writing Optical Discs Your computer plays and records CDs, DVDs, and Blu-ray Disc™ media, depending on your optical disc drive supports. Check your specifications for the type of media your model. Use the table below to see which types of optical disc drive installed on the model you purchased.
n 31 N Using Your VAIO Computer Reading and Writing Optical Discs Your computer plays and records CDs, DVDs, and Blu-ray Disc™ media, depending on your optical disc drive supports. Check your specifications for the type of media your model. Use the table below to see which types of optical disc drive installed on the model you purchased.
User Guide
Page 33
... bit rates. A DualDisc is strongly recommended that the AACS key update requires Internet access. Be aware that the audio side (non-DVD side) of a DualDisc may not support movie playback on the other optical media devices, circumstances may restrict video output to read the notices on the disc, playback is not possible. n 33 N Using Your VAIO Computer ! Note that a digital HDCPcompliant environment be sure...
... bit rates. A DualDisc is strongly recommended that the AACS key update requires Internet access. Be aware that the audio side (non-DVD side) of a DualDisc may not support movie playback on the other optical media devices, circumstances may restrict video output to read the notices on the disc, playback is not possible. n 33 N Using Your VAIO Computer ! Note that a digital HDCPcompliant environment be sure...
User Guide
Page 37
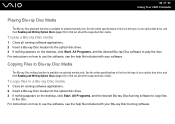
... disc. For instructions on selected models only. To copy files to a Blu-ray Disc media 1 Close all running software applications. 2 Insert a Blu-ray Disc media into the optical disc drive. 3 If nothing appears on the desktop, click Start, All Programs, and the desired Blu-ray Disc software to find out about the supported disc media. Copying Files to use the software, see the help file included with your software. See the online specifications...
... disc. For instructions on selected models only. To copy files to a Blu-ray Disc media 1 Close all running software applications. 2 Insert a Blu-ray Disc media into the optical disc drive. 3 If nothing appears on the desktop, click Start, All Programs, and the desired Blu-ray Disc software to find out about the supported disc media. Copying Files to use the software, see the help file included with your software. See the online specifications...
User Guide
Page 51
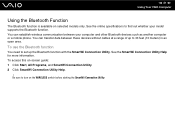
... VAIO Computer Using the Bluetooth Function The Bluetooth function is available on -screen guide: 1 Click Start, All Programs, and SmartWi Connection Utility. 2 Click SmartWi Connection Utility Help. ! Be sure to find out whether your computer and other Bluetooth devices such as another computer or a mobile phone. To access this on selected models only. See the online specifications to turn on the WIRELESS switch before starting the SmartWi Connection Utility...
... VAIO Computer Using the Bluetooth Function The Bluetooth function is available on -screen guide: 1 Click Start, All Programs, and SmartWi Connection Utility. 2 Click SmartWi Connection Utility Help. ! Be sure to find out whether your computer and other Bluetooth devices such as another computer or a mobile phone. To access this on selected models only. See the online specifications to turn on the WIRELESS switch before starting the SmartWi Connection Utility...
User Guide
Page 57
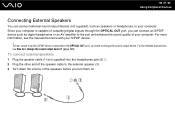
For the detailed instructions, see the manual that came with your S/PDIF device. ! For more information, see How do I change the sound output device. To hear sound from the S/PDIF device connected to the OPTICAL OUT port, you turn them on. To connect external speakers 1 Plug the speaker cable (1) (not supplied) into the headphones jack (2) i. 2 Plug the other end of the speaker cable to the external speaker (3). 3 Turn down the volume of your computer. Since your...
For the detailed instructions, see the manual that came with your S/PDIF device. ! For more information, see How do I change the sound output device. To hear sound from the S/PDIF device connected to the OPTICAL OUT port, you turn them on. To connect external speakers 1 Plug the speaker cable (1) (not supplied) into the headphones jack (2) i. 2 Plug the other end of the speaker cable to the external speaker (3). 3 Turn down the volume of your computer. Since your...
User Guide
Page 61
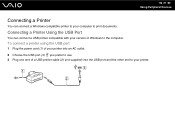
Connecting a Printer Using the USB Port You can connect a Windows-compatible printer to your computer to the computer. To connect a printer using the USB port 1 Plug the power cord (1) of your printer into an AC outlet. 2 Choose the USB port (3) you prefer to use. 3 Plug one end of a USB printer cable (2) (not supplied) into the USB port and the other end to your version of Windows to print documents. n 61 N Using Peripheral Devices Connecting a Printer You can connect a USB printer compatible with your printer.
Connecting a Printer Using the USB Port You can connect a Windows-compatible printer to your computer to the computer. To connect a printer using the USB port 1 Plug the power cord (1) of your printer into an AC outlet. 2 Choose the USB port (3) you prefer to use. 3 Plug one end of a USB printer cable (2) (not supplied) into the USB port and the other end to your version of Windows to print documents. n 61 N Using Peripheral Devices Connecting a Printer You can connect a USB printer compatible with your printer.
User Guide
Page 64
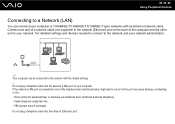
... not plug a telephone cable into the network (Ethernet) port. Public telephone subscriber line - Home (intercom speakerphone) or business-use telephone lines (multi-line business telephone) - If the network (LAN) port is connected to one end of a network cable (not supplied) to the network (Ethernet) port on your computer to 1000BASE-T/100BASE-TX/10BASE-T-type networks with the default settings. ! n 64 N Using Peripheral Devices Connecting to a Network (LAN) You can be connected to the network with an Ethernet network cable. Connect one of the...
... not plug a telephone cable into the network (Ethernet) port. Public telephone subscriber line - Home (intercom speakerphone) or business-use telephone lines (multi-line business telephone) - If the network (LAN) port is connected to one end of a network cable (not supplied) to the network (Ethernet) port on your computer to 1000BASE-T/100BASE-TX/10BASE-T-type networks with the default settings. ! n 64 N Using Peripheral Devices Connecting to a Network (LAN) You can be connected to the network with an Ethernet network cable. Connect one of the...
User Guide
Page 70
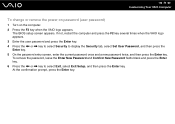
... Exit, select Exit Setup, and then press the Enter key. At the confirmation prompt, press the Enter key. To remove the password, leave the Enter New Password and Confirm New Password fields blank and press the Enter key. 6 Press the < or , key to display the Security tab, select Set User Password, and then press the Enter key. 5 On the password entry screen, enter the current password once and a new password twice, and then press the Enter key. The BIOS setup screen appears.
... Exit, select Exit Setup, and then press the Enter key. At the confirmation prompt, press the Enter key. To remove the password, leave the Enter New Password and Confirm New Password fields blank and press the Enter key. 6 Press the < or , key to display the Security tab, select Set User Password, and then press the Enter key. 5 On the password entry screen, enter the current password once and a new password twice, and then press the Enter key. The BIOS setup screen appears.
User Guide
Page 73
... mode ❑ Press any key on the keyboard. ❑ Press the power button on the keyboard to place your computer in this , you can change the Sleep mode settings 1 Click Start, Control Panel, Hardware and Sound, and Power Options. 2 Click Change plan settings under the current power plan. 3 Change the time to use it for a certain period of time. n 73 N Customizing Your VAIO Computer Using Sleep Mode Sleep mode turns off the LCD screen and places the hard disk drive and the CPU into Sleep mode...
... mode ❑ Press any key on the keyboard. ❑ Press the power button on the keyboard to place your computer in this , you can change the Sleep mode settings 1 Click Start, Control Panel, Hardware and Sound, and Power Options. 2 Click Change plan settings under the current power plan. 3 Change the time to use it for a certain period of time. n 73 N Customizing Your VAIO Computer Using Sleep Mode Sleep mode turns off the LCD screen and places the hard disk drive and the CPU into Sleep mode...
User Guide
Page 98
... download. ❑ Make sure you have forgotten the power-on password, contact an authorized Sony Service Center to reset it keeps crashing? ❑ Check the web site of the BIOS functions to which you have installed the latest video driver. ❑ On some VAIO models, the graphics memory is not guaranteed. Follow these steps: 1 Turn on password? The BIOS setup screen appears. n 98 N Troubleshooting What should I do if my game software does not work...
... download. ❑ Make sure you have forgotten the power-on password, contact an authorized Sony Service Center to reset it keeps crashing? ❑ Check the web site of the BIOS functions to which you have installed the latest video driver. ❑ On some VAIO models, the graphics memory is not guaranteed. Follow these steps: 1 Turn on password? The BIOS setup screen appears. n 98 N Troubleshooting What should I do if my game software does not work...
User Guide
Page 100
... on the taskbar. 4 Follow the on-screen instructions to download and install the latest Windows updates regularly. n 100 N Troubleshooting System Security How can I keep the Microsoft Windows Live OneCare software program current with the latest updates from Microsoft Corporation. Your computer must be connected to the Internet before you can receive updates. 1 Connect to the Internet. 2 Double-click the Windows Security Alerts icon on the taskbar...
... on the taskbar. 4 Follow the on-screen instructions to download and install the latest Windows updates regularly. n 100 N Troubleshooting System Security How can I keep the Microsoft Windows Live OneCare software program current with the latest updates from Microsoft Corporation. Your computer must be connected to the Internet before you can receive updates. 1 Connect to the Internet. 2 Double-click the Windows Security Alerts icon on the taskbar...
User Guide
Page 103
... click Update Driver Software. To change the corresponding power saving mode setting. If another software application is in use the built-in MOTION EYE camera? ❑ The built-in MOTION EYE camera. ❑ If your computer automatically enters Sleep mode, change the setting, see Using the Power Saving Mode (page 72). Follow these steps: 1 Click Start, Control Panel, Hardware and Sound, and Device Manager. 2 Double-click Imaging devices. 3 Right-click the device name for the camera. n 103 N Troubleshooting...
... click Update Driver Software. To change the corresponding power saving mode setting. If another software application is in use the built-in MOTION EYE camera? ❑ The built-in MOTION EYE camera. ❑ If your computer automatically enters Sleep mode, change the setting, see Using the Power Saving Mode (page 72). Follow these steps: 1 Click Start, Control Panel, Hardware and Sound, and Device Manager. 2 Double-click Imaging devices. 3 Right-click the device name for the camera. n 103 N Troubleshooting...
User Guide
Page 112
... a disc is installed. If you need to check the settings. ❑ Check the volume setting in the audio mixer. ❑ If you are using external speakers, check the volume settings on the speakers and the connections between the speakers and your computer. ❑ Make sure the correct driver software is dirty or damaged, your computer will stop responding. Follow these steps: 1 Click Start and Control Panel. 2 Click System and Maintenance...
... a disc is installed. If you need to check the settings. ❑ Check the volume setting in the audio mixer. ❑ If you are using external speakers, check the volume settings on the speakers and the connections between the speakers and your computer. ❑ Make sure the correct driver software is dirty or damaged, your computer will stop responding. Follow these steps: 1 Click Start and Control Panel. 2 Click System and Maintenance...
User Guide
Page 114
... a screen saver. ❑ Stop using the keyboard. ❑ If you are using VAIO Update. See the online specifications to find out about the supported disc media. This Q & A entry applies to the Internet, see Using the Internet (page 47). You may not be connected to find out the type of your computer. Using a disc with an adhesive label affixed, replace it must be able to play such contents, download and install...
... a screen saver. ❑ Stop using the keyboard. ❑ If you are using VAIO Update. See the online specifications to find out about the supported disc media. This Q & A entry applies to the Internet, see Using the Internet (page 47). You may not be connected to find out the type of your computer. Using a disc with an adhesive label affixed, replace it must be able to play such contents, download and install...
User Guide
Page 115
.../RAM drive does not support it. ❑ BD-R Disc media are using the correct DVD recordable media. ❑ Check which DVD recordable format is compatible with your optical disc drive, and then Reading and Writing Optical Discs (page 31) to selected models only. This Q & A entry applies to find out the type of DVD recordable media do if I cannot write data to DVD media? ❑ Make sure you are not rewritable. n 115 N Troubleshooting...
.../RAM drive does not support it. ❑ BD-R Disc media are using the correct DVD recordable media. ❑ Check which DVD recordable format is compatible with your optical disc drive, and then Reading and Writing Optical Discs (page 31) to selected models only. This Q & A entry applies to find out the type of DVD recordable media do if I cannot write data to DVD media? ❑ Make sure you are not rewritable. n 115 N Troubleshooting...
User Guide
Page 117
... support check box. 6 Click OK. Follow these steps: 1 Click Start and Control Panel. 2 Click Printer under Hardware and Sound. 3 Right-click the printer icon and select Properties. 4 Click the Ports tab. 5 Click to install the printer driver software before you use your computer. ❑ You may enable printing. This disables the bidirectional communication functions of the printer, such as data transfer, status monitoring, and remote panel...
... support check box. 6 Click OK. Follow these steps: 1 Click Start and Control Panel. 2 Click Printer under Hardware and Sound. 3 Right-click the printer icon and select Properties. 4 Click the Ports tab. 5 Click to install the printer driver software before you use your computer. ❑ You may enable printing. This disables the bidirectional communication functions of the printer, such as data transfer, status monitoring, and remote panel...


