
Operating Instructions
Page 2
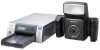
... Still Camera, and the UPA-AC05 AC Power Adapter For the customers in this manual could void your Sony dealer regarding this product, you call : Sony Customer Information Service Center 1-800-222-7669 or http://www.sony.com/ Declaration of the FCC Rules. This equipment generates, uses, and... can be co-located or operated in Canada This Class B digital apparatus complies with part 15 of conformity Trade Name: SONY Model: UP-DX100 Responsible Party: Sony Electronics Inc. Address: ...
... Still Camera, and the UPA-AC05 AC Power Adapter For the customers in this manual could void your Sony dealer regarding this product, you call : Sony Customer Information Service Center 1-800-222-7669 or http://www.sony.com/ Declaration of the FCC Rules. This equipment generates, uses, and... can be co-located or operated in Canada This Class B digital apparatus complies with part 15 of conformity Trade Name: SONY Model: UP-DX100 Responsible Party: Sony Electronics Inc. Address: ...
Operating Instructions
Page 3
... accept any interference received, including interference that these "UPDX100" and "DKC-C300X" are not mentioned in separate service or guarantee documents. This equipment has very low levels of RF energy that conforms to the safety regulations of each case in Europe The manufacturer .../Plug, please consult a qualified service personnel. For the DKC-C300X Digital Still Camera For the customers in Europe Hereby, Sony Corporation, declares that may cause undesired operation. Any unauthorized use of FCC Rules and the Canadian ICES-003. and Canada This equipment complies with...
... accept any interference received, including interference that these "UPDX100" and "DKC-C300X" are not mentioned in separate service or guarantee documents. This equipment has very low levels of RF energy that conforms to the safety regulations of each case in Europe The manufacturer .../Plug, please consult a qualified service personnel. For the DKC-C300X Digital Still Camera For the customers in Europe Hereby, Sony Corporation, declares that may cause undesired operation. Any unauthorized use of FCC Rules and the Canadian ICES-003. and Canada This equipment complies with...
Operating Instructions
Page 4
...35 Viewing Information on Captured Images ....... 35 Using the Print Queue Function 36 Setting up a Frame for Display During Printing 37 Creating an Additional Frame 38 Using Die-cut Print Function 40 Using the Auto Power Off 40 Setting Camera Sounds 41 Selecting the Language Display 42 ...Returning Settings to Defaults 42 Displaying the Firmware Version 43 Locking the Camera Menus 43 Adjusting the Print Quality ...
...35 Viewing Information on Captured Images ....... 35 Using the Print Queue Function 36 Setting up a Frame for Display During Printing 37 Creating an Additional Frame 38 Using Die-cut Print Function 40 Using the Auto Power Off 40 Setting Camera Sounds 41 Selecting the Language Display 42 ...Returning Settings to Defaults 42 Displaying the Firmware Version 43 Locking the Camera Menus 43 Adjusting the Print Quality ...
Operating Instructions
Page 5
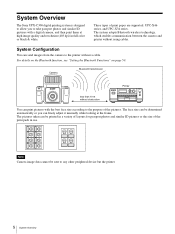
... can be sent to the printer without a cable. Note Camera image data cannot be determined automatically or you to the purpose of the pictures. Three types of the print pack in use. System Overview The Sony UPX-C300 digital printing system is designed to allow you can finely adjust... it manually while looking at high image quality and resolution (403 dpi) in full color or black & white. Camera Bluetooth transmission less than 10 m ...
... can be sent to the printer without a cable. Note Camera image data cannot be determined automatically or you to the purpose of the pictures. Three types of the print pack in use. System Overview The Sony UPX-C300 digital printing system is designed to allow you can finely adjust... it manually while looking at high image quality and resolution (403 dpi) in full color or black & white. Camera Bluetooth transmission less than 10 m ...

Operating Instructions
Page 6
... picture, creating ideal prints for die cuts. Operation Flow This system allows you to adjust color and black & white print settings from the camera. If, for a particular ID picture, you can readjust the face size as necessary. You can enable the die-cut print function to five...around all sides of the head and chin perfectly within the frame. Die-cut print You can quickly confirm adjustment results using the guide print function. 6 System Overview Sony UP-DX100 1 Print Shoot pictures while viewing the LCD to adjust the face size automatically. Review the photo and adjust...
... picture, creating ideal prints for die cuts. Operation Flow This system allows you to adjust color and black & white print settings from the camera. If, for a particular ID picture, you can readjust the face size as necessary. You can enable the die-cut print function to five...around all sides of the head and chin perfectly within the frame. Die-cut print You can quickly confirm adjustment results using the guide print function. 6 System Overview Sony UP-DX100 1 Print Shoot pictures while viewing the LCD to adjust the face size automatically. Review the photo and adjust...
Operating Instructions
Page 7
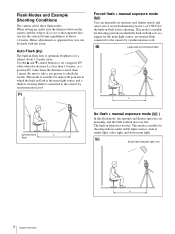
...sources, such as a trigger for the main light source, an external flash connected to the camera by synchronization cord. Forced flash + manual exposure mode () You can manually set so that ...before shooting. Flash Modes and Example Shooting Conditions The camera offers three flash modes. When setting up, make sure the distance between the camera and the subject (L) is set aperture and, shutter...does not fire. Studio light (halogen light, etc.) L 7 System Overview Minor adjustments to the camera by synchronization cord. Be sure to take a test picture to set manually, and the built-in...
...sources, such as a trigger for the main light source, an external flash connected to the camera by synchronization cord. Forced flash + manual exposure mode () You can manually set so that ...before shooting. Flash Modes and Example Shooting Conditions The camera offers three flash modes. When setting up, make sure the distance between the camera and the subject (L) is set aperture and, shutter...does not fire. Studio light (halogen light, etc.) L 7 System Overview Minor adjustments to the camera by synchronization cord. Be sure to take a test picture to set manually, and the built-in...

Operating Instructions
Page 8
... through zoom operations, the brightness of the F value while shooting Even if the F value is factory set to Program, but you can change the setting using the menus if necessary. Flash Mode Flash Control Controlled Flash Program with Zoom and EV without pre-flash Aperture Fixed (Open) Shutter Speed Fixed (1/250...
... through zoom operations, the brightness of the F value while shooting Even if the F value is factory set to Program, but you can change the setting using the menus if necessary. Flash Mode Flash Control Controlled Flash Program with Zoom and EV without pre-flash Aperture Fixed (Open) Shutter Speed Fixed (1/250...

Operating Instructions
Page 9
... the button halfway activates the autofocus function, and pressing it to the camera's built-in parentheses. D Lens filter thread Used to F-5.5 (T)) Autofocus lens with 2x optical zoom. B Tripod screw hole (16) Used to attach the camera to the FLASH MODE setting. E Release button (21) Press this ...button to capture the image shown on the LCD and record it all the way releases the shutter. Camera 1 5 432 Front A Flash (7, 8) Fires according ...
... the button halfway activates the autofocus function, and pressing it to the camera's built-in parentheses. D Lens filter thread Used to F-5.5 (T)) Autofocus lens with 2x optical zoom. B Tripod screw hole (16) Used to attach the camera to the FLASH MODE setting. E Release button (21) Press this ...button to capture the image shown on the LCD and record it all the way releases the shutter. Camera 1 5 432 Front A Flash (7, 8) Fires according ...

Operating Instructions
Page 10
... left if batteries are used. Flashing rapidly (red) The camera is being charged, or data is shutting down . Flashing rapidly (orange) The camera is preparing to take the next picture, the flash is being stored. Contact your nearest Sony dealer or Sony Service Center. Flashing (red...is shutting down . Flashing rapidly (red) The camera is little battery power left if batteries are used . Lights (red) This indicates camera malfunction. Rear 1 2 3 qf qd 4 qh qg qs qa 098 76 5 A LCD screen Use it to the camera ON or OFF. 10 Names and Functions of...
... left if batteries are used. Flashing rapidly (red) The camera is being charged, or data is shutting down . Flashing rapidly (orange) The camera is preparing to take the next picture, the flash is being stored. Contact your nearest Sony dealer or Sony Service Center. Flashing (red...is shutting down . Flashing rapidly (red) The camera is little battery power left if batteries are used . Lights (red) This indicates camera malfunction. Rear 1 2 3 qf qd 4 qh qg qs qa 098 76 5 A LCD screen Use it to the camera ON or OFF. 10 Names and Functions of...

Operating Instructions
Page 11
...commercially available Sony AA NiMH (nickel-metal hydride) rechargeable batteries (type NHAA, max. 2700 mAh). When the mode switch is set menu items. J ENTER button Press this button to 2× zoom is available. picture display. W ( ): Zoom out of the face while maintaining a fixed camera position. H... PRINT button (23, 32) When the mode switch is set to Use b or B to select a playback image to display on the LCD. When navigating menus Use these buttons to select and set to During playback, switches between...
...commercially available Sony AA NiMH (nickel-metal hydride) rechargeable batteries (type NHAA, max. 2700 mAh). When the mode switch is set menu items. J ENTER button Press this button to 2× zoom is available. picture display. W ( ): Zoom out of the face while maintaining a fixed camera position. H... PRINT button (23, 32) When the mode switch is set to Use b or B to select a playback image to display on the LCD. When navigating menus Use these buttons to select and set to During playback, switches between...

Operating Instructions
Page 12
... differ in progress. 12 Names and Functions of Parts I Print cartridge slot (17) Insert the print cartridge here. F Control button (24, 50) When navigating menus, use this button to execute menu items selected while navigating menus and after exchanging the ribbon cartridge. H Print cartridge cover (17) When inserting or removing print...
... differ in progress. 12 Names and Functions of Parts I Print cartridge slot (17) Insert the print cartridge here. F Control button (24, 50) When navigating menus, use this button to execute menu items selected while navigating menus and after exchanging the ribbon cartridge. H Print cartridge cover (17) When inserting or removing print...
Operating Instructions
Page 13
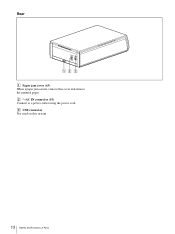
Rear - C USB connector Not used on this cover and remove the jammed paper. B -AC IN connector (19) Connect to a power outlet using the power cord. AC IN 12 3 A Paper jam cover (63) When a paper jam occurs, remove this system 13 Names and Functions of Parts
Rear - C USB connector Not used on this cover and remove the jammed paper. B -AC IN connector (19) Connect to a power outlet using the power cord. AC IN 12 3 A Paper jam cover (63) When a paper jam occurs, remove this system 13 Names and Functions of Parts

Operating Instructions
Page 14
... accessories are supplied with the power cord. Supplied Accessories Confirming the Contents Make sure that the AC power adaptor is near the power outlet during use. Paper tray for the UPC-X46 series (1) Paper tray for the UPC-X34 series (1) Tray cover (1) UPA-AC05 AC power adaptor (1) ...Cleaning cassette (1) Warranty card (1) Operating Instructions (1) Quick Reference Guide (1) Preparations Preparing the Camera 1 Slide to open the external connector cover. 2 Connect the supplied UPA-AC05 AC power adaptor to the DC IN jack on the...
... accessories are supplied with the power cord. Supplied Accessories Confirming the Contents Make sure that the AC power adaptor is near the power outlet during use. Paper tray for the UPC-X46 series (1) Paper tray for the UPC-X34 series (1) Tray cover (1) UPA-AC05 AC power adaptor (1) ...Cleaning cassette (1) Warranty card (1) Operating Instructions (1) Quick Reference Guide (1) Preparations Preparing the Camera 1 Slide to open the external connector cover. 2 Connect the supplied UPA-AC05 AC power adaptor to the DC IN jack on the...

Operating Instructions
Page 15
... charged or close to fully charged. Use these to get a general idea of the camera's LCD. Power Status Indicators When using batteries For the camera in this system, you can use the specifically designed battery charger. 15 Preparations To recharge the batteries, use four size AA Nickel Metal Hydride batteries... batteries are fully discharged. The battery charge is disabled. Note Connecting the AC adapter while the batteries are inside the camera will be disabled shortly. Use the AC power adapter or replace the batteries. Ready the AC power adapter or a new set of the...
... charged or close to fully charged. Use these to get a general idea of the camera's LCD. Power Status Indicators When using batteries For the camera in this system, you can use the specifically designed battery charger. 15 Preparations To recharge the batteries, use four size AA Nickel Metal Hydride batteries... batteries are fully discharged. The battery charge is disabled. Note Connecting the AC adapter while the batteries are inside the camera will be disabled shortly. Use the AC power adapter or replace the batteries. Ready the AC power adapter or a new set of the...

Operating Instructions
Page 16
...8226; Avoid touching the printing surface of the print paper and the ink ribbon of the camera. Fingerprints or dust on used print cartridges and print paper from the printer for printing. Using a print cartridge together with print paper of print paper and a print cartridge. Notes &#...when necessary. Make sure that match in their original packaging. 16 Preparations Camera Tripod Preparing the Printer Before using too much force when tightening may lower the print quality. • When removing partially used print paper. Doing so may fall off. If the screw is loose...
...8226; Avoid touching the printing surface of the print paper and the ink ribbon of the camera. Fingerprints or dust on used print cartridges and print paper from the printer for printing. Using a print cartridge together with print paper of print paper and a print cartridge. Notes &#...when necessary. Make sure that match in their original packaging. 16 Preparations Camera Tripod Preparing the Printer Before using too much force when tightening may lower the print quality. • When removing partially used print paper. Doing so may fall off. If the screw is loose...
Operating Instructions
Page 17
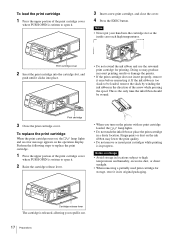
...cartridge cover where PUSH OPEN is written to open it. 2 Raise the cartridge release lever. • Do not rewind the ink ribbon and use the rewound print cartridge for storage, store it in its original packaging. Notes • Never put your hand into place. To replace the print... on storage • Avoid storage in locations subject to high temperatures and humidity, excessive dust, or direct sunlight. • When removing a partially used print cartridge for printing. This is too slack to be wound. • When you to open it out. 17 Preparations If the ink ribbon is...
...cartridge cover where PUSH OPEN is written to open it. 2 Raise the cartridge release lever. • Do not rewind the ink ribbon and use the rewound print cartridge for storage, store it in its original packaging. Notes • Never put your hand into place. To replace the print... on storage • Avoid storage in locations subject to high temperatures and humidity, excessive dust, or direct sunlight. • When removing a partially used print cartridge for printing. This is too slack to be wound. • When you to open it out. 17 Preparations If the ink ribbon is...
Operating Instructions
Page 18
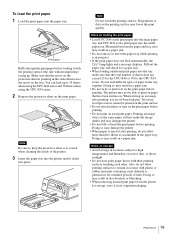
Fingerprints or dust on the print paper before loading it is used print paper. Notes on loading the print paper • Load UPC-X46 series...result in a paper jam. • Do not remove or insert the paper tray while printing is ejected after printing, use an oil-based ink pen. You can load up . Do not load different types of the printer. 3 Insert the ...allow more than five sheets to 25 sheets when using the UPC-X46 series and 30 sheets when using the UPC-X34 series. 2 Remove the protective sheet on . When writing on used when cleaning the inside of paper in locations subject ...
Fingerprints or dust on the print paper before loading it is used print paper. Notes on loading the print paper • Load UPC-X46 series...result in a paper jam. • Do not remove or insert the paper tray while printing is ejected after printing, use an oil-based ink pen. You can load up . Do not load different types of the printer. 3 Insert the ...allow more than five sheets to 25 sheets when using the UPC-X46 series and 30 sheets when using the UPC-X34 series. 2 Remove the protective sheet on . When writing on used when cleaning the inside of paper in locations subject ...
Operating Instructions
Page 19
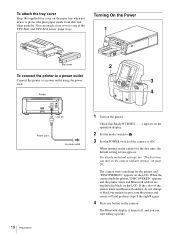
...any of the UPC-X46, and UPC-X34 series' paper trays. For details on default settings, see "The first time you turn the printer and camera off , and you can attach a tray cover to protect the print paper inside from dust and other particles. Turning On the Power 1 DIGITAL PHOTO... PRINTER MENU EXEC PRINT ALARM PUSH OPEN Tray cover 2 To connect the printer to a power outlet Connect the printer to a power outlet using the power 3 cord. 4 Printer Power cord 19 Preparations to power outlet 1 Turn on the operation display. 2 Set the mode switch to . 3 Set the...
...any of the UPC-X46, and UPC-X34 series' paper trays. For details on default settings, see "The first time you turn the printer and camera off , and you can attach a tray cover to protect the print paper inside from dust and other particles. Turning On the Power 1 DIGITAL PHOTO... PRINTER MENU EXEC PRINT ALARM PUSH OPEN Tray cover 2 To connect the printer to a power outlet Connect the printer to a power outlet using the power 3 cord. 4 Printer Power cord 19 Preparations to power outlet 1 Turn on the operation display. 2 Set the mode switch to . 3 Set the...
Operating Instructions
Page 20
... setting) When you turn the camera off while shooting or deleting pictures. If the printer name and Bluetooth address are factory set to allow shooting without manual configuration, but you can change the shooting conditions as necessary using Shooting menu. If the problem still persists, contact your Sony dealer or your usage environment...
... setting) When you turn the camera off while shooting or deleting pictures. If the printer name and Bluetooth address are factory set to allow shooting without manual configuration, but you can change the shooting conditions as necessary using Shooting menu. If the problem still persists, contact your Sony dealer or your usage environment...

Operating Instructions
Page 21
... from the auto-review display without switching the mode switch setting. The picture displayed on the LCD. Taking a Picture 1 2, 3 1 Point the camera at the set to turn off the auto-review display, and then repeat steps 2 and 3. To take the next picture, press the release button or... zoom lever to . Pressing the zoom lever allows you to confirm deletion appears. 2 Select OK by zooming. The picture is used to adjust the frame by pressing the v control button, and then press the ENTER button. To delete the last picture taken Perform the following...
... from the auto-review display without switching the mode switch setting. The picture displayed on the LCD. Taking a Picture 1 2, 3 1 Point the camera at the set to turn off the auto-review display, and then repeat steps 2 and 3. To take the next picture, press the release button or... zoom lever to . Pressing the zoom lever allows you to confirm deletion appears. 2 Select OK by zooming. The picture is used to adjust the frame by pressing the v control button, and then press the ENTER button. To delete the last picture taken Perform the following...


