Operating Instructions
Page 4
... 49 Adjusting the Print Position (PRINT OFFSET 50 Setting the Bluetooth Functions 50 Bluetooth wireless technology 50 The "Basic Imaging Profile 50 Bluetooth Address 50 Passkey Authentication 51 Bluetooth Connection 51 Checking the Bluetooth Connection Statuses of the Camera (PROPERTY 52 Confirming the Bluetooth Address of the Printer 52 Changing the Passkey 52 Setting the Module Power 53...
... 49 Adjusting the Print Position (PRINT OFFSET 50 Setting the Bluetooth Functions 50 Bluetooth wireless technology 50 The "Basic Imaging Profile 50 Bluetooth Address 50 Passkey Authentication 51 Bluetooth Connection 51 Checking the Bluetooth Connection Statuses of the Camera (PROPERTY 52 Confirming the Bluetooth Address of the Printer 52 Changing the Passkey 52 Setting the Module Power 53...
Operating Instructions
Page 5
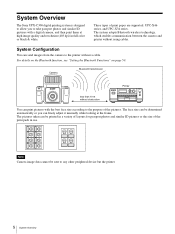
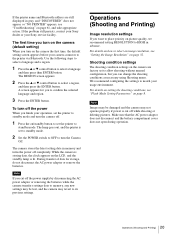
..." on page 50. The pictures taken can be sent to any other peripheral device but the printer. 5 System Overview The system adopts Bluetooth wireless technology, which enables communication between the camera and printer without a cable. System Overview The Sony UPX-C300 digital printing system is designed to allow you can finely adjust it manually while looking at...
..." on page 50. The pictures taken can be sent to any other peripheral device but the printer. 5 System Overview The system adopts Bluetooth wireless technology, which enables communication between the camera and printer without a cable. System Overview The Sony UPX-C300 digital printing system is designed to allow you can finely adjust it manually while looking at...

Operating Instructions
Page 10
...) Normal operation Flashing (orange) The camera is starting up or Bluetooth authentication is displayed, pressing this button deletes the image displayed on the LCD. Flashing rapidly (red) The camera is little battery power left if batteries are used . Contact your nearest Sony dealer or Sony Service Center. Lights (red) This indicates camera malfunction. C AUTO FRAME (automatic...
...) Normal operation Flashing (orange) The camera is starting up or Bluetooth authentication is displayed, pressing this button deletes the image displayed on the LCD. Flashing rapidly (red) The camera is little battery power left if batteries are used . Contact your nearest Sony dealer or Sony Service Center. Lights (red) This indicates camera malfunction. C AUTO FRAME (automatic...

Operating Instructions
Page 12
... to select and set menu items. G Lamps lamp: Lights when the Bluetooth function is enabled. B Paper tray slot (18) Insert the paper tray here. E EXEC (Execute) button (24, 50) Press this button to the printer. H Print cartridge cover (17) When inserting or removing print cartridges,...the ribbon cartridge. ALARM lamp: Lights when an error such as operation status and menu items display here. Printer Front DIGITAL PHOTO PRINTER MENU EXEC PRINT ALARM 1 2 3456 7 PUSH OPEN 8 Bluetooth antenna (inside) PRINT ALARM 90 A 1 (On/Standby) button/lamp (19) When you press the button...
... to select and set menu items. G Lamps lamp: Lights when the Bluetooth function is enabled. B Paper tray slot (18) Insert the paper tray here. E EXEC (Execute) button (24, 50) Press this button to the printer. H Print cartridge cover (17) When inserting or removing print cartridges,...the ribbon cartridge. ALARM lamp: Lights when an error such as operation status and menu items display here. Printer Front DIGITAL PHOTO PRINTER MENU EXEC PRINT ALARM 1 2 3456 7 PUSH OPEN 8 Bluetooth antenna (inside) PRINT ALARM 90 A 1 (On/Standby) button/lamp (19) When you press the button...
Operating Instructions
Page 19
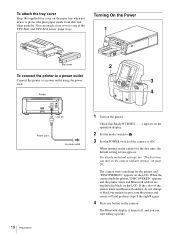
... of the camera to power outlet 1 Turn on the printer. The camera starts searching for the first time, the default setting screen appears. When the camera finds the printer, "DISCOVERED" appears, and the printer name and Bluetooth address are displayed in gray, turn on the camera (default setting...)" on page 20. Turning On the Power 1 DIGITAL PHOTO PRINTER MENU EXEC PRINT ALARM PUSH OPEN Tray...
... of the camera to power outlet 1 Turn on the printer. The camera starts searching for the first time, the default setting screen appears. When the camera finds the printer, "DISCOVERED" appears, and the printer name and Bluetooth address are displayed in gray, turn on the camera (default setting...)" on page 20. Turning On the Power 1 DIGITAL PHOTO PRINTER MENU EXEC PRINT ALARM PUSH OPEN Tray...
Operating Instructions
Page 20
...The first time you turn on the camera (default setting) When you turn the camera off. 1 Press the on/standby button to set to the printer via Bluetooth. If the printer name and Bluetooth address are factory set the printer to HIGH in advance. While the camera is storing data, the clock appears on... to standby mode. 2 Set the POWER switch to OFF to match your operation, set the printer to standby mode and turn on the camera the first time, the default setting screen appears before your Sony service facility. The REGION screen appears. 2 Press the v or V control button to select ...
...The first time you turn on the camera (default setting) When you turn the camera off. 1 Press the on/standby button to set to the printer via Bluetooth. If the printer name and Bluetooth address are factory set the printer to HIGH in advance. While the camera is storing data, the clock appears on... to standby mode. 2 Set the POWER switch to OFF to match your operation, set the printer to standby mode and turn on the camera the first time, the default setting screen appears before your Sony service facility. The REGION screen appears. 2 Press the v or V control button to select ...

Operating Instructions
Page 23
...or reduce the image. - To take another picture during printing. Once these values are transmitted to turn off the auto-review display. Sony UP-DX100 1 Printer name JPN Passport 3 35 45mm 8 Number of prints ID Photo Frame Frame size Number of the image to select a ID photo...press the MENU button. 6 Specify the number of the camera. While the CANCEL button is finished. 5 Press the v or V control button to match the selected ID ohoto frame. 1) Press the ENTER button. appears on the LCD. Reception indicator Bluetooth 1. Press the v or V button repeatedly until data ...
...or reduce the image. - To take another picture during printing. Once these values are transmitted to turn off the auto-review display. Sony UP-DX100 1 Printer name JPN Passport 3 35 45mm 8 Number of prints ID Photo Frame Frame size Number of the image to select a ID photo...press the MENU button. 6 Specify the number of the camera. While the CANCEL button is finished. 5 Press the v or V control button to match the selected ID ohoto frame. 1) Press the ENTER button. appears on the LCD. Reception indicator Bluetooth 1. Press the v or V button repeatedly until data ...
Operating Instructions
Page 31
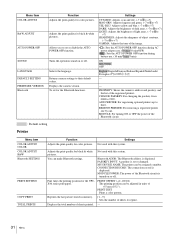
... connection record is displayed. Displays the camera version. ADD PRINTER: For registering optional printers up to +7) GAMMA: Adjusts the tone of object contours. (-7 to 0 to three. Settings Not used with this system. pictures. MY DEVICE NAME: The printer can be adjusted in memory. [1 - 9] Sets the number of the Bluetooth circuits is set or changed. Fine...
... connection record is displayed. Displays the camera version. ADD PRINTER: For registering optional printers up to +7) GAMMA: Adjusts the tone of object contours. (-7 to 0 to three. Settings Not used with this system. pictures. MY DEVICE NAME: The printer can be adjusted in memory. [1 - 9] Sets the number of the Bluetooth circuits is set or changed. Fine...

Operating Instructions
Page 50
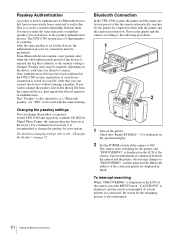
...) wireless technology allows communication between the camera and the printer you intend to display "PRINT SETTING [>>]" on the operation display. 4 Press B on the control button. The word Bluetooth is owned by Sony Corporation under license. The main features of the BIP enable sending or receiving images, and use this document. This is a specific code for...
...) wireless technology allows communication between the camera and the printer you intend to display "PRINT SETTING [>>]" on the operation display. 4 Press B on the control button. The word Bluetooth is owned by Sony Corporation under license. The main features of the BIP enable sending or receiving images, and use this document. This is a specific code for...
Operating Instructions
Page 51
... been confirmed in the UPX-C300 system, registration of the connected printer are displayed in black. Bluetooth Connection In the UPX-C300 system, the printer and the camera are factory preset so that "Ready BT RSSI [----]" is displayed on the printer. Check that the camera automatically searches for the printer for connection when both the printer and the camera are connected, the search...
... been confirmed in the UPX-C300 system, registration of the connected printer are displayed in black. Bluetooth Connection In the UPX-C300 system, the printer and the camera are factory preset so that "Ready BT RSSI [----]" is displayed on the printer. Check that the camera automatically searches for the printer for connection when both the printer and the camera are connected, the search...
Operating Instructions
Page 52
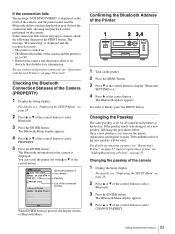
... to connect, check the following the procedures below. Sony UP-DX100 ADDRESS 00:A0:96:12:24:E1 2 ADDRESS 3 ADDRESS OK Bluetooth address of the camera Passkey List of the camera and the printer is set for the camera is no obstacle that disturbs data transmission. The Bluetooth address appears. Then authentication of the control button to...
... to connect, check the following the procedures below. Sony UP-DX100 ADDRESS 00:A0:96:12:24:E1 2 ADDRESS 3 ADDRESS OK Bluetooth address of the camera Passkey List of the camera and the printer is set for the camera is no obstacle that disturbs data transmission. The Bluetooth address appears. Then authentication of the control button to...
Operating Instructions
Page 53
... a digit of the passkey to display "PASSKEY INPUT [>>]." 6 Press B of the control button to connect the camera and the printer using the Bluetooth function. The display returns to Bluetooth Menu. 53 Setting the Bluetooth Functions The display returns to Bluetooth Menu. 5 Press the ENTER button. If it is set a four-digit passkey. 8 Press B of the control...
... a digit of the passkey to display "PASSKEY INPUT [>>]." 6 Press B of the control button to connect the camera and the printer using the Bluetooth function. The display returns to Bluetooth Menu. 53 Setting the Bluetooth Functions The display returns to Bluetooth Menu. 5 Press the ENTER button. If it is set a four-digit passkey. 8 Press B of the control...
Operating Instructions
Page 54
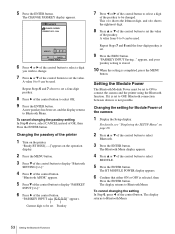
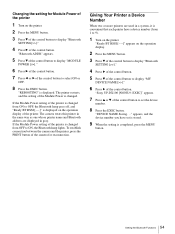
... is displayed on the printer. The printer restarts, and the setting of the camera for Module Power of the printer 1 Turn on the printer. 2 Press the MENU button. 3 Press V of the control button to ON, the Bluetooth lamp lights. "DEVICE ...printer is displayed. "Sony UP-DX100 [NONE-9: EXEC]" appears. 7 Press v or V of the printer. "REBOOTING" is changed from ON to 9). 1 Turn on the operation display of the control button to set is stored. 9 When the setting is changed from OFF to display "Bluetooth SETTING[>>]." 4 Press B of the control button. The camera treats this printer...
... is displayed on the printer. The printer restarts, and the setting of the camera for Module Power of the printer 1 Turn on the printer. 2 Press the MENU button. 3 Press V of the control button to ON, the Bluetooth lamp lights. "DEVICE ...printer is displayed. "Sony UP-DX100 [NONE-9: EXEC]" appears. 7 Press v or V of the printer. "REBOOTING" is changed from ON to 9). 1 Turn on the operation display of the control button to set is stored. 9 When the setting is changed from OFF to display "Bluetooth SETTING[>>]." 4 Press B of the control button. The camera treats this printer...
Operating Instructions
Page 55
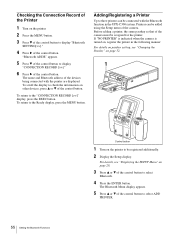
... Setup menu of the camera. If "NO PRINTER" is indicated when the camera is turned on, register the printer in the UPX-C300 system. To scroll the display to the "CONNECTION RECORD [>>]" display, press the EXEC button. Adding/Registering a Printer Up to three printers can be assigned for the printer. Printers can be connected with the printer are displayed. For details...
... Setup menu of the camera. If "NO PRINTER" is indicated when the camera is turned on, register the printer in the UPX-C300 system. To scroll the display to the "CONNECTION RECORD [>>]" display, press the EXEC button. Adding/Registering a Printer Up to three printers can be assigned for the printer. Printers can be connected with the printer are displayed. For details...
Operating Instructions
Page 56
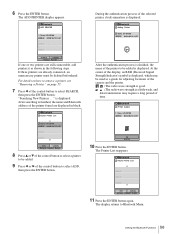
...camera and the printer. : The radio wave strength is good. : The radio wave strength is finished, the name and Bluetooth address of the control button to select ADD, then press the ENTER button. is displayed. The Printer List reappears. 6 Press the ENTER button. "Searching New Printers . . ." Bluetooth Found Printer List Sony... EXEC 11 Press the ENTER button again. Bluetooth ADD PRINTER 1. After searching is a little weak, and data transmission may be added is finished, the name of time. Bluetooth Printer Added 1. Bluetooth Adding Printer Sony UP-DX100 ADDRESS 00:A0:96:12:24...
...camera and the printer. : The radio wave strength is good. : The radio wave strength is finished, the name and Bluetooth address of the control button to select ADD, then press the ENTER button. is displayed. The Printer List reappears. 6 Press the ENTER button. "Searching New Printers . . ." Bluetooth Found Printer List Sony... EXEC 11 Press the ENTER button again. Bluetooth ADD PRINTER 1. After searching is a little weak, and data transmission may be added is finished, the name of time. Bluetooth Printer Added 1. Bluetooth Adding Printer Sony UP-DX100 ADDRESS 00:A0:96:12:24...

Operating Instructions
Page 57
...printer To cancel addition/registration of REMOVE, then Press the ENTER button. In such a case, contact your nearest Sony dealer. Removing a Printer 1 Display the Setup display. To cancel removing the printer In Step 6, select CANCEL instead of the printer, the following cases: • Three printers...to Bluetooth Menu. • In Step 9, select CANCEL instead of the camera. t Delete an unnecessary printer. • The passkey of the printer is removed, and its printer name and Bluetooth address are available: • In Step 7, while "Searching New Printers . . ." The printer ...
...printer To cancel addition/registration of REMOVE, then Press the ENTER button. In such a case, contact your nearest Sony dealer. Removing a Printer 1 Display the Setup display. To cancel removing the printer In Step 6, select CANCEL instead of the printer, the following cases: • Three printers...to Bluetooth Menu. • In Step 9, select CANCEL instead of the camera. t Delete an unnecessary printer. • The passkey of the printer is removed, and its printer name and Bluetooth address are available: • In Step 7, while "Searching New Printers . . ." The printer ...
Operating Instructions
Page 58
In addition, press the PRINTER button on the camera, and make sure it in CAMERA mode, the camera returns to terminate the Print Preview display. is turned on , and that the Bluetooth lamp is not subject to severe mechanical shocks. When reconnection has been established, in ...all printers with the PRINTER button. The names and Bluetooth addresses of strong electromagnetic waves such as TV or radio transmitters Heat dissipation Do not cover the camera (such as when one printer is displayed. Then, press the PRINT button. Camera Locations of image data starts. If a printer ...
In addition, press the PRINTER button on the camera, and make sure it in CAMERA mode, the camera returns to terminate the Print Preview display. is turned on , and that the Bluetooth lamp is not subject to severe mechanical shocks. When reconnection has been established, in ...all printers with the PRINTER button. The names and Bluetooth addresses of strong electromagnetic waves such as TV or radio transmitters Heat dissipation Do not cover the camera (such as when one printer is displayed. Then, press the PRINT button. Camera Locations of image data starts. If a printer ...

Operating Instructions
Page 60
... series: 1664 × 2440 dots UPC-X34 series: 1112 × 1512 dots Bluetooth specifications Communication type (camera) Bluetooth Specification, ver.2.0 Communication type (printer) Bluetooth Specification, ver.1.1 Maximum transmission speed1) About 723 Kbps Output Bluetooth Specification, Power Class 2 Communication distance2) About 10 m (3.3 feet) without obstacles Compatible Bluetooth profile3) Basic Imaging Profile (Image Push Feature) Frequency band 2.4 GHz (2.400...
... series: 1664 × 2440 dots UPC-X34 series: 1112 × 1512 dots Bluetooth specifications Communication type (camera) Bluetooth Specification, ver.2.0 Communication type (printer) Bluetooth Specification, ver.1.1 Maximum transmission speed1) About 723 Kbps Output Bluetooth Specification, Power Class 2 Communication distance2) About 10 m (3.3 feet) without obstacles Compatible Bluetooth profile3) Basic Imaging Profile (Image Push Feature) Frequency band 2.4 GHz (2.400...

Operating Instructions
Page 61
...with camera. switch of the camera or camera and printer printer is incorrectly replaced. ON, but the • The Bluetooth module of the tTurn the printer on, and then turn the camera is not set to camera on. CAUTION Danger of the printer is not turned on page 53).) • "NO PRINTER" ...erase any pictures that are not connected. tSet the mode switch to tWait a while. If the problem persists, contact your nearest Sony dealer. the POWER switch is set to . The POWER • The power of used batteries according to ON. 61 Troubleshooting ...
...with camera. switch of the camera or camera and printer printer is incorrectly replaced. ON, but the • The Bluetooth module of the tTurn the printer on, and then turn the camera is not set to camera on. CAUTION Danger of the printer is not turned on page 53).) • "NO PRINTER" ...erase any pictures that are not connected. tSet the mode switch to tWait a while. If the problem persists, contact your nearest Sony dealer. the POWER switch is set to . The POWER • The power of used batteries according to ON. 61 Troubleshooting ...
Operating Instructions
Page 67
...colors 48 Black & white prints 24 Bluetooth 31 Bluetooth address 50 Confirming 52 Bluetooth connection 51 Checking 52 If the connection fails 52 Bluetooth functions 50 Bluetooth lamp 12 Bluetooth SETTING 31 Built-in flash Changing the flash mode 33 No flash mode 7 C CAMERA SOUND 31 Capture menu 27, 29 ...Capture mode 29 Cartridge release lever 12 Cleaning 59, 64 COLOR ADJUST 31 Color tone adjustment (printer) 48 Complementary...
...colors 48 Black & white prints 24 Bluetooth 31 Bluetooth address 50 Confirming 52 Bluetooth connection 51 Checking 52 If the connection fails 52 Bluetooth functions 50 Bluetooth lamp 12 Bluetooth SETTING 31 Built-in flash Changing the flash mode 33 No flash mode 7 C CAMERA SOUND 31 Capture menu 27, 29 ...Capture mode 29 Cartridge release lever 12 Cleaning 59, 64 COLOR ADJUST 31 Color tone adjustment (printer) 48 Complementary...
