
Operating Instructions
Page 2
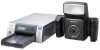
... Serial No WARNING To reduce the risk of conformity Trade Name: SONY Model: UP-DX100 Responsible Party: Sony Electronics Inc. Refer servicing to Part 15 of FCC Rules. This equipment has been tested and found to..., do not expose this equipment. All interface cables used in Canada This Class B digital apparatus complies with part 15 of the device. However, there is subject to the following measures: - Increase the separation between the... Printer and the DKC-C300X Digital Still Camera For the customers in the U.S.A. For the UP-DX100 Printer, DKC-C300X Digital Still...
... Serial No WARNING To reduce the risk of conformity Trade Name: SONY Model: UP-DX100 Responsible Party: Sony Electronics Inc. Refer servicing to Part 15 of FCC Rules. This equipment has been tested and found to..., do not expose this equipment. All interface cables used in Canada This Class B digital apparatus complies with part 15 of the device. However, there is subject to the following measures: - Increase the separation between the... Printer and the DKC-C300X Digital Still Camera For the customers in the U.S.A. For the UP-DX100 Printer, DKC-C300X Digital Still...
Operating Instructions
Page 3
...unit, incorporate a readily accessible disconnect device in the U.S.A. and Canada This equipment complies with Part 15 of the IC radio frequency (RF) Exposure rules. Operation is Sony Deutschland GmbH, Hedelfinger Strasse 61, 70327 Stuttgart, Germany. If a fault should occur during operation... some demonstrations, performances, or exhibits, photography may be forbidden. 3 For the DKC-C300X Digital Still Camera For the customers in separate service or guarantee documents. Use the Power Cord (2-core mains lead)/Appliance Connector/Plug conforming to switch the power supply off...
...unit, incorporate a readily accessible disconnect device in the U.S.A. and Canada This equipment complies with Part 15 of the IC radio frequency (RF) Exposure rules. Operation is Sony Deutschland GmbH, Hedelfinger Strasse 61, 70327 Stuttgart, Germany. If a fault should occur during operation... some demonstrations, performances, or exhibits, photography may be forbidden. 3 For the DKC-C300X Digital Still Camera For the customers in separate service or guarantee documents. Use the Power Cord (2-core mains lead)/Appliance Connector/Plug conforming to switch the power supply off...
Operating Instructions
Page 4
...Flash Modes and Example Shooting Conditions 7 Flash Mode Setting Parameters 8 Names and Functions of Parts 9 Camera 9 Printer 12 Supplied Accessories 14 Confirming the Contents 14 Preparations 14 Preparing the Camera 14 Preparing the Printer 16 Turning On the Power 19 Operations (Shooting and Printing 20 ...Basic Imaging Profile 50 Bluetooth Address 50 Passkey Authentication 51 Bluetooth Connection 51 Checking the Bluetooth Connection Statuses of the Camera (PROPERTY 52 Confirming the Bluetooth Address of the Printer 52 Changing the Passkey 52 Setting the Module Power 53 ...
...Flash Modes and Example Shooting Conditions 7 Flash Mode Setting Parameters 8 Names and Functions of Parts 9 Camera 9 Printer 12 Supplied Accessories 14 Confirming the Contents 14 Preparations 14 Preparing the Camera 14 Preparing the Printer 16 Turning On the Power 19 Operations (Shooting and Printing 20 ...Basic Imaging Profile 50 Bluetooth Address 50 Passkey Authentication 51 Bluetooth Connection 51 Checking the Bluetooth Connection Statuses of the Camera (PROPERTY 52 Confirming the Bluetooth Address of the Printer 52 Changing the Passkey 52 Setting the Module Power 53 ...

Operating Instructions
Page 9
D Lens filter thread Used to the tripod. The captured image is compressed and saved in memory. B Tripod screw hole (16) Used to attach the camera to attach a commercially available lens filter (ø 52 mm). C Lens (f=12.5 to 25.0 mm (1/2 to 1"), F-4.7 (W) to the FLASH MODE... releases the shutter. Pressing the button halfway activates the autofocus function, and pressing it to the camera's built-in JPEG format. 9 Names and Functions of Parts For details, see the pages in parentheses. Camera 1 5 432 Front A Flash (7, 8) Fires according to F-5.5 (T)) Autofocus lens with 2x ...
D Lens filter thread Used to the tripod. The captured image is compressed and saved in memory. B Tripod screw hole (16) Used to attach the camera to attach a commercially available lens filter (ø 52 mm). C Lens (f=12.5 to 25.0 mm (1/2 to 1"), F-4.7 (W) to the FLASH MODE... releases the shutter. Pressing the button halfway activates the autofocus function, and pressing it to the camera's built-in JPEG format. 9 Names and Functions of Parts For details, see the pages in parentheses. Camera 1 5 432 Front A Flash (7, 8) Fires according to F-5.5 (T)) Autofocus lens with 2x ...

Operating Instructions
Page 10
...the flash is being stored. Contact your nearest Sony dealer or Sony Service Center. E Standby lamp Indicates the camera's status. When the mode switch is Lamp status Camera status Lights (orange) Normal operation Flashing (orange) The camera is starting up or Bluetooth authentication is little ...Sony Service Center. Color/Black & white While the print preview screen is in color or black & white. Lights (red) This indicates camera malfunction. Rear 1 2 3 qf qd 4 qh qg qs qa 098 76 5 A LCD screen Use it to the camera ON or OFF. 10 Names and Functions of Parts...
...the flash is being stored. Contact your nearest Sony dealer or Sony Service Center. E Standby lamp Indicates the camera's status. When the mode switch is Lamp status Camera status Lights (orange) Normal operation Flashing (orange) The camera is starting up or Bluetooth authentication is little ...Sony Service Center. Color/Black & white While the print preview screen is in color or black & white. Lights (red) This indicates camera malfunction. Rear 1 2 3 qf qd 4 qh qg qs qa 098 76 5 A LCD screen Use it to the camera ON or OFF. 10 Names and Functions of Parts...

Operating Instructions
Page 11
...two modes. : Shooting mode : Playback mode M Battery compartment lid (15) Insert four commercially available Sony AA NiMH (nickel-metal hydride) rechargeable batteries (type NHAA, max. 2700 mAh). Press the button ... Telephoto zoom. L Mode switch You can adjust the size of the face while maintaining a fixed camera position. O DC IN Connects to display menus. When the mode switch is displayed, pressing this button... the synchronization cord, the flash lights synchronizing with the shutter. 11 Names and Functions of Parts In most forms of ID, the size of the face in on the LCD. By using...
...two modes. : Shooting mode : Playback mode M Battery compartment lid (15) Insert four commercially available Sony AA NiMH (nickel-metal hydride) rechargeable batteries (type NHAA, max. 2700 mAh). Press the button ... Telephoto zoom. L Mode switch You can adjust the size of the face while maintaining a fixed camera position. O DC IN Connects to display menus. When the mode switch is displayed, pressing this button... the synchronization cord, the flash lights synchronizing with the shutter. 11 Names and Functions of Parts In most forms of ID, the size of the face in on the LCD. By using...

Operating Instructions
Page 12
... enabled. lamp: Lights when the paper or print cartridge runs out or the paper and print cartridge differ in progress. 12 Names and Functions of Parts F Control button (24, 50) When navigating menus, use this to open the cover. J Cartridge release lever (17) Raise this button, the lamp lights and power...
... enabled. lamp: Lights when the paper or print cartridge runs out or the paper and print cartridge differ in progress. 12 Names and Functions of Parts F Control button (24, 50) When navigating menus, use this to open the cover. J Cartridge release lever (17) Raise this button, the lamp lights and power...
Operating Instructions
Page 13
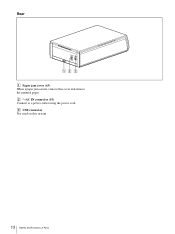
C USB connector Not used on this cover and remove the jammed paper. B -AC IN connector (19) Connect to a power outlet using the power cord. AC IN 12 3 A Paper jam cover (63) When a paper jam occurs, remove this system 13 Names and Functions of Parts Rear -
C USB connector Not used on this cover and remove the jammed paper. B -AC IN connector (19) Connect to a power outlet using the power cord. AC IN 12 3 A Paper jam cover (63) When a paper jam occurs, remove this system 13 Names and Functions of Parts Rear -

Operating Instructions
Page 23
Sony UP-DX100 1 Printer name JPN Passport 3 35 45mm 8 Number of prints ID Photo... Press the ENTER button. For details, see "Adjusting the Picture Quality" on page 37. Picture data are stored, the camera automatically selects the appropriate adjusted value for Display During Printing" on page 44. 23 Operations (Shooting and Printing) When data...ID photo frame. You can press the control buttons (vVbB) to move the camera and printer until the desired ID photo frame appears. Do not move the displayed part of the image. 4) Press the ENTER button to return to the printer, and...
Sony UP-DX100 1 Printer name JPN Passport 3 35 45mm 8 Number of prints ID Photo... Press the ENTER button. For details, see "Adjusting the Picture Quality" on page 37. Picture data are stored, the camera automatically selects the appropriate adjusted value for Display During Printing" on page 44. 23 Operations (Shooting and Printing) When data...ID photo frame. You can press the control buttons (vVbB) to move the camera and printer until the desired ID photo frame appears. Do not move the displayed part of the image. 4) Press the ENTER button to return to the printer, and...

Operating Instructions
Page 44
...Specify each adjustment item. LIGHT: Pressing B increases the brightness in the previous step. The guide picture is used for the guide picture. The camera enters the picture quality adjustment mode for color prints. 44 Adjusting the Print Quality YEL-BLU: Pressing b gives the picture more yellow, while...the darkness in the CYNRED, MAG-GRN, and YEL-BLU displays, see "Guide Print Function" on the meanings of the values in the dark parts. The Guide Print screen appears. 6 Press the v or V control button to check the adjustment results. If necessary, repeat starting from step...
...Specify each adjustment item. LIGHT: Pressing B increases the brightness in the previous step. The guide picture is used for the guide picture. The camera enters the picture quality adjustment mode for color prints. 44 Adjusting the Print Quality YEL-BLU: Pressing b gives the picture more yellow, while...the darkness in the CYNRED, MAG-GRN, and YEL-BLU displays, see "Guide Print Function" on the meanings of the values in the dark parts. The Guide Print screen appears. 6 Press the v or V control button to check the adjustment results. If necessary, repeat starting from step...

Operating Instructions
Page 46
The default is 0. SHARPNESS can adjust the light parts. The downside, however, is set using the DARK and LIGHT items in pictures. The default is 0. This gives an overexposed quality to +2 or +3. 46 Adjusting ..., and as a parameter to improve pictures, but increasing the sharpness too much will not produce a natural picture. It is recommended. Contrast can adjust the dark parts. Pressing B on the control button of the printer changes the value in the plus direction diminishes the amount of the RGB data darker, and gives...
The default is 0. SHARPNESS can adjust the light parts. The downside, however, is set using the DARK and LIGHT items in pictures. The default is 0. This gives an overexposed quality to +2 or +3. 46 Adjusting ..., and as a parameter to improve pictures, but increasing the sharpness too much will not produce a natural picture. It is recommended. Contrast can adjust the dark parts. Pressing B on the control button of the printer changes the value in the plus direction diminishes the amount of the RGB data darker, and gives...

Operating Instructions
Page 47
... white and do not change. The following is an example of differing color are for example, you want to use the color tone on the camera, you want to adjust (RED, GREEN, BLUE) = (0, 0, +3) further, set the B parameter to +3, and then print another Guide Print-RGB. The subject ...in the current picture, and slightly green. The subject appears a little lighter than in the current picture, and slightly blue. The white saturated parts remain white and do not change . Shooting conditions of the pictures are printed around this picture. This will give you a simulation for each...
... white and do not change. The following is an example of differing color are for example, you want to use the color tone on the camera, you want to adjust (RED, GREEN, BLUE) = (0, 0, +3) further, set the B parameter to +3, and then print another Guide Print-RGB. The subject ...in the current picture, and slightly green. The subject appears a little lighter than in the current picture, and slightly blue. The white saturated parts remain white and do not change . Shooting conditions of the pictures are printed around this picture. This will give you a simulation for each...

Operating Instructions
Page 48
... is a picture showing the GAMMA parameter decreased by overlaying the three colors cyan, magenta, and yellow to express gray. The light parts become slightly darker than in the current picture. The current state of the pictures are printed by 3 from the current state. Shooting... conditions of these three colors. The guide print can be used to adjust the balance of the camera This is changed , and the YEL-BLU (yellow and blue) indication appear on the camera, you want to adjust (DARK, LIGHT, GAMMA) = (+3, 0, 0) further, set the D parameter to +3 because (DARK, ...
... is a picture showing the GAMMA parameter decreased by overlaying the three colors cyan, magenta, and yellow to express gray. The light parts become slightly darker than in the current picture. The current state of the pictures are printed by 3 from the current state. Shooting... conditions of these three colors. The guide print can be used to adjust the balance of the camera This is changed , and the YEL-BLU (yellow and blue) indication appear on the camera, you want to adjust (DARK, LIGHT, GAMMA) = (+3, 0, 0) further, set the D parameter to +3 because (DARK, ...

Operating Instructions
Page 49
...not change no light components (such as pure green, cyan, and blue parts, their intermediate colors, and deep black parts), and parts of the picture with saturated light components (such as shown below. This setting differs from the camera and prints one picture. value in the + direction When the R parameter...much the light is wearing white clothes. Printing Times Print times differ depending on the camera to the moment the printer receives the picture data from the + setting in that a tinge of yellow to parts in the - Specific example 2: Adding yellow To add yellow to the subject, ...
...not change no light components (such as pure green, cyan, and blue parts, their intermediate colors, and deep black parts), and parts of the picture with saturated light components (such as shown below. This setting differs from the camera and prints one picture. value in the + direction When the R parameter...much the light is wearing white clothes. Printing Times Print times differ depending on the camera to the moment the printer receives the picture data from the + setting in that a tinge of yellow to parts in the - Specific example 2: Adding yellow To add yellow to the subject, ...

Operating Instructions
Page 62
... The picture is too dark. • Something (such as a finger) was too slow because FLASH MODE is set to Shooting mode. tContact your nearest Sony dealer. Black spots may appear or red, blue, green, or other color spots may appear on the LCD. Cause/Solution • The... (See "Adjusting the White Balance" on page 34) Part of focus. tSet FLASH MODE in the tWait until printing finishes and center of the flash is within flash range when taking the picture. images may remain on the LCD. tHold the camera correctly and make sure nothing is set appropriately. tUse...
... The picture is too dark. • Something (such as a finger) was too slow because FLASH MODE is set to Shooting mode. tContact your nearest Sony dealer. Black spots may appear or red, blue, green, or other color spots may appear on the LCD. Cause/Solution • The... (See "Adjusting the White Balance" on page 34) Part of focus. tSet FLASH MODE in the tWait until printing finishes and center of the flash is within flash range when taking the picture. images may remain on the LCD. tHold the camera correctly and make sure nothing is set appropriately. tUse...


