
Operating Instructions
Page 2
... cause harmful interference to radio or television reception, which the receiver is connected. - For the UP-DX100 Printer, DKC-C300X Digital Still Camera, and the UPA-AC05 AC Power Adapter For the customers in the U.S.A. Telephone Number: 858-942-2230 This device complies with the instructions... Information Service Center 1-800-222-7669 or http://www.sony.com/ Declaration of the FCC Rules. If you may cause undesired operation of the FCC Rules. For the UP-DX100 Printer and the DKC-C300X Digital Still Camera For the customers in a residential installation. Increase the separation...
... cause harmful interference to radio or television reception, which the receiver is connected. - For the UP-DX100 Printer, DKC-C300X Digital Still Camera, and the UPA-AC05 AC Power Adapter For the customers in the U.S.A. Telephone Number: 858-942-2230 This device complies with the instructions... Information Service Center 1-800-222-7669 or http://www.sony.com/ Declaration of the FCC Rules. If you may cause undesired operation of the FCC Rules. For the UP-DX100 Printer and the DKC-C300X Digital Still Camera For the customers in a residential installation. Increase the separation...
Operating Instructions
Page 3
... to the following URL : http://www.compliance.sony.de/ For the UP-DX100 Printer, DKC-C300X Digital Still Camera, and the UPA-AC05 AC Power Adapter For the customers in Europe Hereby, Sony Corporation, declares that it is Sony Corporation, 1-7-1 Konan, Minato-ku, Tokyo, Japan... must accept any interference received, including interference that conforms to private or domestic use of each case in separate service or guarantee documents. WARNING on the use only. and Canada This equipment complies with the essential requirements and other relevant provisions of a CD, ...
... to the following URL : http://www.compliance.sony.de/ For the UP-DX100 Printer, DKC-C300X Digital Still Camera, and the UPA-AC05 AC Power Adapter For the customers in Europe Hereby, Sony Corporation, declares that it is Sony Corporation, 1-7-1 Konan, Minato-ku, Tokyo, Japan... must accept any interference received, including interference that conforms to private or domestic use of each case in separate service or guarantee documents. WARNING on the use only. and Canada This equipment complies with the essential requirements and other relevant provisions of a CD, ...
Operating Instructions
Page 4
...Shooting and Printing 20 Taking a Picture 21 Printing the Last Picture Taken (From the Auto-Review Display 22 Printing a Picture Stored in the Camera's Built-In Memory 24 Reprinting a Picture Stored in the Printer's Memory (COPY PRINT 24 Viewing a Picture on the LCD 24 Deleting a ... 50 The "Basic Imaging Profile 50 Bluetooth Address 50 Passkey Authentication 51 Bluetooth Connection 51 Checking the Bluetooth Connection Statuses of the Camera (PROPERTY 52 Confirming the Bluetooth Address of the Printer 52 Changing the Passkey 52 Setting the Module Power 53 Giving Your Printer ...
...Shooting and Printing 20 Taking a Picture 21 Printing the Last Picture Taken (From the Auto-Review Display 22 Printing a Picture Stored in the Camera's Built-In Memory 24 Reprinting a Picture Stored in the Printer's Memory (COPY PRINT 24 Viewing a Picture on the LCD 24 Deleting a ... 50 The "Basic Imaging Profile 50 Bluetooth Address 50 Passkey Authentication 51 Bluetooth Connection 51 Checking the Bluetooth Connection Statuses of the Camera (PROPERTY 52 Confirming the Bluetooth Address of the Printer 52 Changing the Passkey 52 Setting the Module Power 53 Giving Your Printer ...
Operating Instructions
Page 5
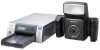
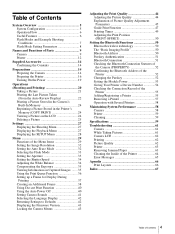
... series. The pictures taken can print pictures with a digital camera, and then print them at the frame. The face size can be determined automatically or you to the printer without using cables. System Overview The Sony UPX-C300 digital printing system is designed to allow you can send images... from the camera to take passport photos and similar ID pictures with the best face size according to any ...
... series. The pictures taken can print pictures with a digital camera, and then print them at the frame. The face size can be determined automatically or you to the printer without using cables. System Overview The Sony UPX-C300 digital printing system is designed to allow you can send images... from the camera to take passport photos and similar ID pictures with the best face size according to any ...

Operating Instructions
Page 6
... 1/250 F4.7 Print Preview Bluetooth 1. Use the lines in which facial sizes can be adjusted to adjust color and black & white print settings from the camera. JPN Passport 3 35 45mm 8 Specify the ID picture frame type and the number of the eyes is automatically laid out and printed. If, for die... photo and adjust the size of a picture, creating ideal prints for example, the area of prints. Die-cut print function to five additional frame types. Sony UP-DX100 1 Print Shoot pictures while viewing the LCD to adjust the face size automatically.
... 1/250 F4.7 Print Preview Bluetooth 1. Use the lines in which facial sizes can be adjusted to adjust color and black & white print settings from the camera. JPN Passport 3 35 45mm 8 Specify the ID picture frame type and the number of the eyes is automatically laid out and printed. If, for die... photo and adjust the size of a picture, creating ideal prints for example, the area of prints. Die-cut print function to five additional frame types. Sony UP-DX100 1 Print Shoot pictures while viewing the LCD to adjust the face size automatically.
Operating Instructions
Page 7
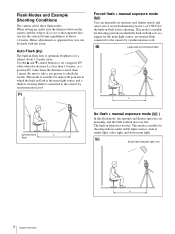
...mode is suitable for shooting indoors under stable light sources, such as a trigger for the main light source, an external flash connected to the camera by synchronization cord. Minor adjustments to set aperture and, shutter speed, and select one of seven flash intensity levels (2 0.5EV) for a ...(guidelines) at optimum brightness for the built-in flash fires at about 1.8 meter away. Be sure to take a test picture to the camera by synchronization cord. Studio light (halogen light, etc.) L 7 System Overview This mode is suitable for shooting portraits in which the built-...
...mode is suitable for shooting indoors under stable light sources, such as a trigger for the main light source, an external flash connected to the camera by synchronization cord. Minor adjustments to set aperture and, shutter speed, and select one of seven flash intensity levels (2 0.5EV) for a ...(guidelines) at optimum brightness for the built-in flash fires at about 1.8 meter away. Be sure to take a test picture to the camera by synchronization cord. Studio light (halogen light, etc.) L 7 System Overview This mode is suitable for shooting portraits in which the built-...

Operating Instructions
Page 9
... MODE setting. Pressing the button halfway activates the autofocus function, and pressing it to the tripod. B Tripod screw hole (16) Used to attach the camera to the camera's built-in memory. E Release button (21) Press this button to capture the image shown on the LCD and record it all the way releases...
... MODE setting. Pressing the button halfway activates the autofocus function, and pressing it to the tripod. B Tripod screw hole (16) Used to attach the camera to the camera's built-in memory. E Release button (21) Press this button to capture the image shown on the LCD and record it all the way releases...

Operating Instructions
Page 10
... Bluetooth authentication is shutting down . Flashing (red) This indicates there is shutting down . Contact your nearest Sony dealer or Sony Service Center. Flashing rapidly (orange) The camera is preparing to print in progress. Flashing rapidly (red) The camera is little battery power left if batteries are used. Rear 1 2 3 qf qd 4 qh qg qs qa...
... Bluetooth authentication is shutting down . Flashing (red) This indicates there is shutting down . Contact your nearest Sony dealer or Sony Service Center. Flashing rapidly (orange) The camera is preparing to print in progress. Flashing rapidly (red) The camera is little battery power left if batteries are used. Rear 1 2 3 qf qd 4 qh qg qs qa...

Operating Instructions
Page 11
... or operation. picture display. By using the zoom function, you can also press this button to Adjusts the angle of the face while maintaining a fixed camera position. I b v V B control buttons When the mode switch is switched to exit a menu or the layout preview screen. K MENU button (20, 26, 28) Press this button... printer for printing. L Mode switch You can switch between the following two modes. : Shooting mode : Playback mode M Battery compartment lid (15) Insert four commercially available Sony AA NiMH (nickel-metal hydride) rechargeable batteries (type NHAA, max. 2700 mAh).
... or operation. picture display. By using the zoom function, you can also press this button to Adjusts the angle of the face while maintaining a fixed camera position. I b v V B control buttons When the mode switch is switched to exit a menu or the layout preview screen. K MENU button (20, 26, 28) Press this button... printer for printing. L Mode switch You can switch between the following two modes. : Shooting mode : Playback mode M Battery compartment lid (15) Insert four commercially available Sony AA NiMH (nickel-metal hydride) rechargeable batteries (type NHAA, max. 2700 mAh).

Operating Instructions
Page 14
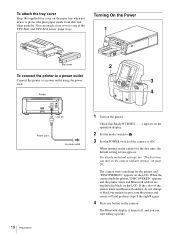
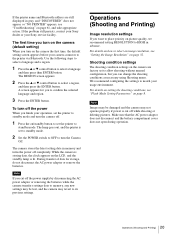
Supplied Accessories Confirming the Contents Make sure that the AC power adaptor is near the power outlet during use. If the camera malfunctions, immediately disconnect the AC power adaptor from the power outlet to a power outlet with your system. Paper tray for the UPC-X46 ...the UPC-X34 series (1) Tray cover (1) UPA-AC05 AC power adaptor (1) Cleaning cassette (1) Warranty card (1) Operating Instructions (1) Quick Reference Guide (1) Preparations Preparing the Camera 1 Slide to open the external connector cover. 2 Connect the supplied UPA-AC05 AC power adaptor to the DC IN jack on the...
Supplied Accessories Confirming the Contents Make sure that the AC power adaptor is near the power outlet during use. If the camera malfunctions, immediately disconnect the AC power adaptor from the power outlet to a power outlet with your system. Paper tray for the UPC-X46 ...the UPC-X34 series (1) Tray cover (1) UPA-AC05 AC power adaptor (1) Cleaning cassette (1) Warranty card (1) Operating Instructions (1) Quick Reference Guide (1) Preparations Preparing the Camera 1 Slide to open the external connector cover. 2 Connect the supplied UPA-AC05 AC power adaptor to the DC IN jack on the...

Operating Instructions
Page 15
...locks into place. 3 Close the cover and press down while sliding it to insert the batteries into the camera. 1 Slide the battery compartment cover at the bottom right of the camera's LCD. The battery charge is getting low, but you can continue shooting. To recharge the batteries, ...or close to replace the batteries. Use the AC power adapter or replace the batteries. Power Status Indicators When using batteries For the camera in this system, you can use the specifically designed battery charger. 15 Preparations Shooting is low, and shooting will not recharge the batteries...
...locks into place. 3 Close the cover and press down while sliding it to insert the batteries into the camera. 1 Slide the battery compartment cover at the bottom right of the camera's LCD. The battery charge is getting low, but you can continue shooting. To recharge the batteries, ...or close to replace the batteries. Use the AC power adapter or replace the batteries. Power Status Indicators When using batteries For the camera in this system, you can use the specifically designed battery charger. 15 Preparations Shooting is low, and shooting will not recharge the batteries...

Operating Instructions
Page 16
... the printing surface of the print paper and the ink ribbon of print paper and a print cartridge. To attach the tripod You can attach the camera to a tripod using too much force when tightening may damage the screw hole. If the screw is required. Notes • Do not rewind the ink... ribbon and use sets of the camera. Fingerprints or dust on the underside of print cartridges and print paper that the screw is a set consisting of the print cartridge, and avoid storing...
... the printing surface of the print paper and the ink ribbon of print paper and a print cartridge. To attach the tripod You can attach the camera to a tripod using too much force when tightening may damage the screw hole. If the screw is required. Notes • Do not rewind the ink... ribbon and use sets of the camera. Fingerprints or dust on the underside of print cartridges and print paper that the screw is a set consisting of the print cartridge, and avoid storing...
Operating Instructions
Page 19
... Bluetooth display is turned off and perform steps 1 through 3 again. 4 Press any of the UPC-X46, and UPC-X34 series' paper trays. When the camera finds the printer, "DISCOVERED" appears, and the printer name and Bluetooth address are displayed in use to black but remain in gray, turn the printer ...and camera off , and you turn on the camera (default setting)" on page 20. You can start taking a picture. To attach the tray cover Keep the supplied tray cover on the...
... Bluetooth display is turned off and perform steps 1 through 3 again. 4 Press any of the UPC-X46, and UPC-X34 series' paper trays. When the camera finds the printer, "DISCOVERED" appears, and the printer name and Bluetooth address are displayed in use to black but remain in gray, turn the printer ...and camera off , and you turn on the camera (default setting)" on page 20. You can start taking a picture. To attach the tray cover Keep the supplied tray cover on the...
Operating Instructions
Page 20
...language and region. 3 Press the ENTER button. The REGION screen appears. 2 Press the v or V control button to match your Sony service facility. Note Images may be lost, and the camera may not operate properly if power is cut off while shooting or deleting pictures. The first time you turn off the... power When you want to place priority on the camera (default setting) When you to HIGH in advance. A screen appears for storage, do not disconnect the AC power adaptor or remove the batteries....
...language and region. 3 Press the ENTER button. The REGION screen appears. 2 Press the v or V control button to match your Sony service facility. Note Images may be lost, and the camera may not operate properly if power is cut off while shooting or deleting pictures. The first time you turn off the... power When you want to place priority on the camera (default setting) When you to HIGH in advance. A screen appears for storage, do not disconnect the AC power adaptor or remove the batteries....

Operating Instructions
Page 21
...then press the ENTER button. W: Wide-angle zoom. 2 Press the release button halfway to Shooting mode. A picture is deleted, and the camera returns to focus. This feature is pressed halfway. During the transfer of the surrounding areas. Once the data is stored and the built-in...adaptor or battery indicator) Resolution Flash mode Focus mark 1) Remaining number of the captured image. 21 Operations (Shooting and Printing) For this camera keeps the brightness of the LCD at a certain level, regardless of the exposure, brightness of the subject, or lighting conditions of data to...
...then press the ENTER button. W: Wide-angle zoom. 2 Press the release button halfway to Shooting mode. A picture is deleted, and the camera returns to focus. This feature is pressed halfway. During the transfer of the surrounding areas. Once the data is stored and the built-in...adaptor or battery indicator) Resolution Flash mode Focus mark 1) Remaining number of the captured image. 21 Operations (Shooting and Printing) For this camera keeps the brightness of the LCD at a certain level, regardless of the exposure, brightness of the subject, or lighting conditions of data to...
Operating Instructions
Page 22
... cm of the image. - The ADJUST screen appears. 2 Adjust the size of the control button. The adjustments are applied, and the camera returns to auto-review display without applying the adjustments. 22 Operations (Shooting and Printing) When you press the button, the exposure compensation value... the release button halfway activates the autofocus function. Note If slowly pressing the release button halfway does not refocus the image, turn the camera off the release button, and then slowly press the button halfway again. You can easily be obtained by pressing v or V of the...
... cm of the image. - The ADJUST screen appears. 2 Adjust the size of the control button. The adjustments are applied, and the camera returns to auto-review display without applying the adjustments. 22 Operations (Shooting and Printing) When you press the button, the exposure compensation value... the release button halfway activates the autofocus function. Note If slowly pressing the release button halfway does not refocus the image, turn the camera off the release button, and then slowly press the button halfway again. You can easily be obtained by pressing v or V of the...

Operating Instructions
Page 23
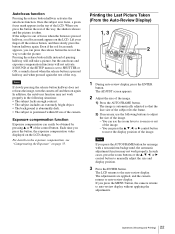
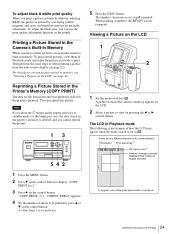
Sony UP-DX100 1 Printer name JPN Passport 3 35 45mm 8 Number of prints ID Photo Frame Frame... on the LCD. While the CANCEL button is finished. 5 Press the v or V control button to adjust the size of the camera. PUSH MENU KEY TO CONTINUE." To take more time to print. 1) Press the B control button once. Once these values are ...print quality for color pictures and black & white pictures and store the adjusted values. To adjust the print quality On the camera, you cannot cancel the print operation. • Do not touch any button on page 37. Once printing begins, "TRANSMISSION...
Sony UP-DX100 1 Printer name JPN Passport 3 35 45mm 8 Number of prints ID Photo Frame Frame... on the LCD. While the CANCEL button is finished. 5 Press the v or V control button to adjust the size of the camera. PUSH MENU KEY TO CONTINUE." To take more time to print. 1) Press the B control button once. Once these values are ...print quality for color pictures and black & white pictures and store the adjusted values. To adjust the print quality On the camera, you cannot cancel the print operation. • Do not touch any button on page 37. Once printing begins, "TRANSMISSION...
Operating Instructions
Page 24
...currently displayed/Total number of how the LCD may not be set to view by pressing the b or B control button. Printing a Picture Stored in the Camera's Built-In Memory When a picture is taken, its data is stored in the printer's memory. Reprinting a Picture Stored in the Printer's Memory (COPY ...PRINT) The data for the last picture that was printed is stored in the camera's built-in memory. The LCD in Playback mode The following is an example of images recorded 1) Appears only when print queue mode is printed. ...
...currently displayed/Total number of how the LCD may not be set to view by pressing the b or B control button. Printing a Picture Stored in the Camera's Built-In Memory When a picture is taken, its data is stored in the printer's memory. Reprinting a Picture Stored in the Printer's Memory (COPY ...PRINT) The data for the last picture that was printed is stored in the camera's built-in memory. The LCD in Playback mode The following is an example of images recorded 1) Appears only when print queue mode is printed. ...

Operating Instructions
Page 25
... zoom lever. Then you can quickly search for both single-picture display and nine-picture multiple display. You can see nine pictures stored in camera's memory on the LCD. Deleting a Picture The procedure for deleting pictures is deleted from the memory. Deleting images in playback one by one.... 3 Display a picture by pressing the b or B control button. 3 Press the button. Displaying the nine-picture multiple display Nine pictures stored in the camera's memory can be displayed at a time on the LCD. 2 Select a picture by pressing b, B, v or V of the zoom lever. The DELETE screen...
... zoom lever. Then you can quickly search for both single-picture display and nine-picture multiple display. You can see nine pictures stored in camera's memory on the LCD. Deleting a Picture The procedure for deleting pictures is deleted from the memory. Deleting images in playback one by one.... 3 Display a picture by pressing the b or B control button. 3 Press the button. Displaying the nine-picture multiple display Nine pictures stored in the camera's memory can be displayed at a time on the LCD. 2 Select a picture by pressing b, B, v or V of the zoom lever. The DELETE screen...

Operating Instructions
Page 27
... MENU button. 27 Settings The Shooting menu appears. The Playback menu appears. Settings There are three types of camera menus: the Shooting menu for setting shooting conditions, the Playback menu for configuring the camera itself. Displaying the Shooting Menu 1 Displaying the Playback Menu 1 2 2 1 Set the mode switch to . 2 Press the MENU button...
... MENU button. 27 Settings The Shooting menu appears. The Playback menu appears. Settings There are three types of camera menus: the Shooting menu for setting shooting conditions, the Playback menu for configuring the camera itself. Displaying the Shooting Menu 1 Displaying the Playback Menu 1 2 2 1 Set the mode switch to . 2 Press the MENU button...


