Operating Instructions
Page 3
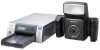
... : http://www.compliance.sony.de/ For the UP-DX100 Printer, DKC-C300X Digital Still Camera, and the UPA-AC05 AC Power Adapter For the customers in separate service or guarantee documents. For any service or guarantee matters please refer to switch the power supply off, or disconnect the... power plug. Any unauthorized use of this manual. For the DKC-C300X Digital Still Camera For the customers in the U.S.A. If a...
... : http://www.compliance.sony.de/ For the UP-DX100 Printer, DKC-C300X Digital Still Camera, and the UPA-AC05 AC Power Adapter For the customers in separate service or guarantee documents. For any service or guarantee matters please refer to switch the power supply off, or disconnect the... power plug. Any unauthorized use of this manual. For the DKC-C300X Digital Still Camera For the customers in the U.S.A. If a...
Operating Instructions
Page 4
... 5 Operation Flow 6 Useful Features 6 Flash Modes and Example Shooting Conditions 7 Flash Mode Setting Parameters 8 Names and Functions of Parts 9 Camera 9 Printer 12 Supplied Accessories 14 Confirming the Contents 14 Preparations 14 Preparing the Camera 14 Preparing the Printer 16 Turning On the Power 19 Operations (Shooting and Printing 20 Taking a Picture 21 Printing...
... 5 Operation Flow 6 Useful Features 6 Flash Modes and Example Shooting Conditions 7 Flash Mode Setting Parameters 8 Names and Functions of Parts 9 Camera 9 Printer 12 Supplied Accessories 14 Confirming the Contents 14 Preparations 14 Preparing the Camera 14 Preparing the Printer 16 Turning On the Power 19 Operations (Shooting and Printing 20 Taking a Picture 21 Printing...

Operating Instructions
Page 11
...When the mode switch is set to Use b or B to select a playback image to the supplied AC power adaptor. O DC IN Connects to display on the LCD. T: Telephoto zoom. W: Wide...following two modes. : Shooting mode : Playback mode M Battery compartment lid (15) Insert four commercially available Sony AA NiMH (nickel-metal hydride) rechargeable batteries (type NHAA, max. 2700 mAh). W ( ): Zoom ... synchronizing with the shutter. 11 Names and Functions of the face while maintaining a fixed camera position. N External connector cover Open it when connecting to the previous screen display. When...
...When the mode switch is set to Use b or B to select a playback image to the supplied AC power adaptor. O DC IN Connects to display on the LCD. T: Telephoto zoom. W: Wide...following two modes. : Shooting mode : Playback mode M Battery compartment lid (15) Insert four commercially available Sony AA NiMH (nickel-metal hydride) rechargeable batteries (type NHAA, max. 2700 mAh). W ( ): Zoom ... synchronizing with the shutter. 11 Names and Functions of the face while maintaining a fixed camera position. N External connector cover Open it when connecting to the previous screen display. When...

Operating Instructions
Page 12
... as operation status and menu items display here. J Cartridge release lever (17) Raise this to the printer. Note This lever is disabled while printing is supplied to select and set menu items. G Lamps lamp: Lights when the Bluetooth function is on, information such as a paper jam occurs. C Operation display When the...
... as operation status and menu items display here. J Cartridge release lever (17) Raise this to the printer. Note This lever is disabled while printing is supplied to select and set menu items. G Lamps lamp: Lights when the Bluetooth function is on, information such as a paper jam occurs. C Operation display When the...

Operating Instructions
Page 14
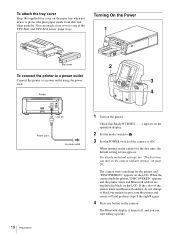
... adaptor from the power outlet to a power outlet with your system. Camera to power outlet UPA-AC05 AC power adaptor (supplied) AC power cord Note Make sure that the following accessories are supplied with the power cord. Paper tray for the UPC-X46 series (1) ...Quick Reference Guide (1) Preparations Preparing the Camera 1 Slide to open the external connector cover. 2 Connect the supplied UPA-AC05 AC power adaptor to the DC IN jack on the camera, and connect the AC adaptor to cut off power supply. 14 Supplied Accessories Supplied Accessories Confirming the Contents Make sure ...
... adaptor from the power outlet to a power outlet with your system. Camera to power outlet UPA-AC05 AC power adaptor (supplied) AC power cord Note Make sure that the following accessories are supplied with the power cord. Paper tray for the UPC-X46 series (1) ...Quick Reference Guide (1) Preparations Preparing the Camera 1 Slide to open the external connector cover. 2 Connect the supplied UPA-AC05 AC power adaptor to the DC IN jack on the camera, and connect the AC adaptor to cut off power supply. 14 Supplied Accessories Supplied Accessories Confirming the Contents Make sure ...

Operating Instructions
Page 15
...battery charge is getting low, but you can continue shooting. Use the AC power adapter or replace the batteries. The batteries are inside the camera will be disabled shortly. Indicator (flashing) Power status The batteries are fully charged or close to make sure it locks into place. 3 ...sliding it to make sure it locks into place. When using an AC power supply The icon appears at the bottom right of the camera's LCD. Power Status Indicators When using batteries For the camera in this system, you can use the specifically designed battery charger. 15 Preparations Ready...
...battery charge is getting low, but you can continue shooting. Use the AC power adapter or replace the batteries. The batteries are inside the camera will be disabled shortly. Indicator (flashing) Power status The batteries are fully charged or close to make sure it locks into place. 3 ...sliding it to make sure it locks into place. When using an AC power supply The icon appears at the bottom right of the camera's LCD. Power Status Indicators When using batteries For the camera in this system, you can use the specifically designed battery charger. 15 Preparations Ready...

Operating Instructions
Page 16
... Only use the rewound print cartridge for this printer (UPC-X46 series, or UPC-X34 series) (not supplied) is loose, the camera may fall off. To attach the tripod You can attach the camera to a tripod using the tripod screw hole located on the same paper will not make the image darker...; Always use . Using a print cartridge together with print paper of print cartridges and print paper that the screw is a set consisting of the camera. Note Tighten the screw for the first time, perform the following steps to print, a print pack designed for storage, store them only when necessary...
... Only use the rewound print cartridge for this printer (UPC-X46 series, or UPC-X34 series) (not supplied) is loose, the camera may fall off. To attach the tripod You can attach the camera to a tripod using the tripod screw hole located on the same paper will not make the image darker...; Always use . Using a print cartridge together with print paper of print cartridges and print paper that the screw is a set consisting of the camera. Note Tighten the screw for the first time, perform the following steps to print, a print pack designed for storage, store them only when necessary...
Operating Instructions
Page 19
...do not change to protect the print paper inside from dust and other particles. When turning on the camera for the printer, and "DISCOVERING" appears on the LCD. For details on default settings, see "The... first time you can attach a tray cover to any button on the camera. If the color of the UPC-X46, and UPC-X34 series' paper trays. Turning On the Power 1...are displayed in gray, turn the printer and camera off , and you turn on the camera (default setting)" on page 20. To attach the tray cover Keep the supplied tray cover on the paper tray when not ...
...do not change to protect the print paper inside from dust and other particles. When turning on the camera for the printer, and "DISCOVERING" appears on the LCD. For details on default settings, see "The... first time you can attach a tray cover to any button on the camera. If the color of the UPC-X46, and UPC-X34 series' paper trays. Turning On the Power 1...are displayed in gray, turn the printer and camera off , and you turn on the camera (default setting)" on page 20. To attach the tray cover Keep the supplied tray cover on the paper tray when not ...
Operating Instructions
Page 20
... "DISCOVERED" does not appear, or "NO PRINTER" appears, see "Troubleshooting" on the camera the first time, the default setting screen appears before your Sony service facility. Note Images may be lost, and the camera may not operate properly if power is set to standby mode. 2 Set the POWER switch...mode and turn off while shooting or deleting pictures. The camera stores the latest setting data in memory and turns the power off the power supply by disconnecting the AC power adaptor or removing the batteries while the camera transfers settings data to memory, any new settings may be...
... "DISCOVERED" does not appear, or "NO PRINTER" appears, see "Troubleshooting" on the camera the first time, the default setting screen appears before your Sony service facility. Note Images may be lost, and the camera may not operate properly if power is set to standby mode. 2 Set the POWER switch...mode and turn off while shooting or deleting pictures. The camera stores the latest setting data in memory and turns the power off the power supply by disconnecting the AC power adaptor or removing the batteries while the camera transfers settings data to memory, any new settings may be...
Operating Instructions
Page 58
... shooting. Maintaining System Performance To maintain system performance, be displayed in yellow. Do not use and storage Using or storing the camera in any printers with Several Printers In a system using several printers, the basic operations are the same as with a currently disconnected... vibration • Near sources of strong magnetism • Near sources of the following . When reconnection has been established, in the supplied carton and cushioning or equivalent packaging, and make sure that is not connected is displayed in yellow. Operation with which connection has been...
... shooting. Maintaining System Performance To maintain system performance, be displayed in yellow. Do not use and storage Using or storing the camera in any printers with Several Printers In a system using several printers, the basic operations are the same as with a currently disconnected... vibration • Near sources of strong magnetism • Near sources of the following . When reconnection has been established, in the supplied carton and cushioning or equivalent packaging, and make sure that is not connected is displayed in yellow. Operation with which connection has been...

Operating Instructions
Page 59
... there is referred to stand for a long time, set the printer to standby mode and disconnect the power cord from the exterior. Specifications Camera General Power supply Supplied from an AC power adaptor (5.0 V DC) or from a location with low humidity to a warm location or placed in a room with...accessories. Temperature: 25°C - Results will not work properly and may damage the finish and erase the indications. If the exterior is moved from Sony NH-AA Batteries Input current 1.65 A max. (using flash; 3) print one image; 4) enter power save mode after turning power on; 2)...
... there is referred to stand for a long time, set the printer to standby mode and disconnect the power cord from the exterior. Specifications Camera General Power supply Supplied from an AC power adaptor (5.0 V DC) or from a location with low humidity to a warm location or placed in a room with...accessories. Temperature: 25°C - Results will not work properly and may damage the finish and erase the indications. If the exterior is moved from Sony NH-AA Batteries Input current 1.65 A max. (using flash; 3) print one image; 4) enter power save mode after turning power on; 2)...

Operating Instructions
Page 60
...distance between the devices, obstacles, radio wave conditions, application software, or the OS. 2) This distance depends on Bluetooth Specification, Ver.2.0. AC power adaptor Power supply 100 to 80% (non condensation) Maximum dimensions (w/h/d) 203 × 85 × 305 mm 12 1/8 inches) (8 × 3 3/8 ×...accessories UP-DX100 Digital Photo Printer 60 Specifications mm film camera), auto focus F-value: F4.7 (at W) to F5.5 (at T) Input/output connectors DC IN 5.0V 5.0 V DC RELEASE 3.5 mm ø (minijack) Printer Power supply 100 to 150-mm lens with the intended use ...
...distance between the devices, obstacles, radio wave conditions, application software, or the OS. 2) This distance depends on Bluetooth Specification, Ver.2.0. AC power adaptor Power supply 100 to 80% (non condensation) Maximum dimensions (w/h/d) 203 × 85 × 305 mm 12 1/8 inches) (8 × 3 3/8 ×...accessories UP-DX100 Digital Photo Printer 60 Specifications mm film camera), auto focus F-value: F4.7 (at W) to F5.5 (at T) Input/output connectors DC IN 5.0V 5.0 V DC RELEASE 3.5 mm ø (minijack) Printer Power supply 100 to 150-mm lens with the intended use ...

Operating Instructions
Page 63
... cartridge still cannot be dust on the operation display because the internal temperature of the printer is displayed on the thermal head. tUse the supplied cleaning cassette to clean the thermal head. (See "Cleaning the Inside of print paper and print cartridge designed for the printer. •... The print paper is in the paper tray. tThe printer makes short beeping sounds when requested to remove the jammed paper, contact your nearest Sony dealer. Wait until printing is no jammed paper. while printing. White lines or marks appear on printed pictures. • There may be ...
... cartridge still cannot be dust on the operation display because the internal temperature of the printer is displayed on the thermal head. tUse the supplied cleaning cassette to clean the thermal head. (See "Cleaning the Inside of print paper and print cartridge designed for the printer. •... The print paper is in the paper tray. tThe printer makes short beeping sounds when requested to remove the jammed paper, contact your nearest Sony dealer. Wait until printing is no jammed paper. while printing. White lines or marks appear on printed pictures. • There may be ...

Operating Instructions
Page 64
...DIGITAL PHOTO PRINTER MENU EXEC PRINT ALARM PUSH OPEN The cleaning cassette and protective sheet clean the inside of the printer using the supplied cleaning cassette and the protective sheet included with the printing pack. After cleaning is finished, the protective sheet is facing up, ... the inside of the printer. DIGITAL PHOTO PRINTER MENU EXEC PRINT ALARM PUSH OPEN 7 Remove the cleaning cassette from the tray. 4 Insert the supplied cleaning cassette and close the print cartridge cover. MENU EXEC PRINT ALARM 5 Press the EXEC button. 2 Place the protective sheet in the same ...
...DIGITAL PHOTO PRINTER MENU EXEC PRINT ALARM PUSH OPEN The cleaning cassette and protective sheet clean the inside of the printer using the supplied cleaning cassette and the protective sheet included with the printing pack. After cleaning is finished, the protective sheet is facing up, ... the inside of the printer. DIGITAL PHOTO PRINTER MENU EXEC PRINT ALARM PUSH OPEN 7 Remove the cleaning cassette from the tray. 4 Insert the supplied cleaning cassette and close the print cartridge cover. MENU EXEC PRINT ALARM 5 Press the EXEC button. 2 Place the protective sheet in the same ...
Operating Instructions
Page 68
...57 Operation with Several Printers 58 Preparing 16 Removing 57 To cancel removing 57 PRINTER button 10 Printing 22 Printing pictures stored in the camera's built-in memory 24 Printing the last picture taken 22 Reprinting pictures from the printer's memory 24 Printing time 49 PROPERTY 30, ... condition 8, 20 Factory settings 20 Shooting environments 7 SHUTTER 29 Shutter speed 34 Size (print layout) 37, 66 Sound (camera) 41 Standby lamp (camera) 10 Standby mode 20 Supplied accessories 14 System configuration 5 T Taking pictures 21 LCD screen 21 Total number of pictures in memory 24 TOTAL PRINTS 31...
...57 Operation with Several Printers 58 Preparing 16 Removing 57 To cancel removing 57 PRINTER button 10 Printing 22 Printing pictures stored in the camera's built-in memory 24 Printing the last picture taken 22 Reprinting pictures from the printer's memory 24 Printing time 49 PROPERTY 30, ... condition 8, 20 Factory settings 20 Shooting environments 7 SHUTTER 29 Shutter speed 34 Size (print layout) 37, 66 Sound (camera) 41 Standby lamp (camera) 10 Standby mode 20 Supplied accessories 14 System configuration 5 T Taking pictures 21 LCD screen 21 Total number of pictures in memory 24 TOTAL PRINTS 31...

