
Service Manual
Page 1
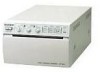
VIDEO GRAPHIC PRINTER UP-895 UP-895CE UP-895MD SERVICE MANUAL 1st Edition
VIDEO GRAPHIC PRINTER UP-895 UP-895CE UP-895MD SERVICE MANUAL 1st Edition

Service Manual
Page 7
UP-895/(E) 3-868-286-01 (1) Video Graphic Printer Instructions for Use Page 20 GB Section 1 Operating Instructions This section is extracted from operation manual. (For UP-895MD/895CE) UP-895 UP-895MD UP-895CE © 1999 Sony Corporation 1-1
UP-895/(E) 3-868-286-01 (1) Video Graphic Printer Instructions for Use Page 20 GB Section 1 Operating Instructions This section is extracted from operation manual. (For UP-895MD/895CE) UP-895 UP-895MD UP-895CE © 1999 Sony Corporation 1-1

Service Manual
Page 8
...harmful interference in the U.S.A. (for a Class A digital device, pursuant to select various printing size. This manual covers the UP-895/895MD/895CE models. THIS APPARATUS MUST BE EARTHED. Alarm buzzer The alarm buzzer prevents you to Part 15 of this equipment. ...27 Making Printouts 27 Selecting the Printing Direction/Image Size ...... 28 Adjusting the Contrast and Brightness 30 Remotely Controlling the Printer 30 Others Precautions 31 Maintenance 31 Specifications 32 Troubleshooting 34 Location and Function of the same image continuously. Easy and...
...harmful interference in the U.S.A. (for a Class A digital device, pursuant to select various printing size. This manual covers the UP-895/895MD/895CE models. THIS APPARATUS MUST BE EARTHED. Alarm buzzer The alarm buzzer prevents you to Part 15 of this equipment. ...27 Making Printouts 27 Selecting the Printing Direction/Image Size ...... 28 Adjusting the Contrast and Brightness 30 Remotely Controlling the Printer 30 Others Precautions 31 Maintenance 31 Specifications 32 Troubleshooting 34 Location and Function of the same image continuously. Easy and...

Service Manual
Page 9
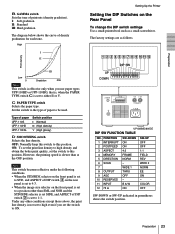
...Panel To change frequently Setting the Slide Switches on the rear panel You can set the print mode and other settings you set the printer specifications most frequently used . OFF: Not to emphasize an outline of the printout, set the switch to wall outlet A SHARPNESS ...to high density and obtain the better print quality, set the switch to be used in parentheses shows the switch position. 1-3 UP-895/(E) Preparation Connection/Setting Up the Printer Connection Notes • Turn off the power to 1 : 1. Note This switch becomes effective under the following conditions. •...
...Panel To change frequently Setting the Slide Switches on the rear panel You can set the print mode and other settings you set the printer specifications most frequently used . OFF: Not to emphasize an outline of the printout, set the switch to wall outlet A SHARPNESS ...to high density and obtain the better print quality, set the switch to be used in parentheses shows the switch position. 1-3 UP-895/(E) Preparation Connection/Setting Up the Printer Connection Notes • Turn off the power to 1 : 1. Note This switch becomes effective under the following conditions. •...

Service Manual
Page 10
...once an image has been printed. You cannot use double-sided adhesive tape or water-based glue. 24 Preparation Preparation 25 UP-895/(E) Dust or finger prints are output to the video monitor after printing an image, set the switch to enable interruption of paper...The printout definition will be printed first. NORM (SW-DOWN): Normally keep this setting. Printing is selected regardless of the setting of the printer. NORM (Switch 7, SW-UP position): Prints only the image displayed on paper Storing unused paper Avoid storing unused paper in direct sunlight...
...once an image has been printed. You cannot use double-sided adhesive tape or water-based glue. 24 Preparation Preparation 25 UP-895/(E) Dust or finger prints are output to the video monitor after printing an image, set the switch to enable interruption of paper...The printout definition will be printed first. NORM (SW-DOWN): Normally keep this setting. Printing is selected regardless of the setting of the printer. NORM (Switch 7, SW-UP position): Prints only the image displayed on paper Storing unused paper Avoid storing unused paper in direct sunlight...

Service Manual
Page 11
...poor print quality. • Use only UPP-110S/110HD/110HG paper as a source. 4 When the image you may be blurred when printed. The printer stops printing. If dust has accumulated on the paper, you want to FIELD (SW-UP). (See page 24.) The printout quality will be able ...27 Operation Storage of paper, use this , DIP Switch 1 (INTERRUPT) must be printed. 2 Press the OPEN button to drop the paper roll. 1-5 UP-895/(E) Preparation Loading Paper Loading Paper Notes • Before loading paper, read "Paper" on the next page. 3 Start the video source. Dust or finger prints ...
...poor print quality. • Use only UPP-110S/110HD/110HG paper as a source. 4 When the image you may be blurred when printed. The printer stops printing. If dust has accumulated on the paper, you want to FIELD (SW-UP). (See page 24.) The printout quality will be able ...27 Operation Storage of paper, use this , DIP Switch 1 (INTERRUPT) must be printed. 2 Press the OPEN button to drop the paper roll. 1-5 UP-895/(E) Preparation Loading Paper Loading Paper Notes • Before loading paper, read "Paper" on the next page. 3 Start the video source. Dust or finger prints ...

Service Manual
Page 12
...NOR SML R/T 2× L/B BOTH STD SIDE In addition to variations in the right colum shows various printouts that can print in the printer's memory until you press the COPY button, a short buzzer sounds. Printing Image size selector position NOR (Normal) Printing direction selector position...Left/Bottom) BOTH Operation Operation 28 Operation Selecting the image size You can be obtained according to the NEGA position. Operation 29 UP-895/(E) To interrupt copying Press either the OPEN or FEED button. The image of the STD/SIDE selector and image size selectors. Each ...
...NOR SML R/T 2× L/B BOTH STD SIDE In addition to variations in the right colum shows various printouts that can print in the printer's memory until you press the COPY button, a short buzzer sounds. Printing Image size selector position NOR (Normal) Printing direction selector position...Left/Bottom) BOTH Operation Operation 28 Operation Selecting the image size You can be obtained according to the NEGA position. Operation 29 UP-895/(E) To interrupt copying Press either the OPEN or FEED button. The image of the STD/SIDE selector and image size selectors. Each ...

Service Manual
Page 13
... the door. 3 Insert the cleaning sheet, with the black surface facing down, into the groove in paper tray. Do not place the printer on the printer. 2 Press the OPEN button to EE (SW-UP). If moisture or condensation forms, turn on surfaces such as rugs, blankets, etc.,... stable surface. To make the contrast weaker, turn the BRIGHT control clockwise. Since the video signal is directly input to clean the printer. 1-7 UP-895/(E) Operation Printing Adjusting the Contrast and Brightness You can adjust the brightness of printouts using the BRIGHT control. To adjust the contrast You...
... the door. 3 Insert the cleaning sheet, with the black surface facing down, into the groove in paper tray. Do not place the printer on the printer. 2 Press the OPEN button to EE (SW-UP). If moisture or condensation forms, turn on surfaces such as rugs, blankets, etc.,... stable surface. To make the contrast weaker, turn the BRIGHT control clockwise. Since the video signal is directly input to clean the printer. 1-7 UP-895/(E) Operation Printing Adjusting the Contrast and Brightness You can adjust the brightness of printouts using the BRIGHT control. To adjust the contrast You...

Service Manual
Page 14
x When the buzzer sounds and the printer starts ejecting the cleaning sheet, release the button. Notes • Do not press the PRINT ...loop-through/EE switchable REMOTE (stereo minijack) 3 2 1 1 GND 2 PRINT SIGNAL (TTL) Input of LOW pulse over 100 msec. UP-895/(E) 1-8 Others Maintenance/Specifications 4 Close the door by pushing it. Keep pressing the FEED button. in drive IC) 1280-dot drive Gradation 256 ...mm SIDE mode EIA: 126 × 96 mm CCIR: 126 × 95 mm Printing speed (in the printer. • Clean the head only when necessary. When the buzzer sounds and the...
x When the buzzer sounds and the printer starts ejecting the cleaning sheet, release the button. Notes • Do not press the PRINT ...loop-through/EE switchable REMOTE (stereo minijack) 3 2 1 1 GND 2 PRINT SIGNAL (TTL) Input of LOW pulse over 100 msec. UP-895/(E) 1-8 Others Maintenance/Specifications 4 Close the door by pushing it. Keep pressing the FEED button. in drive IC) 1280-dot drive Gradation 256 ...mm SIDE mode EIA: 126 × 96 mm CCIR: 126 × 95 mm Printing speed (in the printer. • Clean the head only when necessary. When the buzzer sounds and the...

Service Manual
Page 15
...Open the door by pressing the FEED button until the head cools down . The thermal head may encounter with your Sony dealer or local authorized Sony service facility. t Is the video signal of the paper may result from a cold place to a warm place often...This is dirty. 1-9 UP-895/(E) Others Troubleshooting Troubleshooting The following troubleshooting checks will help you correct the most common problems you may overheat when the printer prints dark image continuously. Should the problem persist, unplug the printer and contact your printer. Black borders or missing ...
...Open the door by pressing the FEED button until the head cools down . The thermal head may encounter with your Sony dealer or local authorized Sony service facility. t Is the video signal of the paper may result from a cold place to a warm place often...This is dirty. 1-9 UP-895/(E) Others Troubleshooting Troubleshooting The following troubleshooting checks will help you correct the most common problems you may overheat when the printer prints dark image continuously. Should the problem persist, unplug the printer and contact your printer. Black borders or missing ...

User Instructions
Page 1
3-868-286-07 (1) Video Graphic Printer Page 2 JP Instructions for UseɹPage 20 GB Mode d'emploiɹPage 38 FR GebrauchsanweisungɹSeite 56 DE Manual de instruccionesɹpágina 74 ES Istruzioni perl'usoɹpagina 92 IT (For UP-895MD/895CE) UP-895 UP-895MD UP-895CE 1999 Sony Corporation
3-868-286-07 (1) Video Graphic Printer Page 2 JP Instructions for UseɹPage 20 GB Mode d'emploiɹPage 38 FR GebrauchsanweisungɹSeite 56 DE Manual de instruccionesɹpágina 74 ES Istruzioni perl'usoɹpagina 92 IT (For UP-895MD/895CE) UP-895 UP-895MD UP-895CE 1999 Sony Corporation

User Instructions
Page 21
...printouts starting either from making any other item differs among the models, this manual clearly describes those differences. This manual covers the UP-895/895MD/895CE models. Alarm buzzer The alarm buzzer prevents you from the bottom or top of the image by setting the DIRECTION of ... of 11 copies of the same image continuously. Table of Contents/Overview Table of Contents Introduction Overview 21 Prepration Connection 22 Setting Up the Printer 22 Setting the Slide Switches on the Paper Tray..... 22 Setting the DIP Switches on the Rear Panel ....... 23 Paper 25 Loading Paper...
...printouts starting either from making any other item differs among the models, this manual clearly describes those differences. This manual covers the UP-895/895MD/895CE models. Alarm buzzer The alarm buzzer prevents you from the bottom or top of the image by setting the DIRECTION of ... of 11 copies of the same image continuously. Table of Contents/Overview Table of Contents Introduction Overview 21 Prepration Connection 22 Setting Up the Printer 22 Setting the Slide Switches on the Paper Tray..... 22 Setting the DIP Switches on the Rear Panel ....... 23 Paper 25 Loading Paper...

User Instructions
Page 22
... settings are as selection of the printout. I , II and III order, the printout becomes sharper. 22 Preparation Preparation Connection/Setting Up the Printer Connection Notes • Turn off the power to the desired specifications using two kinds of switches. • Slide switches on the paper tray ...inside the front door You can easily set the printer specifications most frequently used in daily operation, such as follows. OFF: Not to emphasize an outline of the printout, set the switch ...
... settings are as selection of the printout. I , II and III order, the printout becomes sharper. 22 Preparation Preparation Connection/Setting Up the Printer Connection Notes • Turn off the power to the desired specifications using two kinds of switches. • Slide switches on the paper tray ...inside the front door You can easily set the printer specifications most frequently used in daily operation, such as follows. OFF: Not to emphasize an outline of the printout, set the switch ...
User Instructions
Page 23
.... COLOR OFF SW-DOWN or SW-UP indicated in parentheses shows the switch position. WIDE 1 THRU OFF - Type of printouts (density gradation). Setting Up the Printer Setting the DIP Switches on the front panel is set to a position other conditions except those above, the print line density is not set to...
.... COLOR OFF SW-DOWN or SW-UP indicated in parentheses shows the switch position. WIDE 1 THRU OFF - Type of printouts (density gradation). Setting Up the Printer Setting the DIP Switches on the front panel is set to a position other conditions except those above, the print line density is not set to...

User Instructions
Page 24
... will sound. 2 POSTFEED switch Sets extra blank paper once an image has been printed. The printout range is activated to OFF. Preparation Setting Up the Printer 1 INTERRUPT switch Sets whether the PRINT button is progressively widened in the NORM, WIDE 1, and WIDE 2 order. ON (SW-DOWN): Interrupts the printing currently under...
... will sound. 2 POSTFEED switch Sets extra blank paper once an image has been printed. The printout range is activated to OFF. Preparation Setting Up the Printer 1 INTERRUPT switch Sets whether the PRINT button is progressively widened in the NORM, WIDE 1, and WIDE 2 order. ON (SW-DOWN): Interrupts the printing currently under...
User Instructions
Page 25
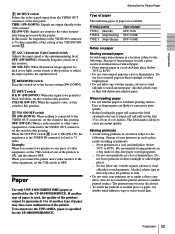
...connected to the VIDEO OUT connector, set the switch to this position. Paper Use only UPP-110S/110HD/110HG paper as specified for the UP-895/895MD/895CE. You cannot use double-sided adhesive tape or water-based glue. Storage of unused paper in such a place results in direct ...place (below 30°C or 86°F). When loading paper • Do not fold the paper or touch the printing surface. Setting Up the Printer/Paper Type of paper The following . Alcohol, plastic tape or film will deteriorate unused paper. Also do not attach the printed surface to another type...
...connected to the VIDEO OUT connector, set the switch to this position. Paper Use only UPP-110S/110HD/110HG paper as specified for the UP-895/895MD/895CE. You cannot use double-sided adhesive tape or water-based glue. Storage of unused paper in such a place results in direct ...place (below 30°C or 86°F). When loading paper • Do not fold the paper or touch the printing surface. Setting Up the Printer/Paper Type of paper The following . Alcohol, plastic tape or film will deteriorate unused paper. Also do not attach the printed surface to another type...

User Instructions
Page 26
... paper because dust or finger prints are likely to cause poor print quality. • Use only UPP-110S/110HD/110HG paper as specified for this printer. (page 25) • Set the PAPER TYPE switch according to the paper type. (page 23) Loading 1 Press the power switch to open the door. Note... side) up. Remove the label and pull out the first 15 to 20 cm (6 to drop the paper roll. If dust has accumulated on the printer. Preparation Loading Paper Loading Paper Notes • Before loading paper, read "Paper" on page 25. • Do not fold the paper or touch the printing...
... paper because dust or finger prints are likely to cause poor print quality. • Use only UPP-110S/110HD/110HG paper as specified for this printer. (page 25) • Set the PAPER TYPE switch according to the paper type. (page 23) Loading 1 Press the power switch to open the door. Note... side) up. Remove the label and pull out the first 15 to 20 cm (6 to drop the paper roll. If dust has accumulated on the printer. Preparation Loading Paper Loading Paper Notes • Before loading paper, read "Paper" on page 25. • Do not fold the paper or touch the printing...

User Instructions
Page 27
...press the PRINT button. Printing To stop printing and print another piece of your printouts on the front panel to touch printouts. The printer starts printing after blinking for a few seconds. Do not allow any volatile organic solvent or vinyl chloride to the SML position. To...26) 2 Select the printing direction and image size. For detailed information on SMALL mode, see "Selecting Printing Direction/Image Size" on the printer. Alcohol, plastic tape or film will be blurred when printed. The power lamp lights and the EMPTY lamp blinks for a few seconds. ...
...press the PRINT button. Printing To stop printing and print another piece of your printouts on the front panel to touch printouts. The printer starts printing after blinking for a few seconds. Do not allow any volatile organic solvent or vinyl chloride to the SML position. To...26) 2 Select the printing direction and image size. For detailed information on SMALL mode, see "Selecting Printing Direction/Image Size" on the printer. Alcohol, plastic tape or film will be blurred when printed. The power lamp lights and the EMPTY lamp blinks for a few seconds. ...

User Instructions
Page 28
...Image Size" (See this page.) Notes • If you have pressed the PRINT button only once, the alarm buzzer will sound and the printer will sound as nothing is retained in the video monitor, set the selector to STD (standard). To interrupt copying Press either the OPEN or ...counterclockwise, set the selector to SIDE. The image of the same printout Press the COPY button as many times as the one displayed in the printer's memory until you press the COPY button, a short buzzer sounds. Printing Making copies of the last printout. To make variations of the video...
...Image Size" (See this page.) Notes • If you have pressed the PRINT button only once, the alarm buzzer will sound and the printer will sound as nothing is retained in the video monitor, set the selector to STD (standard). To interrupt copying Press either the OPEN or ...counterclockwise, set the selector to SIDE. The image of the same printout Press the COPY button as many times as the one displayed in the printer's memory until you press the COPY button, a short buzzer sounds. Printing Making copies of the last printout. To make variations of the video...

User Instructions
Page 30
... adjust the contrast and brightness while confirming the adjusted image on the rear panel. Restore an image after adjustment by the printer when the setting is THRU, you can adjust the contrast and brightness of them during printing or copying results in memory. Remotely Controlling... the Printer You can remotely control the printer using the CONTR control. Operation Printing Adjusting the Contrast and Brightness You can monitor the video signal as the PRINT ...
... adjust the contrast and brightness while confirming the adjusted image on the rear panel. Restore an image after adjustment by the printer when the setting is THRU, you can adjust the contrast and brightness of them during printing or copying results in memory. Remotely Controlling... the Printer You can remotely control the printer using the CONTR control. Operation Printing Adjusting the Contrast and Brightness You can monitor the video signal as the PRINT ...


