
Operating Instructions
Page 1
Refer to these numbers whenever you call upon your Sony dealer regarding this manual thoroughly, and retain it for future reference. DCR-TRV950 TM SERIES DCR-TRV940/TRV950 ©2002 Sony Corporation Owner's Record The model and serial numbers are located on the bottom. AC- 3-075-494-12 (1) Digital Video Camera Recorder Operating Instructions Before operating the unit, please read this product. Record the serial number in the space provided below. DCR-TRV Model No. Serial No. Serial No. Model No.
Refer to these numbers whenever you call upon your Sony dealer regarding this manual thoroughly, and retain it for future reference. DCR-TRV950 TM SERIES DCR-TRV940/TRV950 ©2002 Sony Corporation Owner's Record The model and serial numbers are located on the bottom. AC- 3-075-494-12 (1) Digital Video Camera Recorder Operating Instructions Before operating the unit, please read this product. Record the serial number in the space provided below. DCR-TRV Model No. Serial No. Serial No. Model No.

Operating Instructions
Page 2
...with this Handycam is very easy to discontinue midway (fail), restart the application or disconnect and connect the USB cable again. DCR-TRV950 only Countries and areas where you can help preserve our environment by returning your used in the literature accompanying the appliance. For...to the collection and recycling location nearest you can capture life's precious moments with Part 15 of Conformity Trade Name: SONY Model No.: DCR-TRV950 Responsible Party: Sony Electronics Inc. and CANADA CAUTION TO PREVENT ELECTRIC SHOCK, MATCH WIDE BLADE OF PLUG TO WIDE SLOT, FULLY INSERT...
...with this Handycam is very easy to discontinue midway (fail), restart the application or disconnect and connect the USB cable again. DCR-TRV950 only Countries and areas where you can help preserve our environment by returning your used in the literature accompanying the appliance. For...to the collection and recycling location nearest you can capture life's precious moments with Part 15 of Conformity Trade Name: SONY Model No.: DCR-TRV950 Responsible Party: Sony Electronics Inc. and CANADA CAUTION TO PREVENT ELECTRIC SHOCK, MATCH WIDE BLADE OF PLUG TO WIDE SLOT, FULLY INSERT...
Operating Instructions
Page 3
... device may cause harmful interference to Part 15 of FCC Rules. 3 Consult the dealer or an experienced radio/TV technician for a Class B digital device, pursuant to radio communications. DCR-TRV950 only The term "IC:" before the radio certification number only signifies that interference will not occur in order to comply with Canadian ICES...
... device may cause harmful interference to Part 15 of FCC Rules. 3 Consult the dealer or an experienced radio/TV technician for a Class B digital device, pursuant to radio communications. DCR-TRV950 only The term "IC:" before the radio certification number only signifies that interference will not occur in order to comply with Canadian ICES...
Operating Instructions
Page 5
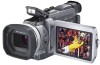
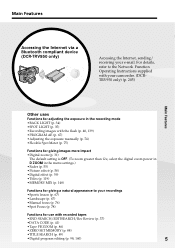
For details, refer to the Network Function Operating Instructions supplied with your camcorder. (DCRTRV950 only) (p. 205) Main Features Other uses Functions for adjusting the exposure in the recording mode •BACK LIGHT (p. 34) •...;Fader (p. 55) •Picture effect (p. 58) •Digital effect (p. 59) •Titles (p. 119) •MEMORY MIX (p. 148) Functions for giving a natural appearance to your e-mail. Main Features Getting Started Accessing the Internet via a Bluetooth compliant device (DCR-TRV950 only) Accessing the Internet, sending/ receiving your recordings •...
For details, refer to the Network Function Operating Instructions supplied with your camcorder. (DCRTRV950 only) (p. 205) Main Features Other uses Functions for adjusting the exposure in the recording mode •BACK LIGHT (p. 34) •...;Fader (p. 55) •Picture effect (p. 58) •Digital effect (p. 59) •Titles (p. 119) •MEMORY MIX (p. 148) Functions for giving a natural appearance to your e-mail. Main Features Getting Started Accessing the Internet via a Bluetooth compliant device (DCR-TRV950 only) Accessing the Internet, sending/ receiving your recordings •...
Operating Instructions
Page 7
...Connecting your camcorder to a tape 171 Enlarging still images recorded on a"Memory Stick" - Table of trouble and how to your computer - Memory Photo recording ......... 135 Recording images from a tape as still images 144 Superimposing a still image in a continuous loop - Digital program editing ... tape on your computer using the USB cable - Introduction 126 Recording still images on your camcorder. Signal convert function 204 Using the Network function (DCR-TRV950 only) Accessing the network 205 For the details, refer to the Network Function Operating Instructions ...
...Connecting your camcorder to a tape 171 Enlarging still images recorded on a"Memory Stick" - Table of trouble and how to your computer - Memory Photo recording ......... 135 Recording images from a tape as still images 144 Superimposing a still image in a continuous loop - Digital program editing ... tape on your computer using the USB cable - Introduction 126 Recording still images on your camcorder. Signal convert function 204 Using the Network function (DCR-TRV950 only) Accessing the network 205 For the details, refer to the Network Function Operating Instructions ...

Operating Instructions
Page 11
...small green button. The picture appears on the LCD screen (p. 165) 1 Set the POWER switch to POWER VCR OFF(CHG) CAMERA MEMORY/NETWORK (DCR-TRV950 only) while pressing the small green button. MEMORY/ NETWORK Quick Start Guide VCR OFF(CHG) CAMERA NOTE Do not pick up . The last ...Adjust the viewfinder lens to open the LCD panel. Viewfinder When the LCD panel is recorded on the "Memory Stick." If you purchase your camcorder, the clock setting is displayed. The image while pressing the button deeply is closed, use the viewfinder with your eye against the eyecup. Recording...
...small green button. The picture appears on the LCD screen (p. 165) 1 Set the POWER switch to POWER VCR OFF(CHG) CAMERA MEMORY/NETWORK (DCR-TRV950 only) while pressing the small green button. MEMORY/ NETWORK Quick Start Guide VCR OFF(CHG) CAMERA NOTE Do not pick up . The last ...Adjust the viewfinder lens to open the LCD panel. Viewfinder When the LCD panel is recorded on the "Memory Stick." If you purchase your camcorder, the clock setting is displayed. The image while pressing the button deeply is closed, use the viewfinder with your eye against the eyecup. Recording...

Operating Instructions
Page 12
... 228. When you carry out an operation, you can hear a beep to CAMERA. Labeling a cassette (p. 124) For details of your camcorder. The DCR-TRV950 is indicated in this manual, buttons and settings on whether or not the tape has a cassette memory are operated only with cassette memory. ...cassette types, see this manual and operating your camcorder, check the model number by (Cassette Memory). 12 Set the POWER switch to indicate that you can use a tape with cassette memory are shown in the text, for example, "DCR-TRV950 only". DATE SEARCH (p. 90) - Getting Started...
... 228. When you carry out an operation, you can hear a beep to CAMERA. Labeling a cassette (p. 124) For details of your camcorder. The DCR-TRV950 is indicated in this manual, buttons and settings on whether or not the tape has a cassette memory are operated only with cassette memory. ...cassette types, see this manual and operating your camcorder, check the model number by (Cassette Memory). 12 Set the POWER switch to indicate that you can use a tape with cassette memory are shown in the text, for example, "DCR-TRV950 only". DATE SEARCH (p. 90) - Getting Started...
Operating Instructions
Page 14
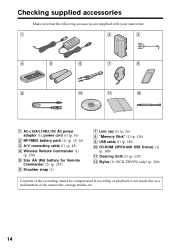
... (1) (p. 183) 0 CD-ROM (SPVD-008 USB Driver) (1) (p. 188) qa Cleaning cloth (1) (p. 237) qs Stylus (1) (DCR-TRV950 only) (p. 206) Contents of the recording cannot be compensated if recording or playback is not made due to a malfunction of the camcorder, storage media, etc. 14 Checking supplied accessories Make sure that the following accessories are supplied...
... (1) (p. 183) 0 CD-ROM (SPVD-008 USB Driver) (1) (p. 188) qa Cleaning cloth (1) (p. 237) qs Stylus (1) (DCR-TRV950 only) (p. 206) Contents of the recording cannot be compensated if recording or playback is not made due to a malfunction of the camcorder, storage media, etc. 14 Checking supplied accessories Make sure that the following accessories are supplied...
Operating Instructions
Page 20
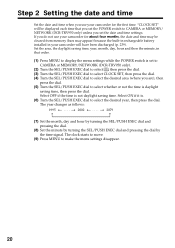
... and then the minute, in your camcorder for about four months, the date and time may appear) because the built-in rechargeable battery installed in that you set the POWER switch to CAMERA or MEMORY/ NETWORK (DCR-TRV950 only) unless you set to CAMERA or MEMORY/NETWORK (DCR-TRV950 only). (2) Turn the SEL/PUSH... and pressing the dial by the time signal. Step 2 Setting the date and time Set the date and time when you do not use your camcorder will be cleared from memory (bars may be displayed each time that order. (1) Press MENU to make the menu settings disappear. 20 "CLOCK SET"...
... and then the minute, in your camcorder for about four months, the date and time may appear) because the built-in rechargeable battery installed in that you set the POWER switch to CAMERA or MEMORY/ NETWORK (DCR-TRV950 only) unless you set to CAMERA or MEMORY/NETWORK (DCR-TRV950 only). (2) Turn the SEL/PUSH... and pressing the dial by the time signal. Step 2 Setting the date and time Set the date and time when you do not use your camcorder will be cleared from memory (bars may be displayed each time that order. (1) Press MENU to make the menu settings disappear. 20 "CLOCK SET"...

Operating Instructions
Page 24
...or VCR while pressing the small green button. (4) Press FN. Operation buttons appear on the LCD screen. Step 4 Using the touch panel Your camcorder has operation buttons on the LCD screen. (6) Press a desired operation item. This section describes how to operate the touch panel during recording or .... (5) Press PAGE2 to go to PAGE1/PAGE2. Refer to FN Press EXIT. Touch the LCD screen directly with your finger or the supplied stylus (DCR-TRV950 only) to operate each function. 5,6 When the POWER switch is set to CAMERA PAGE1 PAGE2 EXIT SPOT DIG FOCUS EFFT END SCH MEM SPOT M ...
...or VCR while pressing the small green button. (4) Press FN. Operation buttons appear on the LCD screen. Step 4 Using the touch panel Your camcorder has operation buttons on the LCD screen. (6) Press a desired operation item. This section describes how to operate the touch panel during recording or .... (5) Press PAGE2 to go to PAGE1/PAGE2. Refer to FN Press EXIT. Touch the LCD screen directly with your finger or the supplied stylus (DCR-TRV950 only) to operate each function. 5,6 When the POWER switch is set to CAMERA PAGE1 PAGE2 EXIT SPOT DIG FOCUS EFFT END SCH MEM SPOT M ...

Operating Instructions
Page 25
If the items are not available The color of it or press those buttons lightly with your camcorder. •When operation buttons do not work even if you press them, an adjustment is required (CALIBRATION) (p. 238). &#.../TOUCH PANEL on your index finger. •Do not press the LCD screen with sharp-pointed objects other than the supplied stylus. (DCR-TRV950 only) •Do not press the LCD screen too hard. •Do not touch the LCD screen with wet hands. •... with your thumb supporting the LCD panel from the back side of the items changes to MEMORY/NETWORK (DCR-TRV950 only). 25
If the items are not available The color of it or press those buttons lightly with your camcorder. •When operation buttons do not work even if you press them, an adjustment is required (CALIBRATION) (p. 238). &#.../TOUCH PANEL on your index finger. •Do not press the LCD screen with sharp-pointed objects other than the supplied stylus. (DCR-TRV950 only) •Do not press the LCD screen too hard. •Do not touch the LCD screen with wet hands. •... with your thumb supporting the LCD panel from the back side of the items changes to MEMORY/NETWORK (DCR-TRV950 only). 25

Operating Instructions
Page 27
...the following: - When you use a cassette with cassette memory, however, you turn off automatically while the cassette is inserted Your camcorder automatically turns off your camcorder. Note on one tape or you slide the LOCK switch in the LP (long play) mode. To enable smooth transition Transition...shorter than the shooting time using the LCD screen The battery time is to save battery power and to MEMORY/NETWORK (DCR-TRV950 only) accidentally. Note on your camcorder. The battery use time when you recorded and the next scene is set to prevent battery and tape wear. Recording ...
...the following: - When you use a cassette with cassette memory, however, you turn off automatically while the cassette is inserted Your camcorder automatically turns off your camcorder. Note on one tape or you slide the LOCK switch in the LP (long play) mode. To enable smooth transition Transition...shorter than the shooting time using the LCD screen The battery time is to save battery power and to MEMORY/NETWORK (DCR-TRV950 only) accidentally. Note on your camcorder. The battery use time when you recorded and the next scene is set to prevent battery and tape wear. Recording ...

Operating Instructions
Page 29
... LCD screen (1) Press FN and select PAGE2 while the POWER switch is set the POWER switch to VCR, press FN to CAMERA or MEMORY/NETWORK (DCR-TRV950 only). Select LCD B.L. Even if you set to display PAGE1. (2) Press LCD BRT. When you adjust LCD BRT The recorded picture will not be affected...
... LCD screen (1) Press FN and select PAGE2 while the POWER switch is set the POWER switch to VCR, press FN to CAMERA or MEMORY/NETWORK (DCR-TRV950 only). Select LCD B.L. Even if you set to display PAGE1. (2) Press LCD BRT. When you adjust LCD BRT The recorded picture will not be affected...

Operating Instructions
Page 31
Move it further for a slower zoom. Basics To use the digital zoom. 31 The digital zooming zone appears when you move the power zoom lever towards the "T" side. You can be set to MEMORY/NETWORK (DCR-TRV950 only) You cannot use zoom greater than 12× Zoom greater than 12× is sharp.... Note on digital zoom The picture quality deteriorates as a default setting. When the POWER switch is set to ...
Move it further for a slower zoom. Basics To use the digital zoom. 31 The digital zooming zone appears when you move the power zoom lever towards the "T" side. You can be set to MEMORY/NETWORK (DCR-TRV950 only) You cannot use zoom greater than 12× Zoom greater than 12× is sharp.... Note on digital zoom The picture quality deteriorates as a default setting. When the POWER switch is set to ...

Operating Instructions
Page 32
The subject uses this feature to CAMERA or MEMORY/NETWORK (DCR-TRV950 only). Set the POWER switch to check his or her own image on the LCD screen while you press FN The does not appear on ...
The subject uses this feature to CAMERA or MEMORY/NETWORK (DCR-TRV950 only). Set the POWER switch to check his or her own image on the LCD screen while you press FN The does not appear on ...
Operating Instructions
Page 34
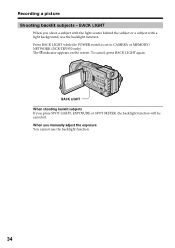
Recording a picture Shooting backlit subjects - Press BACK LIGHT while the POWER switch is set to CAMERA or MEMORY/ NETWORK (DCR-TRV950 only). To cancel, press BACK LIGHT again. BACK LIGHT When you shoot a subject with the light source behind the subject or a subject with a light background, use the backlight function. 34 The . indicator appears on the screen. BACK LIGHT When shooting backlit subjects If you manually adjust the exposure You cannot use the backlight function. When you press SPOT LIGHT, EXPOSURE or SPOT METER, the backlight function will be canceled.
Recording a picture Shooting backlit subjects - Press BACK LIGHT while the POWER switch is set to CAMERA or MEMORY/ NETWORK (DCR-TRV950 only). To cancel, press BACK LIGHT again. BACK LIGHT When you shoot a subject with the light source behind the subject or a subject with a light background, use the backlight function. 34 The . indicator appears on the screen. BACK LIGHT When shooting backlit subjects If you manually adjust the exposure You cannot use the backlight function. When you press SPOT LIGHT, EXPOSURE or SPOT METER, the backlight function will be canceled.
Operating Instructions
Page 35
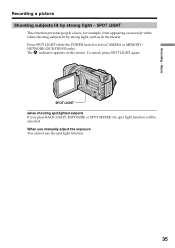
... or SPOT METER, the spot light function will be canceled. Recording - Press SPOT LIGHT while the POWER switch is set to CAMERA or MEMORY/ NETWORK (DCR-TRV950 only).
... or SPOT METER, the spot light function will be canceled. Recording - Press SPOT LIGHT while the POWER switch is set to CAMERA or MEMORY/ NETWORK (DCR-TRV950 only).

Operating Instructions
Page 36
... again. The POWER switch is automatically canceled when: - START/STOP 1 FN START/STOP To stop the count down from the screen while your camcorder is set to MEMORY/NETWORK (DCR-TRV950 only) You can also use the Remote Commander for this operation. (1) In the standby, press FN and select PAGE2. (2) Press SELFTIMER. You...
... again. The POWER switch is automatically canceled when: - START/STOP 1 FN START/STOP To stop the count down from the screen while your camcorder is set to MEMORY/NETWORK (DCR-TRV950 only) You can also use the Remote Commander for this operation. (1) In the standby, press FN and select PAGE2. (2) Press SELFTIMER. You...
Operating Instructions
Page 57
Spot Focus Note on BOUNCE The BOUNCE indicator does not appear in the menu settings - Wide mode - Zoom - Exposure - Picture effect - Shutter speed adjustment - PROGRAM AE 57 Advanced Recording Operations Using the fader When you cannot use the fader. Picture effect - Focus manually - When D ZOOM is activated in the following functions: - While using BOUNCE, you set the POWER switch to MEMORY/NETWORK (DCR-TRV950 only) You cannot use the following mode or functions: - Flexible Spot meter -
Spot Focus Note on BOUNCE The BOUNCE indicator does not appear in the menu settings - Wide mode - Zoom - Exposure - Picture effect - Shutter speed adjustment - PROGRAM AE 57 Advanced Recording Operations Using the fader When you cannot use the fader. Picture effect - Focus manually - When D ZOOM is activated in the following functions: - While using BOUNCE, you set the POWER switch to MEMORY/NETWORK (DCR-TRV950 only) You cannot use the following mode or functions: - Flexible Spot meter -

Operating Instructions
Page 62
... indicator appears on a TV (p. 45). (1) Press CUSTOM PRESET to display the CUSTOM PRESET menu while the POWER switch is set to CAMERA or MEMORY/NETWORK (DCR-TRV950 only). (2) Press the SEL/PUSH EXEC dial. (3) Turn the SEL/PUSH EXEC dial to select SET, then press the dial. (4) Turn the SEL/PUSH EXEC... WB SH I FT AE SH I FT AGC LIMIT RESET RETURN CUSTOM PRESET STBY [CP] : ENCDOLOR LVL [CP] : END 62 Custom preset You can preset the camcorder to adjust the selected item, then press the dial. (7) Press CUSTOM PRESET.
... indicator appears on a TV (p. 45). (1) Press CUSTOM PRESET to display the CUSTOM PRESET menu while the POWER switch is set to CAMERA or MEMORY/NETWORK (DCR-TRV950 only). (2) Press the SEL/PUSH EXEC dial. (3) Turn the SEL/PUSH EXEC dial to select SET, then press the dial. (4) Turn the SEL/PUSH EXEC... WB SH I FT AE SH I FT AGC LIMIT RESET RETURN CUSTOM PRESET STBY [CP] : ENCDOLOR LVL [CP] : END 62 Custom preset You can preset the camcorder to adjust the selected item, then press the dial. (7) Press CUSTOM PRESET.


