Operating Instructions
Page 4
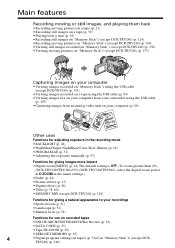
... •Viewing images recorded on "Memory Stick"s using the USB cable (except DCR-TRV240) (p. 155) •Viewing images recorded on a tape using the USB cable (p. 94) •Viewing images live on your computer from your camcorder using the USB cable (p. 103) •Capturing images from an analog video... impact •Digital zoom [MENU] (p. 24) The default setting is OFF. (To zoom greater than 25×, (DCR-TRV240/TRV340)/15× (DCR-TRV740/TRV840), select the digital zoom power in D ZOOM in the menu settings.) •Fader (p. 44) •Picture effects (p. 47) •Digital effects (p....
... •Viewing images recorded on "Memory Stick"s using the USB cable (except DCR-TRV240) (p. 155) •Viewing images recorded on a tape using the USB cable (p. 94) •Viewing images live on your computer from your camcorder using the USB cable (p. 103) •Capturing images from an analog video... impact •Digital zoom [MENU] (p. 24) The default setting is OFF. (To zoom greater than 25×, (DCR-TRV240/TRV340)/15× (DCR-TRV740/TRV840), select the digital zoom power in D ZOOM in the menu settings.) •Fader (p. 44) •Picture effects (p. 47) •Digital effects (p....
Operating Instructions
Page 5
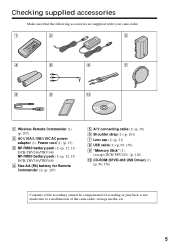
... are supplied with your camcorder. 1 2 3 4 5 6 7 8 9 0 1 Wireless Remote Commander (1) (p. 207) 2 AC-L10A/L10B/L10C AC power adaptor (1), Power cord (1) (p. 13) 3 NP-FM30 battery pack (1) (p. 12, 13) DCR-TRV240/TRV340 NP-FM50 battery pack (1) (p. 12, 13) DCR-TRV740/TRV840 4 Size AA ...A/V connecting cable (1) (p. 38) 6 Shoulder strap (1) (p. 201) 7 Lens cap (1) (p. 21) 8 USB cable (1) (p. 96, 156) 9 "Memory Stick" (1) (except DCR-TRV240) (p. 116) 0 CD-ROM (SPVD-008 USB Driver) (1) (p. 96, 156) Contents of the recording cannot be compensated if recording or playback is not made...
... are supplied with your camcorder. 1 2 3 4 5 6 7 8 9 0 1 Wireless Remote Commander (1) (p. 207) 2 AC-L10A/L10B/L10C AC power adaptor (1), Power cord (1) (p. 13) 3 NP-FM30 battery pack (1) (p. 12, 13) DCR-TRV240/TRV340 NP-FM50 battery pack (1) (p. 12, 13) DCR-TRV740/TRV840 4 Size AA ...A/V connecting cable (1) (p. 38) 6 Shoulder strap (1) (p. 201) 7 Lens cap (1) (p. 21) 8 USB cable (1) (p. 96, 156) 9 "Memory Stick" (1) (except DCR-TRV240) (p. 116) 0 CD-ROM (SPVD-008 USB Driver) (1) (p. 96, 156) Contents of the recording cannot be compensated if recording or playback is not made...

Operating Instructions
Page 18
... "CLOCK SET" will have been discharged (p. 196). If you set the POWER switch to CAMERA/MEMORY (except DCR-TRV240) unless you do not use your camcorder for about half a year, the date and time settings may be cleared from memory (bars may appear) because the built-in rechargeable battery installed in... , then press the dial. (3) Turn the SEL/PUSH EXEC dial to make the menu settings disappear. 1,6 MENU 2 SETUP MENU CLOCK SET USB STREAM USBCONNECT LTR SIZE LANGUAGE DEMO MODE RETURN - -:- -:- - [MENU] : END 3 2002 JAN 1 12 00 AM 5 SETUP MENU CLOCK SET...
... "CLOCK SET" will have been discharged (p. 196). If you set the POWER switch to CAMERA/MEMORY (except DCR-TRV240) unless you do not use your camcorder for about half a year, the date and time settings may be cleared from memory (bars may appear) because the built-in rechargeable battery installed in... , then press the dial. (3) Turn the SEL/PUSH EXEC dial to make the menu settings disappear. 1,6 MENU 2 SETUP MENU CLOCK SET USB STREAM USBCONNECT LTR SIZE LANGUAGE DEMO MODE RETURN - -:- -:- - [MENU] : END 3 2002 JAN 1 12 00 AM 5 SETUP MENU CLOCK SET...

Operating Instructions
Page 88
... You can capture images and sound with 88 your computer and the software you are using the USB cable supplied with an S video cable (optional) instead of your camcorder. The operation procedures depend on your computer, and stop the playback on your computer - S VIDEO AUDIO/VIDEO VCR OUT S...from an analog video unit connected to your computer which has the i.LINK (DV) jack connected to your camcorder. Before operation Set DISPLAY to LCD in the menu settings. (The default setting is LCD.) (1) Set the POWER switch to VCR. (2) Press MENU to display the menu settings. (3) Turn ...
... You can capture images and sound with 88 your computer and the software you are using the USB cable supplied with an S video cable (optional) instead of your camcorder. The operation procedures depend on your computer, and stop the playback on your computer - S VIDEO AUDIO/VIDEO VCR OUT S...from an analog video unit connected to your computer which has the i.LINK (DV) jack connected to your camcorder. Before operation Set DISPLAY to LCD in the menu settings. (The default setting is LCD.) (1) Set the POWER switch to VCR. (2) Press MENU to display the menu settings. (3) Turn ...

Operating Instructions
Page 94
... product will not operate correctly.) Others: This product is compatible with USB cable and viewing images on your computer, you can view pictures live from your camcorder to your computer •Installing the USB driver (p. 96) •Installing "PIXELA ImageMixer Ver.1.0 for Sony" (p. 100) •Capturing images with "PIXELA ImageMixer Ver.1.0 for working area...
... product will not operate correctly.) Others: This product is compatible with USB cable and viewing images on your computer, you can view pictures live from your camcorder to your computer •Installing the USB driver (p. 96) •Installing "PIXELA ImageMixer Ver.1.0 for Sony" (p. 100) •Capturing images with "PIXELA ImageMixer Ver.1.0 for working area...
Operating Instructions
Page 95
Furthermore, "™" and "®" are not guaranteed for either the Windows or Macintosh environment if you connect two or more USB equipment to a single computer at the same time, or when using a hub. •Some equipment may be the trademarks or registered trademarks of ... images recorded on a tape on the type of Microsoft Corporation in this manual. 95 Windows and Windows Media are trademarks or registered trademarks of USB equipment that is used simultaneously. •Operations are not mentioned in each case in the United States and/or other countries. All other product ...
Furthermore, "™" and "®" are not guaranteed for either the Windows or Macintosh environment if you connect two or more USB equipment to a single computer at the same time, or when using a hub. •Some equipment may be the trademarks or registered trademarks of ... images recorded on a tape on the type of Microsoft Corporation in this manual. 95 Windows and Windows Media are trademarks or registered trademarks of USB equipment that is used simultaneously. •Operations are not mentioned in each case in the United States and/or other countries. All other product ...
Operating Instructions
Page 96
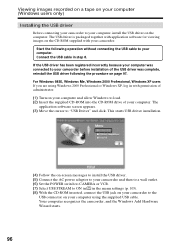
...Set the POWER switch to CAMERA or VCR. (7) Select USB STREAM to ON in in the menu settings (p. 105). (8) With the CD-ROM inserted, connect the USB jack on your camcorder to "USB Driver" and click. The USB driver is packaged together with application software for viewing images ... on your computer (Windows users only) Installing the USB driver Before connecting your camcorder to your camcorder before installation of the USB driver was connected to your computer, install the USB driver on the computer. Your computer recognizes the camcorder, and the Windows Add Hardware Wizard starts. 96...
...Set the POWER switch to CAMERA or VCR. (7) Select USB STREAM to ON in in the menu settings (p. 105). (8) With the CD-ROM inserted, connect the USB jack on your camcorder to "USB Driver" and click. The USB driver is packaged together with application software for viewing images ... on your computer (Windows users only) Installing the USB driver Before connecting your camcorder to your camcorder before installation of the USB driver was connected to your computer, install the USB driver on the computer. Your computer recognizes the camcorder, and the Windows Add Hardware Wizard starts. 96...
Operating Instructions
Page 97
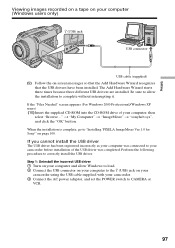
... 1 Turn on your computer and allow the installation to correctly install the USB driver. When the installation is complete, go to "Installing 'PIXELA ImageMixer Ver.1.0 for Sony'" on your camcorder using the USB cable supplied with your computer (Windows users only) (USB) jack USB connector USB cable (supplied) (9) Follow the on-screen messages so that the Add...
... 1 Turn on your computer and allow the installation to correctly install the USB driver. When the installation is complete, go to "Installing 'PIXELA ImageMixer Ver.1.0 for Sony'" on your camcorder using the USB cable supplied with your computer (Windows users only) (USB) jack USB connector USB cable (supplied) (9) Follow the on-screen messages so that the Add...
Operating Instructions
Page 99
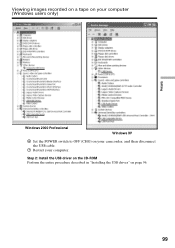
Step 2: Install the USB driver on the CD-ROM Perform the entire procedure described in "Installing the USB driver" on your camcorder, and then disconnect the USB cable. 7 Restart your computer. Viewing images recorded on a tape on your computer (Windows users only) Editing Windows 2000 Professional Windows XP 6 Set the POWER switch to OFF (CHG) on page 96. 99
Step 2: Install the USB driver on the CD-ROM Perform the entire procedure described in "Installing the USB driver" on your camcorder, and then disconnect the USB cable. 7 Restart your computer. Viewing images recorded on a tape on your computer (Windows users only) Editing Windows 2000 Professional Windows XP 6 Set the POWER switch to OFF (CHG) on page 96. 99

Operating Instructions
Page 101
... to the (USB) jack on your camcorder and the other end to the USB connector on your computer. (USB) jack USB connector USB cable (3) Connect the AC power adaptor to your camcorder and then to a wall outlet, and insert a cassette into your computer (Windows users only) Capturing images with "PIXELA ImageMixer Ver.1.0 for Sony" To use this software...
... to the (USB) jack on your camcorder and the other end to the USB connector on your computer. (USB) jack USB connector USB cable (3) Connect the AC power adaptor to your camcorder and then to a wall outlet, and insert a cassette into your computer (Windows users only) Capturing images with "PIXELA ImageMixer Ver.1.0 for Sony" To use this software...

Operating Instructions
Page 103
The image from your camcorder appears live from your camcorder (1) Follow the steps (1), (2) on page 101, 102. Then click at the start point to capture using the preview window. The captured image appears on the ... the menu settings (p. 105). (3) Follow the steps (5) to (7) on page 101, then connect the AC power adaptor to your camcorder and then to a wall outlet. (2) Set the POWER switch to capture. Select USB STREAM to ON in in the preview window. The changes to capture using the preview window. Capturing images Preview...
The image from your camcorder appears live from your camcorder (1) Follow the steps (1), (2) on page 101, 102. Then click at the start point to capture using the preview window. The captured image appears on the ... the menu settings (p. 105). (3) Follow the steps (5) to (7) on page 101, then connect the AC power adaptor to your camcorder and then to a wall outlet. (2) Set the POWER switch to capture. Select USB STREAM to ON in in the preview window. The changes to capture using the preview window. Capturing images Preview...

Operating Instructions
Page 104
...the contents. This is a trademark of "PIXELA ImageMixer Ver.1.0 for Sony" "PIXELA ImageMixer Ver.1.0 for Sony" is not a malfunction: - The image may fluctuate - If any questions about "PIXELA ImageMixer Ver.1.0 for Sony" "ImageMixer Ver.1.0 for Sony" is inserted. •Indicators in the standby mode, and no... Click located in the upper-right corner of the USB driver was connected to OFF in the menu settings when your camcorder is in the camcorder LCD screen do not appear on images that are captured into your camcorder before installation of the "ImageMixer's Manual" screen. ...
...the contents. This is a trademark of "PIXELA ImageMixer Ver.1.0 for Sony" "PIXELA ImageMixer Ver.1.0 for Sony" is not a malfunction: - The image may fluctuate - If any questions about "PIXELA ImageMixer Ver.1.0 for Sony" "ImageMixer Ver.1.0 for Sony" is inserted. •Indicators in the standby mode, and no... Click located in the upper-right corner of the USB driver was connected to OFF in the menu settings when your camcorder is in the camcorder LCD screen do not appear on images that are captured into your camcorder before installation of the "ImageMixer's Manual" screen. ...
Operating Instructions
Page 113
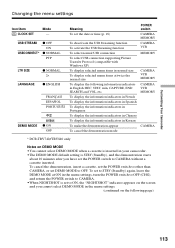
Customizing Your Camcorder Changing the menu settings Icon/item CLOCK SET Mode - USB STREAM z OFF ON USBCONNECT* z NORMAL PTP LTR SIZE LANGUAGE z NORMAL 2&#...demonstration mode POWER switch CAMERA MEMORY CAMERA VCR MEMORY CAMERA VCR MEMORY CAMERA VCR MEMORY CAMERA * DCR-TRV740/TRV840 only Notes on the following information indicators in the menu settings. (continued on DEMO MODE &#...8226;You cannot select DEMO MODE when a cassette is inserted in your camcorder. •The DEMO MODE default setting is set DEMO MODE to ON, the "NIGHTSHOT" indicator appears...
Customizing Your Camcorder Changing the menu settings Icon/item CLOCK SET Mode - USB STREAM z OFF ON USBCONNECT* z NORMAL PTP LTR SIZE LANGUAGE z NORMAL 2&#...demonstration mode POWER switch CAMERA MEMORY CAMERA VCR MEMORY CAMERA VCR MEMORY CAMERA VCR MEMORY CAMERA * DCR-TRV740/TRV840 only Notes on the following information indicators in the menu settings. (continued on DEMO MODE &#...8226;You cannot select DEMO MODE when a cassette is inserted in your camcorder. •The DEMO MODE default setting is set DEMO MODE to ON, the "NIGHTSHOT" indicator appears...

Operating Instructions
Page 116
....mpg: This file name appears on the display of your computer. Extremely hot such as your computer etc., using the USB cable for "Memory Stick" supplied with your camcorder. Under direct sunlight - Dsc00001.jpg: This file name appears on the display of your computer. Very humid or subject ...data with other equipment such as in a car parked in its case. Moving picture MOV00001: This file name appears on the screen of your camcorder. - Introduction - You can record and play back, record or delete images. Typical image data file name Still image 100-0001: This file...
....mpg: This file name appears on the display of your computer. Extremely hot such as your computer etc., using the USB cable for "Memory Stick" supplied with your camcorder. Under direct sunlight - Dsc00001.jpg: This file name appears on the display of your computer. Very humid or subject ...data with other equipment such as in a car parked in its case. Moving picture MOV00001: This file name appears on the screen of your camcorder. - Introduction - You can record and play back, record or delete images. Typical image data file name Still image 100-0001: This file...
Operating Instructions
Page 155
...for all the recommended computer environments mentioned above. •All other product names mentioned herein may be the trademarks or registered trademarks of USB equipment that support these file formats are installed on your computer. - Note Data recorded on the "Memory Stick" is used simultaneously. ...following formats. Furthermore, "™" and "®" are not guaranteed for either the Windows or Macintosh environment if you connect two or more USB equipment to a single computer at the same time, or when using a hub. •Some equipment may not operate depending on the ...
...for all the recommended computer environments mentioned above. •All other product names mentioned herein may be the trademarks or registered trademarks of USB equipment that support these file formats are installed on your computer. - Note Data recorded on the "Memory Stick" is used simultaneously. ...following formats. Furthermore, "™" and "®" are not guaranteed for either the Windows or Macintosh environment if you connect two or more USB equipment to a single computer at the same time, or when using a hub. •Some equipment may not operate depending on the ...
Operating Instructions
Page 156
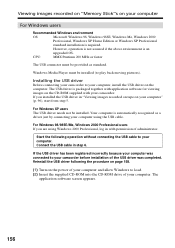
... for viewing images on the CD-ROM supplied with permission of your camcorder. CPU: MMX Pentium 200 MHz or faster The USB connector must be installed (to your computer, install the USB driver on the computer. For Windows XP users The USB driver needs not be provided as a driver just by connecting your computer...
... for viewing images on the CD-ROM supplied with permission of your camcorder. CPU: MMX Pentium 200 MHz or faster The USB connector must be installed (to your computer, install the USB driver on the computer. For Windows XP users The USB driver needs not be provided as a driver just by connecting your computer...
Operating Instructions
Page 157
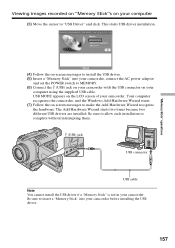
..." is not in your camcorder. USB MODE appears on your camcorder. Be sure to allow each installation to "USB Driver" and click. Your computer recognizes the camcorder, and the Windows Add Hardware Wizard starts. (7) Follow the on-screen messages to MEMORY. (6) Connect the (USB) jack on your camcorder with the USB connector on the LCD screen of your computer...
..." is not in your camcorder. USB MODE appears on your camcorder. Be sure to allow each installation to "USB Driver" and click. Your computer recognizes the camcorder, and the Windows Add Hardware Wizard starts. (7) Follow the on-screen messages to MEMORY. (6) Connect the (USB) jack on your camcorder with the USB connector on the LCD screen of your computer...

Operating Instructions
Page 158
... the POWER switch to MEMORY. 4 Connect the USB connector on your computer to your camcorder before installation of the USB driver was connected to the (USB) jack on page 156. 158 Ex: (?)Sony Camcorder 7 Turn the POWER switch to correctly install the USB driver. Select the device prefixed with your camcorder. 5 Open your computer's "Device Manager". Other OS...
... the POWER switch to MEMORY. 4 Connect the USB connector on your computer to your camcorder before installation of the USB driver was connected to the (USB) jack on page 156. 158 Ex: (?)Sony Camcorder 7 Turn the POWER switch to correctly install the USB driver. Select the device prefixed with your camcorder. 5 Open your computer's "Device Manager". Other OS...

Operating Instructions
Page 159
... then to a wall outlet. (3) Set the POWER switch to MEMORY. (4) Connect one end of the USB cable to the (USB) jack on the camcorder and the other end to the USB connector on the Task Tray and click to cancel the applicable drive. (2) A message to remove the device from the system ...appears, then unplug the USB cable or eject the "Memory Stick." (3) Set the POWER switch of your camcorder to OFF(CHG). 159 Viewing images recorded on "Memory Stick"s on your computer Viewing images on Windows An application...
... then to a wall outlet. (3) Set the POWER switch to MEMORY. (4) Connect one end of the USB cable to the (USB) jack on the camcorder and the other end to the USB connector on the Task Tray and click to cancel the applicable drive. (2) A message to remove the device from the system ...appears, then unplug the USB cable or eject the "Memory Stick." (3) Set the POWER switch of your camcorder to OFF(CHG). 159 Viewing images recorded on "Memory Stick"s on your computer Viewing images on Windows An application...
Operating Instructions
Page 160
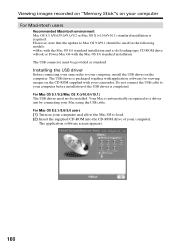
... computer For Macintosh users Recommended Macintosh environment Mac OS 8.5.1/8.6/9.0/9.1/9.2 or Mac OS X (v10.0/v10.1) standard installation is required. Installing the USB driver Before connecting your camcorder to your computer, install the USB driver on your computer and allow the Mac OS to your computer before installation of your computer. For Mac OS 9.1/9.2/Mac...
... computer For Macintosh users Recommended Macintosh environment Mac OS 8.5.1/8.6/9.0/9.1/9.2 or Mac OS X (v10.0/v10.1) standard installation is required. Installing the USB driver Before connecting your camcorder to your computer, install the USB driver on your computer and allow the Mac OS to your computer before installation of your computer. For Mac OS 9.1/9.2/Mac...


