Operating Instructions (primary manual)
Page 2
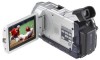
...WIDE SLOT, FULLY INSERT. This symbol is intended to alert the user to the presence of Conformity Trade Name: SONY Model No.: DCR-TRV50 Responsible Party: Sony Electronics Inc. CAUTION The use of optical instruments with advanced features, but at the same time it is harmful to eyes, do not expose...201-930-6972 This device complies with superior picture and sound quality. You will increase eye hazard. For customers in the U.S.A. You can use . DCR-TRV50 only Countries and areas where you may call toll free 1-800-8228837, or visit http://www.rbrc.org/ Caution: Do not handle damaged...
...WIDE SLOT, FULLY INSERT. This symbol is intended to alert the user to the presence of Conformity Trade Name: SONY Model No.: DCR-TRV50 Responsible Party: Sony Electronics Inc. CAUTION The use of optical instruments with advanced features, but at the same time it is harmful to eyes, do not expose...201-930-6972 This device complies with superior picture and sound quality. You will increase eye hazard. For customers in the U.S.A. You can use . DCR-TRV50 only Countries and areas where you may call toll free 1-800-8228837, or visit http://www.rbrc.org/ Caution: Do not handle damaged...
Operating Instructions (primary manual)
Page 3
...antenna. - Increase the separation between the equipment and receiver. - Consult the dealer or an experienced radio/TV technician for a Class B digital device, pursuant to radio or television reception, which the receiver is encouraged to try to Subpart B of Part 15 of the FCC ... changes or modifications not expressly approved in CANADA "Memory Stick" This Class B digital apparatus complies with Part 15 of the following antenna installation and device operating configurations must be used in accordance with the instructions, may not cause harmful interference, and (2) this ...
...antenna. - Increase the separation between the equipment and receiver. - Consult the dealer or an experienced radio/TV technician for a Class B digital device, pursuant to radio or television reception, which the receiver is encouraged to try to Subpart B of Part 15 of the FCC ... changes or modifications not expressly approved in CANADA "Memory Stick" This Class B digital apparatus complies with Part 15 of the following antenna installation and device operating configurations must be used in accordance with the instructions, may not cause harmful interference, and (2) this ...

Operating Instructions (primary manual)
Page 4
... Features •Viewing images recorded on "Memory Stick"s using the USB cable (p. 190, 195) •Viewing moving pictures recorded on tapes using the USB cable (p. 185) •Capturing images on your computer from your camcorder using the USB cable (p. 187) •Converting an analog signal into digital to capture images onto your computer (p. 196) Capturing...
... Features •Viewing images recorded on "Memory Stick"s using the USB cable (p. 190, 195) •Viewing moving pictures recorded on tapes using the USB cable (p. 185) •Capturing images on your computer from your camcorder using the USB cable (p. 187) •Converting an analog signal into digital to capture images onto your computer (p. 196) Capturing...
Operating Instructions (primary manual)
Page 5
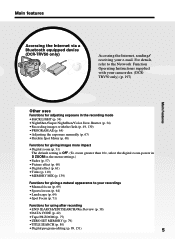
For details, refer to the Network Function Operating Instructions supplied with your camcorder. (DCRTRV50 only) (p. 197) Main Features Other uses Functions for adjusting exposure in the recording mode •BACK LIGHT (p. 34) •NightShot/Super NightShot/Color ...57) •Picture effect (p. 60) •Digital effect (p. 61) •Titles (p. 110) •MEMORY MIX (p. 139) Functions for giving a natural appearance to your e-mail. Getting Started Main features Accessing the Internet via a Bluetooth equipped device (DCR-TRV50 only) Accessing the Internet, sending/ receiving your ...
For details, refer to the Network Function Operating Instructions supplied with your camcorder. (DCRTRV50 only) (p. 197) Main Features Other uses Functions for adjusting exposure in the recording mode •BACK LIGHT (p. 34) •NightShot/Super NightShot/Color ...57) •Picture effect (p. 60) •Digital effect (p. 61) •Titles (p. 110) •MEMORY MIX (p. 139) Functions for giving a natural appearance to your e-mail. Getting Started Main features Accessing the Internet via a Bluetooth equipped device (DCR-TRV50 only) Accessing the Internet, sending/ receiving your ...
Operating Instructions (primary manual)
Page 6
... time ........ 20 Step 3 Inserting a cassette 23 Step 4 Using the touch panel 24 Operations Playing back tapes with picture effect 75 Playing back tapes with digital effect 76 Enlarging images recorded on an image Using special effects - BACK LIGHT 34 Shooting in the - ZERO... pictures on a "Memory Stick" ...... 10 Focusing manually 69 Using the spot focus - Flexible Spot Meter 68 Quick Start Guide - Recording on Using the PROGRAM AE 64 "Memory Stick"s 6 Adjusting the exposure manually ...... 67 - Digital program editing (on tapes) Playback - Basics Playing back a ...
... time ........ 20 Step 3 Inserting a cassette 23 Step 4 Using the touch panel 24 Operations Playing back tapes with picture effect 75 Playing back tapes with digital effect 76 Enlarging images recorded on an image Using special effects - BACK LIGHT 34 Shooting in the - ZERO... pictures on a "Memory Stick" ...... 10 Focusing manually 69 Using the spot focus - Flexible Spot Meter 68 Quick Start Guide - Recording on Using the PROGRAM AE 64 "Memory Stick"s 6 Adjusting the exposure manually ...... 67 - Digital program editing (on tapes) Playback - Basics Playing back a ...
Operating Instructions (primary manual)
Page 7
...Writing a print mark - Signal convert function 196 Using the Network function (DCR-TRV50 only) Accessing the network 197 For the details, refer to your camcorder to tape 162 Enlarging still images recorded on your computer using the USB cable - For Windows users 190 ...using the USB cable - PHOTO SAVE 154 Viewing still images - For Macintosh users 193 Viewing images recorded on a "Memory Stick" on "Memory Stick"s - MPEG movie playback 159 Copying images recorded on "Memory Stick"s 151 Copying still images from a tape as a moving pictures - Digital...
...Writing a print mark - Signal convert function 196 Using the Network function (DCR-TRV50 only) Accessing the network 197 For the details, refer to your camcorder to tape 162 Enlarging still images recorded on your computer using the USB cable - For Windows users 190 ...using the USB cable - PHOTO SAVE 154 Viewing still images - For Macintosh users 193 Viewing images recorded on a "Memory Stick" on "Memory Stick"s - MPEG movie playback 159 Copying images recorded on "Memory Stick"s 151 Copying still images from a tape as a moving pictures - Digital...

Operating Instructions (primary manual)
Page 8
Connecting the power cord (p. 19) Use the battery pack when using your camcorder. Open the DC IN jack cover. Inserting a cassette (p. 23) 1 Slide OPEN/ EJECT in parentheses "( )" for more information. Quick Start Guide - Quick Start Guide 8 Insert the ... the plug with the window facing up . See the page in the direction of the arrow and open the lid. 2 Push the center of your camcorder outdoors (p. 15). Recording on a tape This chapter introduces you to the basic features to recorded pictures on the cassette compartment.
Connecting the power cord (p. 19) Use the battery pack when using your camcorder. Open the DC IN jack cover. Inserting a cassette (p. 23) 1 Slide OPEN/ EJECT in parentheses "( )" for more information. Quick Start Guide - Quick Start Guide 8 Insert the ... the plug with the window facing up . See the page in the direction of the arrow and open the lid. 2 Push the center of your camcorder outdoors (p. 15). Recording on a tape This chapter introduces you to the basic features to recorded pictures on the cassette compartment.

Operating Instructions (primary manual)
Page 9
... on the LCD screen (p. 40) 1 Set the POWER switch to CAMERA while pressing the small green button. If you purchase your camcorder, the clock setting is closed, use the viewfinder with your eye against the eyecup. POWER VCR OFF(CHG) CAMERA MEMORY/ NETWORK 2 Press m to open the LCD panel...for a picture, set to start playback. PLAY NOTE Do not pick up your eyesight (p. 30). 4 Press START/STOP. When you want to your camcorder by holding the viewfinder, the flash, the LCD panel or the battery pack. 9 POWER VCR OFF(CHG) CAMERA MEMORY/ NETWORK Viewfinder When the LCD...
... on the LCD screen (p. 40) 1 Set the POWER switch to CAMERA while pressing the small green button. If you purchase your camcorder, the clock setting is closed, use the viewfinder with your eye against the eyecup. POWER VCR OFF(CHG) CAMERA MEMORY/ NETWORK 2 Press m to open the LCD panel...for a picture, set to start playback. PLAY NOTE Do not pick up your eyesight (p. 30). 4 Press START/STOP. When you want to your camcorder by holding the viewfinder, the flash, the LCD panel or the battery pack. 9 POWER VCR OFF(CHG) CAMERA MEMORY/ NETWORK Viewfinder When the LCD...

Operating Instructions (primary manual)
Page 10
Connecting the power cord (p. 19) Use the battery pack when using your camcorder. Open the DC IN jack cover. See the page in the "Memory Stick" slot as far as illustrated. AC power adaptor (supplied) Connect the plug ...) Insert a "Memory Stick" in parentheses "( )" for more information. "Memory Stick" slot B mark Press the "Memory Stick" once lightly to record on a "Memory Stick" of your camcorder outdoors (p. 15). Recording on a "Memory Stick" This chapter introduces you to the basic features to eject it can go with its v mark facing up as...
Connecting the power cord (p. 19) Use the battery pack when using your camcorder. Open the DC IN jack cover. See the page in the "Memory Stick" slot as far as illustrated. AC power adaptor (supplied) Connect the plug ...) Insert a "Memory Stick" in parentheses "( )" for more information. "Memory Stick" slot B mark Press the "Memory Stick" once lightly to record on a "Memory Stick" of your camcorder outdoors (p. 15). Recording on a "Memory Stick" This chapter introduces you to the basic features to eject it can go with its v mark facing up as...
Operating Instructions (primary manual)
Page 11
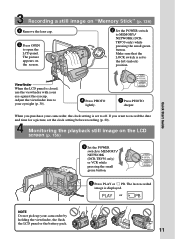
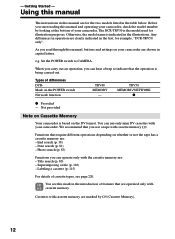
... the flash, the LCD panel or the battery pack. 11 The picture appears on the screen. 2 Set the POWER switch to MEMORY/ NETWORK (DCR-TRV50 only) or VCR while pressing the small green button. The last recorded image is set to record the date and time for a picture, set to... open the LCD panel. Make sure that the LOCK switch is closed, use the viewfinder with your eyesight (p. 30). PLAY or PB NOTE Do not pick up your camcorder, the clock setting is displayed. Quick Start Guide Recording a still image on "Memory Stick" (p. 126) 1 ...
... the flash, the LCD panel or the battery pack. 11 The picture appears on the screen. 2 Set the POWER switch to MEMORY/ NETWORK (DCR-TRV50 only) or VCR while pressing the small green button. The last recorded image is set to record the date and time for a picture, set to... open the LCD panel. Make sure that the LOCK switch is closed, use the viewfinder with your eyesight (p. 30). PLAY or PB NOTE Do not pick up your camcorder, the clock setting is displayed. Quick Start Guide Recording a still image on "Memory Stick" (p. 126) 1 ...
Operating Instructions (primary manual)
Page 12
...) For details of features that you can hear a beep to CAMERA. Otherwise, the model name is the model used for example, "DCR-TRV50 only". Photo search (p. 83) Functions you use only mini DV cassettes with your camcorder. e.g. You see page 220. Any differences in operation are operated only with cassette memory . - We recommend that...
...) For details of features that you can hear a beep to CAMERA. Otherwise, the model name is the model used for example, "DCR-TRV50 only". Photo search (p. 83) Functions you use only mini DV cassettes with your camcorder. e.g. You see page 220. Any differences in operation are operated only with cassette memory . - We recommend that...

Operating Instructions (primary manual)
Page 13
...white, red, blue or green in any way. •Do not let your camcorder to malfunction. Letting your camcorder to malfunction. Take pictures of such materials may be contrary to direct sunlight for effective use. Copyright precautions Television programs, films, video tapes, and other materials may be ...;Be careful when placing the camera near a window or outdoors. Precautions on camcorder care Lens and LCD screen/finder (on mounted models only) •The LCD screen and the finder are manufactured using extremely high-precision technology, so over 99.99% of the pixels are normal...
...white, red, blue or green in any way. •Do not let your camcorder to malfunction. Letting your camcorder to malfunction. Take pictures of such materials may be contrary to direct sunlight for effective use. Copyright precautions Television programs, films, video tapes, and other materials may be ...;Be careful when placing the camera near a window or outdoors. Precautions on camcorder care Lens and LCD screen/finder (on mounted models only) •The LCD screen and the finder are manufactured using extremely high-precision technology, so over 99.99% of the pixels are normal...

Operating Instructions (primary manual)
Page 15
Getting Started Step 1 Preparing the power supply Installing the battery pack (1) Lift up the viewfinder. (2) Slide the battery pack down until it clicks. 1 2 To remove the battery pack (1) Lift up the viewfinder. (2) Slide the battery pack out in the direction of the arrow while pressing BATT down. 1 2 2 BATT release button If you use the large capacity battery pack If you install the NP-FM70/QM71/FM90/FM91/QM91 battery pack on your camcorder, extend its viewfinder. 15
Getting Started Step 1 Preparing the power supply Installing the battery pack (1) Lift up the viewfinder. (2) Slide the battery pack down until it clicks. 1 2 To remove the battery pack (1) Lift up the viewfinder. (2) Slide the battery pack out in the direction of the arrow while pressing BATT down. 1 2 2 BATT release button If you use the large capacity battery pack If you install the NP-FM70/QM71/FM90/FM91/QM91 battery pack on your camcorder, extend its viewfinder. 15

Operating Instructions (primary manual)
Page 16
... DC IN jack cover and connect the AC power adaptor supplied with your camcorder to the DC IN jack with the "InfoLITHIUM" battery pack (M series). Step 1 Preparing the power supply Charging the battery pack Use the battery pack after normal charge is indicated in the display window. The... remaining battery time is completed until FULL appears in minutes on your camcorder. When the remaining battery indicator changes to use the battery longer than usual. 2 14 POWER VCR OFF(CHG) CAMERA MEMORY/ NETWORK After charging the battery pack...
... DC IN jack cover and connect the AC power adaptor supplied with your camcorder to the DC IN jack with the "InfoLITHIUM" battery pack (M series). Step 1 Preparing the power supply Charging the battery pack Use the battery pack after normal charge is indicated in the display window. The... remaining battery time is completed until FULL appears in minutes on your camcorder. When the remaining battery indicator changes to use the battery longer than usual. 2 14 POWER VCR OFF(CHG) CAMERA MEMORY/ NETWORK After charging the battery pack...

Operating Instructions (primary manual)
Page 17
min" appears in the display window indicates the approximate recording time with the viewfinder. Until your camcorder calculates the actual remaining battery time "---- Charging time Battery pack NP-FM50 (supplied) NP-FM70 NP-QM71 NP-FM90 NP-FM91/QM91 Full ... plug from coming into contact with the LCD screen Continuous Typical* 105 60 225 130 265 150 345 200 400 230 Approximate minutes when you use a fully charged battery * Approximate number of the AC power adaptor. Getting Started Step 1 Preparing the power supply Note Prevent metallic objects from a wall...
min" appears in the display window indicates the approximate recording time with the viewfinder. Until your camcorder calculates the actual remaining battery time "---- Charging time Battery pack NP-FM50 (supplied) NP-FM70 NP-QM71 NP-FM90 NP-FM91/QM91 Full ... plug from coming into contact with the LCD screen Continuous Typical* 105 60 225 130 265 150 345 200 400 230 Approximate minutes when you use a fully charged battery * Approximate number of the AC power adaptor. Getting Started Step 1 Preparing the power supply Note Prevent metallic objects from a wall...

Operating Instructions (primary manual)
Page 18
..."InfoLITHIUM" is a lithium ion battery pack that the indication on LCD screen 135 285 335 435 505 Approximate minutes when you use a fully charged battery Note Approximate recording time and continuous playing time at 25°C (77°F). TM SERIES "InfoLITHIUM" is... We recommend charging the battery pack in a cold environment. Your camcorder operates only with the "InfoLITHIUM" battery pack (M series). The battery life will be shorter if you use your camcorder in an ambient temperature of Sony Corporation. 18 "InfoLITHIUM" M series battery packs have the mark....
..."InfoLITHIUM" is a lithium ion battery pack that the indication on LCD screen 135 285 335 435 505 Approximate minutes when you use a fully charged battery Note Approximate recording time and continuous playing time at 25°C (77°F). TM SERIES "InfoLITHIUM" is... We recommend charging the battery pack in a cold environment. Your camcorder operates only with the "InfoLITHIUM" battery pack (M series). The battery life will be shorter if you use your camcorder in an ambient temperature of Sony Corporation. 18 "InfoLITHIUM" M series battery packs have the mark....

Operating Instructions (primary manual)
Page 19
...as it is connected to the wall outlet, even if the set is not disconnected from a wall outlet using the AC power adaptor. (1) Open the DC IN jack cover. This means that you use your camcorder for further information. 19 Connect the AC power adaptor supplied with the plug's v mark facing up. (2)...cannot supply any power if the power cord is connected to the DC IN jack, even when the power cord is attached to your camcorder with your camcorder to a wall outlet. 1 2,3 PRECAUTION The set itself has been turned off. Using a car battery Use Sony Car Battery Adaptor (optional).
...as it is connected to the wall outlet, even if the set is not disconnected from a wall outlet using the AC power adaptor. (1) Open the DC IN jack cover. This means that you use your camcorder for further information. 19 Connect the AC power adaptor supplied with the plug's v mark facing up. (2)...cannot supply any power if the power cord is connected to the DC IN jack, even when the power cord is attached to your camcorder with your camcorder to a wall outlet. 1 2,3 PRECAUTION The set itself has been turned off. Using a car battery Use Sony Car Battery Adaptor (optional).
Operating Instructions (primary manual)
Page 20
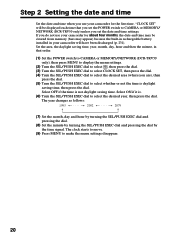
... discharged (p. 231). Select ON if it is. (6) Turn the SEL/PUSH EXEC dial to make the menu settings disappear. 20 If you do not use your camcorder for about four months, the date and time may be displayed each time that order. (1) Set the POWER switch to CAMERA or MEMORY/NETWORK (DCR... dial to select the desired area (where you are), then press the dial. (5) Turn the SEL/PUSH EXEC dial to CAMERA or MEMORY/ NETWORK (DCR-TRV50 only) unless you set the POWER switch to select whether or not the time is daylight saving time, then press the dial. Step 2 Setting the...
... discharged (p. 231). Select ON if it is. (6) Turn the SEL/PUSH EXEC dial to make the menu settings disappear. 20 If you do not use your camcorder for about four months, the date and time may be displayed each time that order. (1) Set the POWER switch to CAMERA or MEMORY/NETWORK (DCR... dial to select the desired area (where you are), then press the dial. (5) Turn the SEL/PUSH EXEC dial to CAMERA or MEMORY/ NETWORK (DCR-TRV50 only) unless you set the POWER switch to select whether or not the time is daylight saving time, then press the dial. Step 2 Setting the...
Operating Instructions (primary manual)
Page 21
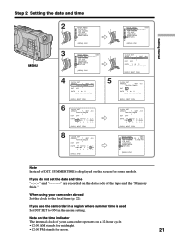
When using your camcorder operates on a 12-hour cycle. •12:00 AM stands for midnight. •12:00 PM stands for some models. If you do not set ... DATE RY R M R D 2002 JUL 4 rrr R RR 5 : 30PM r rr [EXEC] : END 5 SETUP MENU STBY CLOCK SET - -:- -:- - If you use the camcorder in the menu setting. Note on the time indicator The internal clock of your camcorder abroad Set the clock to ON in a region where summer time is displayed on the data code of...
When using your camcorder operates on a 12-hour cycle. •12:00 AM stands for midnight. •12:00 PM stands for some models. If you do not set ... DATE RY R M R D 2002 JUL 4 rrr R RR 5 : 30PM r rr [EXEC] : END 5 SETUP MENU STBY CLOCK SET - -:- -:- - If you use the camcorder in the menu setting. Note on the time indicator The internal clock of your camcorder abroad Set the clock to ON in a region where summer time is displayed on the data code of...

Operating Instructions (primary manual)
Page 23
... in step 3. The cassette compartment automatically goes down. (5) After the cassette compartment goes down forcibly. When you press any part of the cassette back to use a cassette with the window facing up and opens. (3) Push the center of the cassette compartment other than the mark. Insert the cassette straight as far... erasure Slide the write-protect tab on the cassette compartment. Doing so may cause a malfunction. •The cassette compartment may not be closed when you use this function properly (p. 220).
... in step 3. The cassette compartment automatically goes down. (5) After the cassette compartment goes down forcibly. When you press any part of the cassette back to use a cassette with the window facing up and opens. (3) Push the center of the cassette compartment other than the mark. Insert the cassette straight as far... erasure Slide the write-protect tab on the cassette compartment. Doing so may cause a malfunction. •The cassette compartment may not be closed when you use this function properly (p. 220).


