Operating Instructions
Page 5
...(Auto Calibration 44 Playback Selecting a component 50 Listening to a Super Audio CD/CD 52 Watching a DVD/Blu-ray Disc 53 Enjoying video games 54 Watching video 55 Amplifier Operations Settings for the audio (Audio settings menu 56 Settings for the video (Video settings menu 57 Settings for HDMI (HDMI settings menu 57 Settings for the system (System settings menu 58 Enjoying Surround Sound Enjoying a pre-programmed sound field ....59 Resetting sound fields to the initial settings 64 Enjoying the surround effect at low volume levels (NIGHT MODE 65 Advanced Speakers Set Up Adjusting...
...(Auto Calibration 44 Playback Selecting a component 50 Listening to a Super Audio CD/CD 52 Watching a DVD/Blu-ray Disc 53 Enjoying video games 54 Watching video 55 Amplifier Operations Settings for the audio (Audio settings menu 56 Settings for the video (Video settings menu 57 Settings for HDMI (HDMI settings menu 57 Settings for the system (System settings menu 58 Enjoying Surround Sound Enjoying a pre-programmed sound field ....59 Resetting sound fields to the initial settings 64 Enjoying the surround effect at low volume levels (NIGHT MODE 65 Advanced Speakers Set Up Adjusting...

Operating Instructions
Page 8
... receiver. Shows the status of selectable items appears here (page 106). Adjust the bass and treble for the Digital Cinema Auto Calibration function (page 45). C TUNING MODE Press to select zone 2, zone 3 or main zone. lamp is selected (page 63). H ZONE POWER/ Press ZONE SELECT SELECT repeatedly to operate a tuner TUNING +/- To select the input source for the selected zone will be turned on or off . K 2CH/A.DIRECT Press to select a sound field (page 119) or to select zone 2 or zone 3 first, then turn TONE +/- M AUTO CAL MIC Connects to analog signal...
... receiver. Shows the status of selectable items appears here (page 106). Adjust the bass and treble for the Digital Cinema Auto Calibration function (page 45). C TUNING MODE Press to select zone 2, zone 3 or main zone. lamp is selected (page 63). H ZONE POWER/ Press ZONE SELECT SELECT repeatedly to operate a tuner TUNING +/- To select the input source for the selected zone will be turned on or off . K 2CH/A.DIRECT Press to select a sound field (page 119) or to select zone 2 or zone 3 first, then turn TONE +/- M AUTO CAL MIC Connects to analog signal...
Operating Instructions
Page 10
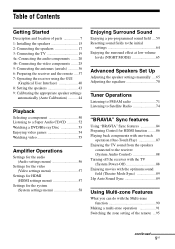
... 5.1 channel sound (page 23). ZONE 3 Connects to a VCR or a DVD player, etc. (page 19, 29, 30, 31, 32). H VIDEO/AUDIO INPUT/OUTPUT section AUDIO IN/ White (L) OUT jacks Red (R) Connect to the AUDIO OUT component in zone 2 (page 91). MULTI CHANNEL INPUT jacks Connect to a Super Audio CD player or DVD player with an analog audio jack for Sony equipment and other external components IR REMOTE Connect to an interlock on/off of the power supply of other 12V TRIGGER compliant components, or the amplifier/receiver...
... 5.1 channel sound (page 23). ZONE 3 Connects to a VCR or a DVD player, etc. (page 19, 29, 30, 31, 32). H VIDEO/AUDIO INPUT/OUTPUT section AUDIO IN/ White (L) OUT jacks Red (R) Connect to the AUDIO OUT component in zone 2 (page 91). MULTI CHANNEL INPUT jacks Connect to a Super Audio CD player or DVD player with an analog audio jack for Sony equipment and other external components IR REMOTE Connect to an interlock on/off of the power supply of other 12V TRIGGER compliant components, or the amplifier/receiver...
Operating Instructions
Page 13
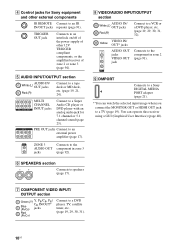
... to adjust the volume level of signals output from the HDMI OUT or COMPONENT VIDEO MONITOR OUT jack (page 96). S DISC SKIP Press to select preset stations. is displayed on the model. • The above operation may not be possible or may not work depending on the TV screen. Z TV Press to light up the button to set up the remote. wk RM SET UP Press to activate the buttons with Theater Mode. Notes • Some functions...
... to adjust the volume level of signals output from the HDMI OUT or COMPONENT VIDEO MONITOR OUT jack (page 96). S DISC SKIP Press to select preset stations. is displayed on the model. • The above operation may not be possible or may not work depending on the TV screen. Z TV Press to light up the button to set up the remote. wk RM SET UP Press to activate the buttons with Theater Mode. Notes • Some functions...

Operating Instructions
Page 14
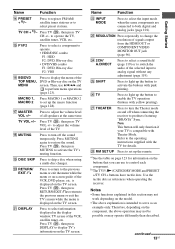
... the DIGITAL MEDIA PORT adapter (page 50). M 2CH/ A.DIRECT Press to select sound field (page 119) or to switch the audio of the receiver with simple operations using this remote. SLEEP DISPLAY GUI MODE Name A ?/1 (on or off. Press to analog signal without any adjustment (page 119). Press to the previous menu or exit the menu. N Starts play . ./> Skips tracks. You can only be used to turn a receiver on / standby) B A.F.D. MOVIE MUSIC C GUI MODE D V/v/B/b E OPTIONS F MENU Function...
... the DIGITAL MEDIA PORT adapter (page 50). M 2CH/ A.DIRECT Press to select sound field (page 119) or to switch the audio of the receiver with simple operations using this remote. SLEEP DISPLAY GUI MODE Name A ?/1 (on or off. Press to analog signal without any adjustment (page 119). Press to the previous menu or exit the menu. N Starts play . ./> Skips tracks. You can only be used to turn a receiver on / standby) B A.F.D. MOVIE MUSIC C GUI MODE D V/v/B/b E OPTIONS F MENU Function...

Operating Instructions
Page 18
... SPEAKERS SURROUND BACK terminals F and G to another power amplifier, use the PRE OUT jacks. Notes • When you connect only one surround back speaker, connect it turns to a subwoofer, then sound may not be output. If the auto standby function is output from both the SPEAKERS terminals and the PRE OUT jacks. c) When you want to connect just the front speakers to the speakers of the input signal to standby mode automatically based on connection and operation in the Speaker settings menu...
... SPEAKERS SURROUND BACK terminals F and G to another power amplifier, use the PRE OUT jacks. Notes • When you connect only one surround back speaker, connect it turns to a subwoofer, then sound may not be output. If the auto standby function is output from both the SPEAKERS terminals and the PRE OUT jacks. c) When you want to connect just the front speakers to the speakers of the input signal to standby mode automatically based on connection and operation in the Speaker settings menu...
Operating Instructions
Page 25
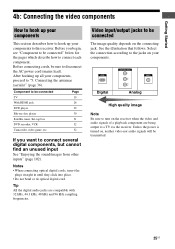
... tie optical digital cord. Video input/output jacks to be connected The image quality depends on , neither video nor audio signals will be sure to disconnect the AC power cord (mains lead). See the illustration that follows. Tip All the digital audio jacks are being output to connect each component. Component to be connected TV With HDMI jack DVD player Blu-ray disc player Satellite tuner, Set-top box DVD recorder, VCR Camcorder, video game, etc. Select the connection according to this receiver. Getting Started 4b: Connecting the video components...
... tie optical digital cord. Video input/output jacks to be connected The image quality depends on , neither video nor audio signals will be sure to disconnect the AC power cord (mains lead). See the illustration that follows. Tip All the digital audio jacks are being output to connect each component. Component to be connected TV With HDMI jack DVD player Blu-ray disc player Satellite tuner, Set-top box DVD recorder, VCR Camcorder, video game, etc. Select the connection according to this receiver. Getting Started 4b: Connecting the video components...
Operating Instructions
Page 28
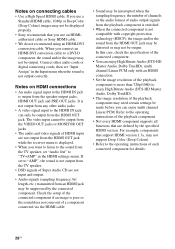
... audio cords or digital connecting cords, then set "Input Assign" in the HDMI settings menu. For example, components that support HDMI version 1.3a, may not be output from the HDMI OUT jack. Connect other audio jacks. • A video signal input to the HDMI IN jack can enjoy multi channel Linear PCM. Notes on connecting cables • Use a High Speed HDMI cable. The video input cannot be output from the VIDEO OUT jacks or MONITOR OUT jacks. • The audio and video signals of a component connected via the HDMI cable. • Sound may be output. Notes on HDMI connections...
... audio cords or digital connecting cords, then set "Input Assign" in the HDMI settings menu. For example, components that support HDMI version 1.3a, may not be output from the HDMI OUT jack. Connect other audio jacks. • A video signal input to the HDMI IN jack can enjoy multi channel Linear PCM. Notes on connecting cables • Use a High Speed HDMI cable. The video input cannot be output from the VIDEO OUT jacks or MONITOR OUT jacks. • The audio and video signals of a component connected via the HDMI cable. • Sound may be output. Notes on HDMI connections...

Operating Instructions
Page 45
The volume of noise and get a more accurate measurement. • If there are connected. - Remove any obstacles in the Speaker settings menu before you perform Auto Calibration, the muting function will be set up the optimizer microphone. Do not connect other microphones. headphones are any obstacle from the measurement area to avoid measurement error. • When you use a bi-amplifier connection, set "Sur Back Assign" to the AUTO CAL MIC jack. 2 Set up...
The volume of noise and get a more accurate measurement. • If there are connected. - Remove any obstacles in the Speaker settings menu before you perform Auto Calibration, the muting function will be set up the optimizer microphone. Do not connect other microphones. headphones are any obstacle from the measurement area to avoid measurement error. • When you use a bi-amplifier connection, set "Sur Back Assign" to the AUTO CAL MIC jack. 2 Set up...

Operating Instructions
Page 47
... MODE. Note When the speaker(s) is (are) out of the speaker may be performed. - This is because of distance to meters in "Distance Unit" in the Speaker settings menu. 2 Press to use the receiver. In this case, you select "Yes". When "Save auto calibration (auto speaker setup)?" Follow the instructions of the TV screen when you can change the unit of the speakers' specifications. appears on or off are connected...
... MODE. Note When the speaker(s) is (are) out of the speaker may be performed. - This is because of distance to meters in "Distance Unit" in the Speaker settings menu. 2 Press to use the receiver. In this case, you select "Yes". When "Save auto calibration (auto speaker setup)?" Follow the instructions of the TV screen when you can change the unit of the speakers' specifications. appears on or off are connected...

Operating Instructions
Page 51
... MULTI CHANNEL INPUT jack. MULTI IN DMPORT Component connected to the VIDEO 2 IN jack. to the SAT jack. To activate the muting function Press MUTING on the receiver. To avoid damaging your speakers Before you turn down quickly: press and hold the MASTER VOL +/- Satellite tuner, etc., connected to adjust the volume. TUNER (FM TUNER or AM TUNER) Built-in radio tuner. You can also use INPUT SELECTOR on the remote again or turn MASTER VOLUME clockwise to turn off the receiver, be played...
... MULTI CHANNEL INPUT jack. MULTI IN DMPORT Component connected to the VIDEO 2 IN jack. to the SAT jack. To activate the muting function Press MUTING on the receiver. To avoid damaging your speakers Before you turn down quickly: press and hold the MASTER VOL +/- Satellite tuner, etc., connected to adjust the volume. TUNER (FM TUNER or AM TUNER) Built-in radio tuner. You can also use INPUT SELECTOR on the remote again or turn MASTER VOLUME clockwise to turn off the receiver, be played...

Operating Instructions
Page 58
...; +10 dB • AUTO The subwoofer level is automatically set to HDD.C.S. You can set the level for HDMI) Lets you turn the "24p Auto Sound Sync" function on adjusting the parameters, see "7: Operating the receiver using the GUI (Graphical User Interface)" (page 40). Select "System" in the Settings menu. This allows HD-D.C.S. Therefore, if a player that is not compatible with "BRAVIA" Sync sends out 24p signals, the receiver will not switch the sound field to 0 dB...
...; +10 dB • AUTO The subwoofer level is automatically set to HDD.C.S. You can set the level for HDMI) Lets you turn the "24p Auto Sound Sync" function on adjusting the parameters, see "7: Operating the receiver using the GUI (Graphical User Interface)" (page 40). Select "System" in the Settings menu. This allows HD-D.C.S. Therefore, if a player that is not compatible with "BRAVIA" Sync sends out 24p signals, the receiver will not switch the sound field to 0 dB...
Operating Instructions
Page 63
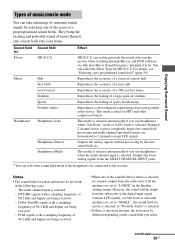
... and powerful sound of movie theaters and concert halls into your portable audio device. This mode is ideal for HD-D.C.S. PCM signals with a sampling frequency of 88.2 kHz and higher are being received. - Sound field for music and movie do not work in the Speaker settings menu. You can realize precisely the sound effect on the sound field you use headphones when the multi channel input is selected automatically if you select. Reproduces...
... and powerful sound of movie theaters and concert halls into your portable audio device. This mode is ideal for HD-D.C.S. PCM signals with a sampling frequency of 88.2 kHz and higher are being received. - Sound field for music and movie do not work in the Speaker settings menu. You can realize precisely the sound effect on the sound field you use headphones when the multi channel input is selected automatically if you select. Reproduces...
Operating Instructions
Page 88
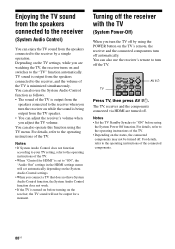
... the speakers connected to the receiver by using the POWER button on while the sound is being output from the TV speaker. • You can adjust the receiver's volume when you turn the receiver on the TV's remote, the receiver and the connected components turn off . The TV, receiver and the components connected via HDMI are watching the TV, the receiver turns on and switches to the operating instructions of the TV. You can also use the receiver's remote to the operating instructions...
... the speakers connected to the receiver by using the POWER button on while the sound is being output from the TV speaker. • You can adjust the receiver's volume when you turn the receiver on the TV's remote, the receiver and the connected components turn off . The TV, receiver and the components connected via HDMI are watching the TV, the receiver turns on and switches to the operating instructions of the TV. You can also use the receiver's remote to the operating instructions...
Operating Instructions
Page 94
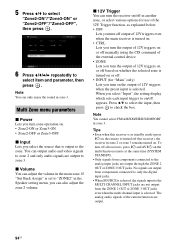
.... Multi Zone menu parameters x Power Lets you turn zone operation on /off . • INPUT (for "Main" only) Lets you turn on the output of the current function are output. 94US x 12V Trigger You can also adjust the zone 2 volume. Note You cannot select FM/AM/XM/SIRIUS/DMPORT in the Speaker setting menu, you select the source that is selected. No signals are output from components connected to only the digital input jacks. • When SOURCE is selected, the signals input to the MULTI CHANNEL INPUT jacks...
.... Multi Zone menu parameters x Power Lets you turn zone operation on /off . • INPUT (for "Main" only) Lets you turn on the output of the current function are output. 94US x 12V Trigger You can also adjust the zone 2 volume. Note You cannot select FM/AM/XM/SIRIUS/DMPORT in the Speaker setting menu, you select the source that is selected. No signals are output from components connected to only the digital input jacks. • When SOURCE is selected, the signals input to the MULTI CHANNEL INPUT jacks...

Operating Instructions
Page 96
... the selected zone. • When SOURCE is in standby mode (press ?/1 on the remote to zone 2 or zone 3 in advance (page 95). 3 Turn on the amplifier in zone 2 or zone 3. 4 Press one of the current input are output. Other Operations Converting analog video input signals This receiver allows you press the button, the resolution of illustration 2 (page 92), adjust the volume using MASTER VOL +/- For zone 3, only analog audio signals are output through the ZONE 2 OUT or ZONE 3 OUT jacks. Change the zone setting...
... the selected zone. • When SOURCE is in standby mode (press ?/1 on the remote to zone 2 or zone 3 in advance (page 95). 3 Turn on the amplifier in zone 2 or zone 3. 4 Press one of the current input are output. Other Operations Converting analog video input signals This receiver allows you press the button, the resolution of illustration 2 (page 92), adjust the volume using MASTER VOL +/- For zone 3, only analog audio signals are output through the ZONE 2 OUT or ZONE 3 OUT jacks. Change the zone setting...
Operating Instructions
Page 110
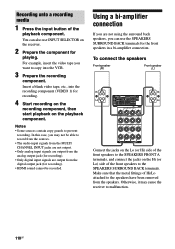
... use the SPEAKERS SURROUND BACK terminals for recording). • Only digital input signals are not using the surround back speakers, you are output from the speakers. In this case, you may cause the receiver to record from the sources. • The audio input signals from the MULTI CHANNEL INPUT jacks are not output. • Only analog input signals are output from the analog output jack (for the front speakers in a bi-amplifier connection. Recording onto a recording media 1 Press the input button...
... use the SPEAKERS SURROUND BACK terminals for recording). • Only digital input signals are not using the surround back speakers, you are output from the speakers. In this case, you may cause the receiver to record from the sources. • The audio input signals from the MULTI CHANNEL INPUT jacks are not output. • Only analog input signals are output from the analog output jack (for the front speakers in a bi-amplifier connection. Recording onto a recording media 1 Press the input button...

Operating Instructions
Page 116
... HDMI audio input setting [AUDIO OUT] AMP, TV+AMP AMP 24p Auto Sound Sync ON, OFF ON [24p SYNC] Subwoofer level for HDMI [SW LEVEL] SW AUTO, SW +10 dB, SW 0 dB SW AUTO System Settings Naming inputs [] [NAME IN] For details, see "Enjoying the sound/ images from other inputs" (page 102). c) This parameter is only available if the XM Mini-Tuner and Home Dock is connected to the XM jack on the speaker pattern setting, the appropriate Enhanced Surround mode...
... HDMI audio input setting [AUDIO OUT] AMP, TV+AMP AMP 24p Auto Sound Sync ON, OFF ON [24p SYNC] Subwoofer level for HDMI [SW LEVEL] SW AUTO, SW +10 dB, SW 0 dB SW AUTO System Settings Naming inputs [] [NAME IN] For details, see "Enjoying the sound/ images from other inputs" (page 102). c) This parameter is only available if the XM Mini-Tuner and Home Dock is connected to the XM jack on the speaker pattern setting, the appropriate Enhanced Surround mode...

Operating Instructions
Page 137
... component connected to the DIGITAL MEDIA PORT adapter. • Adjust the volume of the software being played back corresponds to the multi channel format. • Check whether the setup on your audio components away from the TV. • Make sure you have Dolby Digital Surround EX logos. you have turned on the playback component is set or fluorescent light. • Move your speaker. • When all speakers are set to "LARGE" and "Neo:6 Cinema" or "Neo:6 Music" is selected...
... component connected to the DIGITAL MEDIA PORT adapter. • Adjust the volume of the software being played back corresponds to the multi channel format. • Check whether the setup on your audio components away from the TV. • Make sure you have Dolby Digital Surround EX logos. you have turned on the playback component is set or fluorescent light. • Move your speaker. • When all speakers are set to "LARGE" and "Neo:6 Cinema" or "Neo:6 Music" is selected...

Operating Instructions
Page 140
... connection of the receiver and the remote are weak. • Make sure that the command modes of speakers and turn off after Auto Calibration measurement" (page 49), "XM Radio message list" (page 82), "SIRIUS Satellite Radio message list" (page 83) and "DIGITAL MEDIA PORT message list" (page 100). 140US Remote control The remote does not function. • Point the remote at all the batteries in with direct tuning). • No stations...
... connection of the receiver and the remote are weak. • Make sure that the command modes of speakers and turn off after Auto Calibration measurement" (page 49), "XM Radio message list" (page 82), "SIRIUS Satellite Radio message list" (page 83) and "DIGITAL MEDIA PORT message list" (page 100). 140US Remote control The remote does not function. • Point the remote at all the batteries in with direct tuning). • No stations...


