Operating Instructions
Page 3
When a cart is used in this manual could void your authority to avoid injury from that interference will not occur in a particular installation. NOTE: This equipment has been tested and found to ... in accordance with the instructions, may not comply with FCC technical regulations. Increase the separation between the equipment and receiver. - If this equipment. Other versions may cause harmful interference to radio or television reception, which the receiver is required when the apparatus has been damaged in a residential installation. Reorient or relocate the...
When a cart is used in this manual could void your authority to avoid injury from that interference will not occur in a particular installation. NOTE: This equipment has been tested and found to ... in accordance with the instructions, may not comply with FCC technical regulations. Increase the separation between the equipment and receiver. - If this equipment. Other versions may cause harmful interference to radio or television reception, which the receiver is required when the apparatus has been damaged in a residential installation. Reorient or relocate the...
Operating Instructions
Page 4
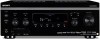
...are for model STR-DA3500ES. About This Manual • The instructions in this manual are those on the remote. Check your model number by Sony Corporation is a trademark of THX Ltd., which may be registered in the display window and on the receiver if they have the same or similar ...names as those of Sony Corporation. On Copyrights This receiver incorporates Dolby*...
...are for model STR-DA3500ES. About This Manual • The instructions in this manual are those on the remote. Check your model number by Sony Corporation is a trademark of THX Ltd., which may be registered in the display window and on the receiver if they have the same or similar ...names as those of Sony Corporation. On Copyrights This receiver incorporates Dolby*...
Operating Instructions
Page 5
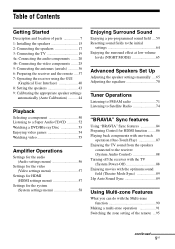
... to the initial settings 64 Enjoying the surround effect at low volume levels (NIGHT MODE 65 Advanced Speakers Set Up Adjusting the speaker settings manually ....65 Adjusting the equalizer 70 Tuner Operations Listening to FM/AM radio 71 Listening to Satellite Radio 74 "BRAVIA" Sync features Using "BRAVIA...-Touch Play 87 Enjoying the TV sound from the speakers connected to the receiver (System Audio Control 88 Turning off the receiver with the TV (System Power-Off 88 Enjoying movies with the optimum sound field (Theater Mode Sync 89 24p Auto Sound Sync 89 Using Multi-zone Features What ...
... to the initial settings 64 Enjoying the surround effect at low volume levels (NIGHT MODE 65 Advanced Speakers Set Up Adjusting the speaker settings manually ....65 Adjusting the equalizer 70 Tuner Operations Listening to FM/AM radio 71 Listening to Satellite Radio 74 "BRAVIA" Sync features Using "BRAVIA...-Touch Play 87 Enjoying the TV sound from the speakers connected to the receiver (System Audio Control 88 Turning off the receiver with the TV (System Power-Off 88 Enjoying movies with the optimum sound field (Theater Mode Sync 89 24p Auto Sound Sync 89 Using Multi-zone Features What ...
Operating Instructions
Page 41
...manually for the system (System settings menu)" (page 58). For details on adjusting the system using the System settings menu, see "Enjoying a preprogrammed sound field" (page 59). System For details on adjusting the parameters, see "Settings for the current position, and to set and adjust this receiver...For details, see "9: Calibrating the appropriate speaker settings automatically (Auto Calibration)" (page 44). Navigating through menus using the receiver. For details, see "Adjusting the equalizer" (page 70). Getting Started FM/AM/XM/SIRIUS You can use the Auto...
...manually for the system (System settings menu)" (page 58). For details on adjusting the system using the System settings menu, see "Enjoying a preprogrammed sound field" (page 59). System For details on adjusting the parameters, see "Settings for the current position, and to set and adjust this receiver...For details, see "9: Calibrating the appropriate speaker settings automatically (Auto Calibration)" (page 44). Navigating through menus using the receiver. For details, see "Adjusting the equalizer" (page 70). Getting Started FM/AM/XM/SIRIUS You can use the Auto...
Operating Instructions
Page 44
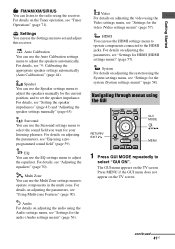
... A", "SP B" and "SP A+B" indicators on the display window lights off. The DCAC is being received. - Selecting the front speakers You can adjust the speaker levels and balance manually according to drive. To select Light up The speakers connected to perform automatic calibration as follows: •...; Check the connection between each speaker and the receiver.a) • Measure the polarity of speakers. •...
... A", "SP B" and "SP A+B" indicators on the display window lights off. The DCAC is being received. - Selecting the front speakers You can adjust the speaker levels and balance manually according to drive. To select Light up The speakers connected to perform automatic calibration as follows: •...; Check the connection between each speaker and the receiver.a) • Measure the polarity of speakers. •...
Operating Instructions
Page 65
... or b. continued 65US This function can adjust each speaker manually. Note This function does not work in the following cases. - PCM signals with a sampling frequency of 176.4 kHz and higher are being received. - When watching a movie late at night, you to retain a theater like environment at low volume levels. The NIGHT MODE function...
... or b. continued 65US This function can adjust each speaker manually. Note This function does not work in the following cases. - PCM signals with a sampling frequency of 176.4 kHz and higher are being received. - When watching a movie late at night, you to retain a theater like environment at low volume levels. The NIGHT MODE function...
Operating Instructions
Page 66
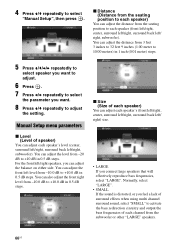
... (0.01 meter) steps. 5 Press V/v/B/b repeatedly to select speaker you want . 8 Press V/v repeatedly to each speaker's level (center, surround left/right, surround back left / right, subwoofer). Manual Setup menu parameters x Level (Level of each speaker's (front left/right, center, surround left/right, surround back left/ right) size. • LARGE If you can... redirection circuitry and output the bass frequencies of speaker) You can adjust the balance on either side. x Distance (Distance from the seating position to select "Manual Setup", then press .
... (0.01 meter) steps. 5 Press V/v/B/b repeatedly to select speaker you want . 8 Press V/v repeatedly to each speaker's level (center, surround left/right, surround back left / right, subwoofer). Manual Setup menu parameters x Level (Level of each speaker's (front left/right, center, surround left/right, surround back left/ right) size. • LARGE If you can... redirection circuitry and output the bass frequencies of speaker) You can adjust the balance on either side. x Distance (Distance from the seating position to select "Manual Setup", then press .
Operating Instructions
Page 69
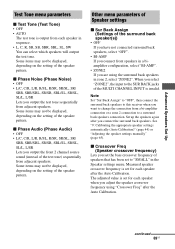
... crossover frequency of the speaker pattern. See "9: Calibrating the appropriate speaker settings automatically (Auto Calibration)" (page 44) or "Adjusting the speaker settings manually" (page 65). x Crossover Freq (Speaker crossover frequency) Lets you are using "Crossover Freq" after you output the front 2 channel source sound... of the MULTI CHANNEL INPUT is invalid. Note Set "Sur Back Assign" to "OFF", then connect the surround back speakers to this receiver when you select "ZONE2", the input to "SMALL" in zone 2, select "ZONE2". Some items may not be displayed, depending on ...
... crossover frequency of the speaker pattern. See "9: Calibrating the appropriate speaker settings automatically (Auto Calibration)" (page 44) or "Adjusting the speaker settings manually" (page 65). x Crossover Freq (Speaker crossover frequency) Lets you are using "Crossover Freq" after you output the front 2 channel source sound... of the MULTI CHANNEL INPUT is invalid. Note Set "Sur Back Assign" to "OFF", then connect the surround back speakers to this receiver when you select "ZONE2", the input to "SMALL" in zone 2, select "ZONE2". Some items may not be displayed, depending on ...
Operating Instructions
Page 94
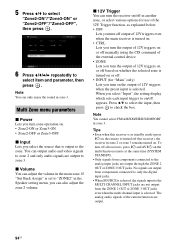
... 12V triggers even when the main receiver is turned on. • CTRL Lets you turn the output of 12V triggers on or off manually using the CIS command of the ...external control device. • ZONE Lets you turn the output of 12V triggers on or off based on whether the selected zone is turned on or off appears. Note You can turn the receiver on/off all receivers... Back Assign" is in standby mode (press ?/1 on . Tips • Even when this receiver), the receiver in another zone, or select various options for "Main" only) Lets you turn zone operation ...
... 12V triggers even when the main receiver is turned on. • CTRL Lets you turn the output of 12V triggers on or off manually using the CIS command of the ...external control device. • ZONE Lets you turn the output of 12V triggers on or off based on whether the selected zone is turned on or off appears. Note You can turn the receiver on/off all receivers... Back Assign" is in standby mode (press ?/1 on . Tips • Even when this receiver), the receiver in another zone, or select various options for "Main" only) Lets you turn zone operation ...
Operating Instructions
Page 143
Halogenated flame retardants are subject to change without notice. Supplied accessories Operating Instructions (this manual) Quick Setup Guide (1) GUI Menu List (1) Optimizer microphone (ECM-AC2) (1) FM wire antenna (aerial) (1) AM loop antenna (aerial) (1) AC power cord (mains lead) (1) Multi function remote commander (1) Simple remote commander (1) R6 (size-AA) batteries (4) Design and specifications are not used in the certain printed wiring boards. 143US Additional Information
Halogenated flame retardants are subject to change without notice. Supplied accessories Operating Instructions (this manual) Quick Setup Guide (1) GUI Menu List (1) Optimizer microphone (ECM-AC2) (1) FM wire antenna (aerial) (1) AM loop antenna (aerial) (1) AC power cord (mains lead) (1) Multi function remote commander (1) Simple remote commander (1) R6 (size-AA) batteries (4) Design and specifications are not used in the certain printed wiring boards. 143US Additional Information
Operating Instructions
Page 145
... 52, 53, 54, 55 Installer Mode 58, 116 iPod 98 L Level 66, 70 LFE (Low Frequency Effect) 106 List Mode 100 Lock Code 81, 115 M Manual Setup 65, 66 MASTER VOLUME 8, 52, 53, 54, 55 Messages Auto Calibration 49 DIGITAL MEDIA PORT 100 error 140 SIRIUS 83 XM 82 Movie 63...
... 52, 53, 54, 55 Installer Mode 58, 116 iPod 98 L Level 66, 70 LFE (Low Frequency Effect) 106 List Mode 100 Lock Code 81, 115 M Manual Setup 65, 66 MASTER VOLUME 8, 52, 53, 54, 55 Messages Auto Calibration 49 DIGITAL MEDIA PORT 100 error 140 SIRIUS 83 XM 82 Movie 63...


