
Operating Instructions
Page 6
... display operation ..........44 Basic Operations Playback 46 Enjoying sound/images from the components connected to the DIGITAL MEDIA PORT 48 Using the Sleep Timer 52 Recording using the receiver 52 6GB Tuner Operations Listening to FM/AM radio 53 Presetting FM/AM radio stations (Preset... Radio...... 58 Preparing to listen to the SIRIUS Satellite Radio 58 Selecting a channel of the SIRIUS Satellite Radio 59 Presetting SIRIUS Satellite Radio channels 61 Restricting access to specific channels (Parental Lock 62 Enjoying Surround Sound Selecting the sound field 65 Enjoying the surround...
... display operation ..........44 Basic Operations Playback 46 Enjoying sound/images from the components connected to the DIGITAL MEDIA PORT 48 Using the Sleep Timer 52 Recording using the receiver 52 6GB Tuner Operations Listening to FM/AM radio 53 Presetting FM/AM radio stations (Preset... Radio...... 58 Preparing to listen to the SIRIUS Satellite Radio 58 Selecting a channel of the SIRIUS Satellite Radio 59 Presetting SIRIUS Satellite Radio channels 61 Restricting access to specific channels (Parental Lock 62 Enjoying Surround Sound Selecting the sound field 65 Enjoying the surround...
Operating Instructions
Page 13
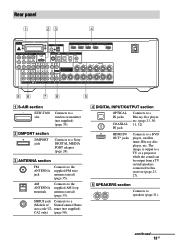
... output to a TV or a projector while the sound can be output from a TV or/and speakers connected to a Sony DIGITAL MEDIA PORT adapter (page 24). B DMPORT section DMPORT jack Connects to this receiver (page 23, 27). D DIGITAL INPUT/OUTPUT section OPTICAL IN jacks COAXIAL IN jack Connects to the supplied AM loop antenna (aerial) (page 35...
... output to a TV or a projector while the sound can be output from a TV or/and speakers connected to a Sony DIGITAL MEDIA PORT adapter (page 24). B DMPORT section DMPORT jack Connects to this receiver (page 23, 27). D DIGITAL INPUT/OUTPUT section OPTICAL IN jacks COAXIAL IN jack Connects to the supplied AM loop antenna (aerial) (page 35...
Operating Instructions
Page 18
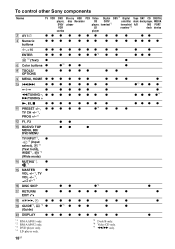
To control other Sony components Name B AV ?/1 D Numeric buttons TV VCR DVD Blu-ray HDD PSX Video Digital DSS*1 Digital Tape DAT CD DIGITAL player, disc Recorder DVD/ player VCR CD CATV player, terminal*1 LD satellite/ deck deck player, MEDIA terrestrial A/B receiver*2 MD PORT deck device combo player zz z z z z z z zz zz zz z z z z z z z z zzz z -/--, >10 ENTER zz z z z z z zz zz z z z z z*4 z z z z zz z *2 (Text) z z F Color buttons z z*3 z z z H TOOLS/ z OPTIONS z z zz zz I MENU, HOME z z z z z z z zz z J ./> zz z z z z z z z*5 z z z
To control other Sony components Name B AV ?/1 D Numeric buttons TV VCR DVD Blu-ray HDD PSX Video Digital DSS*1 Digital Tape DAT CD DIGITAL player, disc Recorder DVD/ player VCR CD CATV player, terminal*1 LD satellite/ deck deck player, MEDIA terrestrial A/B receiver*2 MD PORT deck device combo player zz z z z z z z zz zz zz z z z z z z z z zzz z -/--, >10 ENTER zz z z z z z zz zz z z z z z*4 z z z z zz z *2 (Text) z z F Color buttons z z*3 z z z H TOOLS/ z OPTIONS z z zz zz I MENU, HOME z z z z z z z zz z J ./> zz z z z z z z z*5 z z z
Operating Instructions
Page 24
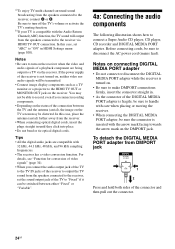
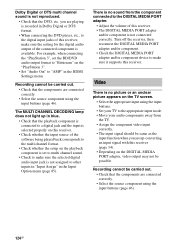
... components The following illustration shows how to connect a Super Audio CD player, CD player, CD recorder and DIGITAL MEDIA PORT adapter. a)To enjoy TV multi channel surround sound broadcasting from the speakers connected to the receiver via the receiver. Be sure to turn on the status of a playback component are compatible with the arrow mark facing towards...
... components The following illustration shows how to connect a Super Audio CD player, CD player, CD recorder and DIGITAL MEDIA PORT adapter. a)To enjoy TV multi channel surround sound broadcasting from the speakers connected to the receiver via the receiver. Be sure to turn on the status of a playback component are compatible with the arrow mark facing towards...

Operating Instructions
Page 25
Connections Super Audio CD player, CD player, CD recorder A TV* B DIGITAL MEDIA PORT adapter A Audio cord (not supplied) B Video cord (not supplied) * You can enjoy the images from the components connected to the DIGITAL MEDIA PORT adapter when you connect the TV to the receiver. 25GB
Connections Super Audio CD player, CD player, CD recorder A TV* B DIGITAL MEDIA PORT adapter A Audio cord (not supplied) B Video cord (not supplied) * You can enjoy the images from the components connected to the DIGITAL MEDIA PORT adapter when you connect the TV to the receiver. 25GB
Operating Instructions
Page 45
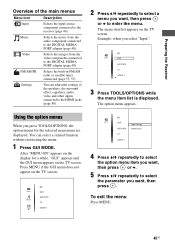
.... Video Selects the images from the audio component connected to the DIGITAL MEDIA PORT adapter (page 48). Settings You can select a related function without reselecting the menu. 1 Press GUI MODE. To exit the menu Press MENU. 45GB The option menu appears. Preparing the Receiver Overview of the speakers, the surround effect, equalizer, audio, video...
.... Video Selects the images from the audio component connected to the DIGITAL MEDIA PORT adapter (page 48). Settings You can select a related function without reselecting the menu. 1 Press GUI MODE. To exit the menu Press MENU. 45GB The option menu appears. Preparing the Receiver Overview of the speakers, the surround effect, equalizer, audio, video...
Operating Instructions
Page 48
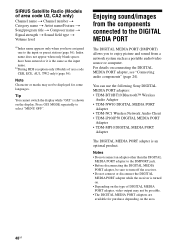
... of area code U2, CA2 only) Channel name t Channel number t Category name t Artist name/Feature t Song/program title t Composer name t Signal strength t Sound field type t Volume level a)Index name appears only when you to turn off the receiver. • Do not connect or disconnect the DIGITAL MEDIA PORT adapter while the receiver is turned on. • Depending...
... of area code U2, CA2 only) Channel name t Channel number t Category name t Artist name/Feature t Song/program title t Composer name t Signal strength t Sound field type t Volume level a)Index name appears only when you to turn off the receiver. • Do not connect or disconnect the DIGITAL MEDIA PORT adapter while the receiver is turned on. • Depending...

Operating Instructions
Page 49
...content you want from the contents list displayed on the DIGITAL MEDIA PORT adapter you want , then press . They may vary depending on each mode are just examples. You can select an operation screen using the GUI menu of the receiver. After "MENU ON" appears on the display for...The list of tracks will be displayed on the GUI screen of the receiver 1 Make sure that "System GUI" is for a while, "GUI" appears and the GUI menu appears on the TV screen. 2 Press V/v repeatedly to the DIGITAL MEDIA PORT adapter V/v/B/b, Basic Operations 1 Press GUI MODE. When an adapter other...
...content you want from the contents list displayed on the DIGITAL MEDIA PORT adapter you want , then press . They may vary depending on each mode are just examples. You can select an operation screen using the GUI menu of the receiver. After "MENU ON" appears on the display for...The list of tracks will be displayed on the GUI screen of the receiver 1 Make sure that "System GUI" is for a while, "GUI" appears and the GUI menu appears on the TV screen. 2 Press V/v repeatedly to the DIGITAL MEDIA PORT adapter V/v/B/b, Basic Operations 1 Press GUI MODE. When an adapter other...

Operating Instructions
Page 50
...playback, or find the beginning of the previous track Find the beginning of the selected track, the displayed screen changes depending on setting of the receiver. Contents list for audio iPod Playlists > Playlist > Track Artists > Artist > Album > Track Albums > Album > Track Songs > Track Genres...Video Playlist > Content Video Podcasts > Episode > Content 3 Press MASTER VOL +/- (RM-AAP051 only) or 2 +/- (RM-AAP052 only) to the DIGITAL MEDIA PORT adapter using the iPod menu Make sure that "iPod" is selected in step 4 in "Selecting the operation screen" (page 49). c)Displayed as "Genre...
...playback, or find the beginning of the previous track Find the beginning of the selected track, the displayed screen changes depending on setting of the receiver. Contents list for audio iPod Playlists > Playlist > Track Artists > Artist > Album > Track Albums > Album > Track Songs > Track Genres...Video Playlist > Content Video Podcasts > Episode > Content 3 Press MASTER VOL +/- (RM-AAP051 only) or 2 +/- (RM-AAP052 only) to the DIGITAL MEDIA PORT adapter using the iPod menu Make sure that "iPod" is selected in step 4 in "Selecting the operation screen" (page 49). c)Displayed as "Genre...

Operating Instructions
Page 51
... "Audiobook", then press or b. 4 Press V/v repeatedly to select the mode you want to the adapter. Warning* Check the display of the DIGITAL MEDIA PORT adapter. Basic Operations Selecting the playback mode 1 Play back the track you want to listen to following , then press . Searching* Searching the... server. * TDM-NC1 only. 51GB No Track* No track was found . Connecting* Connecting to the DIGITAL MEDIA PORT adapter" (page 49). 2 Press TOOLS/OPTIONS. x Repeat (TDM-iP50 only) • OFF • One • All x Shuffle (TDM-iP50 ...
... "Audiobook", then press or b. 4 Press V/v repeatedly to select the mode you want to the adapter. Warning* Check the display of the DIGITAL MEDIA PORT adapter. Basic Operations Selecting the playback mode 1 Play back the track you want to listen to following , then press . Searching* Searching the... server. * TDM-NC1 only. 51GB No Track* No track was found . Connecting* Connecting to the DIGITAL MEDIA PORT adapter" (page 49). 2 Press TOOLS/OPTIONS. x Repeat (TDM-iP50 only) • OFF • One • All x Shuffle (TDM-iP50 ...
Operating Instructions
Page 124
... make sure it supports this receiver. For example, when connecting the "PlayStation 3", set to multi channel sound. • Check to make sure the setting for the digital audio output of the software being played back corresponds to the multi channel format. • Check whether the setup on this receiver. • The DIGITAL MEDIA PORT adapter and/or component is available...
... make sure it supports this receiver. For example, when connecting the "PlayStation 3", set to multi channel sound. • Check to make sure the setting for the digital audio output of the software being played back corresponds to the multi channel format. • Check whether the setup on this receiver. • The DIGITAL MEDIA PORT adapter and/or component is available...
Operating Instructions
Page 129
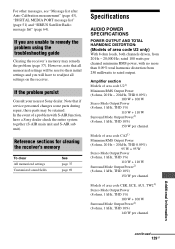
...Sony dealer check the entire system together (S-AIR main unit and S-AIR sub unit). In the event of a problem with no more than 0.09% total harmonic distortion from 20 Hz - 20,000 Hz; rated 100 watts per channel minimum RMS power, with S-AIR function, have to readjust all settings on the receiver... per channel Additional Information continued 129GB For other messages, see "Message list after Auto Calibration measurement" (page 43), "DIGITAL MEDIA PORT message list" (page 51) and "SIRIUS Satellite Radio message list" (page 64). Reference sections for clearing the receiver's memory...
...Sony dealer check the entire system together (S-AIR main unit and S-AIR sub unit). In the event of a problem with no more than 0.09% total harmonic distortion from 20 Hz - 20,000 Hz; rated 100 watts per channel minimum RMS power, with S-AIR function, have to readjust all settings on the receiver... per channel Additional Information continued 129GB For other messages, see "Message list after Auto Calibration measurement" (page 43), "DIGITAL MEDIA PORT message list" (page 51) and "SIRIUS Satellite Radio message list" (page 64). Reference sections for clearing the receiver's memory...

Operating Instructions
Page 131
... U2, CA2 120 V AC, 60 Hz ECE, CEK 230 V AC, 50/60 Hz AU1 230 V AC, 50 Hz TW2 110 V AC, 60 Hz Power output (DIGITAL MEDIA PORT) DC OUT: 5V, 0.7A MAX Power consumption Area code Power consumption U2, CA2, CEK, ECE, AU1, TW2 250 W Power consumption (during standby mode) 0.9 W (When "Ctrl...
... U2, CA2 120 V AC, 60 Hz ECE, CEK 230 V AC, 50/60 Hz AU1 230 V AC, 50 Hz TW2 110 V AC, 60 Hz Power output (DIGITAL MEDIA PORT) DC OUT: 5V, 0.7A MAX Power consumption Area code Power consumption U2, CA2, CEK, ECE, AU1, TW2 250 W Power consumption (during standby mode) 0.9 W (When "Ctrl...


