

Limited Warranty (U.S. Only)
Page 1
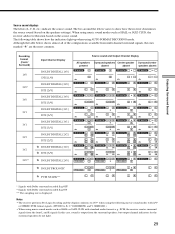
... Sony to any part of two (2) year from your convenience, Sony Electronics Inc. Some states do not allow the exclusion or limitation of protection, to you must pay for all labor charges. 2. 4-557-173-02 General Stereo/Hifi Components/Tape Decks ® CD Players/Mini Disc Players/Audio Systems Hifi Audio LIMITED WARRANTY Sony Electronics Inc. ("Sony") warrants this Product is valid only in material or workmanship as fuses...
... Sony to any part of two (2) year from your convenience, Sony Electronics Inc. Some states do not allow the exclusion or limitation of protection, to you must pay for all labor charges. 2. 4-557-173-02 General Stereo/Hifi Components/Tape Decks ® CD Players/Mini Disc Players/Audio Systems Hifi Audio LIMITED WARRANTY Sony Electronics Inc. ("Sony") warrants this Product is valid only in material or workmanship as fuses...
Operating Instructions
Page 2
... try to disconnect the receiver from the wall outlet. STR-DE475/K402 Serial No. On power sources • Before operating the receiver, check that the operating voltage is no guarantee that provides guidelines for a long time, be connected to the grounding system of the receiver with your local power supply. This symbol is connected. - If you call CATV system installer's attention to Article 82040...
... try to disconnect the receiver from the wall outlet. STR-DE475/K402 Serial No. On power sources • Before operating the receiver, check that the operating voltage is no guarantee that provides guidelines for a long time, be connected to the grounding system of the receiver with your local power supply. This symbol is connected. - If you call CATV system installer's attention to Article 82040...
Operating Instructions
Page 3
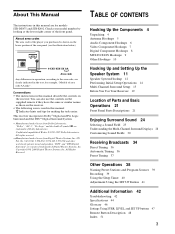
... Multi-Channel Surround Displays 28 Customizing Sound Fields 30 Receiving Broadcasts 34 Direct Tuning 36 Automatic Tuning 36 Preset Tuning 37 Other Operations 38 Naming Preset Stations and Program Sources 39 Recording 39 Using the Sleep Timer 40 Adjustment Using the SET UP Button 41 Additional Information 42 Troubleshooting 42 Specifications 44 Glossary 46 Settings Using SURR, LEVEL, and SET UP buttons 47 Remote Button Description 48 Index 51 3 Confidential unpublished Works. © 1992-1997 Dolby Laboratories. US Pat. About This Manual The instructions...
... Multi-Channel Surround Displays 28 Customizing Sound Fields 30 Receiving Broadcasts 34 Direct Tuning 36 Automatic Tuning 36 Preset Tuning 37 Other Operations 38 Naming Preset Stations and Program Sources 39 Recording 39 Using the Sleep Timer 40 Adjustment Using the SET UP Button 41 Additional Information 42 Troubleshooting 42 Specifications 44 Glossary 46 Settings Using SURR, LEVEL, and SET UP buttons 47 Remote Button Description 48 Index 51 3 Confidential unpublished Works. © 1992-1997 Dolby Laboratories. US Pat. About This Manual The instructions...
Operating Instructions
Page 6
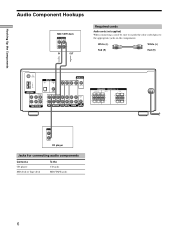
... OPTICAL CENTER L COAXIAL MONITOR VIDEO IN VIDEO IN VIDEO OUT VIDEO IN VIDEO OUT AUDIO OUT R SUB FRONT SURROUND WOOFER MULTI CH IN R IN CD OUT IN AUDIO IN AUDIO IN AUDIO OUT AUDIO IN SUB MD/TAPE TV/SAT DVD/LD VIDEO WOOFER SPEAKERS IMPEDANCE USE 8 - 16Ω SURROUND R L CENTER FRONT R L R L R L OUTPUT LINE L R CD player Jacks for connecting audio components Connect a CD player MD deck or Tape deck To the CD jacks MD/TAPE jacks 6 ç Hooking Up the Components Audio Component Hookups MD/TAPE deck INPUT OUTPUT LINE LINE L R IN OUT Required cords Audio cords...
... OPTICAL CENTER L COAXIAL MONITOR VIDEO IN VIDEO IN VIDEO OUT VIDEO IN VIDEO OUT AUDIO OUT R SUB FRONT SURROUND WOOFER MULTI CH IN R IN CD OUT IN AUDIO IN AUDIO IN AUDIO OUT AUDIO IN SUB MD/TAPE TV/SAT DVD/LD VIDEO WOOFER SPEAKERS IMPEDANCE USE 8 - 16Ω SURROUND R L CENTER FRONT R L R L R L OUTPUT LINE L R CD player Jacks for connecting audio components Connect a CD player MD deck or Tape deck To the CD jacks MD/TAPE jacks 6 ç Hooking Up the Components Audio Component Hookups MD/TAPE deck INPUT OUTPUT LINE LINE L R IN OUT Required cords Audio cords...

Operating Instructions
Page 7
... SURROUND WOOFER MULTI CH IN R IN CD OUT IN AUDIO IN AUDIO IN AUDIO OUT AUDIO IN SUB MD/TAPE TV/SAT DVD/LD VIDEO WOOFER SPEAKERS IMPEDANCE USE 8 - 16Ω SURROUND R L CENTER FRONT R L R L R L VOLTAGE SELECTOR 120V 240V 220V ç IN OUT INPUT OUTPUT VIDEO VIDEO IN OUT AUDIO AUDIO IN OUT L R VCR Jacks for connecting video components Connect a TV or satellite tuner VCR DVD or LD player TV monitor To the TV/SAT jacks VIDEO jacks DVD/LD jacks MONITOR VIDEO OUT jack Note on video component hookups You can connect your TV's audio output jacks...
... SURROUND WOOFER MULTI CH IN R IN CD OUT IN AUDIO IN AUDIO IN AUDIO OUT AUDIO IN SUB MD/TAPE TV/SAT DVD/LD VIDEO WOOFER SPEAKERS IMPEDANCE USE 8 - 16Ω SURROUND R L CENTER FRONT R L R L R L VOLTAGE SELECTOR 120V 240V 220V ç IN OUT INPUT OUTPUT VIDEO VIDEO IN OUT AUDIO AUDIO IN OUT L R VCR Jacks for connecting video components Connect a TV or satellite tuner VCR DVD or LD player TV monitor To the TV/SAT jacks VIDEO jacks DVD/LD jacks MONITOR VIDEO OUT jack Note on video component hookups You can connect your TV's audio output jacks...
Operating Instructions
Page 8
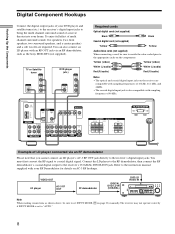
... sub woofer are compatible with sampling frequencies of 32 kHz, 44.1 kHz, and 48kHz. • The coaxial digital input jack is set INPUT MODE (qa on the receiver are required. VIDEO OUT LD player AC-3 RF OUT RF demodulator DIGITAL DVD/LD IN (COAXIAL) ? / 1 PHONES DVD/LD VIDEO IN DISPLAY DIMMER MULTI CHANNEL DECODING MULTI CH IN INPUT MODE PRESET - Hooking Up the Components Digital Component Hookups Connect the digital output jacks of your DVD player and satellite tuner (etc.) to the receiver's digital input jacks to bring the multi channel surround sound of a movie theater...
... sub woofer are compatible with sampling frequencies of 32 kHz, 44.1 kHz, and 48kHz. • The coaxial digital input jack is set INPUT MODE (qa on the receiver are required. VIDEO OUT LD player AC-3 RF OUT RF demodulator DIGITAL DVD/LD IN (COAXIAL) ? / 1 PHONES DVD/LD VIDEO IN DISPLAY DIMMER MULTI CHANNEL DECODING MULTI CH IN INPUT MODE PRESET - Hooking Up the Components Digital Component Hookups Connect the digital output jacks of your DVD player and satellite tuner (etc.) to the receiver's digital input jacks to bring the multi channel surround sound of a movie theater...
Operating Instructions
Page 9
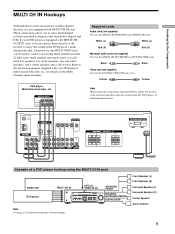
...MULTI CH IN FRONT and SURROUND jacks White (L) White (L) Red (R) Red (R) Monaural audio cords (not supplied) Two for the MULTI CH IN CENTER and SUB WOOFER jacks Black Black Video cord (not supplied) One for details on the Multi Channel input hookups. TUNING + MEMORY SHIFT FM MODE FM AM MENU NAME LEVEL SOUND CONTROL SURR SOUND FIELD ENTER A.F.D. BASS + VIDEO DVD/LD TV/SAT MD/TAPE CD TUNER MASTER VOLUME + - TREBLE + - Alternatively, the MULTI CH IN jacks can connect them directly to the receiver to the instruction manual supplied with MULTI CH IN jacks. MODE...
...MULTI CH IN FRONT and SURROUND jacks White (L) White (L) Red (R) Red (R) Monaural audio cords (not supplied) Two for the MULTI CH IN CENTER and SUB WOOFER jacks Black Black Video cord (not supplied) One for details on the Multi Channel input hookups. TUNING + MEMORY SHIFT FM MODE FM AM MENU NAME LEVEL SOUND CONTROL SURR SOUND FIELD ENTER A.F.D. BASS + VIDEO DVD/LD TV/SAT MD/TAPE CD TUNER MASTER VOLUME + - TREBLE + - Alternatively, the MULTI CH IN jacks can connect them directly to the receiver to the instruction manual supplied with MULTI CH IN jacks. MODE...
Operating Instructions
Page 12
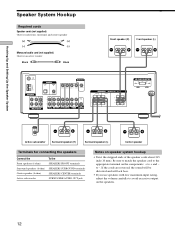
...speaker (L) FM 75Ω COAXIAL AM ANTENNA ANTENNA L DIGITAL TV/SAT IN DVD/LD IN OPTICAL CENTER L COAXIAL MONITOR VIDEO IN VIDEO IN VIDEO OUT VIDEO IN VIDEO OUT AUDIO OUT R SUB FRONT SURROUND WOOFER MULTI CH IN R IN CD OUT IN AUDIO IN AUDIO IN AUDIO OUT AUDIO IN SUB MD/TAPE TV/SAT DVD/LD VIDEO WOOFER SPEAKERS IMPEDANCE USE 8 - 16Ω SURROUND R L CENTER FRONT R L R L R L VOLTAGE SELECTOR 120V 240V 220V INPUT AUDIO IN ] } ] } ] } Active sub woofer Surround speaker (R) Surround speaker (L) Center speaker Terminals for connecting the speakers Connect...
...speaker (L) FM 75Ω COAXIAL AM ANTENNA ANTENNA L DIGITAL TV/SAT IN DVD/LD IN OPTICAL CENTER L COAXIAL MONITOR VIDEO IN VIDEO IN VIDEO OUT VIDEO IN VIDEO OUT AUDIO OUT R SUB FRONT SURROUND WOOFER MULTI CH IN R IN CD OUT IN AUDIO IN AUDIO IN AUDIO OUT AUDIO IN SUB MD/TAPE TV/SAT DVD/LD VIDEO WOOFER SPEAKERS IMPEDANCE USE 8 - 16Ω SURROUND R L CENTER FRONT R L R L R L VOLTAGE SELECTOR 120V 240V 220V INPUT AUDIO IN ] } ] } ] } Active sub woofer Surround speaker (R) Surround speaker (L) Center speaker Terminals for connecting the speakers Connect...
Operating Instructions
Page 14
... to your system. The next time you turn the receiver on . ?/1 ? / 1 PHONES DISPLAY DIMMER MULTI CHANNEL DECODING MULTI CH IN INPUT MODE PRESET - Notes • Running the demonstration will not appear. BASS + VIDEO DVD/LD TV/SAT MD/TAPE CD TUNER MASTER VOLUME + - TUNING + SET UP - This procedure is not necessary if the demonstration activates when you turn the power on , the demonstration will clear the receiver's memory. When the demonstration starts...
... to your system. The next time you turn the receiver on . ?/1 ? / 1 PHONES DISPLAY DIMMER MULTI CHANNEL DECODING MULTI CH IN INPUT MODE PRESET - Notes • Running the demonstration will not appear. BASS + VIDEO DVD/LD TV/SAT MD/TAPE CD TUNER MASTER VOLUME + - TUNING + SET UP - This procedure is not necessary if the demonstration activates when you turn the power on , the demonstration will clear the receiver's memory. When the demonstration starts...
Operating Instructions
Page 16
... you want to activate the bass redirection circuitry and output the surround channel bass frequencies from the sub woofer or other "LARGE" speakers. • If you do not connect the center speaker, select "NO". The sound of surround effects when using small speakers, you can set to "LARGE") or sub woofer. *1 • If you do not connect surround speakers, select "NO".*3 z *1~*3 correspond to the following Dolby Pro Logic modes *1 NORMAL *2 PHANTOM *3 3 STEREO z About speaker sizes (LARGE and SMALL) Internally...
... you want to activate the bass redirection circuitry and output the surround channel bass frequencies from the sub woofer or other "LARGE" speakers. • If you do not connect the center speaker, select "NO". The sound of surround effects when using small speakers, you can set to "LARGE") or sub woofer. *1 • If you do not connect surround speakers, select "NO".*3 z *1~*3 correspond to the following Dolby Pro Logic modes *1 NORMAL *2 PHANTOM *3 3 STEREO z About speaker sizes (LARGE and SMALL) Internally...
Operating Instructions
Page 17
... may obtain better results using "PL. Refer to obtain proper balance. SIDE". If you do not connect a sub woofer, select "S.W. With the Digital Cinema Sound modes, speaker position is set to "PL. Nevertheless, each setting has on page 15). • Do not place the surround speakers farther away from your listening position than the front speakers. This activates the bass redirection circuitry and outputs the LFE signals from the front...
... may obtain better results using "PL. Refer to obtain proper balance. SIDE". If you do not connect a sub woofer, select "S.W. With the Digital Cinema Sound modes, speaker position is set to "PL. Nevertheless, each setting has on page 15). • Do not place the surround speakers farther away from your listening position than the front speakers. This activates the bass redirection circuitry and outputs the LFE signals from the front...
Operating Instructions
Page 19
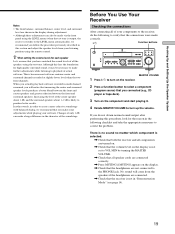
... quality surround sound, it . 4 Rotate MASTER VOLUME to turn on the receiver. 2 Press a function button to select a component (program source) that the connections were made via the front panel using the remote control. TUNING + MEMORY SHIFT FM MODE FM AM MENU NAME LEVEL SOUND CONTROL SURR SOUND FIELD ENTER A.F.D. TREBLE + - There is no sound no matter which component is selected. , Check that both the receiver and all speaker cords are connected correctly. , Press MUTING if MUTING appears on the display is output, the receiver switches to the LEVEL menu automatically...
... quality surround sound, it . 4 Rotate MASTER VOLUME to turn on the receiver. 2 Press a function button to select a component (program source) that the connections were made via the front panel using the remote control. TUNING + MEMORY SHIFT FM MODE FM AM MENU NAME LEVEL SOUND CONTROL SURR SOUND FIELD ENTER A.F.D. TREBLE + - There is no sound no matter which component is selected. , Check that both the receiver and all speaker cords are connected correctly. , Press MUTING if MUTING appears on the display is output, the receiver switches to the LEVEL menu automatically...
Operating Instructions
Page 22
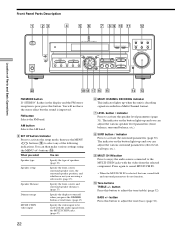
... MENU +/- Front Panel Parts Description 1 23 4 5 6 7 89 0 qa qs ? / 1 PHONES DISPLAY DIMMER MULTI CHANNEL DECODING MULTI CH IN INPUT MODE PRESET - TREBLE + - FM button Selects the FM band. button Press this button. TUNING + SET UP - BASS + VIDEO DVD/LD TV/SAT MD/TAPE CD TUNER MASTER VOLUME + - buttons (qk). AM button Selects the AM band. 5 SET UP button/indicator Press to activate the setup mode, then use the MENU / buttons (ql) to cancel MULTI CH IN. • When the MULTI CH IN is poor, press this button to adjust the tone (bass...
... MENU +/- Front Panel Parts Description 1 23 4 5 6 7 89 0 qa qs ? / 1 PHONES DISPLAY DIMMER MULTI CHANNEL DECODING MULTI CH IN INPUT MODE PRESET - TREBLE + - FM button Selects the FM band. button Press this button. TUNING + SET UP - BASS + VIDEO DVD/LD TV/SAT MD/TAPE CD TUNER MASTER VOLUME + - buttons (qk). AM button Selects the AM band. 5 SET UP button/indicator Press to activate the setup mode, then use the MENU / buttons (ql) to cancel MULTI CH IN. • When the MULTI CH IN is poor, press this button to adjust the tone (bass...
Operating Instructions
Page 23
... adjust the selected speaker level and surround parameters (etc.). w; buttons Turn to activate the name function and enter names for your digital components (DVD/LD and TV/SAT). If there are both digital and analog connections. ql MENU / buttons Press to adjust the volume. Each press switches the input mode of the currently selected component. qd MASTER VOLUME control After turning on the component you want to enjoy surround sound. Location of Parts and Basic Operations qa INPUT MODE button Press to mute the sound. Select To AUTO...
... adjust the selected speaker level and surround parameters (etc.). w; buttons Turn to activate the name function and enter names for your digital components (DVD/LD and TV/SAT). If there are both digital and analog connections. ql MENU / buttons Press to adjust the volume. Each press switches the input mode of the currently selected component. qd MASTER VOLUME control After turning on the component you want to enjoy surround sound. Location of Parts and Basic Operations qa INPUT MODE button Press to mute the sound. Select To AUTO...
Operating Instructions
Page 29
... DIGITAL [3/1] DTS [3/1] DOLBY DIGITAL [2/2] DTS [2/2] DOLBY DIGITAL [3/2] DTS [3/2] DOLBY DIGITAL [2/0] DOLBY PROLOGIC PCM XX kHz*** Source sound and Output Channel Display All speakers present ; DIGITAL L C R LCR dts ; DIGITAL L C R PRO LOGIC S ; DIGITAL L R C dts ; DIGITAL L C R L R dts ; DIGITAL L C R L R dts ; DIGITAL L R S LCR dts ; The following table shows how the indicators light up when using the following movie sound modes with Dolby surround encoded flag ON *** The sampling rate is output from multi channel surround signals...
... DIGITAL [3/1] DTS [3/1] DOLBY DIGITAL [2/2] DTS [2/2] DOLBY DIGITAL [3/2] DTS [3/2] DOLBY DIGITAL [2/0] DOLBY PROLOGIC PCM XX kHz*** Source sound and Output Channel Display All speakers present ; DIGITAL L C R LCR dts ; DIGITAL L C R PRO LOGIC S ; DIGITAL L R C dts ; DIGITAL L C R L R dts ; DIGITAL L C R L R dts ; DIGITAL L R S LCR dts ; The following table shows how the indicators light up when using the following movie sound modes with Dolby surround encoded flag ON *** The sampling rate is output from multi channel surround signals...
Operating Instructions
Page 43
... low-level sound is heard from the surround speakers. , Make sure the sound field function is on (press SOUND FIELD MODE). , Select the appropriate center mode (see pages 25-27). , Adjust the speaker volume (see page 18). , Make sure the surround speaker size parameter is set to the analog MD/TAPE terminals. Preset the stations (see page 37). , Press DISPLAY so that the antennas are connected correctly. , Select the source component with a FUNCTION button. , When recording from a digital component, make sure the input mode...
... low-level sound is heard from the surround speakers. , Make sure the sound field function is on (press SOUND FIELD MODE). , Select the appropriate center mode (see pages 25-27). , Adjust the speaker volume (see page 18). , Make sure the surround speaker size parameter is set to the analog MD/TAPE terminals. Preset the stations (see page 37). , Press DISPLAY so that the antennas are connected correctly. , Select the source component with a FUNCTION button. , When recording from a digital component, make sure the input mode...
Operating Instructions
Page 48
... mode. Remote Button SLEEP AV ?/1 ?/1 VIDEO/ VIDEO 1 VIDEO 2 VIDEO 3 DVD/LD TV/SAT MD/TAPE CD/SACD TUNER PHONO AUX FN SHIFT* 0-9 >10 Operations Receiver TV/VCR/ CD player/ DVD player/ MD deck/ VCD player/ LD player/ DAT deck Receiver Receiver Receiver Receiver Receiver Receiver Receiver Receiver Receiver Receiver Receiver Remote Receiver CD player/ MD deck/ VCD player/ LD player/ DAT deck TV/VCR/SAT CD player/ MD deck/ Tape deck/ LD player/ VCD player Function Activates the sleep function and the duration which the receiver turns off . To listen Minidisc or audio tape. Use with components...
... mode. Remote Button SLEEP AV ?/1 ?/1 VIDEO/ VIDEO 1 VIDEO 2 VIDEO 3 DVD/LD TV/SAT MD/TAPE CD/SACD TUNER PHONO AUX FN SHIFT* 0-9 >10 Operations Receiver TV/VCR/ CD player/ DVD player/ MD deck/ VCD player/ LD player/ DAT deck Receiver Receiver Receiver Receiver Receiver Receiver Receiver Receiver Receiver Receiver Receiver Remote Receiver CD player/ MD deck/ VCD player/ LD player/ DAT deck TV/VCR/SAT CD player/ MD deck/ Tape deck/ LD player/ VCD player Function Activates the sleep function and the duration which the receiver turns off . To listen Minidisc or audio tape. Use with components...
Operating Instructions
Page 49
... factory settings of the two cursor modes: LEVEL and SURROUND. MULTI CH/ 2 CH DIRECT MUTING TEST TONE MAIN MENU TV/VCR Receiver Receiver Receiver Receiver Receiver Receiver Receiver Function Stops play. Selects preset channels. MENU DVD Displays DVD menu. Selects input signal: TV input or video input. Press this section may not be changed. Additional Information 49 F. Receiver Adjusts the master volume of the small picture. TITLE DVD Displays DVD title. ** Only for the small picture. Remote Button x POSITION** Operations CD player/ MD deck...
... factory settings of the two cursor modes: LEVEL and SURROUND. MULTI CH/ 2 CH DIRECT MUTING TEST TONE MAIN MENU TV/VCR Receiver Receiver Receiver Receiver Receiver Receiver Receiver Function Stops play. Selects preset channels. MENU DVD Displays DVD menu. Selects input signal: TV input or video input. Press this section may not be changed. Additional Information 49 F. Receiver Adjusts the master volume of the small picture. TITLE DVD Displays DVD title. ** Only for the small picture. Remote Button x POSITION** Operations CD player/ MD deck...
Operating Instructions
Page 51
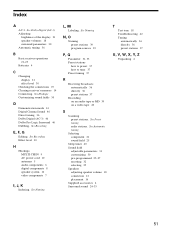
...40 Sound field adjustable parameters 31 customizing 30 pre-programmed 25-27 resetting 32 selecting 25 Speakers adjusting speaker volume 18 connection 12 placement 16 Supplied accessories 4 Surround sound 24-33 T Test tone 18 Troubleshooting 42 Tuning automatically 36 directly 36 preset stations 37 U, V, W, X, Y, Z Unpacking 4 51 Index A AC-3. See Recording E, F, G Editing. See Recording Effect level 30 H Hookups MULTI CH IN 9 AC power cord 10 antennas 5 audio components 6 digital components 8 speaker system 12 video components 7 I, J, K Indexing. See Preset tuning radio stations...
...40 Sound field adjustable parameters 31 customizing 30 pre-programmed 25-27 resetting 32 selecting 25 Speakers adjusting speaker volume 18 connection 12 placement 16 Supplied accessories 4 Surround sound 24-33 T Test tone 18 Troubleshooting 42 Tuning automatically 36 directly 36 preset stations 37 U, V, W, X, Y, Z Unpacking 4 51 Index A AC-3. See Recording E, F, G Editing. See Recording Effect level 30 H Hookups MULTI CH IN 9 AC power cord 10 antennas 5 audio components 6 digital components 8 speaker system 12 video components 7 I, J, K Indexing. See Preset tuning radio stations...
Service Manual
Page 6
... DVD/LD , TV/SAT , MD/TAPE , CD , TUNER can be used.) FACTORY SET MODE * All preset contents are pressed "REST 00" appears. While depressing the TUNING+ button or the PRESET TUNING+ button, press the power ?/1 button to turn on one after another in clockwise direction, "VOL MIN", "VOL 1" to "VOL 30", "VOL MAX" appear. 6 Press the VIDEO button, confirm display SW SLEEP D PRO LOGIC MPEGSTEREO COAX D.RANGE TA L R L F E S RDS INFO MUTING k m MHz Digital Cinema Sound, SET...
... DVD/LD , TV/SAT , MD/TAPE , CD , TUNER can be used.) FACTORY SET MODE * All preset contents are pressed "REST 00" appears. While depressing the TUNING+ button or the PRESET TUNING+ button, press the power ?/1 button to turn on one after another in clockwise direction, "VOL MIN", "VOL 1" to "VOL 30", "VOL MAX" appear. 6 Press the VIDEO button, confirm display SW SLEEP D PRO LOGIC MPEGSTEREO COAX D.RANGE TA L R L F E S RDS INFO MUTING k m MHz Digital Cinema Sound, SET...


