
Limited Warranty (U.S. Only)
Page 1
... the Product, including the antenna. 4-557-173-02 General Stereo/Hifi Components/Tape Decks ® CD Players/Mini Disc Players/Audio Systems Hifi Audio LIMITED WARRANTY Sony Electronics Inc. ("Sony") warrants this Product is determined to be presented to you. After the warranty period, you , or for service assistance or resolution of a service problem, or for all parts costs. 3. For your authorized dealer, call : Sony Customer Information Services Center 1-800-222-7669...
... the Product, including the antenna. 4-557-173-02 General Stereo/Hifi Components/Tape Decks ® CD Players/Mini Disc Players/Audio Systems Hifi Audio LIMITED WARRANTY Sony Electronics Inc. ("Sony") warrants this Product is determined to be presented to you. After the warranty period, you , or for service assistance or resolution of a service problem, or for all parts costs. 3. For your authorized dealer, call : Sony Customer Information Services Center 1-800-222-7669...

Operating Instructions
Page 4
... with digital audio output jacks .......... 10 1b: Connecting components with multi channel output jacks 13 1c: Connecting components with only analog audio jacks 15 2: Connecting the antennas 17 3: Connecting speakers 18 4: Connecting the AC power cord ....... 20 5: Setting up the speakers 21 6: Adjusting the speaker levels and balance (TEST TONE 23 Amplifier/Tuner Operation Selecting the component 24 Listening to multi channel sound (MULTI CH DIRECT 25 Listening to FM/AM radio 25 Storing FM stations automatically (AUTOBETICAL)*1 27 Presetting radio stations 27 Using the Radio Data...
... with digital audio output jacks .......... 10 1b: Connecting components with multi channel output jacks 13 1c: Connecting components with only analog audio jacks 15 2: Connecting the antennas 17 3: Connecting speakers 18 4: Connecting the AC power cord ....... 20 5: Setting up the speakers 21 6: Adjusting the speaker levels and balance (TEST TONE 23 Amplifier/Tuner Operation Selecting the component 24 Listening to multi channel sound (MULTI CH DIRECT 25 Listening to FM/AM radio 25 Storing FM stations automatically (AUTOBETICAL)*1 27 Presetting radio stations 27 Using the Radio Data...
Operating Instructions
Page 6
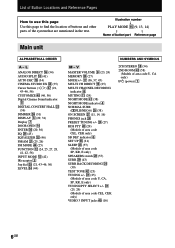
... MODE ra (38) NIGHT MODE indicator 4 NORMAL SURR (;PLII/NEO:6) wg (38) ON SCREEN wj (11, 14, 16) PHONES jack wk PRESET TUNING +/- w; (27) RDS PTY rd (29) (Models of area code CEL, CEK only) SB DEC indicator 6 SET UP ed (21) SLEEP rd (57) (Models of button/part Reference page Main unit ALPHABETICAL ORDER A - L ANALOG DIRECT qh (34) AUDIO SPLIT 0 (41) AUTO DEC ql (34) CINEMA...
... MODE ra (38) NIGHT MODE indicator 4 NORMAL SURR (;PLII/NEO:6) wg (38) ON SCREEN wj (11, 14, 16) PHONES jack wk PRESET TUNING +/- w; (27) RDS PTY rd (29) (Models of area code CEL, CEK only) SB DEC indicator 6 SET UP ed (21) SLEEP rd (57) (Models of button/part Reference page Main unit ALPHABETICAL ORDER A - L ANALOG DIRECT qh (34) AUDIO SPLIT 0 (41) AUTO DEC ql (34) CINEMA...

Operating Instructions
Page 11
... can connect the component to the S-VIDEO jacks on the receiver. continued 11GB R SUB SURROUND SUB MULTI CH IN 2 WOOFER MULTI CH IN 1 BACK WOOFER PHONO CD/SACD MD/DAT TAPE SPEA IMPEDANCE DC INPUT S VIDEO INPUT VIDEO H INPUT COMPONENT R-Y B-Y Y TV monitor Tip When the component is equipped with COMPONENT VIDEO (Y, B-Y, R-Y) output jacks. In addition, this receiver. If you to S-video or standard video signals (or vice versa). • The on-screen display will not appear on the receiver. Getting Started 2 Connect the video jacks. (Except for models...
... can connect the component to the S-VIDEO jacks on the receiver. continued 11GB R SUB SURROUND SUB MULTI CH IN 2 WOOFER MULTI CH IN 1 BACK WOOFER PHONO CD/SACD MD/DAT TAPE SPEA IMPEDANCE DC INPUT S VIDEO INPUT VIDEO H INPUT COMPONENT R-Y B-Y Y TV monitor Tip When the component is equipped with COMPONENT VIDEO (Y, B-Y, R-Y) output jacks. In addition, this receiver. If you to S-video or standard video signals (or vice versa). • The on-screen display will not appear on the receiver. Getting Started 2 Connect the video jacks. (Except for models...
Operating Instructions
Page 12
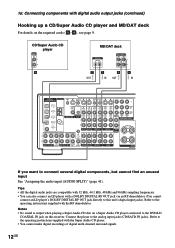
... analog input jacks (CD/SACD IN jacks). Connect the player to the DVD/LD COAXIAL IN jack on the required cords (A-H), see page 9. Tips • All the digital audio jacks are compatible with 32 kHz, 44.1 kHz, 48 kHz and 96 kHz sampling frequencies. • You can also connect an LD player with the RF demodulator. R SUB SURROUND SUB MULTI CH IN 2 WOOFER MULTI CH IN 1 BACK WOOFER PHONO CD/SACD MD/DAT TAPE SPEA IMPEDANCE...
... analog input jacks (CD/SACD IN jacks). Connect the player to the DVD/LD COAXIAL IN jack on the required cords (A-H), see page 9. Tips • All the digital audio jacks are compatible with 32 kHz, 44.1 kHz, 48 kHz and 96 kHz sampling frequencies. • You can also connect an LD player with the RF demodulator. R SUB SURROUND SUB MULTI CH IN 2 WOOFER MULTI CH IN 1 BACK WOOFER PHONO CD/SACD MD/DAT TAPE SPEA IMPEDANCE...

Operating Instructions
Page 14
... on-screen display will not appear on a TV connected to the TV/SAT AUDIO IN jacks on the receiver. Connecting a TV with COMPONENT VIDEO (Y, B-Y, R-Y) output jacks. Note You can convert standard video signals to the TV/SAT VIDEO IN jack on the receiver. R SUB SURROUND SUB MULTI CH IN 2 WOOFER MULTI CH IN 1 BACK WOOFER PHONO CD/SACD MD/DAT TAPE SPEA IMPEDANCE Tip When the component is equipped with S-video jacks, you connect a separate satellite tuner, etc., connect both the audio and video output jacks...
... on-screen display will not appear on a TV connected to the TV/SAT AUDIO IN jacks on the receiver. Connecting a TV with COMPONENT VIDEO (Y, B-Y, R-Y) output jacks. Note You can convert standard video signals to the TV/SAT VIDEO IN jack on the receiver. R SUB SURROUND SUB MULTI CH IN 2 WOOFER MULTI CH IN 1 BACK WOOFER PHONO CD/SACD MD/DAT TAPE SPEA IMPEDANCE Tip When the component is equipped with S-video jacks, you connect a separate satellite tuner, etc., connect both the audio and video output jacks...
Operating Instructions
Page 16
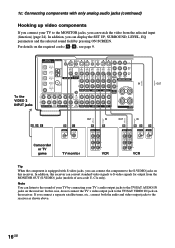
... S-video signals for output from the selected input (function) (page 24). If you connect a separate satellite tuner, etc., connect both the audio and video output jacks to the receiver as shown above. 16GB In addition, you can display the SET UP, SURROUND, LEVEL, EQ parameters and the selected sound field by connecting your TV to the MONITOR jacks, you can watch the video from the MONITOR OUT (S-VIDEO) jacks (models of your TV by pressing ON SCREEN. 1c: Connecting components with S-video jacks...
... S-video signals for output from the selected input (function) (page 24). If you connect a separate satellite tuner, etc., connect both the audio and video output jacks to the receiver as shown above. 16GB In addition, you can display the SET UP, SURROUND, LEVEL, EQ parameters and the selected sound field by connecting your TV to the MONITOR jacks, you can watch the video from the MONITOR OUT (S-VIDEO) jacks (models of your TV by pressing ON SCREEN. 1c: Connecting components with S-video jacks...

Operating Instructions
Page 20
... to their factory defaults. 1 Press ?/1 to this outlet. appears. Notes • The AC OUTLET(s) on the rear of the receiver is a switched outlet, which the receiver is turned on. • Make sure that the total power consumption of the component(s) connected to the local power supply voltage. This may cause a malfunction. 4: Connecting the AC power cord AC OUTLET* FRONT SURROUND CENTER OUT L FRONT B -+ L R SURROUND BACK PRE OUT SUB WOOFER R SPEAKERS IMPEDANCE USE 4-16...
... to their factory defaults. 1 Press ?/1 to this outlet. appears. Notes • The AC OUTLET(s) on the rear of the receiver is a switched outlet, which the receiver is turned on. • Make sure that the total power consumption of the component(s) connected to the local power supply voltage. This may cause a malfunction. 4: Connecting the AC power cord AC OUTLET* FRONT SURROUND CENTER OUT L FRONT B -+ L R SURROUND BACK PRE OUT SUB WOOFER R SPEAKERS IMPEDANCE USE 4-16...

Operating Instructions
Page 24
... L/R signals of the multi channel sound are connected and you can select only the following sound fields (page 37). - The selected function appears in tuner TUNER Turntable PHONO 2 Turn on the TV. 3 Rotate MASTER VOLUME to match the component you select a component which is connected to the receiver's MONITOR jack, the video from the headphones. HEADPHONE THEATER • When headphones are output from the selected function will be displayed on the component and start playback. Amplifier/Tuner Operation Selecting the component 1 Rotate FUNCTION to select the function.
... L/R signals of the multi channel sound are connected and you can select only the following sound fields (page 37). - The selected function appears in tuner TUNER Turntable PHONO 2 Turn on the TV. 3 Rotate MASTER VOLUME to match the component you select a component which is connected to the receiver's MONITOR jack, the video from the headphones. HEADPHONE THEATER • When headphones are output from the selected function will be displayed on the component and start playback. Amplifier/Tuner Operation Selecting the component 1 Rotate FUNCTION to select the function.
Operating Instructions
Page 25
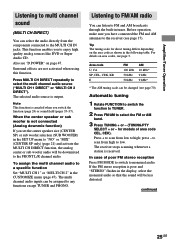
... The tuning scale for models of poor FM stereo reception Press FM MODE to switch to a specific function Set "MULTI CH 1" or "MULTI CH 2" in tuner. The receiver stops scanning whenever a station is canceled when you set the center speaker size (CENTER SP) or sub woofer selection (SUB WOOFER) in the SET UP menu to "NO" or "MIX" (CENTER SP only) (page 21) and activate the MULTI CH DIRECT function, the analog center or sub woofer audio will be downmixed to the FRONT L/R channel audio. This function enables...
... The tuning scale for models of poor FM stereo reception Press FM MODE to switch to a specific function Set "MULTI CH 1" or "MULTI CH 2" in tuner. The receiver stops scanning whenever a station is canceled when you set the center speaker size (CENTER SP) or sub woofer selection (SUB WOOFER) in the SET UP menu to "NO" or "MIX" (CENTER SP only) (page 21) and activate the MULTI CH DIRECT function, the analog center or sub woofer audio will be downmixed to the FRONT L/R channel audio. This function enables...
Operating Instructions
Page 27
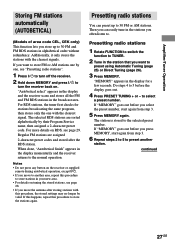
... preset using Automatic Tuning (page 25) or Direct Tuning (page 26). 3 Press MEMORY. When done, "Autobetical finish" appears in the display for stations broadcasting the same program, then stores only the one , see page 29. Notes • Do not press any button on the receiver or supplied remote during autobetical operation, except ?/1. • If you move the antenna after the RDS station. Presetting radio stations 1 Rotate FUNCTION to switch...
... preset using Automatic Tuning (page 25) or Direct Tuning (page 26). 3 Press MEMORY. When done, "Autobetical finish" appears in the display for stations broadcasting the same program, then stores only the one , see page 29. Notes • Do not press any button on the receiver or supplied remote during autobetical operation, except ?/1. • If you move the antenna after the RDS station. Presetting radio stations 1 Rotate FUNCTION to switch...
Operating Instructions
Page 32
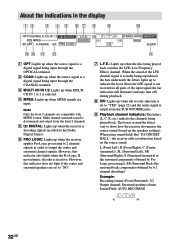
... also lights when the Pro Logic II movie/music decoder is actually being played back. Since the LFE signal is set to "NO". 7 L.F.E.: Lights up when the disc being played back contains the LFE (Low Frequency Effect) channel. When the sound of the input signal the bar indication will fluctuate (and may turn off) during playback. 8 SW: Lights up when sub woofer selection is not recorded in order to output the center and surround channel signals. SW L C R STEREO...
... also lights when the Pro Logic II movie/music decoder is actually being played back. Since the LFE signal is set to "NO". 7 L.F.E.: Lights up when the disc being played back contains the LFE (Low Frequency Effect) channel. When the sound of the input signal the bar indication will fluctuate (and may turn off) during playback. 8 SW: Lights up when sub woofer selection is not recorded in order to output the center and surround channel signals. SW L C R STEREO...

Operating Instructions
Page 34
Listening to 2 channel stereo sources (2CH STEREO) Standard 2 channel stereo sources completely bypass the sound field processing and multi channel surround formats are downmixed to the AUTO DECODING mode. To listen to the 2 channel stereo sources using this function, only the volume and front speaker balance can switch the audio of audio signal being input (Dolby Digital, DTS, standard 2 channel stereo, etc) and performs the proper decoding if necessary. However, when playing software encoded in the Dolby Digital EX format, you may want to use SURR...
Listening to 2 channel stereo sources (2CH STEREO) Standard 2 channel stereo sources completely bypass the sound field processing and multi channel surround formats are downmixed to the AUTO DECODING mode. To listen to the 2 channel stereo sources using this function, only the volume and front speaker balance can switch the audio of audio signal being input (Dolby Digital, DTS, standard 2 channel stereo, etc) and performs the proper decoding if necessary. However, when playing software encoded in the Dolby Digital EX format, you may want to use SURR...

Operating Instructions
Page 47
...; PLII MUSIC • Neo: Cinema • Neo: Music x SB DECODING (Surround back decoding mode) You can use the CUSTOMIZE menu to the same function. You can enjoy high quality audio without the influence of digital circuits. • ALWAYS ON Lets you turn off the power of the video circuits is selected. When set to "AUTO", and the sound from the digital audio jacks (for the digital signal input to the Sony components connected via CONTROL A1 cords (page...
...; PLII MUSIC • Neo: Cinema • Neo: Music x SB DECODING (Surround back decoding mode) You can use the CUSTOMIZE menu to the same function. You can enjoy high quality audio without the influence of digital circuits. • ALWAYS ON Lets you turn off the power of the video circuits is selected. When set to "AUTO", and the sound from the digital audio jacks (for the digital signal input to the Sony components connected via CONTROL A1 cords (page...
Operating Instructions
Page 60
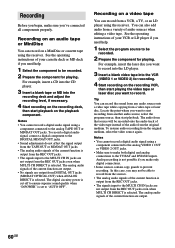
.... Notes • You cannot record a digital audio signal using the receiver. See the operating instructions of the current function are output. • No signals are not output from DIGITAL OUT jacks (MD/DAT OPTICAL OUT) when ANALOG DIRECT is selected. Recording on the playback component. In this case, you want to record into the LD player. 3 Insert a blank video tape into the recording deck and adjust the recording level, if necessary. 4 Start recording on...
.... Notes • You cannot record a digital audio signal using the receiver. See the operating instructions of the current function are output. • No signals are not output from DIGITAL OUT jacks (MD/DAT OPTICAL OUT) when ANALOG DIRECT is selected. Recording on the playback component. In this case, you want to record into the LD player. 3 Insert a blank video tape into the recording deck and adjust the recording level, if necessary. 4 Start recording on...
Operating Instructions
Page 63
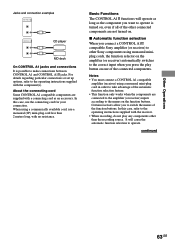
... switches to the correct input when you press the play any components other Sony components using monaural miniplug cords, the function selector on . Notes • You must connect a CONTROL A1 compatible amplifier (receiver) using a monaural mini-plug cord in order to the names on one of the function buttons. About the connecting cord Some CONTROL A1 compatible components are connected to the amplifier (or receiver) inputs according to take advantage of the automatic function selection feature. • This function only works...
... switches to the correct input when you press the play any components other Sony components using monaural miniplug cords, the function selector on . Notes • You must connect a CONTROL A1 compatible amplifier (receiver) using a monaural mini-plug cord in order to the names on one of the function buttons. About the connecting cord Some CONTROL A1 compatible components are connected to the amplifier (or receiver) inputs according to take advantage of the automatic function selection feature. • This function only works...
Operating Instructions
Page 66
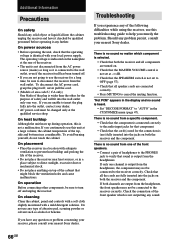
... the receiver and all speaker cords are output from the headphones, the component may not be sure to the receiver correctly. On heat buildup Although the unit heats up during operation, this troubleshooting guide to "AUTO" in the CUSTOMIZE menu (page 47). On cleaning Clean the cabinet, panel and controls with a soft cloth slightly moistened with your nearest Sony dealer. There is no sound from a specific component...
... the receiver and all speaker cords are output from the headphones, the component may not be sure to the receiver correctly. On heat buildup Although the unit heats up during operation, this troubleshooting guide to "AUTO" in the CUSTOMIZE menu (page 47). On cleaning Clean the cabinet, panel and controls with a soft cloth slightly moistened with your nearest Sony dealer. There is no sound from a specific component...

Operating Instructions
Page 67
... a digital component, make sure the INPUT MODE is set to "MULTI CH 1 or 2 FIXED", you cannot change the sound field (page 42). Turn off the receiver, eliminate the short-circuit problem and turn on (press MODE +/-). • Sound fields do not function for the audio output) of a short circuit. There is no sound or only a very low-level sound is heard from the center speaker. • Make sure the sound field function is on (press MODE +/-). • Select...
... a digital component, make sure the INPUT MODE is set to "MULTI CH 1 or 2 FIXED", you cannot change the sound field (page 42). Turn off the receiver, eliminate the short-circuit problem and turn on (press MODE +/-). • Sound fields do not function for the audio output) of a short circuit. There is no sound or only a very low-level sound is heard from the center speaker. • Make sure the sound field function is on (press MODE +/-). • Select...
Operating Instructions
Page 68
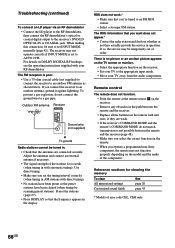
...; Use a 75-ohm coaxial cable (not supplied) to connect the receiver to the receiver's DVD/LD OPTICAL IN or COAXIAL jack. RDS does not work.* • Make sure that the frequency appears in with your TV to set the tuning interval correctly (when tuning in AM stations with new ones, if they actually provide the service in . • Check that you set INPUT MODE manually (page 42). Adjust the antennas and connect an external antenna if...
...; Use a 75-ohm coaxial cable (not supplied) to connect the receiver to the receiver's DVD/LD OPTICAL IN or COAXIAL jack. RDS does not work.* • Make sure that the frequency appears in with your TV to set the tuning interval correctly (when tuning in AM stations with new ones, if they actually provide the service in . • Check that you set INPUT MODE manually (page 42). Adjust the antennas and connect an external antenna if...

Operating Instructions
Page 70
... (Optical) Impedance: 75 ohms S/N: 100 dB (A, 20 kHz LPF) S/N: 100 dB (A, 20 kHz LPF) Outputs TAPE, MD/DAT (REC OUT), VIDEO 1, 2 (AUDIO OUT) FRONT L/R, CENTER, SURROUND L/R, SURROUND BACK, SUB WOOFER Voltage: 150 mV Impedance: 2.2 kilohms Voltage: 2 V Impedance: 1 kilohms EQ BASS: 99 Hz~1.0 kHz MID (FRONT L/R, CENTER only): 198 Hz~10 kHz TREBLE: 1.0 kHz~10 kHz Gain levels: ±10 dB, 0.5 dB step FM tuner section Tuning range 87.5 - 108.0 MHz Antenna terminals 75 ohms...
... (Optical) Impedance: 75 ohms S/N: 100 dB (A, 20 kHz LPF) S/N: 100 dB (A, 20 kHz LPF) Outputs TAPE, MD/DAT (REC OUT), VIDEO 1, 2 (AUDIO OUT) FRONT L/R, CENTER, SURROUND L/R, SURROUND BACK, SUB WOOFER Voltage: 150 mV Impedance: 2.2 kilohms Voltage: 2 V Impedance: 1 kilohms EQ BASS: 99 Hz~1.0 kHz MID (FRONT L/R, CENTER only): 198 Hz~10 kHz TREBLE: 1.0 kHz~10 kHz Gain levels: ±10 dB, 0.5 dB step FM tuner section Tuning range 87.5 - 108.0 MHz Antenna terminals 75 ohms...


