Operating Guide
Page 6
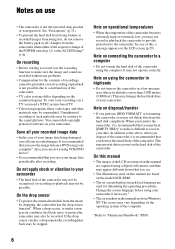
...drop sensor catches a drop repeatedly, recording/play back may damage the hard disk drive of the camcorder. • TV color systems differ depending on the LCD screen ...camcorder. Note on a DVD using the computer. When you transfer the camcorder, it is not possible due to "Handycam Handbook" (PDF). 6 This may vary depending on connecting the camcorder to a computer • Do not format the hard disk...prevent the hard disk from being broken or recorded images from the shock by dropping, the camcorder has the drop sensor function*. You cannot dub copyright protected software on a...
...drop sensor catches a drop repeatedly, recording/play back may damage the hard disk drive of the camcorder. • TV color systems differ depending on the LCD screen ...camcorder. Note on a DVD using the computer. When you transfer the camcorder, it is not possible due to "Handycam Handbook" (PDF). 6 This may vary depending on connecting the camcorder to a computer • Do not format the hard disk...prevent the hard disk from being broken or recorded images from the shock by dropping, the camcorder has the drop sensor function*. You cannot dub copyright protected software on a...
Operating Guide
Page 8
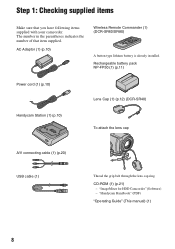
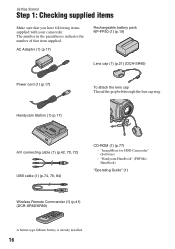
.... The number in the parentheses indicates the number of that you have following items supplied with your camcorder. AC Adaptor (1) (p.10) Wireless Remote Commander (1) (DCR-SR60/SR80) A button-type lithium battery is already installed. "ImageMixer for HDD Camcorder" (Software) - "Handycam Handbook" (PDF) "Operating Guide" (This manual) (1) 8 Step 1: Checking supplied items Make sure that item supplied...
.... The number in the parentheses indicates the number of that you have following items supplied with your camcorder. AC Adaptor (1) (p.10) Wireless Remote Commander (1) (DCR-SR60/SR80) A button-type lithium battery is already installed. "ImageMixer for HDD Camcorder" (Software) - "Handycam Handbook" (PDF) "Operating Guide" (This manual) (1) 8 Step 1: Checking supplied items Make sure that item supplied...
Operating Guide
Page 21
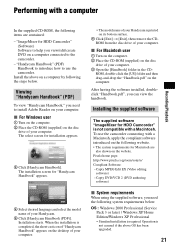
... model name of your Handycam is not assured if the above on the disc drive of your computer. 3 Open the [Handbook] folder in the CD- Installing the supplied software The supplied software "ImageMixer for HDD Camcorder" (Software) Software to help you can view... the handbook. Pixela home page: http://www.pixela.co.jp/oem/sony/e/ Compliant Software: - Capty DVD/VCD 2 (DVD authoring software...
... model name of your Handycam is not assured if the above on the disc drive of your computer. 3 Open the [Handbook] folder in the CD- Installing the supplied software The supplied software "ImageMixer for HDD Camcorder" (Software) Software to help you can view... the handbook. Pixela home page: http://www.pixela.co.jp/oem/sony/e/ Compliant Software: - Capty DVD/VCD 2 (DVD authoring software...
Operating Guide
Page 22
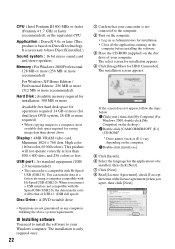
...Camcorder]. This product will be installed, then click [Next]. 7 Click [Next]. 8 Read [License Agreement], check [I accept the terms of USB1.1 (USB full speed). Disc Drive : A DVD writable drive • Operations are not guaranteed on the disc drive... (CD-ROM)* * Drive names (such as Administrators for installation. • Close all the applications running on the computer before installing the software. 3 Place the CD-...(512 MB or more recommended) Hard Disk : Available memory required for installation: 300 MB or more Available free hard disk space for operations required: 14...
...Camcorder]. This product will be installed, then click [Next]. 7 Click [Next]. 8 Read [License Agreement], check [I accept the terms of USB1.1 (USB full speed). Disc Drive : A DVD writable drive • Operations are not guaranteed on the disc drive... (CD-ROM)* * Drive names (such as Administrators for installation. • Close all the applications running on the computer before installing the software. 3 Place the CD-...(512 MB or more recommended) Hard Disk : Available memory required for installation: 300 MB or more Available free hard disk space for operations required: 14...

Operating Guide
Page 23
... once, then starts up again automatically (Restart). qf Remove the CD-ROM from the disc drive of your computer. 23 When you complete the installation, the shortcut icons for [ImageMixer for HDD Camcorder" starts. qs If the [Installing Microsoft ® DirectX ®] screen is checked, then..., skip to restart my computer now.] is displayed, follow the steps below to Install the Program] screen. The installation for "ImageMixer for HDD Camcorder] and [ImageMixer destination folder] appear on the [Ready to install DirectX 9.0c. qd Make sure [Yes, I want to step qd. 1Read...
... once, then starts up again automatically (Restart). qf Remove the CD-ROM from the disc drive of your computer. 23 When you complete the installation, the shortcut icons for [ImageMixer for HDD Camcorder" starts. qs If the [Installing Microsoft ® DirectX ®] screen is checked, then..., skip to restart my computer now.] is displayed, follow the steps below to Install the Program] screen. The installation for "ImageMixer for HDD Camcorder] and [ImageMixer destination folder] appear on the [Ready to install DirectX 9.0c. qd Make sure [Yes, I want to step qd. 1Read...

Handycam Handbook
Page 7
...8226; The illustrations used on this Handbook are based on the model DCR-SR80. • The on-screen displays in Germany, and Sony Corporation, and produces superior images. The number value indicates the amount of light from what you need a NTSC system-based TV. &#...tapes, and other DCR-SR40/ SR60/SR80. However, there may be provided, even if recording or playback is manufactured using your camcorder to direct sunlight for Modulation Transfer Function. Doing so might cause your camcorder if necessary (p.63). You cannot dub copyright protected software on a TV, you see....
...8226; The illustrations used on this Handbook are based on the model DCR-SR80. • The on-screen displays in Germany, and Sony Corporation, and produces superior images. The number value indicates the amount of light from what you need a NTSC system-based TV. &#...tapes, and other DCR-SR40/ SR60/SR80. However, there may be provided, even if recording or playback is manufactured using your camcorder to direct sunlight for Modulation Transfer Function. Doing so might cause your camcorder if necessary (p.63). You cannot dub copyright protected software on a TV, you see....
Handycam Handbook
Page 11
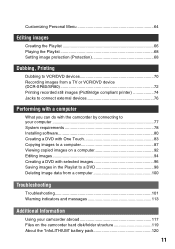
...TV or VCR/DVD device (DCR-SR60/SR80 72 Printing recorded still images (PictBridge compliant printer 74 Jacks to connect external devices 76 Performing with a computer What you can do with the camcorder by connecting to your computer 77 System requirements 78 Installing software 80 Creating a DVD with One Touch...to a DVD 98 Deleting image data from a computer 100 Troubleshooting Troubleshooting 101 Warning indicators and messages 113 Additional Information Using your camcorder abroad 117 Files on the camcorder hard disk/folder structure 119 About the "InfoLITHIUM" battery pack 120 11
...TV or VCR/DVD device (DCR-SR60/SR80 72 Printing recorded still images (PictBridge compliant printer 74 Jacks to connect external devices 76 Performing with a computer What you can do with the camcorder by connecting to your computer 77 System requirements 78 Installing software 80 Creating a DVD with One Touch...to a DVD 98 Deleting image data from a computer 100 Troubleshooting Troubleshooting 101 Warning indicators and messages 113 Additional Information Using your camcorder abroad 117 Files on the camcorder hard disk/folder structure 119 About the "InfoLITHIUM" battery pack 120 11
Handycam Handbook
Page 14
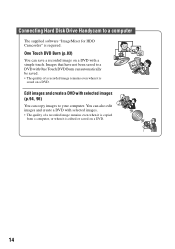
... is required. You can also edit images and create a DVD with One Touch DVD Burn can copy images to your computer. Connecting Hard Disk Drive Handycam to a computer The supplied software "ImageMixer for HDD Camcorder" is edited or saved on a DVD. One Touch DVD Burn (p.83) You can save a recorded image on a DVD with selected images...
... is required. You can also edit images and create a DVD with One Touch DVD Burn can copy images to your computer. Connecting Hard Disk Drive Handycam to a computer The supplied software "ImageMixer for HDD Camcorder" is edited or saved on a DVD. One Touch DVD Burn (p.83) You can save a recorded image on a DVD with selected images...
Handycam Handbook
Page 16
... (1) (p.17) A/V connecting cable (1) (p.42, 70, 72) USB cable (1) (p.74, 76, 84) CD-ROM (1) (p.77) - "ImageMixer for HDD Camcorder" (Software) - "Handycam Handbook" (PDF/this Handbook) "Operating Guide" (1) Wireless Remote Commander (1) (p.41) (DCR-SR60/SR80) A button-type lithium battery is already installed. 16 Getting Started Step 1: Checking supplied items Make sure that item supplied. The number...
... (1) (p.17) A/V connecting cable (1) (p.42, 70, 72) USB cable (1) (p.74, 76, 84) CD-ROM (1) (p.77) - "ImageMixer for HDD Camcorder" (Software) - "Handycam Handbook" (PDF/this Handbook) "Operating Guide" (1) Wireless Remote Commander (1) (p.41) (DCR-SR60/SR80) A button-type lithium battery is already installed. 16 Getting Started Step 1: Checking supplied items Make sure that item supplied. The number...
Handycam Handbook
Page 44
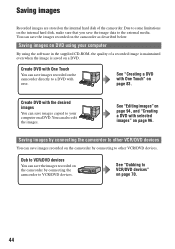
Saving images on DVD using the software in the supplied CD-ROM, the quality of the camcorder. Saving images by connecting the camcorder to other VCR/DVD devices You can save images recorded on the camcorder by connecting the camcorder to VCR/DVD devices. See "Dubbing to the external media. ...page 94, and "Creating a DVD with One Touch You can save images recorded on the camcorder directly to some limitations on the internal hard disk, make sure that you save the images recorded on the camcorder as described below. You can also edit the images. See "Creating a DVD with ease...
Saving images on DVD using the software in the supplied CD-ROM, the quality of the camcorder. Saving images by connecting the camcorder to other VCR/DVD devices You can save images recorded on the camcorder by connecting the camcorder to VCR/DVD devices. See "Dubbing to the external media. ...page 94, and "Creating a DVD with One Touch You can save images recorded on the camcorder directly to some limitations on the internal hard disk, make sure that you save the images recorded on the camcorder as described below. You can also edit the images. See "Creating a DVD with ease...
Handycam Handbook
Page 77
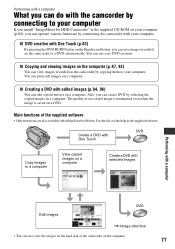
... hard disk of the camcorder on a computer. x Creating a DVD with your computer. Performing with a computer What you can do with the camcorder by connecting to your computer If you install "ImageMixer for HDD Camcorder" in the supplied software. You can print still images on the camcorder ...software • Other functions are also available other than described below. Create a DVD with One Touch DVD Copy images to a computer View copied images on a computer Create a DVD with selected images Performing with One Touch (p.83) By pressing the DVD BURN button on the Handycam...
... hard disk of the camcorder on a computer. x Creating a DVD with your computer. Performing with a computer What you can do with the camcorder by connecting to your computer If you install "ImageMixer for HDD Camcorder" in the supplied software. You can print still images on the camcorder ...software • Other functions are also available other than described below. Create a DVD with One Touch DVD Copy images to a computer View copied images on a computer Create a DVD with selected images Performing with One Touch (p.83) By pressing the DVD BURN button on the Handycam...
Handycam Handbook
Page 78
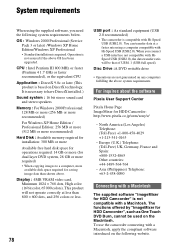
...jp/oem/sony/e/ - OS : Windows 2000 Professional (Service Pack 3 or later) /Windows XP Home Edition/Windows XP Professional • Standard installation is not compatible with HiSpeed USB (USB2.0), the data transfer ratio will not operate correctly at a faster rate using the supplied software, you... more Available free hard disk space for operations required: 14 GB or more (for dual layer DVD system, 28 GB or more required) • When copying images to a computer, more available disk space required for HDD Camcorder" is required. Disc Drive :A DVD writable drive • Operations are...
...jp/oem/sony/e/ - OS : Windows 2000 Professional (Service Pack 3 or later) /Windows XP Home Edition/Windows XP Professional • Standard installation is not compatible with HiSpeed USB (USB2.0), the data transfer ratio will not operate correctly at a faster rate using the supplied software, you... more Available free hard disk space for operations required: 14 GB or more (for dual layer DVD system, 28 GB or more required) • When copying images to a computer, more available disk space required for HDD Camcorder" is required. Disc Drive :A DVD writable drive • Operations are...
Handycam Handbook
Page 79
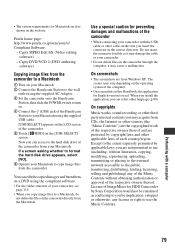
... using the supplied AC Adaptor. 3 Set the camcorder onto the Handycam Station, then slide the POWER switch to turn on. 4 Connect the (USB) jack of the Handycam Station to your Macintosh to copy image files from the camcorder. If a screen asking whether to you by ...www.pixela.co.jp/oem/sony/e/ Compliant Software: - Capty MPEG Edit EX (Video editing software) - Do not insert the connector forcibly as conferring to format the hard disk drive appears, select [NO]. 6 Operate your Macintosh using the compliant software. • For the folder structure of your camcorder, see page 119. &#...
... using the supplied AC Adaptor. 3 Set the camcorder onto the Handycam Station, then slide the POWER switch to turn on. 4 Connect the (USB) jack of the Handycam Station to your Macintosh to copy image files from the camcorder. If a screen asking whether to you by ...www.pixela.co.jp/oem/sony/e/ Compliant Software: - Capty MPEG Edit EX (Video editing software) - Do not insert the connector forcibly as conferring to format the hard disk drive appears, select [NO]. 6 Operate your Macintosh using the compliant software. • For the folder structure of your camcorder, see page 119. &#...
Handycam Handbook
Page 80
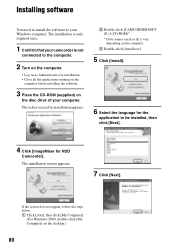
The installation is only required once. 1 Confirm that your camcorder is not connected to the computer. 2 Turn on the computer. • Log on as (E:)) vary depending on the computer. 3 Double-click [install.exe]. 5... screen appears. 7 Click [Next]. The select screen for installation appears. 2 Double-click [CAMCORDERSOFT (E:)] (CD-ROM)* * Drive names (such as Administrators for HDD Camcorder]. Installing software You need to install the software to be installed, then click [Next]. 4 Click [ImageMixer for installation. • Close all the applications running on the computer...
The installation is only required once. 1 Confirm that your camcorder is not connected to the computer. 2 Turn on the computer. • Log on as (E:)) vary depending on the computer. 3 Double-click [install.exe]. 5... screen appears. 7 Click [Next]. The select screen for installation appears. 2 Double-click [CAMCORDERSOFT (E:)] (CD-ROM)* * Drive names (such as Administrators for HDD Camcorder]. Installing software You need to install the software to be installed, then click [Next]. 4 Click [ImageMixer for installation. • Close all the applications running on the computer...
Handycam Handbook
Page 81
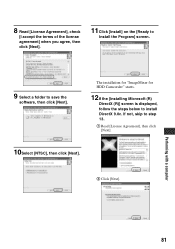
If not, skip to install DirectX 9.0c. The installation for "ImageMixer for HDD Camcorder" starts. 12If the [Installing Microsoft (R) DirectX (R)] screen is displayed, follow the steps below to step 13. 1 Read [License Agreement], then click [Next]. 10Select [NTSC], then click [Next]. 2 Click [Next]. Performing with a computer 81 8 Read [License Agreement], check [I accept the terms of the license agreement] when you agree, then click [Next]. 11Click [Install] on the [Ready to Install the Program] screen. 9 Select a folder to save the software, then click [Next].
If not, skip to install DirectX 9.0c. The installation for "ImageMixer for HDD Camcorder" starts. 12If the [Installing Microsoft (R) DirectX (R)] screen is displayed, follow the steps below to step 13. 1 Read [License Agreement], then click [Next]. 10Select [NTSC], then click [Next]. 2 Click [Next]. Performing with a computer 81 8 Read [License Agreement], check [I accept the terms of the license agreement] when you agree, then click [Next]. 11Click [Install] on the [Ready to Install the Program] screen. 9 Select a folder to save the software, then click [Next].
Handycam Handbook
Page 83
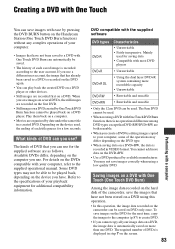
...Some DVD types may not be able to the supplied operational manual. DVD compatible with the supplied software DVD types Characteristics DVD-R • Unrewritable • Fairly inexpensive. You cannot add more data on...a DVD with One Touch (One Touch DVD Burn) Among the image data recorded on the hard disk of the camcorder, save the images that have not been stored on a DVD using a low quality DVD....with One Touch You can save images with ease by pressing the DVD BURN button on the Handycam Station (One Touch DVD Burn function) without any complex operations of your computer. • ...
...Some DVD types may not be able to the supplied operational manual. DVD compatible with the supplied software DVD types Characteristics DVD-R • Unrewritable • Fairly inexpensive. You cannot add more data on...a DVD with One Touch (One Touch DVD Burn) Among the image data recorded on the hard disk of the camcorder, save the images that have not been stored on a DVD using a low quality DVD....with One Touch You can save images with ease by pressing the DVD BURN button on the Handycam Station (One Touch DVD Burn function) without any complex operations of your computer. • ...
Handycam Handbook
Page 84
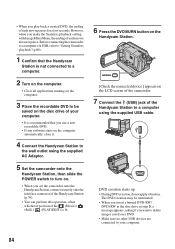
... • When you insert a burned DVD-RW/ DVD+RW in the disc drive in step 3, a message appears, asking if you set the camcorder onto the Handycam Station, connect securely onto the interface connector of the Handycam Station (p.76). • You can perform this operation, when whichever position of ...recommended that you use a new recordable DVD. • If any software starts on the computer automatically, close it. 4 Connect the Handycam Station to the wall outlet using the supplied AC Adaptor. 5 Set the camcorder onto the Handycam Station, then slide the POWER switch to turn on. • ...
... • When you insert a burned DVD-RW/ DVD+RW in the disc drive in step 3, a message appears, asking if you set the camcorder onto the Handycam Station, connect securely onto the interface connector of the Handycam Station (p.76). • You can perform this operation, when whichever position of ...recommended that you use a new recordable DVD. • If any software starts on the computer automatically, close it. 4 Connect the Handycam Station to the wall outlet using the supplied AC Adaptor. 5 Set the camcorder onto the Handycam Station, then slide the POWER switch to turn on. • ...
Handycam Handbook
Page 85
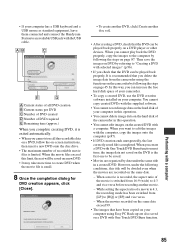
...screen instructions, then insert a new DVD onto the disc drive. • The maximum number of recordable movie files is completed. You cannot copy created DVDs with the supplied software. • You cannot record image data on the hard disk of DVD required E Remaining time (approx.) When you ...You cannot delete image data on the hard disk of your camcorder. • To copy a created DVD, use the DVD creation software installed on your computer has a USB keyboard and a USB mouse as standard equipment, leave them connected and connect the Handycam Station to an available USB jack with ...
...screen instructions, then insert a new DVD onto the disc drive. • The maximum number of recordable movie files is completed. You cannot copy created DVDs with the supplied software. • You cannot record image data on the hard disk of DVD required E Remaining time (approx.) When you ...You cannot delete image data on the hard disk of your camcorder. • To copy a created DVD, use the DVD creation software installed on your computer has a USB keyboard and a USB mouse as standard equipment, leave them connected and connect the Handycam Station to an available USB jack with ...
Handycam Handbook
Page 96
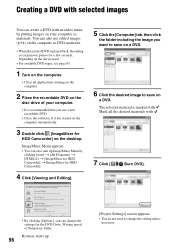
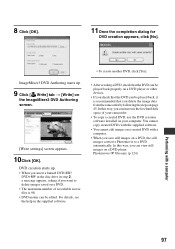
Mark all applications running on the computer. 2 Place the recordable DVD on the disc drive of each movie pauses for the DVD Drive, Writing speed, or Temporary folder. You can also use edited images (p.94) on the computer as materials. Browser starts up ImageMixer... 3 Double click [ImageMixer for HDD Camcorder]. 4 Click [Viewing and Editing]. 5 Click the [Computer] tab, then click the folder including the image you can change the setting unless necessary. The selected material is recommended that you use a new recordable DVD. • Close the software, if it has started on the ...
Mark all applications running on the computer. 2 Place the recordable DVD on the disc drive of each movie pauses for the DVD Drive, Writing speed, or Temporary folder. You can also use edited images (p.94) on the computer as materials. Browser starts up ImageMixer... 3 Double click [ImageMixer for HDD Camcorder]. 4 Click [Viewing and Editing]. 5 Click the [Computer] tab, then click the folder including the image you can change the setting unless necessary. The selected material is recommended that you use a new recordable DVD. • Close the software, if it has started on the ...
Handycam Handbook
Page 97
You cannot copy created DVDs with the supplied software. • You cannot edit images on the ImageMixer3 DVD Authoring screen. [Write settings...drive in the supplied software. • To create another DVD, click [Yes]. • After creating a DVD, check that the DVD can increase the free hard disk space of recordable movie files is 98. • DVD menus can be played back, it is recommended that you delete the image data from the camcorder... the DVD can view still images on your camcorder. • To copy a created DVD, use the DVD creation software installed on a DVD player.
You cannot copy created DVDs with the supplied software. • You cannot edit images on the ImageMixer3 DVD Authoring screen. [Write settings...drive in the supplied software. • To create another DVD, click [Yes]. • After creating a DVD, check that the DVD can increase the free hard disk space of recordable movie files is 98. • DVD menus can be played back, it is recommended that you delete the image data from the camcorder... the DVD can view still images on your camcorder. • To copy a created DVD, use the DVD creation software installed on a DVD player.


