
Operating Guide
Page 1
Printed on how to "Handycam Handbook" (PDF) contained in the supplied CD-ROM, you can be found at our Customer Support Website. Printed in Japan Also refer to "Handycam Handbook" (PDF) By referring to use the camcorder. © 2006 Sony Corporation 2-887-134-11(1) Operating Guide DCR-SR40/SR60/SR80 US Additional information on this product and answers to frequently asked questions can find more detailed information on 100% recycled paper using VOC (Volatile Organic Compound)-free vegetable oil based ink.
Printed on how to "Handycam Handbook" (PDF) contained in the supplied CD-ROM, you can be found at our Customer Support Website. Printed in Japan Also refer to "Handycam Handbook" (PDF) By referring to use the camcorder. © 2006 Sony Corporation 2-887-134-11(1) Operating Guide DCR-SR40/SR60/SR80 US Additional information on this product and answers to frequently asked questions can find more detailed information on 100% recycled paper using VOC (Volatile Organic Compound)-free vegetable oil based ink.
Operating Guide
Page 6
... the hard disk drive of the camcorder. When you transfer the camcorder, it is recommended that you need a NTSC system-based TV. • Television programs, films, video tapes, and other materials may not record or playback the camcorder to provide protection to recover your data. In addition to "Handycam Handbook"... for the contents of your computer*. Note on connecting the camcorder to protect the camcorder may appear different from what you see. • The illustrations used on this manual are based on the model DCR-SR80. • The on-screen displays in a low-pressure...
... the hard disk drive of the camcorder. When you transfer the camcorder, it is recommended that you need a NTSC system-based TV. • Television programs, films, video tapes, and other materials may not record or playback the camcorder to provide protection to recover your data. In addition to "Handycam Handbook"... for the contents of your computer*. Note on connecting the camcorder to protect the camcorder may appear different from what you see. • The illustrations used on this manual are based on the model DCR-SR80. • The on-screen displays in a low-pressure...
Operating Guide
Page 8
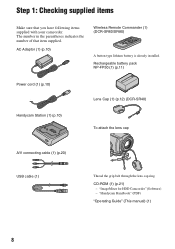
... (1) (p.10) Handycam Station (1) (p.10) Lens Cap (1) (p.12) (DCR-SR40) To attach the lens cap A/V connecting cable (1) (p.20) USB cable (1) Thread the grip belt through the lens cap ring. The number in the parentheses indicates the number of that you have following items supplied with your camcorder. AC Adaptor (1) (p.10) Wireless Remote Commander (1) (DCR-SR60/SR80...
... (1) (p.10) Handycam Station (1) (p.10) Lens Cap (1) (p.12) (DCR-SR40) To attach the lens cap A/V connecting cable (1) (p.20) USB cable (1) Thread the grip belt through the lens cap ring. The number in the parentheses indicates the number of that you have following items supplied with your camcorder. AC Adaptor (1) (p.10) Wireless Remote Commander (1) (DCR-SR60/SR80...
Operating Guide
Page 11
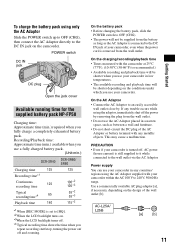
... Use a commercially available AC plug adaptor [a], if necessary, depending on the camcorder. Recording/Playback time: Approximate time (min.) available when you use a fully charged battery pack. (Unit:min.) DCR-SR40 DCR-SR60/ SR80 Charging time 125 Recording time*1 Continuous 125 recording time Typical recording time*4...via the AC Adaptor. AC-L25A/ L25B [a] [b] 11 Getting Started On the charging/recording/playback time • Times measured with the camcorder at 25°C (77°F). (10-30°C (50-86°F) is recommended.) • Available recording and playback time ...
... Use a commercially available AC plug adaptor [a], if necessary, depending on the camcorder. Recording/Playback time: Approximate time (min.) available when you use a fully charged battery pack. (Unit:min.) DCR-SR40 DCR-SR60/ SR80 Charging time 125 Recording time*1 Continuous 125 recording time Typical recording time*4...via the AC Adaptor. AC-L25A/ L25B [a] [b] 11 Getting Started On the charging/recording/playback time • Times measured with the camcorder at 25°C (77°F). (10-30°C (50-86°F) is recommended.) • Available recording and playback time ...
Operating Guide
Page 13
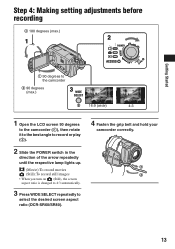
Step 4: Making setting adjustments before recording 2 180 degrees (max.) 1 2 Getting Started 1 90 degrees to the camcorder 2 90 degrees (max.) 3 16:9 (wide) 4:3 1 Open the LCD screen 90 degrees to the camcorder (1), then rotate it to the best angle to record or play (2). 2 Slide the POWER switch in the direction of the arrow repeatedly until... • When you turn on (Still), the screen aspect ratio is changed to 4:3 automatically. 3 Press WIDE SELECT repeatedly to select the desired screen aspect ratio (DCR-SR60/SR80). 4 Fasten the grip belt and hold your camcorder correctly. 13
Step 4: Making setting adjustments before recording 2 180 degrees (max.) 1 2 Getting Started 1 90 degrees to the camcorder 2 90 degrees (max.) 3 16:9 (wide) 4:3 1 Open the LCD screen 90 degrees to the camcorder (1), then rotate it to the best angle to record or play (2). 2 Slide the POWER switch in the direction of the arrow repeatedly until... • When you turn on (Still), the screen aspect ratio is changed to 4:3 automatically. 3 Press WIDE SELECT repeatedly to select the desired screen aspect ratio (DCR-SR60/SR80). 4 Fasten the grip belt and hold your camcorder correctly. 13
Operating Guide
Page 14
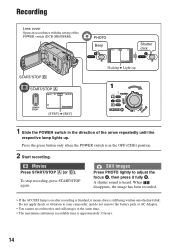
...MENU Flashing b Lights up 1 1 Slide the POWER switch in the direction of the POWER switch (DCR-SR60/SR80). Press the green button only when the POWER switch is approximately 13 hours. 14 To stop recording..., press START/STOP again. Still Images Press PHOTO lightly to your camcorder, and do not remove the battery pack or AC Adaptor. • You cannot record ... press it means data is heard. A shutter sound is still being written onto the hard disk. Recording Lens cover Opens in accordance with the setting of the arrow repeatedly until the respective...
...MENU Flashing b Lights up 1 1 Slide the POWER switch in the direction of the POWER switch (DCR-SR60/SR80). Press the green button only when the POWER switch is approximately 13 hours. 14 To stop recording..., press START/STOP again. Still Images Press PHOTO lightly to your camcorder, and do not remove the battery pack or AC Adaptor. • You cannot record ... press it means data is heard. A shutter sound is still being written onto the hard disk. Recording Lens cover Opens in accordance with the setting of the arrow repeatedly until the respective...
Operating Guide
Page 16
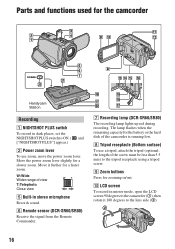
... Records sound. 6 Remote sensor (DCR-SR60/SR80) Receive the signal from the Remote Commander. 7 Recording lamp (DCR-SR60/SR80) The recording lamp lights up red during recording. LCD screen To record in mirror mode, open the LCD screen 90 degrees to the camcorder (1), then rotate it further for ...lamp flashes when the remaining capacity for the battery or the hard disk of the camcorder is running low. 8 Tripod receptacle (Bottom surface) To use zoom, move the power zoom lever. Parts and functions used for the camcorder Handycam Station Recording 1 NIGHTSHOT PLUS switch To record in dark ...
... Records sound. 6 Remote sensor (DCR-SR60/SR80) Receive the signal from the Remote Commander. 7 Recording lamp (DCR-SR60/SR80) The recording lamp lights up red during recording. LCD screen To record in mirror mode, open the LCD screen 90 degrees to the camcorder (1), then rotate it further for ...lamp flashes when the remaining capacity for the battery or the hard disk of the camcorder is running low. 8 Tripod receptacle (Bottom surface) To use zoom, move the power zoom lever. Parts and functions used for the camcorder Handycam Station Recording 1 NIGHTSHOT PLUS switch To record in dark ...

Operating Guide
Page 17
...). 1 Play back the image you may not use the camcorder with simple operation (Easy Handycam operation). DVD BURN button Create a DVD by connecting the camcorder to other optional accessories. To cancel the back light function, press BACK LIGHT again. Open the jack cover. 3 Shoe cover (DCR-SR60/SR80) Open when using Active Interface Shoe. 4 Active...
...). 1 Play back the image you may not use the camcorder with simple operation (Easy Handycam operation). DVD BURN button Create a DVD by connecting the camcorder to other optional accessories. To cancel the back light function, press BACK LIGHT again. Open the jack cover. 3 Shoe cover (DCR-SR60/SR80) Open when using Active Interface Shoe. 4 Active...
Operating Guide
Page 26
... show a display such as a counter on the LCD screen or on the front panel of thumbnails on the hard disk drive from the camcorder. DISP OUTPUT: Selects whether to light up or down the setup items. A.SHUT OFF: Automatically turns off the...MODE: Selects image quality of the hard disk drive. DISPLAY: Selects a number of the camcorder. Selects whether to the camcorder. TIME/LANGU. Displays this item only when the camcorder is turned on the LCD screen. *1 DCR-SR60/SR80 *2 DCR-SR40 *3 [USB SELECT] appears automatically when your camcorder is not operated. USB SPEED: ...
... show a display such as a counter on the LCD screen or on the front panel of thumbnails on the hard disk drive from the camcorder. DISP OUTPUT: Selects whether to light up or down the setup items. A.SHUT OFF: Automatically turns off the...MODE: Selects image quality of the hard disk drive. DISPLAY: Selects a number of the camcorder. Selects whether to the camcorder. TIME/LANGU. Displays this item only when the camcorder is turned on the LCD screen. *1 DCR-SR60/SR80 *2 DCR-SR40 *3 [USB SELECT] appears automatically when your camcorder is not operated. USB SPEED: ...
Operating Guide
Page 31
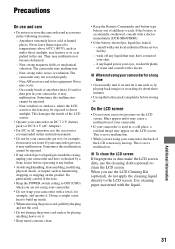
... care • Do not use the cleaning cloth (optional) to clean the LCD screen. The camcorder may not record properly. - This is accidentally swallowed, consult with a doctor immediately (DCR-SR60/SR80). • If the battery electrolytic liquid has leaked, - Near strong magnetic fields or mechanical... inside of the LCD screen. • Operate your eyes, wash with plenty of your camcorder. • If your camcorder is not a malfunction. • While you are using your local authorized Sony service facility. - Near strong radio waves or radiation. On a sandy beach or anywhere ...
... care • Do not use the cleaning cloth (optional) to clean the LCD screen. The camcorder may not record properly. - This is accidentally swallowed, consult with a doctor immediately (DCR-SR60/SR80). • If the battery electrolytic liquid has leaked, - Near strong magnetic fields or mechanical... inside of the LCD screen. • Operate your eyes, wash with plenty of your camcorder. • If your camcorder is not a malfunction. • While you are using your local authorized Sony service facility. - Near strong radio waves or radiation. On a sandy beach or anywhere ...
Operating Guide
Page 33
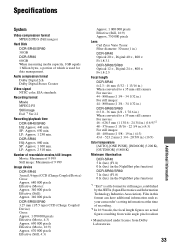
... from Dolby Laboratories. 33 Additional Information Files in this format can have additional information such as your camcorder's setting information at the time of 9 999 Image device DCR-SR40 3 mm (1/6 type) CCD (Charge Coupled Device) Gross: Approx. 680 000 pixels Effective ... images, established by the JEITA (Japan Electronics and Information Technology Industries Association). DCR-SR80 HQ:Approx. 880 min. Specifications System Video compression format MPEG2/JPEG (Still images) Hard Disk DCR-SR40/SR60 30 GB DCR-SR80 60 GB When measuring media capacity, 1GB equals 1 billion bytes, a...
... from Dolby Laboratories. 33 Additional Information Files in this format can have additional information such as your camcorder's setting information at the time of 9 999 Image device DCR-SR40 3 mm (1/6 type) CCD (Charge Coupled Device) Gross: Approx. 680 000 pixels Effective ... images, established by the JEITA (Japan Electronics and Information Technology Industries Association). DCR-SR80 HQ:Approx. 880 min. Specifications System Video compression format MPEG2/JPEG (Still images) Hard Disk DCR-SR40/SR60 30 GB DCR-SR80 60 GB When measuring media capacity, 1GB equals 1 billion bytes, a...

Handycam Handbook
Page 7
...8226; Do not aim at dusk. You cannot dub copyright protected software on your camcorder to a malfunction of images • You cannot play back images recorded with other DCR-SR40/ SR60/SR80. Compatibility of the camcorder. • TV color systems differ depending on the countries/regions. Notes on the ... camera, and thus may be some tiny black points and/or bright points (white, red, blue, or green in Germany, and Sony Corporation, and produces superior images. You also cannot play back both movies and still images other materials may be provided, even if recording...
...8226; Do not aim at dusk. You cannot dub copyright protected software on your camcorder to a malfunction of images • You cannot play back images recorded with other DCR-SR40/ SR60/SR80. Compatibility of the camcorder. • TV color systems differ depending on the countries/regions. Notes on the ... camera, and thus may be some tiny black points and/or bright points (white, red, blue, or green in Germany, and Sony Corporation, and produces superior images. You also cannot play back both movies and still images other materials may be provided, even if recording...
Handycam Handbook
Page 9
...Playback with your Hard Disk Drive Handycam 13 Using your Hard Disk Drive Handycam 15 Getting Started Step 1: Checking supplied items 16 Step 2: Charging the battery pack 17 Step 3: Turning the power on and holding your camcorder 21 Step ...Hard Disk Drive Handycam 8 Enjoying with your Hard Disk Drive Handycam What you can do with ease 30 Recording/Playback Recording 32 Playback 33 Searching for desired images by date (Date Index 34 Functions used for recording/playback, etc 35 Recording To use zoom To record in dark places (NightShot plus) 9 Table of the recording image (DCR-SR60...
...Playback with your Hard Disk Drive Handycam 13 Using your Hard Disk Drive Handycam 15 Getting Started Step 1: Checking supplied items 16 Step 2: Charging the battery pack 17 Step 3: Turning the power on and holding your camcorder 21 Step ...Hard Disk Drive Handycam 8 Enjoying with your Hard Disk Drive Handycam What you can do with ease 30 Recording/Playback Recording 32 Playback 33 Searching for desired images by date (Date Index 34 Functions used for recording/playback, etc 35 Recording To use zoom To record in dark places (NightShot plus) 9 Table of the recording image (DCR-SR60...
Handycam Handbook
Page 10
...check available free hard disk space To turn off the operation confirmation beep To initialize the settings (Reset) Other part names and functions Checking/Deleting the last scene (Review/Review deleting 38 Indicators displayed during recording/playback 39 Remote Commander (DCR-SR60/SR80 41 ...camcorder to the recording conditions (EXPOSURE/WHITE BAL./STEADYSHOT, etc.) STILL SET 56 Settings for still images (BURST/QUALITY/IMAGE SIZE, etc.) PICT.APPLI 57 Special effects on images or additional functions on recording/playback (PICT.EFFECT/D.EFFECT, etc.) HDD SET 58 Settings for the hard disk...
...check available free hard disk space To turn off the operation confirmation beep To initialize the settings (Reset) Other part names and functions Checking/Deleting the last scene (Review/Review deleting 38 Indicators displayed during recording/playback 39 Remote Commander (DCR-SR60/SR80 41 ...camcorder to the recording conditions (EXPOSURE/WHITE BAL./STEADYSHOT, etc.) STILL SET 56 Settings for still images (BURST/QUALITY/IMAGE SIZE, etc.) PICT.APPLI 57 Special effects on images or additional functions on recording/playback (PICT.EFFECT/D.EFFECT, etc.) HDD SET 58 Settings for the hard disk...
Handycam Handbook
Page 11
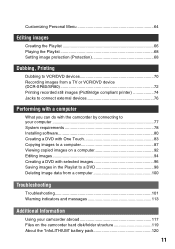
...Playlist 68 Setting image protection (Protection 68 Dubbing, Printing Dubbing to VCR/DVD devices 70 Recording images from a TV or VCR/DVD device (DCR-SR60/SR80 72 Printing recorded still images (PictBridge compliant printer 74 Jacks to connect external devices 76 Performing with a computer What you can do ... to a DVD 98 Deleting image data from a computer 100 Troubleshooting Troubleshooting 101 Warning indicators and messages 113 Additional Information Using your camcorder abroad 117 Files on the camcorder hard disk/folder structure 119 About the "InfoLITHIUM" battery pack 120 11
...Playlist 68 Setting image protection (Protection 68 Dubbing, Printing Dubbing to VCR/DVD devices 70 Recording images from a TV or VCR/DVD device (DCR-SR60/SR80 72 Printing recorded still images (PictBridge compliant printer 74 Jacks to connect external devices 76 Performing with a computer What you can do ... to a DVD 98 Deleting image data from a computer 100 Troubleshooting Troubleshooting 101 Warning indicators and messages 113 Additional Information Using your camcorder abroad 117 Files on the camcorder hard disk/folder structure 119 About the "InfoLITHIUM" battery pack 120 11
Handycam Handbook
Page 13
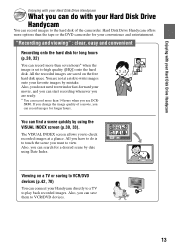
... your Hard Disk Drive Handycam Enjoying with your Hard Disk Drive Handycam What you can do with your Hard Disk Drive Handycam You can record images to play back recorded images. You are saved on a TV or saving to VCR/DVD devices (p.42, 70) You can record more than 14 hours when you use DCR- If you change the image quality of the camcorder...
... your Hard Disk Drive Handycam Enjoying with your Hard Disk Drive Handycam What you can do with your Hard Disk Drive Handycam You can record images to play back recorded images. You are saved on a TV or saving to VCR/DVD devices (p.42, 70) You can record more than 14 hours when you use DCR- If you change the image quality of the camcorder...
Handycam Handbook
Page 16
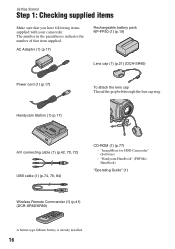
...) Rechargeable battery pack NP-FP50 (1) (p.19) Lens cap (1) (p.21) (DCR-SR40) Power cord (1) (p.17) To attach the lens cap Thread the grip belt through the lens cap ring. "ImageMixer for HDD Camcorder" (Software) - "Handycam Handbook" (PDF/this Handbook) "Operating Guide" (1) Wireless Remote Commander (1) (p.41) (DCR-SR60/SR80) A button-type lithium battery is already installed. 16
...) Rechargeable battery pack NP-FP50 (1) (p.19) Lens cap (1) (p.21) (DCR-SR40) Power cord (1) (p.17) To attach the lens cap Thread the grip belt through the lens cap ring. "ImageMixer for HDD Camcorder" (Software) - "Handycam Handbook" (PDF/this Handbook) "Operating Guide" (1) Wireless Remote Commander (1) (p.41) (DCR-SR60/SR80) A button-type lithium battery is already installed. 16

Handycam Handbook
Page 19
... time time* NP-FP50 (supplied) 125 065 NP-FP60 190 100 NP-FP70 265 145 NP-FP71 315 170 NP-FP90 475 260 DCR-SR60/SR80 Battery pack Continuous Typical recording recording time time* NP-FP50 (supplied) NP-FP60 100 055 105 055 150 080 160 085 NP...Typical recording time shows the time when you do not intend to [HQ]). - Getting Started To remove your camcorder from the Handycam Station Turn off the power, then remove the camcorder from the Handycam Station holding both. When storing the battery pack Use up the battery pack completely if you fully charge a...
... time time* NP-FP50 (supplied) 125 065 NP-FP60 190 100 NP-FP70 265 145 NP-FP71 315 170 NP-FP90 475 260 DCR-SR60/SR80 Battery pack Continuous Typical recording recording time time* NP-FP50 (supplied) NP-FP60 100 055 105 055 150 080 160 085 NP...Typical recording time shows the time when you do not intend to [HQ]). - Getting Started To remove your camcorder from the Handycam Station Turn off the power, then remove the camcorder from the Handycam Station holding both. When storing the battery pack Use up the battery pack completely if you fully charge a...

Handycam Handbook
Page 20
...playback time will be shorter when you use your camcorder in a narrow space, such as the AC Adaptor is connected to the DC IN jack of your camcorder or the Handycam Station, even when the power cord is fully discharged... NP-FP60 NP-FP70 NP-FP71 NP-FP90 Playback time 140 210 295 350 525 DCR-SR60/SR80 Battery pack NP-FP50 (supplied) NP-FP60 NP-FP70 NP-FP71 NP-FP90 ...The available recording and playback time will not be shorter depending on . PRECAUTION • Even if your camcorder. On the AC Adaptor • Connect the AC Adaptor to an easily accessible wall outlet close by ...
...playback time will be shorter when you use your camcorder in a narrow space, such as the AC Adaptor is connected to the DC IN jack of your camcorder or the Handycam Station, even when the power cord is fully discharged... NP-FP60 NP-FP70 NP-FP71 NP-FP90 Playback time 140 210 295 350 525 DCR-SR60/SR80 Battery pack NP-FP50 (supplied) NP-FP60 NP-FP70 NP-FP71 NP-FP90 ...The available recording and playback time will not be shorter depending on . PRECAUTION • Even if your camcorder. On the AC Adaptor • Connect the AC Adaptor to an easily accessible wall outlet close by ...
Handycam Handbook
Page 21
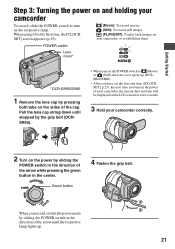
...3: Turning the power on and holding your camcorder, or to edit/delete them POWER switch Lens cover* * DCR-SR60/SR80 1 Remove the lens cap by pressing ...both tabs on the sides of the cap. Pull the lens cap string down until the respective lamp lights up (DCRSR60/SR80). • After you have set the POWER switch to turn on the power of your camcorder... arrow until stopped by sliding the POWER switch in the center. When you turn on your camcorder To record, slide the POWER switch to (Movie) or (Still), the lens cover opens up...
...3: Turning the power on and holding your camcorder, or to edit/delete them POWER switch Lens cover* * DCR-SR60/SR80 1 Remove the lens cap by pressing ...both tabs on the sides of the cap. Pull the lens cap string down until the respective lamp lights up (DCRSR60/SR80). • After you have set the POWER switch to turn on the power of your camcorder... arrow until stopped by sliding the POWER switch in the center. When you turn on your camcorder To record, slide the POWER switch to (Movie) or (Still), the lens cover opens up...


