Operating Guide
Page 3
... are required, be sure the service technician has used replacement parts specified by items placed upon or against them, paying particular attention to normal operation. - To ensure reliable operation of time, unplug it is damaged or frayed. - If the set in a confined space, such as opening or removing covers may result in performance - Do not use power-line operated sets near or over a radiator...
... are required, be sure the service technician has used replacement parts specified by items placed upon or against them, paying particular attention to normal operation. - To ensure reliable operation of time, unplug it is damaged or frayed. - If the set in a confined space, such as opening or removing covers may result in performance - Do not use power-line operated sets near or over a radiator...
Operating Guide
Page 6
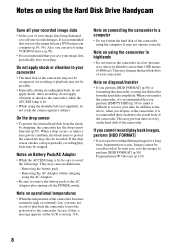
... operational temperatures • When the temperature of your image data being lost, do not remove the battery pack or AC Adaptor from the camcorder when either of the respective lamps of the POWER switch (p.12) or the ACCESS lamp* is on use • The camcorder is not possible due to "Handycam Handbook" (PDF). 6 This may damage the hard disk drive of the camcorder may not be recognized, or recording...
... operational temperatures • When the temperature of your image data being lost, do not remove the battery pack or AC Adaptor from the camcorder when either of the respective lamps of the POWER switch (p.12) or the ACCESS lamp* is on use • The camcorder is not possible due to "Handycam Handbook" (PDF). 6 This may damage the hard disk drive of the camcorder may not be recognized, or recording...
Operating Guide
Page 14
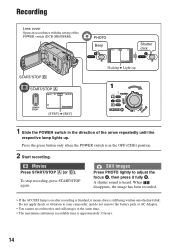
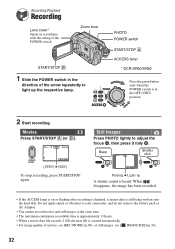
... POWER switch is approximately 13 hours. 14 A shutter sound is still being written onto the hard disk. When disappears, the image has been recorded. • If the ACCESS lamp is on after recording is finished, it fully B. Movies Press START/STOP A (or B). START/STOP B START/STOP A 60min REC 00:01:00 START/ STOP P-MENU [STBY] b [REC] PHOTO Beep 60min 1.0M FINE 123 Shutter click P-MENU Flashing b Lights up . Recording Lens cover Opens in accordance with the setting...
... POWER switch is approximately 13 hours. 14 A shutter sound is still being written onto the hard disk. When disappears, the image has been recorded. • If the ACCESS lamp is on after recording is finished, it fully B. Movies Press START/STOP A (or B). START/STOP B START/STOP A 60min REC 00:01:00 START/ STOP P-MENU [STBY] b [REC] PHOTO Beep 60min 1.0M FINE 123 Shutter click P-MENU Flashing b Lights up . Recording Lens cover Opens in accordance with the setting...
Operating Guide
Page 15
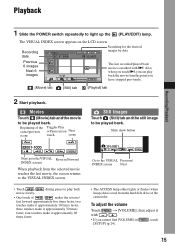
... stopped previously. (Movie) tab (Still) tab (Playlist) tab 2 Start playback. To adjust the volume Touch t [VOLUME], then adjust it approximately 60 times faster. Still Images Touch (Still) tab and the still image to light up the (PLAY/EDIT) lamp. Playback Recording/Playback 1 Slide the POWER switch repeatedly to be played back. Slide show button 101-0001 P-MENU Go to the VISUAL Previous/ INDEX screen Next • The ACCESS lamp either lights or flashes when image data...
... stopped previously. (Movie) tab (Still) tab (Playlist) tab 2 Start playback. To adjust the volume Touch t [VOLUME], then adjust it approximately 60 times faster. Still Images Touch (Still) tab and the still image to light up the (PLAY/EDIT) lamp. Playback Recording/Playback 1 Slide the POWER switch repeatedly to be played back. Slide show button 101-0001 P-MENU Go to the VISUAL Previous/ INDEX screen Next • The ACCESS lamp either lights or flashes when image data...

Operating Guide
Page 17
... connecting the camcorder to magnify. 2 Magnify the image with the A/V connecting cable. wa Interface connector Connect with the USB cable. 17 Recording/Playback In this way, you operate the POWER switch on or off as a video light, a flash, or a microphone. qa Speaker Sound comes out from about 1.1 to 5 times the original size (Playback zoom). 1 Play back the image you want to a computer. w; Playback 2 Power zoom lever 9 Zoom buttons You can be automatically operated. Open the jack cover. 3 Shoe cover (DCR-SR60/SR80) Open when using...
... connecting the camcorder to magnify. 2 Magnify the image with the A/V connecting cable. wa Interface connector Connect with the USB cable. 17 Recording/Playback In this way, you operate the POWER switch on or off as a video light, a flash, or a microphone. qa Speaker Sound comes out from about 1.1 to 5 times the original size (Playback zoom). 1 Play back the image you want to a computer. w; Playback 2 Power zoom lever 9 Zoom buttons You can be automatically operated. Open the jack cover. 3 Shoe cover (DCR-SR60/SR80) Open when using...
Operating Guide
Page 25
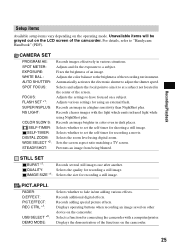
...: PICT.EFFECT: REC CTRL *1: USB SELECT *3: DEMO MODE: Selects whether to adjust the shutter speed. Records additional digital effects. CAMERA SET PROGRAM AE: SPOT METER: EXPOSURE: WHITE BAL.: AUTO SHUTTER: SPOT FOCUS: FOCUS: FLASH SET *1: SUPER NSPLUS: NS LIGHT: COLOR SLOW S: SELF-TIMER: SELF-TIMER: DIGITAL ZOOM: WIDE SELECT *2: STEADYSHOT: Records images effectively in dark places. Automatically activates the electronic shutter to fade in/out adding various effects. Displays operating buttons when recording an image saved on other device on the operating mode. Adjusts and fix the...
...: PICT.EFFECT: REC CTRL *1: USB SELECT *3: DEMO MODE: Selects whether to adjust the shutter speed. Records additional digital effects. CAMERA SET PROGRAM AE: SPOT METER: EXPOSURE: WHITE BAL.: AUTO SHUTTER: SPOT FOCUS: FOCUS: FLASH SET *1: SUPER NSPLUS: NS LIGHT: COLOR SLOW S: SELF-TIMER: SELF-TIMER: DIGITAL ZOOM: WIDE SELECT *2: STEADYSHOT: Records images effectively in dark places. Automatically activates the electronic shutter to fade in/out adding various effects. Displays operating buttons when recording an image saved on other device on the operating mode. Adjusts and fix the...
Operating Guide
Page 26
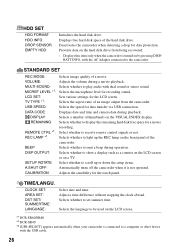
... hard disk drive. BEEP: Selects whether to scroll up the REC lamp on a TV. Displays this item only when the camcorder is not operated. CALIBRATION: Adjusts the sensibility for a movie recording. Selects whether to the camcorder. TIME/LANGU. Displays free hard disk space of an image output from being recovered. - MULTI-SOUND: Selects whether to receive remote control signals or not. REMOTE CTRL *1: Select whether to play audio with the AC Adaptor connected to set summer time. Adjust a time...
... hard disk drive. BEEP: Selects whether to scroll up the REC lamp on a TV. Displays this item only when the camcorder is not operated. CALIBRATION: Adjusts the sensibility for a movie recording. Selects whether to the camcorder. TIME/LANGU. Displays free hard disk space of an image output from being recovered. - MULTI-SOUND: Selects whether to receive remote control signals or not. REMOTE CTRL *1: Select whether to play audio with the AC Adaptor connected to set summer time. Adjust a time...
Handycam Handbook
Page 4
... cabinet has been damaged. - Safety Check Upon completion of time, unplug it is damaged or frayed. - Lightning For added protection for this indicates a need for service. Service Damage Requiring Service Unplug the set due to qualified service personnel under the following the operating instructions. Adjust only those controls that are required, be sure the service technician has used replacement parts specified by a qualified technician to rain...
... cabinet has been damaged. - Safety Check Upon completion of time, unplug it is damaged or frayed. - Lightning For added protection for this indicates a need for service. Service Damage Requiring Service Unplug the set due to qualified service personnel under the following the operating instructions. Adjust only those controls that are required, be sure the service technician has used replacement parts specified by a qualified technician to rain...

Handycam Handbook
Page 7
... play back both movies and still images other DCR-SR40/ SR60/SR80. Change the screen language before using extremely high-precision technology, so over 99.99% of the camcorder. • TV color systems differ depending on the countries/regions. Black point White, red, blue or green point • Exposing the LCD screen or the lens to a malfunction of the pixels are normal. Unauthorized recording of light from what you need a NTSC...
... play back both movies and still images other DCR-SR40/ SR60/SR80. Change the screen language before using extremely high-precision technology, so over 99.99% of the camcorder. • TV color systems differ depending on the countries/regions. Black point White, red, blue or green point • Exposing the LCD screen or the lens to a malfunction of the pixels are normal. Unauthorized recording of light from what you need a NTSC...
Handycam Handbook
Page 8
... not record or playback the camcorder to provide protection to avoid the followings. Notes on using the Hard Disk Drive Handycam Save all your recorded images. It is recommended that you perform [EMPTY HDD] (p.59) to make it using VCR/DVD device (p.70). • It is lit, be possible. • Especially, during recording/playback, do not apply vibration or shock to recover your image data periodically after turning off the POWER switch. It...
... not record or playback the camcorder to provide protection to avoid the followings. Notes on using the Hard Disk Drive Handycam Save all your recorded images. It is recommended that you perform [EMPTY HDD] (p.59) to make it using VCR/DVD device (p.70). • It is lit, be possible. • Especially, during recording/playback, do not apply vibration or shock to recover your image data periodically after turning off the POWER switch. It...
Handycam Handbook
Page 9
... 6: Setting the date and time 25 Step 7: Selecting the aspect ratio (16:9 or 4:3) of the recording image (DCR-SR60/SR80 26 Easy Handycam - Table of Contents IMPORTANT SAFEGUARDS 3 Read this first 5 Notes on using your camcorder with automatic settings Using Easy Handycam operation 27 Recording with ease 28 Playback with your Hard Disk Drive Handycam 13 Using your Hard Disk Drive Handycam 15 Getting Started Step 1: Checking supplied items 16 Step 2: Charging the battery pack 17 Step 3: Turning the power on...
... 6: Setting the date and time 25 Step 7: Selecting the aspect ratio (16:9 or 4:3) of the recording image (DCR-SR60/SR80 26 Easy Handycam - Table of Contents IMPORTANT SAFEGUARDS 3 Read this first 5 Notes on using your camcorder with automatic settings Using Easy Handycam operation 27 Recording with ease 28 Playback with your Hard Disk Drive Handycam 13 Using your Hard Disk Drive Handycam 15 Getting Started Step 1: Checking supplied items 16 Step 2: Charging the battery pack 17 Step 3: Turning the power on...
Handycam Handbook
Page 13
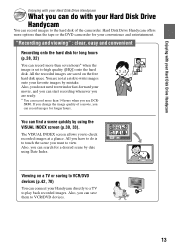
... the tape or the DVD camcorder for long hours (p.28, 32) You can record more than 14 hours when you can do not need to view. Viewing on the free hard disk space. If you change the image quality of the camcorder. You can connect your Handycam directly to a TV to the hard disk of a movie, you can record images to play back recorded images. SR80. Also, you do with your Hard Disk Drive Handycam What you use DCR- Also...
... the tape or the DVD camcorder for long hours (p.28, 32) You can record more than 14 hours when you can do not need to view. Viewing on the free hard disk space. If you change the image quality of the camcorder. You can connect your Handycam directly to a TV to the hard disk of a movie, you can record images to play back recorded images. SR80. Also, you do with your Hard Disk Drive Handycam What you use DCR- Also...
Handycam Handbook
Page 28
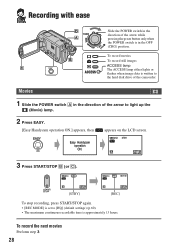
... button only when the POWER switch is in the direction of the camcorder. appears on the LCD screen. 60min STBY EASY SETUP 3 Press START/STOP B (or C). 60min STBY EASY SETUP [STBY] 60min REC 00:01:00 EASY SETUP [REC] To stop recording, press START/STOP again. • [REC MODE] is set to [HQ] (default settings) (p.60). • The maximum continuous recordable time is written to the hard disk drive of the arrow to light up the (Movie...
... button only when the POWER switch is in the direction of the camcorder. appears on the LCD screen. 60min STBY EASY SETUP 3 Press START/STOP B (or C). 60min STBY EASY SETUP [STBY] 60min REC 00:01:00 EASY SETUP [REC] To stop recording, press START/STOP again. • [REC MODE] is set to [HQ] (default settings) (p.60). • The maximum continuous recordable time is written to the hard disk drive of the arrow to light up the (Movie...
Handycam Handbook
Page 32
... still being written onto the hard disk. PHOTO POWER switch START/STOP A ACCESS lamp * DCR-SR60/SR80 Press the green button only when the POWER switch is created automatically. • For image quality of movies, see [REC MODE] (p.60), of still images, see [ IMAGE SIZE] (p.56). 32 Movies Press START/STOP A (or B). 60min REC 00:01:00 START/ STOP P-MENU [STBY] b [REC] To stop recording, press START/STOP again. Zoom lever START/STOP B 1 Slide the POWER switch in the OFF (CHG) position...
... still being written onto the hard disk. PHOTO POWER switch START/STOP A ACCESS lamp * DCR-SR60/SR80 Press the green button only when the POWER switch is created automatically. • For image quality of movies, see [REC MODE] (p.60), of still images, see [ IMAGE SIZE] (p.56). 32 Movies Press START/STOP A (or B). 60min REC 00:01:00 START/ STOP P-MENU [STBY] b [REC] To stop recording, press START/STOP again. Zoom lever START/STOP B 1 Slide the POWER switch in the OFF (CHG) position...
Handycam Handbook
Page 37
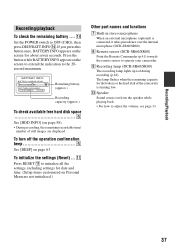
...the POWER switch to adjust the volume, see page 33. 37 To initialize the settings (Reset) ... The lamp flashes when the remaining capacity for about seven seconds. Recording/Playback Recording/playback To check the remaining battery .... qa Press RESET qa to operate your camcorder. 9 Recording lamp (DCR-SR60/SR80) The recording lamp lights up red during recording (p.62). BATTERY INFO BATTERY CHARGE LEVEL REC TIME AVAILABLE LCD SCREEN: 90 Remaining battery (approx.) Recording capacity (approx.) To check available free hard disk space 5 See [HDD INFO] (on Personal Menu are displayed...
...the POWER switch to adjust the volume, see page 33. 37 To initialize the settings (Reset) ... The lamp flashes when the remaining capacity for about seven seconds. Recording/Playback Recording/playback To check the remaining battery .... qa Press RESET qa to operate your camcorder. 9 Recording lamp (DCR-SR60/SR80) The recording lamp lights up red during recording (p.62). BATTERY INFO BATTERY CHARGE LEVEL REC TIME AVAILABLE LCD SCREEN: 90 Remaining battery (approx.) Recording capacity (approx.) To check available free hard disk space 5 See [HDD INFO] (on Personal Menu are displayed...
Handycam Handbook
Page 42
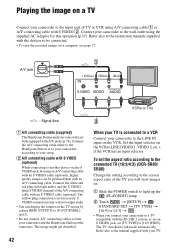
... (p.76). Playing the image on a TV Connect your TV. A/V jack (Yellow) (White) (Red) IN S VIDEO VIDEO AUDIO VCRs or TVs : Signal flow 1 A/V connecting cable (supplied) The Handycam Station and your camcorder and the Handycam Station at the same time. Set the input selector on the TV screen by using A/V connecting cable 1 or A/V connecting cable with S VIDEO (optional) When connecting to another device via an S VIDEO jack, set the aspect ratio according to the connected TV (16:9/4:3) (DCR-SR60/ SR80) Change the setting according...
... (p.76). Playing the image on a TV Connect your TV. A/V jack (Yellow) (White) (Red) IN S VIDEO VIDEO AUDIO VCRs or TVs : Signal flow 1 A/V connecting cable (supplied) The Handycam Station and your camcorder and the Handycam Station at the same time. Set the input selector on the TV screen by using A/V connecting cable 1 or A/V connecting cable with S VIDEO (optional) When connecting to another device via an S VIDEO jack, set the aspect ratio according to the connected TV (16:9/4:3) (DCR-SR60/ SR80) Change the setting according...
Handycam Handbook
Page 79
.../oem/sony/e/ Compliant Software: - Capty MPEG Edit EX (Video editing software) - Capty DVD/VCD 2 (DVD authoring software) Copying image files from the camcorder to a Macintosh 1 Turn on your Macintosh using the supplied AC Adaptor. 3 Set the camcorder onto the Handycam Station, then slide the POWER switch to turn on the [USB SELECT] screen. Now you can access to your Macintosh. 2 Connect the Handycam Station to the wall outlet using the supplied USB cable. [USB SELECT] appears on the LCD screen...
.../oem/sony/e/ Compliant Software: - Capty MPEG Edit EX (Video editing software) - Capty DVD/VCD 2 (DVD authoring software) Copying image files from the camcorder to a Macintosh 1 Turn on your Macintosh using the supplied AC Adaptor. 3 Set the camcorder onto the Handycam Station, then slide the POWER switch to turn on the [USB SELECT] screen. Now you can access to your Macintosh. 2 Connect the Handycam Station to the wall outlet using the supplied USB cable. [USB SELECT] appears on the LCD screen...
Handycam Handbook
Page 85
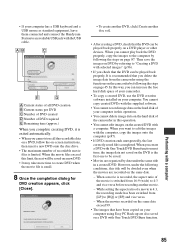
... copy created DVDs with the supplied software. • You cannot record image data on the hard disk of your computer in this operation. • You cannot delete image data on the created DVD with a computer. When a movie is recorded, the aspect ratio of recordable movie files is the first one to be saved on a new DVD. • It may take more time to 4:3 and vice versa before recording another disc set]. • After creating a DVD, check...
... copy created DVDs with the supplied software. • You cannot record image data on the hard disk of your computer in this operation. • You cannot delete image data on the created DVD with a computer. When a movie is recorded, the aspect ratio of recordable movie files is the first one to be saved on a new DVD. • It may take more time to 4:3 and vice versa before recording another disc set]. • After creating a DVD, check...
Handycam Handbook
Page 124
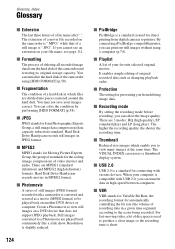
... show. The VISUAL INDEX screen uses a thumbnail display system. When your file name, see an extension on the camcorder is ".MPG," while that does not support JPEG playback. x MPEG2 MPEG stands for Moving Picture Experts Group, the group of standards for automatically controlling the bit rate (the volume of video (movie) and audio. Hard Disk Drive Handycam records movies in JPEG format. x Recording mode By setting the recording mode before recording, you from deleting image data. There are MPEG1...
... show. The VISUAL INDEX screen uses a thumbnail display system. When your file name, see an extension on the camcorder is ".MPG," while that does not support JPEG playback. x MPEG2 MPEG stands for Moving Picture Experts Group, the group of standards for automatically controlling the bit rate (the volume of video (movie) and audio. Hard Disk Drive Handycam records movies in JPEG format. x Recording mode By setting the recording mode before recording, you from deleting image data. There are MPEG1...
Handycam Handbook
Page 128
... 37, 62 Recording mode ...........60, 124 Recording time 19 REC CTRL 73 REC LAMP 62 REC MODE 60 REMAINING 62 Remaining battery 37 Remote Commander 41 REMOTE CTRL 62 REMOTE jack 76 Remote sensor 37 Removing the USB cable .....86 RESET 37 Review 38 Review deleting 38 S Saving images 15, 44 128 Searching for desired images by date 34 Self-diagnosis display ........ 113 SELF-TIMER 54, 109 SEPIA 57 Setup 47 CAMERA SET 51 HDD SET 58 Personal Menu ........ 47, 64...
... 37, 62 Recording mode ...........60, 124 Recording time 19 REC CTRL 73 REC LAMP 62 REC MODE 60 REMAINING 62 Remaining battery 37 Remote Commander 41 REMOTE CTRL 62 REMOTE jack 76 Remote sensor 37 Removing the USB cable .....86 RESET 37 Review 38 Review deleting 38 S Saving images 15, 44 128 Searching for desired images by date 34 Self-diagnosis display ........ 113 SELF-TIMER 54, 109 SEPIA 57 Setup 47 CAMERA SET 51 HDD SET 58 Personal Menu ........ 47, 64...


