Operating Guide
Page 8
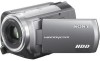
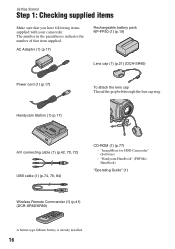
...) To attach the lens cap A/V connecting cable (1) (p.20) USB cable (1) Thread the grip belt through the lens cap ring. "Handycam Handbook" (PDF) "Operating Guide" (This manual) (1) 8 AC Adaptor (1) (p.10) Wireless Remote Commander (1) (DCR-SR60/SR80) A button-type lithium battery is already installed. "ImageMixer for HDD Camcorder" (Software) - The number in the parentheses indicates the number...
...) To attach the lens cap A/V connecting cable (1) (p.20) USB cable (1) Thread the grip belt through the lens cap ring. "Handycam Handbook" (PDF) "Operating Guide" (This manual) (1) 8 AC Adaptor (1) (p.10) Wireless Remote Commander (1) (DCR-SR60/SR80) A button-type lithium battery is already installed. "ImageMixer for HDD Camcorder" (Software) - The number in the parentheses indicates the number...

Operating Guide
Page 17
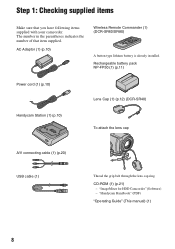
... other optional accessories. Connecting to the shoulder belt hook. wa Interface connector Connect with the USB cable. 17 Recording/Playback ws (USB) jack Connect with the camcorder and the Handycam Station. qa Speaker Sound comes out from about 1.1 to 5 times the original size (Playback zoom). 1 Play ...settings or check the remaining battery power. qh EASY button By pressing the EASY button, most of the buttons on the camcorder. ql REMOTE jack (DCR-SR60/SR80) Connect other devices qj qk ql ....... To cancel the back light function, press BACK LIGHT again. qh EASY ...
... other optional accessories. Connecting to the shoulder belt hook. wa Interface connector Connect with the USB cable. 17 Recording/Playback ws (USB) jack Connect with the camcorder and the Handycam Station. qa Speaker Sound comes out from about 1.1 to 5 times the original size (Playback zoom). 1 Play ...settings or check the remaining battery power. qh EASY button By pressing the EASY button, most of the buttons on the camcorder. ql REMOTE jack (DCR-SR60/SR80) Connect other devices qj qk ql ....... To cancel the back light function, press BACK LIGHT again. qh EASY ...
Operating Guide
Page 26
...CTRL *1: Select whether to show a display such as a counter on the LCD screen or on the hard disk drive from the camcorder. SETUP ROTATE: Select whether to the camcorder. CALIBRATION: Adjusts the sensibility for the LCD screen. VOLUME: Adjusts the volume during playback. MULTI-SOUND...the VISUAL INDEX display. Displays free hard disk space of thumbnails on the front panel of the camcorder. Selects the language to be used on the LCD screen. *1 DCR-SR60/SR80 *2 DCR-SR40 *3 [USB SELECT] appears automatically when your camcorder is turned on by pressing DISP/ ...
...CTRL *1: Select whether to show a display such as a counter on the LCD screen or on the hard disk drive from the camcorder. SETUP ROTATE: Select whether to the camcorder. CALIBRATION: Adjusts the sensibility for the LCD screen. VOLUME: Adjusts the volume during playback. MULTI-SOUND...the VISUAL INDEX display. Displays free hard disk space of thumbnails on the front panel of the camcorder. Selects the language to be used on the LCD screen. *1 DCR-SR60/SR80 *2 DCR-SR40 *3 [USB SELECT] appears automatically when your camcorder is turned on by pressing DISP/ ...
Operating Guide
Page 34
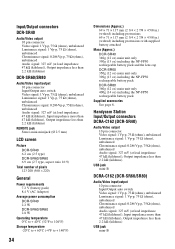
Handycam Station Input/Output connectors DCRA-C162 (DCR-SR40) Audio/Video output 10 pin connector Video signal: 1 Vp-p, 75 Ω (ohms), unbalanced Luminance signal: 1 Vp-p, 75 Ω (ohms), unbalanced Chrominance signal: 0.286 Vp-p, ...75 Ω (ohms), unbalanced Audio signal: 327 mV (at load impedance 47 kΩ (kilohms)), Output impedance less than 2.2 kΩ (kilohms) USB jack mini-B DCRA-C162 (DCR-SR60/SR80) Audio/Video input/output 10 pin connector Input/Output auto switch Video signal: 1 Vp-p, 75 Ω (ohms), unbalanced Luminance signal: 1 Vp-p, 75...
Handycam Station Input/Output connectors DCRA-C162 (DCR-SR40) Audio/Video output 10 pin connector Video signal: 1 Vp-p, 75 Ω (ohms), unbalanced Luminance signal: 1 Vp-p, 75 Ω (ohms), unbalanced Chrominance signal: 0.286 Vp-p, ...75 Ω (ohms), unbalanced Audio signal: 327 mV (at load impedance 47 kΩ (kilohms)), Output impedance less than 2.2 kΩ (kilohms) USB jack mini-B DCRA-C162 (DCR-SR60/SR80) Audio/Video input/output 10 pin connector Input/Output auto switch Video signal: 1 Vp-p, 75 Ω (ohms), unbalanced Luminance signal: 1 Vp-p, 75...
Handycam Handbook
Page 10
...check available free hard disk space To turn off the operation confirmation beep To initialize the settings (Reset) Other part names and functions Checking/Deleting the last scene (Review/Review deleting 38 Indicators displayed during recording/playback 39 Remote Commander (DCR-SR60/SR80 41 ...camcorder to the recording conditions (EXPOSURE/WHITE BAL./STEADYSHOT, etc.) STILL SET 56 Settings for still images (BURST/QUALITY/IMAGE SIZE, etc.) PICT.APPLI 57 Special effects on images or additional functions on recording/playback (PICT.EFFECT/D.EFFECT, etc.) HDD SET 58 Settings for the hard disk...
...check available free hard disk space To turn off the operation confirmation beep To initialize the settings (Reset) Other part names and functions Checking/Deleting the last scene (Review/Review deleting 38 Indicators displayed during recording/playback 39 Remote Commander (DCR-SR60/SR80 41 ...camcorder to the recording conditions (EXPOSURE/WHITE BAL./STEADYSHOT, etc.) STILL SET 56 Settings for still images (BURST/QUALITY/IMAGE SIZE, etc.) PICT.APPLI 57 Special effects on images or additional functions on recording/playback (PICT.EFFECT/D.EFFECT, etc.) HDD SET 58 Settings for the hard disk...
Handycam Handbook
Page 16
... for HDD Camcorder" (Software) - Handycam Station (1) (p.17) A/V connecting cable (1) (p.42, 70, 72) USB cable (1) (p.74, 76, 84) CD-ROM (1) (p.77) - AC Adaptor (1) (p.17) Rechargeable battery pack NP-FP50 (1) (p.19) Lens cap (1) (p.21) (DCR-SR40) Power cord (1) (p.17) To attach the lens cap Thread the grip belt through the lens cap ring. "Handycam Handbook" (PDF/this...
... for HDD Camcorder" (Software) - Handycam Station (1) (p.17) A/V connecting cable (1) (p.42, 70, 72) USB cable (1) (p.74, 76, 84) CD-ROM (1) (p.77) - AC Adaptor (1) (p.17) Rechargeable battery pack NP-FP50 (1) (p.19) Lens cap (1) (p.21) (DCR-SR40) Power cord (1) (p.17) To attach the lens cap Thread the grip belt through the lens cap ring. "Handycam Handbook" (PDF/this...
Handycam Handbook
Page 50
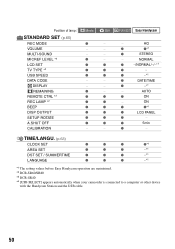
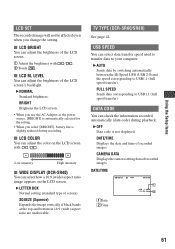
.... (p.63) CLOCK SET z z z z*1 AREA SET z z z -*1 DST SET / SUMMERTIME z z z -*1 LANGUAGE z z z -*1 *1 The setting values before Easy Handycam operation are maintained. *2 DCR-SR60/SR80 *3 DCR-SR40 *4 [USB SELECT] appears automatically when your camcorder is connected to a computer or other device with the Handycam Station and the USB cable. 50 z z z -*1 DATA CODE - - z STEREO MICREF LEVEL *2 LCD SET z - - z - z z*1 MULTI-SOUND - - A.SHUT OFF z z z 5min...
.... (p.63) CLOCK SET z z z z*1 AREA SET z z z -*1 DST SET / SUMMERTIME z z z -*1 LANGUAGE z z z -*1 *1 The setting values before Easy Handycam operation are maintained. *2 DCR-SR60/SR80 *3 DCR-SR40 *4 [USB SELECT] appears automatically when your camcorder is connected to a computer or other device with the Handycam Station and the USB cable. 50 z z z -*1 DATA CODE - - z STEREO MICREF LEVEL *2 LCD SET z - - z - z z*1 MULTI-SOUND - - A.SHUT OFF z z z 5min...
Handycam Handbook
Page 58
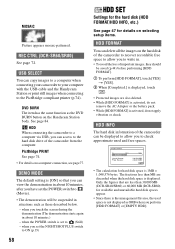
... suspended in . • To avoid the loss of the camcorder from the computer. MOSAIC Picture appears mosaic-patterned. See page 84. REC CTRL (DCR-SR60/SR80) See page 72. USB SELECT You can access to the hard disk drive of important images, they should be displayed to allow you set... - HDD INFO The hard disk information of the camcorder can delete all the images on the hard disk of the camcorder to recover recordable free space to allow you can copy images to a computer when connecting your camcorder to your computer with the USB cable and the Handycam Station or print still images...
... suspended in . • To avoid the loss of the camcorder from the computer. MOSAIC Picture appears mosaic-patterned. See page 84. REC CTRL (DCR-SR60/SR80) See page 72. USB SELECT You can access to the hard disk drive of important images, they should be displayed to allow you set... - HDD INFO The hard disk information of the camcorder can delete all the images on the hard disk of the camcorder to recover recordable free space to allow you can copy images to a computer when connecting your camcorder to your computer with the USB cable and the Handycam Station or print still images...
Handycam Handbook
Page 60
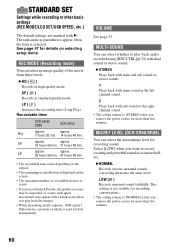
...recordable movies is displayed on selecting setup items. REC MODE (Recording mode) You can select the microphone level for recording sound. Recordable time: DCR-SR40/ SR60 DCR-SR80 approx. B NORMAL Records various surround sounds, converting them into the same level. SP ( SP ) Records in high quality mode. ... concert hall, etc. This setting is selected. STANDARD SET Settings while recording or other basic settings (REC MODE/LCD SET/USB SPEED, etc.) The default settings are marked with a block noise when you remove the power source for more than five minutes. 60
...recordable movies is displayed on selecting setup items. REC MODE (Recording mode) You can select the microphone level for recording sound. Recordable time: DCR-SR40/ SR60 DCR-SR80 approx. B NORMAL Records various surround sounds, converting them into the same level. SP ( SP ) Records in high quality mode. ... concert hall, etc. This setting is selected. STANDARD SET Settings while recording or other basic settings (REC MODE/LCD SET/USB SPEED, etc.) The default settings are marked with a block noise when you remove the power source for more than five minutes. 60
Handycam Handbook
Page 61
...data transfer speed used to transfer data to USB1.1 (full speed transfer). B LETTER BOX Normal setting (standard type of recorded images. USB SPEED You can adjust the color on the LCD screen. DATE/TIME Displays the date and time of screen) SQUEZE (Squeeze) Expands the image... the Setup items LCD SET The recorded image will not be affected even when you select [BRIGHT], battery life is not displayed. TV TYPE (DCR-SR60/SR80) See page 42. FULL SPEED Sends data corresponding to USB1.1 (full speed transfer). B NORMAL Standard brightness. DATA CODE You can select how...
...data transfer speed used to transfer data to USB1.1 (full speed transfer). B LETTER BOX Normal setting (standard type of recorded images. USB SPEED You can adjust the color on the LCD screen. DATE/TIME Displays the date and time of screen) SQUEZE (Squeeze) Expands the image... the Setup items LCD SET The recorded image will not be affected even when you select [BRIGHT], battery life is not displayed. TV TYPE (DCR-SR60/SR80) See page 42. FULL SPEED Sends data corresponding to USB1.1 (full speed transfer). B NORMAL Standard brightness. DATA CODE You can select how...
Handycam Handbook
Page 76
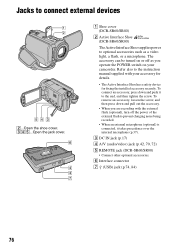
...accessory securely. Refer also to optional accessories such as you are recording with your camcorder. Jacks to connect external devices 2...Open the shoe cover. 345...Open the jack cover. 1 Shoe cover (DCR-SR60/SR80) 2 Active Interface Shoe (DCR-SR60/SR80) The Active Interface Shoe supplies power to the instruction manual supplied with ... and push it takes precedence over the internal microphone (p.37). 3 DC IN jack (p.17) 4 A/V (audio/video) jack (p.42, 70, 72) 5 REMOTE jack (DCR-SR60/SR80) • Connect other optional accessories. 6 Interface connector 7 (USB) jack (p.74, 84) 76
...accessory securely. Refer also to optional accessories such as you are recording with your camcorder. Jacks to connect external devices 2...Open the shoe cover. 345...Open the jack cover. 1 Shoe cover (DCR-SR60/SR80) 2 Active Interface Shoe (DCR-SR60/SR80) The Active Interface Shoe supplies power to the instruction manual supplied with ... and push it takes precedence over the internal microphone (p.37). 3 DC IN jack (p.17) 4 A/V (audio/video) jack (p.42, 70, 72) 5 REMOTE jack (DCR-SR60/SR80) • Connect other optional accessories. 6 Interface connector 7 (USB) jack (p.74, 84) 76
Handycam Handbook
Page 110
... of the camcorder. An error message appears when you are not displayed on , and repeat the operation. Images from connected devices cannot be output when you connect a device via the S VIDEO plug only. If not, remove the USB cable from the Handycam Station and the computer, and turn on the LCD screen (DCR-SR60/ SR80...
... of the camcorder. An error message appears when you are not displayed on , and repeat the operation. Images from connected devices cannot be output when you connect a device via the S VIDEO plug only. If not, remove the USB cable from the Handycam Station and the computer, and turn on the LCD screen (DCR-SR60/ SR80...


