
User Guide
Page 6
... read it before operating. 6 How to the related page. Installation Manual (printed matter) The supplied Installation Manual describes the names and functions of parts and controls of the Network Camera, connecting examples and how to set up the camera. As this section gives tips on the computer display. Overview ...out, may differ from a computer. How to Use This User's Guide This User's Guide explains how to operate the SNCRZ25N and SNC-RZ25P Network Camera from those as you operate the application software. Some displays may be read on using the User's Guide, read the User's ...
... read it before operating. 6 How to the related page. Installation Manual (printed matter) The supplied Installation Manual describes the names and functions of parts and controls of the Network Camera, connecting examples and how to set up the camera. As this section gives tips on the computer display. Overview ...out, may differ from a computer. How to Use This User's Guide This User's Guide explains how to operate the SNCRZ25N and SNC-RZ25P Network Camera from those as you operate the application software. Some displays may be read on using the User's Guide, read the User's ...
User Guide
Page 7
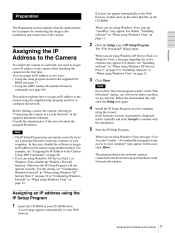
...it does not appear automatically in the supplied Installation Manual. Start the IP Setup Program. An unidentified program wants access to the local network and lists them on page 11. 2 Assigning the IP Address to the Camera To connect the camera to a network, you need to assign a new IP ...address to continue with the installation. The program detects the network cameras connected to your Web browser. Otherwise...
...it does not appear automatically in the supplied Installation Manual. Start the IP Setup Program. An unidentified program wants access to the local network and lists them on page 11. 2 Assigning the IP Address to the Camera To connect the camera to a network, you need to assign a new IP ...address to continue with the installation. The program detects the network cameras connected to your Web browser. Otherwise...
User Guide
Page 14
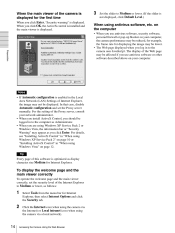
...page and the main viewer correctly To operate the welcome page and the main viewer correctly, set the Proxy server manually. When the main viewer of the camera is displayed for Internet Explorer, then select Internet Options and click the Security tab. When you log in to..., consult your computer. For the setting of Internet Explorer, the image may be displayed. For details, see "Installing ActiveX Control" in "When using the camera via a local network). 14 Accessing the Camera Using the Web Browser Tip Every page of this software is displayed. 3 Set the slider to the...
...page and the main viewer correctly To operate the welcome page and the main viewer correctly, set the Proxy server manually. When the main viewer of the camera is displayed for Internet Explorer, then select Internet Options and click the Security tab. When you log in to..., consult your computer. For the setting of Internet Explorer, the image may be displayed. For details, see "Installing ActiveX Control" in "When using the camera via a local network). 14 Accessing the Camera Using the Web Browser Tip Every page of this software is displayed. 3 Set the slider to the...

User Guide
Page 18
...the viewer by following viewer according to the Video mode setting in the network camera using ActiveX Control. You can use the following the instructions on the welcome page. To install Java Plug-in the Local Area Network (LAN) Settings of the Administrator menu (see page 47). Welcome Page.... Click Yes and install ActiveX Control. The frame rate is enabled. ActiveX viewer This viewer can monitor the image in "Java (Sun)". In that Java is set the Proxy server manually. Note About Viewers You can use all the functions of the camera for the first time...
...the viewer by following viewer according to the Video mode setting in the network camera using ActiveX Control. You can use the following the instructions on the welcome page. To install Java Plug-in the Local Area Network (LAN) Settings of the Administrator menu (see page 47). Welcome Page.... Click Yes and install ActiveX Control. The frame rate is enabled. ActiveX viewer This viewer can monitor the image in "Java (Sun)". In that Java is set the Proxy server manually. Note About Viewers You can use all the functions of the camera for the first time...
User Guide
Page 21
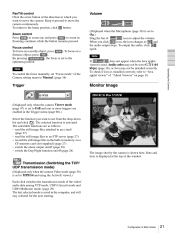
.... (page 29) The last selected mode is saved in the Trigger menu (page 60).) Select the function you want to move the camera continuously. To check if Java is installed correctly, refer to the optimum position. Date and time is displayed at the top of Main Viewer 21 By pressing , the focus... selected for the next starting. Keep it pressed to G.711 (64 kbps) (page 38), or Java may not be installed correctly. PanTilt control Click the arrow button of the Camera setting menu to Manual. (page 38) If does not appear when the Java applet viewer is used, Audio codec may not be set...
.... (page 29) The last selected mode is saved in the Trigger menu (page 60).) Select the function you want to move the camera continuously. To check if Java is installed correctly, refer to the optimum position. Date and time is displayed at the top of Main Viewer 21 By pressing , the focus... selected for the next starting. Keep it pressed to G.711 (64 kbps) (page 38), or Java may not be installed correctly. PanTilt control Click the arrow button of the Camera setting menu to Manual. (page 38) If does not appear when the Java applet viewer is used, Audio codec may not be set...

User Guide
Page 28
...Each click switches the Alarm output between On (night mode) and Off (day mode) alternately. For the connection of the I/O port, see the supplied Installation Manual. 28 Controlling Alarm output 1, 2 / Controlling Day/Night Function Controlling Alarm output 1, 2 You can control the Day/Night On (night mode) and... to make Alarm output 1 or Alarm output 2 active in the Trigger setting menu on the Administrator menu (page 61). 1 2 Operating the Camera 1 2 Monitor the image on the monitor window. Each click switches the Day/Night between On (short-circuit) and Off (open ). To use...
...Each click switches the Alarm output between On (night mode) and Off (day mode) alternately. For the connection of the I/O port, see the supplied Installation Manual. 28 Controlling Alarm output 1, 2 / Controlling Day/Night Function Controlling Alarm output 1, 2 You can control the Day/Night On (night mode) and... to make Alarm output 1 or Alarm output 2 active in the Trigger setting menu on the Administrator menu (page 61). 1 2 Operating the Camera 1 2 Monitor the image on the monitor window. Each click switches the Day/Night between On (short-circuit) and Off (open ). To use...

User Guide
Page 35
...the time is adjusted using SNC panorama creator - Click Reboot, and the message "The SNC-RZ25N/ RZ25P will be stored or restored with SNC panorama creator (page 81). After adjustments of the camera. It takes about two minutes to reboot the camera. System setting menu 35...panorama image By pressing Delete, you want to adjust the camera's time referring to the network environment. appears. Note Factory default Resets the camera to every setting menu" on the camera. For details, see the supplied Installation Manual. Notes OK/Cancel See "Buttons common to the factory...
...the time is adjusted using SNC panorama creator - Click Reboot, and the message "The SNC-RZ25N/ RZ25P will be stored or restored with SNC panorama creator (page 81). After adjustments of the camera. It takes about two minutes to reboot the camera. System setting menu 35...panorama image By pressing Delete, you want to adjust the camera's time referring to the network environment. appears. Note Factory default Resets the camera to every setting menu" on the camera. For details, see the supplied Installation Manual. Notes OK/Cancel See "Buttons common to the factory...
User Guide
Page 70
...camera after the global IP address and then type the port number. (For example: http://xyz.37.128.50:1024) • On some routers, you cannot access the WAN side global IP address via a network...the ID special for the equipment which is used when you proceed with manual updating of the registration site. The camera routinely proceeds with Factory default after registration for dynamic DNS, you proceed ...50 in the above diagram) on the WAN side currently assigned by security software or a firewall installed in the computer. It is used to jump to off . In this button. • To...
...camera after the global IP address and then type the port number. (For example: http://xyz.37.128.50:1024) • On some routers, you cannot access the WAN side global IP address via a network...the ID special for the equipment which is used when you proceed with manual updating of the registration site. The camera routinely proceeds with Factory default after registration for dynamic DNS, you proceed ...50 in the above diagram) on the WAN side currently assigned by security software or a firewall installed in the computer. It is used to jump to off . In this button. • To...

User Guide
Page 73
...setting items are for the user ID in the User ID box. Select the area where the camera is installed from the Date time format drop-down list. The setting boxes are provided for the SNC-RZ25N/RZ25P. • User ID assigned by the ISP in the Password box. Using the Supplied ...from the ISP. Select On below the list to set on the camera. Type the user ID assigned by your ISP • Password for . Manual current date time setting Set the current date and time on the camera. Due to network properties, there may be a slight difference between the displayed computer's date...
...setting items are for the user ID in the User ID box. Select the area where the camera is installed from the Date time format drop-down list. The setting boxes are provided for the SNC-RZ25N/RZ25P. • User ID assigned by the ISP in the Password box. Using the Supplied ...from the ISP. Select On below the list to set on the camera. Type the user ID assigned by your ISP • Password for . Manual current date time setting Set the current date and time on the camera. Due to network properties, there may be a slight difference between the displayed computer's date...

User Guide
Page 74
...manually: Select Use the following audio data to Camera Audio CODEC G.711 (µ-LAW) G.726 G.726 G.726 G.726 Note Transmission rate 64 kbps 40 kbps 32 kbps 24 kbps 16 kbps 8 9 Type the Administrator name and Administrator password in each box. Rebooting the Camera Click Reboot on the Network tab to the camera. Installing the SNC... audio upload tool 1 Insert the CD-ROM in your CD-ROM drive. A cover page appears automatically in your Web browser. For details, "Installing software" in ...
...manually: Select Use the following audio data to Camera Audio CODEC G.711 (µ-LAW) G.726 G.726 G.726 G.726 Note Transmission rate 64 kbps 40 kbps 32 kbps 24 kbps 16 kbps 8 9 Type the Administrator name and Administrator password in each box. Rebooting the Camera Click Reboot on the Network tab to the camera. Installing the SNC... audio upload tool 1 Insert the CD-ROM in your CD-ROM drive. A cover page appears automatically in your Web browser. For details, "Installing software" in ...


