

User Guide
Page 2
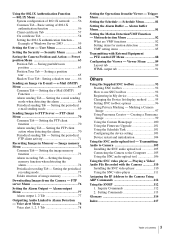
... camera toward a specified point ..... 23 Using the Trigger Button 24 Sending a monitor image via e-mail 24 Sending a monitor image to an FTP server ......24 Recording a camera image as a still image .......24 Controlling alarm output 1, 2 24 Controlling the Day/Night function 24 Playing an audio file stored in the camera ........24 Switching TCP/UDP Transmission Mode ..........25 Using the System Utility 26 SNC Viewer 26 SNC Desktop Viewer 27 Administrating the Camera Basic Operations of the Administrator Menu ...29 How to install...
... camera toward a specified point ..... 23 Using the Trigger Button 24 Sending a monitor image via e-mail 24 Sending a monitor image to an FTP server ......24 Recording a camera image as a still image .......24 Controlling alarm output 1, 2 24 Controlling the Day/Night function 24 Playing an audio file stored in the camera ........24 Switching TCP/UDP Transmission Mode ..........25 Using the System Utility 26 SNC Viewer 26 SNC Desktop Viewer 27 Administrating the Camera Basic Operations of the Administrator Menu ...29 How to install...
User Guide
Page 3
... Periodical recording Tab - PTZ control I/F Menu 88 Configuring the Viewer - Inquiry Commands 112 2. Setting the FTP client function 70 Alarm sending Tab - Setting the image memory function 73 Alarm recording Tab - Motion detection Menu 82 What are VMF functions 82 Setting items for motion detection 83 VMF setting items 85 Transmitting with the Camera 110 Installing the SNC video player 110 Using the SNC video player 111 Assigning the IP Address to the Camera Using ARP Commands 112 Using the SNMP 112 1. Setting Commands...
... Periodical recording Tab - PTZ control I/F Menu 88 Configuring the Viewer - Inquiry Commands 112 2. Setting the FTP client function 70 Alarm sending Tab - Setting the image memory function 73 Alarm recording Tab - Motion detection Menu 82 What are VMF functions 82 Setting items for motion detection 83 VMF setting items 85 Transmitting with the Camera 110 Installing the SNC video player 110 Using the SNC video player 111 Assigning the IP Address to the Camera Using ARP Commands 112 Using the SNMP 112 1. Setting Commands...
User Guide
Page 4
... Corporation in high-quality HD (720P) (SNC-RH124/SNC-RH164). • XDNR and Visibility Enhancer enable clearer images for streaming. • Three video compression modes (video codecs) JPEG/MPEG4/H.264 are supported. • Single codec mode, dual codec mode, and triple (SNC-RS46N/P, SNC-RS44N/P, SNC-RS86N/P, SNC-RS84N/P only) codec mode are provided. • Up to any time without prior written approval from camera can be monitored at a maximum frame...
... Corporation in high-quality HD (720P) (SNC-RH124/SNC-RH164). • XDNR and Visibility Enhancer enable clearer images for streaming. • Three video compression modes (video codecs) JPEG/MPEG4/H.264 are supported. • Single codec mode, dual codec mode, and triple (SNC-RS46N/P, SNC-RS44N/P, SNC-RS86N/P, SNC-RS84N/P only) codec mode are provided. • Up to any time without prior written approval from camera can be monitored at a maximum frame...
User Guide
Page 6
... "File Download" dialog, you use a personal firewall or antivirus software in the Web browser, double-click the index.htm file on page 10. 2 Click the Setup icon of the network about the assigned IP address. An unidentified program wants access to continue with the installation. 5 Start SNC toolbox. Consult the administrator of SNC toolbox. In this page) • Using the ARP (Address Resolution Protocol) commands (see "Configuring Windows Firewall" in "When using Windows Vista, the "Auto...
... "File Download" dialog, you use a personal firewall or antivirus software in the Web browser, double-click the index.htm file on page 10. 2 Click the Setup icon of the network about the assigned IP address. An unidentified program wants access to continue with the installation. 5 Start SNC toolbox. Consult the administrator of SNC toolbox. In this page) • Using the ARP (Address Resolution Protocol) commands (see "Configuring Windows Firewall" in "When using Windows Vista, the "Auto...

User Guide
Page 14
... the setting of the Proxy server, consult your network administrator. • When you install ActiveX Control, you use antivirus software or other software described above on your computer. 14 Accessing the Camera Using the Web Browser For details, see "Installing ActiveX Control" in "When using Windows XP Service Pack 2 or later" on page 8 or "Installing ActiveX Control" in "When using Windows Vista" on the computer • When you should be displayed. Tip The software is optimized for Internet Explorer...
... the setting of the Proxy server, consult your network administrator. • When you install ActiveX Control, you use antivirus software or other software described above on your computer. 14 Accessing the Camera Using the Web Browser For details, see "Installing ActiveX Control" in "When using Windows XP Service Pack 2 or later" on page 8 or "Installing ActiveX Control" in "When using Windows Vista" on the computer • When you should be displayed. Tip The software is optimized for Internet Explorer...

User Guide
Page 17
..., JPEG/FLASH or ActiveX Viewer. About Viewers You can be logged in to the computer as a user 1 Start the Web browser on page 14 and check the security level. When you want to monitor. For the setting of the Proxy server, consult your computer and type the IP address of Internet Explorer, the camera image may be displayed in sequence. You must install this software is optimized for Internet Explorer in Medium...
..., JPEG/FLASH or ActiveX Viewer. About Viewers You can be logged in to the computer as a user 1 Start the Web browser on page 14 and check the security level. When you want to monitor. For the setting of the Proxy server, consult your computer and type the IP address of Internet Explorer, the camera image may be displayed in sequence. You must install this software is optimized for Internet Explorer in Medium...

User Guide
Page 21
... with Auto flip set to change the tilt movement upward. • When you want to the home position, click . Control bar The following operation buttons are two modes of the image to Area zoom mode and Vector dragging mode) You can choose a part of camera operation: the "Area zoom" mode and "Vector dragging" mode. Indicates the availability of analog zoom. Controlling via the control panel (Operation common to view and zoom in all modes. Zoom control Click to zoom...
... with Auto flip set to change the tilt movement upward. • When you want to the home position, click . Control bar The following operation buttons are two modes of the image to Area zoom mode and Vector dragging mode) You can choose a part of camera operation: the "Area zoom" mode and "Vector dragging" mode. Indicates the availability of analog zoom. Controlling via the control panel (Operation common to view and zoom in all modes. Zoom control Click to zoom...

User Guide
Page 25
... video/audio communications. If a router that case, disable the software or select the TCP mode. • If you can select TCP or UDP as the transmission port, RTP (Real-time Transport Protocol) and UDP multicast techniques are using Windows Vista" on page 11. 1 Select TCP, UDP (Unicast) or UDP (Multicast) from the Connection drop-down list in the Others panel. Since RTP is installed...
... video/audio communications. If a router that case, disable the software or select the TCP mode. • If you can select TCP or UDP as the transmission port, RTP (Real-time Transport Protocol) and UDP multicast techniques are using Windows Vista" on page 11. 1 Select TCP, UDP (Unicast) or UDP (Multicast) from the Connection drop-down list in the Others panel. Since RTP is installed...

User Guide
Page 29
... User name. • After changing a setting on the left side of the Administrator Menu For details, see "Operating the Camera" on every menu. Enter the user name and password for the Administrator. Example: "Date & time" tab of "System" menu See pages 31 to suit the user's needs. Basic Operations of the menu tabs and setting options. 5 After setting, click OK. The user name "admin" and password "admin...
... User name. • After changing a setting on the left side of the Administrator Menu For details, see "Operating the Camera" on every menu. Enter the user name and password for the Administrator. Example: "Date & time" tab of "System" menu See pages 31 to suit the user's needs. Basic Operations of the menu tabs and setting options. 5 After setting, click OK. The user name "admin" and password "admin...

User Guide
Page 30
... Camera menu for setting the network connection. Camera Menu" (page 37). For details, see "Configuring the Network - SSL Displays the SSL menu for recording an image/audio file, etc., in the built-in memory or in a CF memory card (not supplied) inserted in the camera. ("Recording Images in user name and password. ("Setting the User - User Menu" on page 56) User Displays the User menu for sending an image/ audio file, etc., to an FTP server. ("Sending Images to the camera. ("Setting the Security - Security...
... Camera menu for setting the network connection. Camera Menu" (page 37). For details, see "Configuring the Network - SSL Displays the SSL menu for recording an image/audio file, etc., in the built-in memory or in a CF memory card (not supplied) inserted in the camera. ("Recording Images in user name and password. ("Setting the User - User Menu" on page 56) User Displays the User menu for sending an image/ audio file, etc., to an FTP server. ("Sending Images to the camera. ("Setting the Security - Security...

User Guide
Page 31
... operate pan, tilt, zoom and some other functions of the software. Alarm buffer Menu" on page 81) Motion Detection Displays the Motion detection menu for communications with external equipment through the external serial terminal. ("Transmitting with External Equipment PTZ control I/F Menu" on page 89) Configuring the System - Exclusive control mode Controls the authority to use and configure advanced settings. ("Configuring the Viewer - System Menu Use this camera is controlled by the settings of the Web browser...
... operate pan, tilt, zoom and some other functions of the software. Alarm buffer Menu" on page 81) Motion Detection Displays the Motion detection menu for communications with external equipment through the external serial terminal. ("Transmitting with External Equipment PTZ control I/F Menu" on page 89) Configuring the System - Exclusive control mode Controls the authority to use and configure advanced settings. ("Configuring the Viewer - System Menu Use this camera is controlled by the settings of the Web browser...

User Guide
Page 35
... See "Buttons common to every menu" on the camera starts to reboot the camera. appears. For details, see the supplied Installation Manual. System Menu Phase adjustment (SNC-RS46N/P, SNC-RS44N/ P, SNC-RS86N/P, SNC-RS84N/P only) Enter a value. (0 to installation. Display sample: Video output mode Configure or confirm the signal output settings from the analog image output terminal of the camera and click Set. This will be reset to change the signal setting for...
... See "Buttons common to every menu" on the camera starts to reboot the camera. appears. For details, see the supplied Installation Manual. System Menu Phase adjustment (SNC-RS46N/P, SNC-RS44N/ P, SNC-RS86N/P, SNC-RS84N/P only) Enter a value. (0 to installation. Display sample: Video output mode Configure or confirm the signal output settings from the analog image output terminal of the camera and click Set. This will be reset to change the signal setting for...
User Guide
Page 37
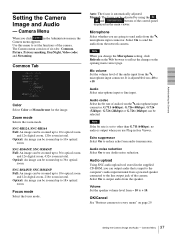
... total. Manual: The focus can be zoomed up to send audio from the network camera. OK/Cancel See "Buttons common to send the audio from the m microphone input connector. Camera Menu When you can be adjusted by using the , and buttons of the camera. Optical: An image can output audio that is automatically adjusted. Microphone Select whether you are going to 18× optical zoom. Administrating the Camera Setting the Camera Image and Audio - Zoom mode Selects the zoom mode. Select...
... total. Manual: The focus can be zoomed up to send audio from the network camera. OK/Cancel See "Buttons common to send the audio from the m microphone input connector. Camera Menu When you can be adjusted by using the , and buttons of the camera. Optical: An image can output audio that is automatically adjusted. Microphone Select whether you are going to 18× optical zoom. Administrating the Camera Setting the Camera Image and Audio - Zoom mode Selects the zoom mode. Select...
User Guide
Page 62
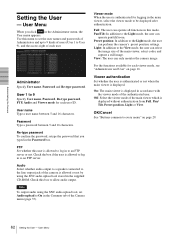
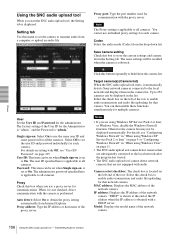
... connected to the line output jack of the camera is allowed to the Light mode, the user can select the image size of the Camera menu (page 37). Note To output audio using the SNC audio upload tool stored in this user is allowed or not by using the SNC audio upload tool, set the user names and passwords of Administrator and up to 9 kinds of each user ID. View: The user can operate pan/tilt/zoom...
... connected to the line output jack of the camera is allowed to the Light mode, the user can select the image size of the Camera menu (page 37). Note To output audio using the SNC audio upload tool stored in this user is allowed or not by using the SNC audio upload tool, set the user names and passwords of Administrator and up to 9 kinds of each user ID. View: The user can operate pan/tilt/zoom...
User Guide
Page 63
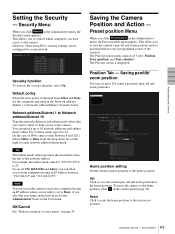
... (programmed action of the network address. Set Click to the camera. To move the camera to the factory-set to 256 camera positions (pan, tilt and zoom positions). Security Menu Network address/Subnet 1 to Network address/Subnet 10 Type the network addresses and subnet mask values that you to 10 network addresses and subnet mask values. Saving the Camera Position and Action - Reset Click to reset the home position to the home position, click in the control panel (page 19). Likewise, when using IPv6, security settings...
... (programmed action of the network address. Set Click to the camera. To move the camera to the factory-set to 256 camera positions (pan, tilt and zoom positions). Security Menu Network address/Subnet 1 to Network address/Subnet 10 Type the network addresses and subnet mask values that you to 10 network addresses and subnet mask values. Saving the Camera Position and Action - Reset Click to reset the home position to the home position, click in the control panel (page 19). Likewise, when using IPv6, security settings...
User Guide
Page 106
... password for that camera. When it automatically detects Sony network cameras connected to On. Up to 256 cameras can be displayed automatically. Otherwise the camera list may not be set when Single sign-on : Select On to obtain the proxy setting automatically from Internet Explorer. Model: Displays the model name of the proxy server. Select this menu to set the camera to set to enable audio transmission and audio file uploading for communications. Proxy port: Type the port number used...
... password for that camera. When it automatically detects Sony network cameras connected to On. Up to 256 cameras can be displayed automatically. Otherwise the camera list may not be set when Single sign-on : Select On to obtain the proxy setting automatically from Internet Explorer. Model: Displays the model name of the proxy server. Select this menu to set the camera to set to enable audio transmission and audio file uploading for communications. Proxy port: Type the port number used...

User Guide
Page 107
... start ) to multiple cameras displayed in red. Transmitting Audio to the Audio upload tab or the Voice alert tab, the camera is "admin." User: Displays the specified user ID and password. User ID/Password Use this button. Note on the Common tab of 256 cameras has been reached. You can adjust the microphone volume and enable/disable muting, if necessary. Before transmitting, set for all cameras. Type the IP address and port number of the network camera...
... start ) to multiple cameras displayed in red. Transmitting Audio to the Audio upload tab or the Voice alert tab, the camera is "admin." User: Displays the specified user ID and password. User ID/Password Use this button. Note on the Common tab of 256 cameras has been reached. You can adjust the microphone volume and enable/disable muting, if necessary. Before transmitting, set for all cameras. Type the IP address and port number of the network camera...

User Guide
Page 108
... in the Setting tab is used for connection. The list shows the information and status of the camera. You can review the recorded sound or upload the recording to start playback, open the recorded file or another audio file and click this button to stop ) Click to hide the camera list. "DHCP" is shown at the end of the camera. Model: Displays the model name of sound via a microphone connected to...
... in the Setting tab is used for connection. The list shows the information and status of the camera. You can review the recorded sound or upload the recording to start playback, open the recorded file or another audio file and click this button to stop ) Click to hide the camera list. "DHCP" is shown at the end of the camera. Model: Displays the model name of sound via a microphone connected to...

User Guide
Page 112
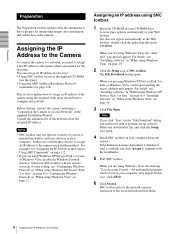
Also when you turn on the computer. 2 Enter the IP address and the MAC address of the camera to the camera using ARP (Address Resolution Protocol) commands without using the following ARP commands. Others Assigning the IP Address to the Camera Using ARP Commands This section explains how to assign an IP address to assign a new IP address, using the supplied SNC toolbox. arp -s ping -t Note When you restart the camera, execute the operation within 5 minutes. 1 Open the command prompt on the camera, execute the ARP and PING commands within 5 minutes.
Also when you turn on the computer. 2 Enter the IP address and the MAC address of the camera to the camera using ARP (Address Resolution Protocol) commands without using the following ARP commands. Others Assigning the IP Address to the Camera Using ARP Commands This section explains how to assign an IP address to assign a new IP address, using the supplied SNC toolbox. arp -s ping -t Note When you restart the camera, execute the operation within 5 minutes. 1 Open the command prompt on the camera, execute the ARP and PING commands within 5 minutes.

User Guide
Page 114
... coding/decoding video and audio data. FTP client Software to be used to communicate between the lightest and darkest portions of the website is successful after the URL of the image. HTTP port A port used for accessing the FTP server. Common name A URL to translate the name into the corresponding IP address. Access is verified as a web browser. 114 Glossary Default gateway Device that can be used to access another computer, it asks a DNS server to be typed...
... coding/decoding video and audio data. FTP client Software to be used to communicate between the lightest and darkest portions of the website is successful after the URL of the image. HTTP port A port used for accessing the FTP server. Common name A URL to translate the name into the corresponding IP address. Access is verified as a web browser. 114 Glossary Default gateway Device that can be used to access another computer, it asks a DNS server to be typed...


