User Guide
Page 2
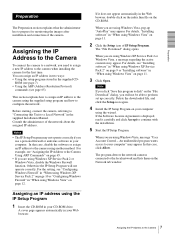
... when Detecting the Alarm 45 Periodical recording Tab - Trigger setting Menu 49 2 Table of Contents Overview Features 4 Camera section 4 Network section, Control section 4 Others 4 Phenomena Specific to CCD Image Sensors ....... 5 How to Use This User's Guide 6 System Requirements 6 Preparation Assigning the IP Address to the Camera 7 Assigning an IP address using the IP Setup Program 7 When using Windows XP Service Pack 2 .......... 9 When using Windows Vista 11 Accessing the Camera Using the Web Browser 13 Basic Configuration by the Administrator ....... 15 Operating the Camera...
... when Detecting the Alarm 45 Periodical recording Tab - Trigger setting Menu 49 2 Table of Contents Overview Features 4 Camera section 4 Network section, Control section 4 Others 4 Phenomena Specific to CCD Image Sensors ....... 5 How to Use This User's Guide 6 System Requirements 6 Preparation Assigning the IP Address to the Camera 7 Assigning an IP address using the IP Setup Program 7 When using Windows XP Service Pack 2 .......... 9 When using Windows Vista 11 Accessing the Camera Using the Web Browser 13 Basic Configuration by the Administrator ....... 15 Operating the Camera...
User Guide
Page 4
... send to the plug-in power type microphone input (standard voltage 2.4 V) terminal (mini jack, monaural). • The motion detection function (in the color mode). • High quality CCD and the clear dome cover enable to get high sensitivity. • Various exposure modes (Auto iris lens, CCD iris, Manual). • You can manually set up. Network section, Control section • Real-time monitoring of the image and sound from 3.0 mm to the alarm output terminals. •...
... send to the plug-in power type microphone input (standard voltage 2.4 V) terminal (mini jack, monaural). • The motion detection function (in the color mode). • High quality CCD and the clear dome cover enable to get high sensitivity. • Various exposure modes (Auto iris lens, CCD iris, Manual). • You can manually set up. Network section, Control section • Real-time monitoring of the image and sound from 3.0 mm to the alarm output terminals. •...
User Guide
Page 6
... operate the application software. Jumping to the related page. Installation Manual (printed matter) The supplied Installation Manual describes the names and functions of parts and controls of the Network Camera, connecting examples and how to Use This User's Guide / System Requirements Processor Intel Pentium III, 1 GHz or higher (Intel Pentium 4, 2 GHz or higher recommended) RAM 256 MB or more OS Microsoft Windows 2000, Windows XP, Windows Vista Web browser Microsoft Internet Explorer...
... operate the application software. Jumping to the related page. Installation Manual (printed matter) The supplied Installation Manual describes the names and functions of parts and controls of the Network Camera, connecting examples and how to Use This User's Guide / System Requirements Processor Intel Pentium III, 1 GHz or higher (Intel Pentium 4, 2 GHz or higher recommended) RAM 256 MB or more OS Microsoft Windows 2000, Windows XP, Windows Vista Web browser Microsoft Internet Explorer...
User Guide
Page 7
... "Connecting this Unit to a Local Network" in the supplied CD- For the setting, see page 65) This section explains how to assign an IP address to the camera using Windows Vista" on your computer. The "File Download" dialog opens. For details, "Installing software" in "When using the supplied setup program and how to configure the network. Note If you are using Windows Vista, pop-up correctly. An unidentified program wants access to...
... "Connecting this Unit to a Local Network" in the supplied CD- For the setting, see page 65) This section explains how to assign an IP address to the camera using Windows Vista" on your computer. The "File Download" dialog opens. For details, "Installing software" in "When using the supplied setup program and how to configure the network. Note If you are using Windows Vista, pop-up correctly. An unidentified program wants access to...
User Guide
Page 12
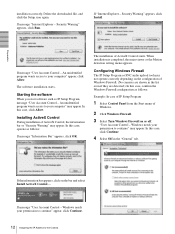
... IP Setup Program or SNC audio upload tool may appear. If message "Internet Explorer - The software installation starts. Preparation installation correctly. "User Account Control - Security Warning" appears, click Run. If "Internet Explorer - Starting the software When you start software such as follows: Example: In case of IP Setup Program 1 Select Control Panel from the Start menu of ActiveX Control starts. In this case, confirm the Windows Firewall configuration as IP Setup Program, message "User Account Control - Delete the downloaded...
... IP Setup Program or SNC audio upload tool may appear. If message "Internet Explorer - The software installation starts. Preparation installation correctly. "User Account Control - Security Warning" appears, click Run. If "Internet Explorer - Starting the software When you start software such as follows: Example: In case of IP Setup Program 1 Select Control Panel from the Start menu of ActiveX Control starts. In this case, confirm the Windows Firewall configuration as IP Setup Program, message "User Account Control - Delete the downloaded...
User Guide
Page 16
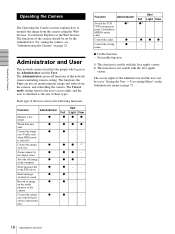
... the user can use all functions of this network camera including camera setting. z- - - - - - - - - For setting the camera, see "Administrating the Camera" on page 37. 16 Administrator and User The Administrator can use are monitoring the image and audio from the camera using the Web browser. Operating the Camera Operating the Camera The Operating the Camera section explains how to a mail Record an image z z on the inside memory of the camera Control the Alarm z z out of the I/O port on the camera main unit User Light View...
... the user can use all functions of this network camera including camera setting. z- - - - - - - - - For setting the camera, see "Administrating the Camera" on page 37. 16 Administrator and User The Administrator can use are monitoring the image and audio from the camera using the Web browser. Operating the Camera Operating the Camera The Operating the Camera section explains how to a mail Record an image z z on the inside memory of the camera Control the Alarm z z out of the I/O port on the camera main unit User Light View...

User Guide
Page 18
... is enabled. You need to the main viewer at the factory for the first time (clicking Enter to enter the main viewer), the Security Warning appears. To install Java Plug-in Download Java 2 Runtime Environment, Standard Edition (JRE) from the menu bar of the Administrator menu (see page 37). The user name "admin" and the password "admin" are set to Homepage - You can select this viewer when the camera video mode...
... is enabled. You need to the main viewer at the factory for the first time (clicking Enter to enter the main viewer), the Security Warning appears. To install Java Plug-in Download Java 2 Runtime Environment, Standard Edition (JRE) from the menu bar of the Administrator menu (see page 37). The user name "admin" and the password "admin" are set to Homepage - You can select this viewer when the camera video mode...
User Guide
Page 24
... dialog. By selecting it, the network transmission load of the video/ audio data as the transmission port, RTP (Real-time Transport Protocol) and UDP multicast techniques are using Windows Vista" on page 10 or "Configuring Windows Firewall" in "When using Windows XP Service Pack 2 or Windows Vista, disable "Windows Firewall." Operating the Camera 3 Click one of reading Web page, you decide not change the transmission setting, click Cancel. Notes •...
... dialog. By selecting it, the network transmission load of the video/ audio data as the transmission port, RTP (Real-time Transport Protocol) and UDP multicast techniques are using Windows Vista" on page 10 or "Configuring Windows Firewall" in "When using Windows XP Service Pack 2 or Windows Vista, disable "Windows Firewall." Operating the Camera 3 Click one of reading Web page, you decide not change the transmission setting, click Cancel. Notes •...
User Guide
Page 26
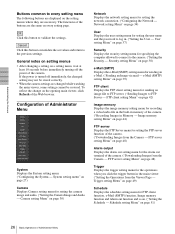
... FTP Server - If the power is turned off the power of the Web browser. To reflect the change on page 30) Network Displays the network setting menu for sending an image file to FTP server. ("Sending Images to the previous settings. Configuration of the camera. ("Downloading Images from the Camera - Camera setting Menu" on the opening main viewer, click Refresh of the camera. e-Mail (SMTP) setting Menu" on page 48) Alarm output Displays the alarm out setting menu for the operations when you click the trigger button in . ("Setting the User - FTP server setting Menu...
... FTP Server - If the power is turned off the power of the Web browser. To reflect the change on page 30) Network Displays the network setting menu for sending an image file to FTP server. ("Sending Images to the previous settings. Configuration of the camera. ("Downloading Images from the Camera - Camera setting Menu" on the opening main viewer, click Refresh of the camera. e-Mail (SMTP) setting Menu" on page 48) Alarm output Displays the alarm out setting menu for the operations when you click the trigger button in . ("Setting the User - FTP server setting Menu...
User Guide
Page 27
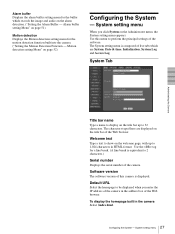
... which records the image and audio on page 52) Configuring the System - Software version The software version of this menu to 2 characters.) Serial number Displays the serial number of the Web browser. To display the homepage built in HTML format. Welcome text Type a text to show on the title bar of the camera. Use the tag for the motion detection function built into the camera. ("Setting the Motion Detection Function - Alarm buffer Displays the alarm buffer setting menu...
... which records the image and audio on page 52) Configuring the System - Software version The software version of this menu to 2 characters.) Serial number Displays the serial number of the Web browser. To display the homepage built in HTML format. Welcome text Type a text to show on the title bar of the camera. Use the tag for the motion detection function built into the camera. ("Setting the Motion Detection Function - Alarm buffer Displays the alarm buffer setting menu...
User Guide
Page 29
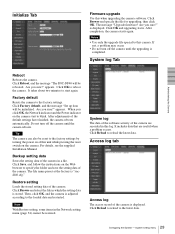
... click OK, the Network indicator and the Power indicator on the Web browser to blink. Backup setting data Saves the setting data of the camera is completed. Initialize Tab Firmware upgrade Use this log. is "sncdf40.cfg." Click OK and upgrading starts. Do not turn off the camera until the upgrading is displayed. Note With Restore setting, some items in this when upgrading the camera software. If not, a problem may occur. •...
... click OK, the Network indicator and the Power indicator on the Web browser to blink. Backup setting data Saves the setting data of the camera is completed. Initialize Tab Firmware upgrade Use this log. is "sncdf40.cfg." Click OK and upgrading starts. Do not turn off the camera until the upgrading is displayed. Note With Restore setting, some items in this when upgrading the camera software. If not, a problem may occur. •...
User Guide
Page 33
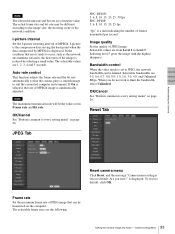
... the image is reset to JPEG, the network bandwidth can be limited. I-picture interval Set the I -picture is the compression data serving the basic point when the data compressed by selecting a small value. Auto rate control This function adjusts the frame rate and the bit rate automatically so that errors tends to every setting menu" on page 26. JPEG Tab SNC-DF40N...
... the image is reset to JPEG, the network bandwidth can be limited. I-picture interval Set the I -picture is the compression data serving the basic point when the data compressed by selecting a small value. Auto rate control This function adjusts the frame rate and the bit rate automatically so that errors tends to every setting menu" on page 26. JPEG Tab SNC-DF40N...

User Guide
Page 34
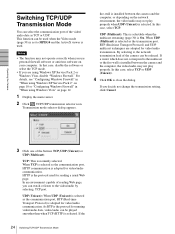
... use a port number other than 80, select the text box and type a port number between 1024 and 65535. The Network setting menu consists of the camera to be transmitted to connect the camera and the computer. Network Tab This section provides the menus for connecting the camera through the network cable. Select it when the IP address is working on the network. Obtain DNS server address automatically Select this menu to configure the network...
... use a port number other than 80, select the text box and type a port number between 1024 and 65535. The Network setting menu consists of the camera to be transmitted to connect the camera and the computer. Network Tab This section provides the menus for connecting the camera through the network cable. Select it when the IP address is working on the network. Obtain DNS server address automatically Select this menu to configure the network...
User Guide
Page 54
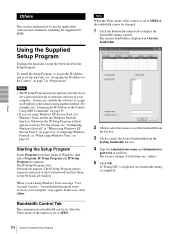
... access to select the desired bandwidth from Start menu of both items are "admin." 5 Click OK. The current bandwidth is completed. 54 Using the Supplied Setup Program Notes • The IP Setup Program may appear. The IP Setup Program starts. The factory settings of Windows, then select Program, IP Setup Program and IP Setup Program in "When using Windows XP Service Pack 2 or Windows Vista, disable the Windows Firewall function. The IP Setup Program detects cameras connected to the Camera Using...
... access to select the desired bandwidth from Start menu of both items are "admin." 5 Click OK. The current bandwidth is completed. 54 Using the Supplied Setup Program Notes • The IP Setup Program may appear. The IP Setup Program starts. The factory settings of Windows, then select Program, IP Setup Program and IP Setup Program in "When using Windows XP Service Pack 2 or Windows Vista, disable the Windows Firewall function. The IP Setup Program detects cameras connected to the Camera Using...
User Guide
Page 55
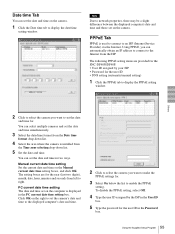
... and time. PPPoE Tab PPPoE is installed from left to set on the camera. 1 Click the Date time tab to display the date/time setting window. The setting boxes are provided for the SNC-DF40N/DF40P. • User ID assigned by the ISP in the PC current date time setting box. You can select multiple cameras and set the date and time in the Password box. 55 Using the Supplied Setup Program Click...
... and time. PPPoE Tab PPPoE is installed from left to set on the camera. 1 Click the Date time tab to display the date/time setting window. The setting boxes are provided for the SNC-DF40N/DF40P. • User ID assigned by the ISP in the PC current date time setting box. You can select multiple cameras and set the date and time in the Password box. 55 Using the Supplied Setup Program Click...
User Guide
Page 57
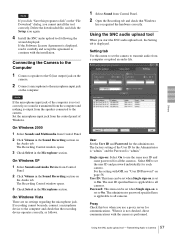
... program to disk" on the "File Download" dialog, you use the same user ID and same password for all cameras. Set the microphone input jack from Control Panel. 2 Click Volume in the Sound Recording section on the Audio tab. On Windows 2000 1 Select Sounds and Multimedia from the speaker connected to the camera. On Windows Vista There are no sound is transmitted from the computer and nothing is displayed. User Set...
... program to disk" on the "File Download" dialog, you use the same user ID and same password for all cameras. Set the microphone input jack from Control Panel. 2 Click Volume in the Sound Recording section on the Audio tab. On Windows 2000 1 Select Sounds and Multimedia from the speaker connected to the camera. On Windows Vista There are no sound is transmitted from the computer and nothing is displayed. User Set...
User Guide
Page 58
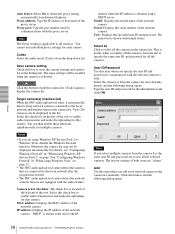
... IP address or host name of the network camera. Click it automatically detects Sony network cameras connected to enable audio transmission and audio file uploading for communications with turned letters. The password is rebooted. Add Use this button to select all cameras. Proxy port: Type the port number used for that camera. Serial: Displays the serial number of the proxy server. Select all Click to hide the camera list. Codec Select the audio mode (Codec) from Internet Explorer. Save camera setting Check...
... IP address or host name of the network camera. Click it automatically detects Sony network cameras connected to enable audio transmission and audio file uploading for communications with turned letters. The password is rebooted. Add Use this button to select all cameras. Proxy port: Type the port number used for that camera. Serial: Displays the serial number of the proxy server. Select all Click to hide the camera list. Codec Select the audio mode (Codec) from Internet Explorer. Save camera setting Check...
User Guide
Page 62
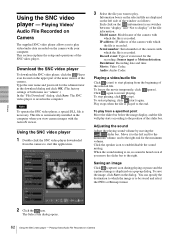
... the left side of the window as follows: Each click on the upper part of the main viewer of event used for the recording: Sensor input or Motion detection. Adjusting the sound Adjust the playing sound volume by moving the slider bar. Download the SNC video player To download the SNC video player, click the Player icon located on the (information) icon switches between "display" and "Not to play starts...
... the left side of the window as follows: Each click on the upper part of the main viewer of event used for the recording: Sensor input or Motion detection. Adjusting the sound Adjust the playing sound volume by moving the slider bar. Download the SNC video player To download the SNC video player, click the Player icon located on the (information) icon switches between "display" and "Not to play starts...
User Guide
Page 63
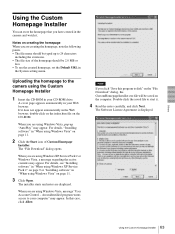
..., "Installing software" in the Web browser, double-click on the index.htm file on the computer. The "File Download" dialog opens. The installer starts and notes are using the Custom Homepage Installer 1 Insert the CD-ROM in the System setting menu. In this program to the camera using Windows XP Service Pack 2 or Windows Vista, a message regarding the active contents may appear. The Software License Agreement is displayed...
..., "Installing software" in the Web browser, double-click on the index.htm file on the computer. The "File Download" dialog opens. The installer starts and notes are using the Custom Homepage Installer 1 Insert the CD-ROM in the System setting menu. In this program to the camera using Windows XP Service Pack 2 or Windows Vista, a message regarding the active contents may appear. The Software License Agreement is displayed...
User Guide
Page 68
... digital zoom 19, 21 DNS server 34 Domain suffix 34 Dynamic IP address notification ....35 E e-Mail 26 e-Mail (SMTP 26 e-Mail (SMTP) setting Menu .........39 e-Mail address 36 Exposure mode 31 F Factory default 29 factory settings 29 flash memory 28 format of date and time 28 Frame rate 19, 20 frame rate 19, 20 free space 44 FTP client 26, 50 FTP client setting Menu 42 FTP server 26, 42 FTP server setting Menu 48 H Home 19...
... digital zoom 19, 21 DNS server 34 Domain suffix 34 Dynamic IP address notification ....35 E e-Mail 26 e-Mail (SMTP 26 e-Mail (SMTP) setting Menu .........39 e-Mail address 36 Exposure mode 31 F Factory default 29 factory settings 29 flash memory 28 format of date and time 28 Frame rate 19, 20 frame rate 19, 20 free space 44 FTP client 26, 50 FTP client setting Menu 42 FTP server 26, 42 FTP server setting Menu 48 H Home 19...


