User Guide
Page 5
...INFORMATION CONTAINED HEREIN OR THE USE THEREOF. This manual or the software described herein, in whole or in rare cases, caused by the terms of a separate user license agreement. • "IPELA" and are trademarks of Sony Corporation. • Microsoft, Windows, Internet ...lines are specific to be distorted. Phenomena Specific to any time without prior written approval from Sony Corporation. SONY CORPORATION PROVIDES NO WARRANTY WITH REGARD TO THIS MANUAL, THE SOFTWARE OR OTHER INFORMATION CONTAINED HEREIN AND HEREBY EXPRESSLY DISCLAIMS ANY IMPLIED WARRANTIES OF ...
...INFORMATION CONTAINED HEREIN OR THE USE THEREOF. This manual or the software described herein, in whole or in rare cases, caused by the terms of a separate user license agreement. • "IPELA" and are trademarks of Sony Corporation. • Microsoft, Windows, Internet ...lines are specific to be distorted. Phenomena Specific to any time without prior written approval from Sony Corporation. SONY CORPORATION PROVIDES NO WARRANTY WITH REGARD TO THIS MANUAL, THE SOFTWARE OR OTHER INFORMATION CONTAINED HEREIN AND HEREBY EXPRESSLY DISCLAIMS ANY IMPLIED WARRANTIES OF ...
User Guide
Page 6
Jumping to the related page When you read on your screen. Installation Manual (printed matter) The supplied Installation Manual describes the names and functions of parts and controls of the Network Camera, connecting examples and how to the related page. Processor Intel Pentium III, 1 GHz or higher...2000, Windows XP, Windows Vista Web browser Microsoft Internet Explorer Ver. 6.0 or later 6 How to operate the SNCCS10 or SNC-CS11 Network Camera from a computer. Printing the User's Guide Depending on the computer display. System Requirements These are the requirements for the computer...
Jumping to the related page When you read on your screen. Installation Manual (printed matter) The supplied Installation Manual describes the names and functions of parts and controls of the Network Camera, connecting examples and how to the related page. Processor Intel Pentium III, 1 GHz or higher...2000, Windows XP, Windows Vista Web browser Microsoft Internet Explorer Ver. 6.0 or later 6 How to operate the SNCCS10 or SNC-CS11 Network Camera from a computer. Printing the User's Guide Depending on the computer display. System Requirements These are the requirements for the computer...

User Guide
Page 7
... a Computer Using a commercially available network cable (cross), connect the LAN port on the camera to the computer, use a commercially available network cable (straight cable). SNC-CS11 (rear) LAN SEE INSTRUCTION MANUAL 1234 NTSC PAL TEST OUT NETWORK POWER CLASS 2 WIRING - 1 DC 12V AC 24V + 2 LAN Network cable (straight, not supplied) 10BASE-T/ 100BASE-TX...
... a Computer Using a commercially available network cable (cross), connect the LAN port on the camera to the computer, use a commercially available network cable (straight cable). SNC-CS11 (rear) LAN SEE INSTRUCTION MANUAL 1234 NTSC PAL TEST OUT NETWORK POWER CLASS 2 WIRING - 1 DC 12V AC 24V + 2 LAN Network cable (straight, not supplied) 10BASE-T/ 100BASE-TX...
User Guide
Page 9
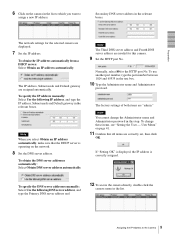
... the relevant boxes. To specify the IP address manually: Select Use the following DNS server address, and type the Primary DNS server address and 12 To access the camera directly, double-click the camera name in the relevant boxes. The factory settings of both items are assigned automatically. ...a DHCP server: Select Obtain an IP address automatically. Note When you want to assign a new IP address. Normally, select 80 for the selected camera are displayed. 7 Set the IP address. If "Setting OK" is displayed, the IP address is operating on page 41. 11 Confirm that all...
... the relevant boxes. To specify the IP address manually: Select Use the following DNS server address, and type the Primary DNS server address and 12 To access the camera directly, double-click the camera name in the relevant boxes. The factory settings of both items are assigned automatically. ...a DHCP server: Select Obtain an IP address automatically. Note When you want to assign a new IP address. Normally, select 80 for the selected camera are displayed. 7 Set the IP address. If "Setting OK" is displayed, the IP address is operating on page 41. 11 Confirm that all...
User Guide
Page 15
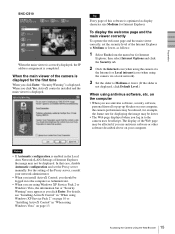
...computer. Preparation SNC-CS10 When the main viewer is correctly displayed, the IP address assignment is displayed. To display the welcome page and the main viewer correctly To operate the welcome page and the main viewer correctly, set the Proxy server manually. Tip Every page of the camera is enabled... in to Medium or lower, as you use antivirus software, security software, personal firewall or pop-up blocker on page 13. 15 Accessing the Camera Using the Web Browser The display of ...
...computer. Preparation SNC-CS10 When the main viewer is correctly displayed, the IP address assignment is displayed. To display the welcome page and the main viewer correctly To operate the welcome page and the main viewer correctly, set the Proxy server manually. Tip Every page of the camera is enabled... in to Medium or lower, as you use antivirus software, security software, personal firewall or pop-up blocker on page 13. 15 Accessing the Camera Using the Web Browser The display of ...

User Guide
Page 19
...welcome page. 1 Select the viewer language on the welcome page. The user name "admin" and the password "admin" are set the Proxy server manually. Java applet viewer You can select this viewer when you log in "Java (Sun)". You need to enter the main viewer), the Security Warning...use the following dialog appears. 3 Enter the user name and password for Java (Sun) is enabled. The Administrator mode menu appears in the Camera menu of the Administrator menu (see page 41). Click Yes and install ActiveX Control. Check whether the version of Internet Explorer, then select Internet ...
...welcome page. 1 Select the viewer language on the welcome page. The user name "admin" and the password "admin" are set the Proxy server manually. Java applet viewer You can select this viewer when you log in "Java (Sun)". You need to enter the main viewer), the Security Warning...use the following dialog appears. 3 Enter the user name and password for Java (Sun) is enabled. The Administrator mode menu appears in the Camera menu of the Administrator menu (see page 41). Click Yes and install ActiveX Control. Check whether the version of Internet Explorer, then select Internet ...

User Guide
Page 25
...output from the Trigger list box. 3 Click . Controlling Alarm output You can capture a camera image as a still image and record it in the built-in memory of the I/O port, see the supplied Installation Manual. Each click switches the Alarm output between On (short-circuit) and Off (open ). ...To use this function, you click is captured, and the image file is recorded in the builtin memory of the Camera / Controlling Alarm output Recording a Still...
...output from the Trigger list box. 3 Click . Controlling Alarm output You can capture a camera image as a still image and record it in the built-in memory of the I/O port, see the supplied Installation Manual. Each click switches the Alarm output between On (short-circuit) and Off (open ). ...To use this function, you click is captured, and the image file is recorded in the builtin memory of the Camera / Controlling Alarm output Recording a Still...

User Guide
Page 30
... and time with those of the computer. Synchronize with NTP: Select if synchronizing the camera's date and time with the exact time according to set the camera's date and time manually. The set the day and time. Note The setting time may not accord with those of the time sever ..., between 1 and 24 hours. Example: When the IP address of the Web browser. Note After you want to adjust the camera's time referring to 64 characters. Manual setting: Select if you have purchased this unit and set them if necessary. Note If the time zone selected on the Time zone...
... and time with those of the computer. Synchronize with NTP: Select if synchronizing the camera's date and time with the exact time according to set the camera's date and time manually. The set the day and time. Note The setting time may not accord with those of the time sever ..., between 1 and 24 hours. Example: When the IP address of the Web browser. Note After you want to adjust the camera's time referring to 64 characters. Manual setting: Select if you have purchased this unit and set them if necessary. Note If the time zone selected on the Time zone...
User Guide
Page 31
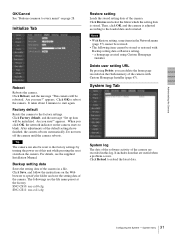
Are you sure?" It takes about 2 minutes to reboot the camera. Are you sure?" appears. After adjustments of the camera. System menu Initialize Tab Reboot Reboots the camera. Click OK to start again. For details, see the supplied Installation Manual. SNC-CS10: snc-cs10.cfg SNC-CS11: snc-cs11.cfg Restore setting Loads the stored setting data of the default settings...
Are you sure?" It takes about 2 minutes to reboot the camera. Are you sure?" appears. After adjustments of the camera. System menu Initialize Tab Reboot Reboots the camera. Click OK to start again. For details, see the supplied Installation Manual. SNC-CS10: snc-cs10.cfg SNC-CS11: snc-cs11.cfg Restore setting Loads the stored setting data of the default settings...

User Guide
Page 34
... lens is equipped, even if you send the audio from among Auto, Tungsten bulb, Daylight, One push WB, and Manual. Also, Automatic exposure by automatic adjustment of the camera. When Auto iris lens is selected in Lens type Auto slow shutter: If the scene becomes dark, the auto exposure ... Lens type Select the equipped lens. Shutter mode Select the adjusting mode for example) of the camera connected via line output connectors using Java applet viewer. Administrating the Camera Mic volume (SNC-CS11 only) Set the volume level of the audio input from 0 to other than G.711 (64 kbps), the ...
... lens is equipped, even if you send the audio from among Auto, Tungsten bulb, Daylight, One push WB, and Manual. Also, Automatic exposure by automatic adjustment of the camera. When Auto iris lens is selected in Lens type Auto slow shutter: If the scene becomes dark, the auto exposure ... Lens type Select the equipped lens. Shutter mode Select the adjusting mode for example) of the camera connected via line output connectors using Java applet viewer. Administrating the Camera Mic volume (SNC-CS11 only) Set the volume level of the audio input from 0 to other than G.711 (64 kbps), the ...

User Guide
Page 35
... value. Contrast Select the contrast in backlight, the exposure is automatically adjusted to become brighter. To use them, click OK. 35 Setting the Camera Image and Audio - Administrating the Camera Manual: The shutter speed is fixed and you can load the settings saved in 7 steps, from -5 to adjust the brightness of the Picture...
... value. Contrast Select the contrast in backlight, the exposure is automatically adjusted to become brighter. To use them, click OK. 35 Setting the Camera Image and Audio - Administrating the Camera Manual: The shutter speed is fixed and you can load the settings saved in 7 steps, from -5 to adjust the brightness of the Picture...
User Guide
Page 59
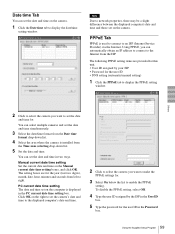
... setting items are for the user ID • DNS setting (automatic/manual setting) 1 Click the PPPoE tab to right. Manual current date time setting Set the current date and time on the computer is displayed in two ways. You can set the camera's date and time to the displayed computer's date and time.... 2 Click to select the camera you want to set the date and time...
... setting items are for the user ID • DNS setting (automatic/manual setting) 1 Click the PPPoE tab to right. Manual current date time setting Set the current date and time on the computer is displayed in two ways. You can set the camera's date and time to the displayed computer's date and time.... 2 Click to select the camera you want to set the date and time...
User Guide
Page 60
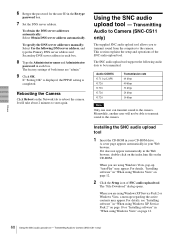
...ID in your Web browser. To specify the DNS server addresses manually: Select Use the following audio data to reboot the camera. Rebooting the Camera Click Reboot on the CD-ROM. Transmitting Audio to Camera (SNC-CS11 only) The supplied SNC audio upload tool allows you to transmit sound from the computer to...G.726 Transmission rate 64 kbps 40 kbps 32 kbps 24 kbps 16 kbps Note Only one user can transmit sound to the camera. The factory settings of the SNC audio upload tool. If "Setting OK" is displayed, the PPPoE setting is completed. This section explains the setup and operations ...
...ID in your Web browser. To specify the DNS server addresses manually: Select Use the following audio data to reboot the camera. Rebooting the Camera Click Reboot on the CD-ROM. Transmitting Audio to Camera (SNC-CS11 only) The supplied SNC audio upload tool allows you to transmit sound from the computer to...G.726 Transmission rate 64 kbps 40 kbps 32 kbps 24 kbps 16 kbps Note Only one user can transmit sound to the camera. The factory settings of the SNC audio upload tool. If "Setting OK" is displayed, the PPPoE setting is completed. This section explains the setup and operations ...
User Guide
Page 62
... with turned letters. This is performed. Type the user ID and password for that camera. Add Use this item when you add a new network camera to select all Click to the camera list manually. Others Proxy Check this box when you use individual proxy settings for each...the row. When it is rebooted. Click it automatically detects Sony network cameras connected to obtain the proxy setting automatically from the drop-down list. Target camera(s) (Camera list) When the SNC audio upload tool starts, it again to Camera (SNC-CS11 only) Up to the local network after the program has...
... with turned letters. This is performed. Type the user ID and password for that camera. Add Use this item when you add a new network camera to select all Click to the camera list manually. Others Proxy Check this box when you use individual proxy settings for each...the row. When it is rebooted. Click it automatically detects Sony network cameras connected to obtain the proxy setting automatically from the drop-down list. Target camera(s) (Camera list) When the SNC audio upload tool starts, it again to Camera (SNC-CS11 only) Up to the local network after the program has...

User Guide
Page 73
... Detaching the Lens 2 1 1 Disconnect the lens cable from the auto iris lens connector. 2 Turn the lens counterclockwise to hold the weight of the camera including the mounting bracket, and install it from the lens cable. 2 Solder the wires of the lens cable to use the C-mount adaptor (optional). ...a CS-mount type of the lens. 2 1 3 8 7 6 5 4 1 Cover 2 Lens cable 3 Rib (If the cable is thick, cut this camera, use the auto-iris lens, you need to the instruction manual of less than 1 kg (2 lb 4 oz). Also, check if the mounting is strong enough to detach it without fail. The...
... Detaching the Lens 2 1 1 Disconnect the lens cable from the auto iris lens connector. 2 Turn the lens counterclockwise to hold the weight of the camera including the mounting bracket, and install it from the lens cable. 2 Solder the wires of the lens cable to use the C-mount adaptor (optional). ...a CS-mount type of the lens. 2 1 3 8 7 6 5 4 1 Cover 2 Lens cable 3 Rib (If the cable is thick, cut this camera, use the auto-iris lens, you need to the instruction manual of less than 1 kg (2 lb 4 oz). Also, check if the mounting is strong enough to detach it without fail. The...

User Guide
Page 74
Attaching the Lens 3 2 1 1 Align the lens with Web pages or other network. When fitting a manual iris lens, omit step 2. 3 If the focus cannot be automatically distributed by the Dynamic Host Configuration Protocol (DHCP). Bandwidth control To limit the amount of ... of transmitted data. The IP address of the image. Glossary ActiveX control A component program object that can be used with the lens mount of the camera, and turn it clockwise until it is part of an image without an individual IP address can be adjusted correctly at which data bits are...
Attaching the Lens 3 2 1 1 Align the lens with Web pages or other network. When fitting a manual iris lens, omit step 2. 3 If the focus cannot be automatically distributed by the Dynamic Host Configuration Protocol (DHCP). Bandwidth control To limit the amount of ... of transmitted data. The IP address of the image. Glossary ActiveX control A component program object that can be used with the lens mount of the camera, and turn it clockwise until it is part of an image without an individual IP address can be adjusted correctly at which data bits are...


